Have you decided to take charge of your own kitchen? Here are 25 ideas, how to make a wall cabinet for the kitchen with drawings and step-by-step photos. These aren't the most difficult projects, but you definitely need some help so you don't waste a ton of time searching for information.
Making your own kitchen wall cabinets will save you money and create a custom-designed kitchen. This way you will get exactly what you want. Here are simple models that even a novice master can handle. But once your kitchen cabinets are installed, it can feel like you've been making cabinets your whole life. In addition, in the article you will find step-by-step photos on how to make photodiode lighting for a kitchen cabinet , install a microwave in the cabinet, make a towel holder and much other useful information.
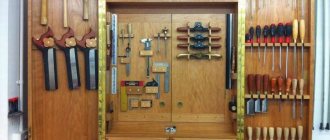
WE APPLY FINISHING PRODUCTS AND INSTALL ACCESSORIES
1. Remove the hinges from the hinged door and sand all parts with 220 grit sandpaper. Apply a finish (we used a dark oil-based stain and then sprayed three coats of semi-gloss varnish, sanding in between with 320-grit sandpaper).
2. Prepare a mirror, glass for the door and glass shelves of the required sizes (we took glass for the shelves with polished pencil edges, and smoothed out all the sharp edge corners on the mirror). Lay the cabinet on its back, apply mirror glue (available at hardware stores) and glue the mirror in place. 11press the mirror close to shelf C and center it across the width. Leave the glue to dry for 48 hours.
3. Insert the magnets into their sockets (photo D). Insert glass into the door and nail the pants without heads. Cover the remaining nail holes with putty of a matching color. Screw the hinges to both doors and then to the frame. Install handles. Drill pilot holes and install the magnetic clamp plates (the flat head screws that come with the kit often do not fit flush in the washers, in this case simply countersink the washer holes a little deeper).
4. Drill pilot holes and screw the lamp base to the top wall B. Install the lamp and lamp. Drill through countersink holes in the mounting rail F. Level it horizontally and secure it to the wall. Hang the cabinet so that the mounting strips on the wall and the cabinet interlock with each other. Pass the power cord through the slots provided in the top and bottom walls. Install shelf supports and shelves. Now you can arrange your collection, close the door, turn on the lighting and, taking a few steps back, admire the results of your work.
Selection of stain for wall cabinets. Kitchen made of wood for $165.
Related link: DIY display cabinet - photos and detailed drawings
Cabinet assembly diagram, design reliability
The most important point to begin with is that the cabinet does not fall apart during use, everything else is secondary. Therefore, you need to understand what clings to what, which side holds which and takes the load. Anyone who has assembled a wardrobe a couple of times will most likely understand.
For example, we take the sides and must fix them in a vertical (if possible, strictly vertical, using a bubble level and an assistant) position. How can this be done? Well, for example, with a lid, that is, secure it with a board on top, already starting to assemble the cabinet. But the lid will not hold the structure completely, so it is necessary to fix the top and bottom in one more plane. We secure the side walls with another board at the back and our cabinet now acquires a stable, reliable position.
Schematic illustration of fastening parts of a wooden cabinet
But first you need to assemble the parts themselves, which we will then fasten together.
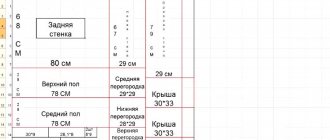
Measurements and drawing up a design diagram
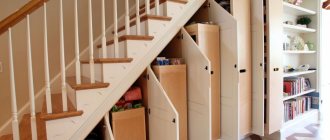
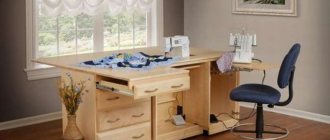
Sometimes you may only need a floor cabinet, but the conditions of a small-sized kitchen do not allow it to be placed indoors. It will be cheaper to make it yourself than to spend money on ordering furniture of non-standard sizes. Having thought through the design first, you should begin to develop a drawing indicating all dimensions. The purchase of necessary materials is made based on the calculations made.
Laminated chipboard and MDF are always on sale for creating furniture. These types of materials are in great demand. The specialists who sell them can immediately process the edges of the workpieces after cutting. If you order the drilling of holes in advance, this will allow you to connect the parts using dowels.
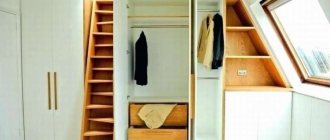
You can make not only small floor cabinets, but also furniture sets. They are necessary for storing utensils, dishes, household kitchen appliances, and food. Before creating such a project, a kitchen plan is drawn up, which marks the location of the stove, sink, pipes, hood, etc. Wall cabinets allow you to disguise the gas meter and wiring. They have shelves inside where utensils should be stored.
If the kitchen is already furnished, then a plan can help to increase its functionality. When compiling it, you need to make sure that the new furniture will fit between the already installed items. It may be necessary to make kitchen drawers, the exact measurements of which are of great importance. Furniture doors should swing open and recline freely, and drawers should slide out. When taking measurements in the kitchen, you should take into account that its corners may not be perfectly straight.
We also recommend reading:
How to profitably fit a marble countertop into your kitchen interior? Kitchen islands with a dining area: design and layout options How to get rid of ants in the house: the most effective ways Not by bread alone: how to turn the dining area into a place for pleasant relaxation
Wooden cabinet doors and hinges
The easiest option is to use door hinges. This is how they used to do it on massive wooden cabinets. Let's look at this option.
Door hinges are the easiest door opener to install.
One of the disadvantages is that there is no door adjustment, that is, you have hung them and cannot adjust them in any way.
The installation diagram is the same as for → installing interior doors. Hinges at equal distances from the bottom and top are screwed into the ends of the doors and cabinet walls. It is important to do this evenly and at the same distance. You need to read how interior doors are installed, specifically hinges, to understand.
The second option for hinges for a solid wood cabinet is furniture hinges.
They are quite easy to install; you just need to drill a round hole for one part of the hinge. They have the ability to adjust, BUT they will not be able to support the heavy weight of massive wooden doors. Therefore, if your cabinet is small and more like a bedside table, then such a mount will be suitable. If this is a massive cabinet, then you need to use stronger hinges.
Another option for fastening doors is antique hinges. Such hinges are installed on the front of the cabinet and bring their own aesthetics to the product. There are a wide variety of them on sale and such loops can be made with your own hands.
Antique wooden furniture hinges
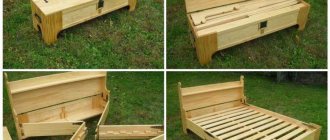
How to make a corner cabinet for the kitchen?
- Choose the right material and purchase it in the right quantity. Calculating the purchase volume is very simple if you follow the previously drawn up diagram.
- Prepare the tools necessary for the job. Their list includes: fasteners, hangers, sealing compound, furniture screed, drill, sandpaper, fittings and some other devices. It all depends on what model you plan to create.
- Prepare the basic details for the future cabinet. It is most convenient to cut them from solid slabs. Be extremely careful when performing this work and use power tools to achieve the best results. Alternatively, you can contact a specialized company that will make blanks at a professional level.
- Make through holes to insert dowels into them and fasten the individual elements that make up the furniture. Lubricate the chopsticks with adhesive to increase the reliability of the structure.
- Check the evenness of individual parts of the structure using a level.
- Screw the confirmations into the dowels using a hex wrench for this purpose.
- Install the legs and adjust the height. If the design does not require legs, this step can be skipped.
- Make holes in the side elements and place cross-shaped fastenings for the doors in them.
- On the walls located on the sides, attach elements for rails, due to which the boxes will roll out. Secure the rails.
- Attach the back wall.
- Secure the fittings.
Corner cabinet diagram
Corner cabinet drawing
The presented instructions will help every person understand how to make a corner cabinet for the kitchen with their own hands; the various diagrams and drawings presented here will simplify the solution of this problem. If you complete all the work correctly, you will enjoy the finished cabinet installed in the corner for a long time.
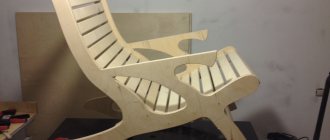
Antique wooden cabinet
The easiest way is to make cabinets or cabinets “antique”, or even “like a fairy tale”, there are no precise cuts, cuts, or particularly precise fitting required; of course, you need to try, but looking at the photo below, it will be clear what we are talking about. That is, some “defects” become not defects, but decoration.