Editor's word:
Here you will learn how to make your own floor shelf for books, flowers, toys, shoes and storage of other various things. Step-by-step photos, detailed instructions, drawings and layouts
Article menu:
Floor shelves made of different materials:
- ... made of wood (in general, there are 250 options for photo shelves scattered throughout the article with step-by-step photos, which are included in other sections)
- ... from pipes (a selection of 80 step-by-step photos of making shelves from pipes with your own hands)
- ... made of bricks and boards (chic shelf with excellent step-by-step photos)
- ... from drawers (4 DIY shelf models with master class)
- ... from glass bottles (2 options with step-by-step photos)
- ... from the stairs (2nd master class)
Different types of floor shelves:
- corner three master classes with step-by-step photos on how to make a floor-mounted corner shelf with your own hands
- rack step by step photos on how to make a rack with your own hands (see also racks in other sections)
- in the Art Nouveau style here are 2 models of floor shelves with step-by-step photos
- shelves and racks made of pipes 5 most popular options
- for flowers, several master classes of shelves for flowers that you can make with your own hands, in the end of the section there is a photo gallery with 180 photos
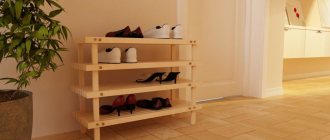
- for shoes, a couple of options for floor shelves for shoes, which you will learn how to make with your own hands from the step-by-step photos with instructions and drawings given there
- shelving - secret door
Photo galleries:
- 80 photos of floor shelves for flowers (which you can make yourself. A small photo gallery of interesting options)
- 50 diagrams and drawings of floor shelves for shoes (excellent layouts of drawings of instructions for making shelves for shoes with your own hands in the gallery)
- 245 photos of floor shelves (large photo gallery of shelves that you can make yourself)
... made of wood
Section: Shelves made from drawers from a table or bedside table with step-by-step photos
It so happened that the neighbor of the author of the photo decided to throw out some old furniture and asked the author if he needed anything. The author took only the drawers from the cabinet; they collected dust in the garage for a long time until such a shelf was made from them. Simply arrange the drawers the way you like and secure them with screws. Painting upon request.
Photo source: instructables.com. Author: ksassily
Chapter:
Modern DIY bookshelf
(Which costs $2000 in the store)
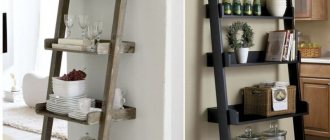
Again, this shelf is in the Art Nouveau style . Student from North Carolina, not having much money to buy, decided to make a shelf that would hold some of his things like a pedestal. He also wanted the shelf to look modern. After a long search, he found a prototype shelf that cost $2,000 in the store. So this student made himself a similar shelf at a cost of $20 .
Of course, it didn’t work out the first time, because... due to the many shelves, I forgot to take into account the thickness of one of the boards. But in the end, after filling the holes from the screws with putty and painting, we got a modern and presentable shelf.
All shelf boards are located at an angle of 90 degrees. to each other. The shelf itself stands at an angle of 45 degrees in relation to the floor.
Photo source: instructables.com. Author: thatticus
How to place it on the wall?
Shelves can be placed anywhere on the wall. However, several nuances are still taken into account. The place where these products will be attached must be thought out in advance. Shelves should be hung so that they do not interfere with movement in space. In some cases, safer models with smoothed or oblique corners are chosen.
An excellent solution is to place full-wall shelves above a desk or computer desk. This way you can achieve systematization of things and keep them as convenient as possible at hand. In addition, due to such a spectacular design technique, the decor will look stylish and acquire a creative spirit.
The photo shows gray shelves located on the wall above the desktop.
Shelves can be added to any free wall, corner in a room or space near a window, or hung above a bed, sofa, chest of drawers or dining table. Wall shelves in combination with low cabinets in the design of the area around the TV will look harmonious. It should be borne in mind that models distinguished by an unusual shape and color should have a calmer and more restrained environment in the form of wall decoration and decorative elements.
A hanging shelf with indoor plants will fit perfectly into the space between the windows. This design will be an excellent alternative to flowerpots or flowers in pots placed on the windowsill.
The photo shows a living room design with a closed shelf above the sofa.
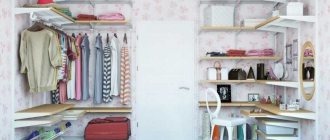
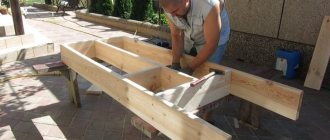
DIY flower shelf-screen
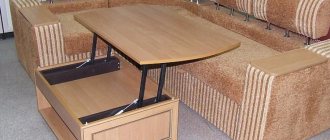
The shelves may be different, but you can always come up with something original. We suggest you make a flower screen shelf with your own hands , a very convenient thing to divide the room space.
Moreover, this is not just a mobile partition, but also a flower rack, so it will perform two functions at once. The dimensions of the screen can be chosen arbitrarily; you can make it, for example, according to this scheme. We will need:
- two 20 mm boards 2.5 meters long;
- 5 pieces of wooden blocks;
- self-tapping screws, clamping screws, beech tenons;
- glue, putty, acrylic paint.
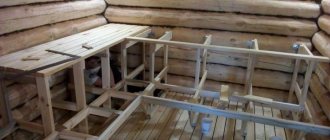
First of all, we make two side frames. Then, in the corners and for the middle shelf, we make holes for confirmations, and in the ends of the bars that will go under the vertical posts, we drill holes for tenons.
We also drill holes at the ends of the crossbars and place wooden spikes on the glue. We tighten the vertical posts and crossbars with screws, and place the short crossbars on spikes. We seal all the cracks with putty. Then these places need to be sanded (when the putty dries).
We are preparing the shelves. To do this, we cut off the corners at the bottom and middle shelves and fasten them to the frame with self-tapping screws. We fasten the partitions using confirmations. Then we screw the crossbars under the wheels.
All that remains is to paint and arrange the flower pots. Photo source supersadovnik.ru
nuances of fastening, fastening methods, instructions, photos, videos
A shelf on the wall is a decoration for any interior. Every person wants to mount a shelf on the wall so that it fits perfectly into the overall design of the room. This problem is not at all difficult to solve. Absolutely anyone who has free time and a set of necessary tools can nail a shelf to the wall.
The nuances of fastening shelves
As the main support for the shelf, you can choose an anchor bolt, thanks to which you can securely fasten the piece of furniture.
Its dimensions are as follows:
- diameter up to 12 mm,
length – 180 mm.
In order to attach the shelf to the wall correctly, it is important to follow the recommendations of experts
As a base for the shelf, you can take a piece of board from a window sill with artificial turf.
The dimensions are as follows:
- thickness – 25 mm,
width – up to 200 mm.
There are only two options for mounting:
- classic,
hidden.
A hidden option for fastening shelves is needed in cases where decorative elements are absolutely incompatible with protruding fasteners. Attaching shelves in this version is just as easy as in the traditional one.
Depending on the type of fastening of the shelf, the options for its installation and types of fasteners vary
When working with anchor bolts, a clear sequence of actions should be followed
A shelf with hidden fasteners looks neater
Sequence of work
Before you attach the shelf to the wall, you need to know that the thicker the shelf, the thicker the support should be. A hole is drilled in the end part an average of 5 mm below the surface. All holes for shelves in the wall must match, otherwise attaching them will be quite problematic.
Metal corner - the most reliable fastening for a wooden shelf
When using anchor bolts, you can use special brackets
Invisible fastening of shelves is carried out in a hidden way
Using your imagination, you can create a unique shelf fastener
Attaching the shelf to the wall:
- A strip of the required length is considered a template. It is applied to the end of the shelf and a hole of the required diameter is made, after which it is applied to the wall.
The next step will be drilling, which must be done with maximum precision.
To attach the shelf you will need:
- electric drill,
threaded coupling,
brackets,
lath - template,
carpentry glue,
screws.
Installation of a corner shelf (video)
Store shelf mounts
A shelf that you bought at a hardware store can be very difficult to attach to the wall. Be sure to read the instructions that came with it. Most likely, it will contain all the necessary recommendations on how to screw the product to the wall.
Next you need to understand what type of fastening the shelf has. Usually, complete with a shelf and instructions, it also includes elements that are used to fasten the product. It is also necessary to select brackets, thanks to which the shelf will be secured.
Pelican mount is most often used for glass shelves
Bracket options may vary:
- fastenings that do not extend beyond the shelves;
flat brackets with pear-shaped holes at the end.
Steps to attach the shelf to the wall:
- Based on the possible dimensions of the shelf, you will need to decide on the place where the fastening will be made. Choose the right place so that other furniture in the room does not interfere.
Using a building level, you need to control the position of the product.
Nests are first created in the walls so that after this procedure the shelves can be safely attached. These nests are made with a puncher or drill, and then dowels are driven into the resulting holes.
After this, the shelf is mounted on the wall.
The final stage is screwing the fastening elements into the holes.
How to hang shelves on the wall (video)
Thus, it was clearly shown how to attach any shelves to the wall. The fastening is carefully planned and only after the plan has been developed, work begins.
Attention, TODAY only!
= What shelves can be made from:
| made of wood Example: DIY flower shelves 230 | from metal pipes Example: DIY pipe shelves | from PVC pipes |
| made of cardboard Example: Shelf rack made of cardboard boxes | from paper | from plasterboard |
| from glass Example: Shelves in Art Nouveau style 180 do-it-yourself photos | from old boxes Example: DIY drawer shelves 120 photos | from pallets pallets |
| stainless steel | from glass | from old stairs |
| From bars | from bottles Example: Glass bottle shelves | from driftwood and branches Example: Bookshelf made of branches and driftwood |
| made of bricks Example: Bookshelves made of bricks and boards | from newspapers Example: Newspaper shelf | From cans Example: DIY kitchen shelves: 456 photos, drawings, instructions |
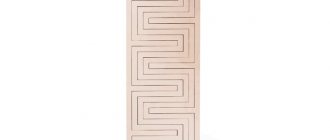
Original shelf designs
Quite often, shelves play only a decorative role when they are mounted on the walls.
In this regard, it makes sense to work on the shape of these shelves so that they attract attention and also harmonize, creating an overall impression of the design as a whole. Naturally, these shelves are not intended for installing heavy things or interior elements on them
Their task is to attract attention with their interesting appearance and shape.
The shelves are purely decorative
An equally interesting idea is glass shelves. If you install one glass shelf, then it will not be so interesting, but if you create a whole ensemble, in combination with wood or metal, then it will already look like something. Glass is still a heavy material, so it is better to opt for metal.
Glass decor
Systems made of glass and metal are often found in retail outlets, but this does not mean that they cannot be used in residential premises. Glass and metal are modern and stylish.
Made of glass and metal
Shelves can have a very original look, since they can be made from anything, and here everything depends on the possibilities of a person’s imagination. Even from pipes, both metal and plastic, you can build a designer item. To do this, you can use various remnants from repairs.
From the remains of pipes
In short, people with imagination are able to create something extraordinary, and the main thing is that no one will have something like this, even from unnecessary trash.