how to make a closet in the hallway
We present 30 interesting ideas on how to make a wardrobe in the hallway with your own hands at minimal cost. With the onset of cold weather, when a lot of warm clothes appear on the hangers, this topic is especially relevant. If you want to create a beautiful interior in your hallway without breaking the bank, use the information presented in this article to make beautiful and functional furniture for your hallway.
Basically, there are open cabinets in the hallway with shelves, hangers and additional drawers for storing shoes. If you want to make a closet from scratch, these sample models with step-by-step photos and drawings will help you decide exactly what to do, how to store it, and make the most of every inch of space.
Style solutions
Furniture design is selected depending on the style of the apartment's interior. If you are a supporter of minimalism, the ideal option in your case would be a snow-white modular design consisting of matte or glossy blocks. Chromed metal is used for hooks in such models. The design is as laconic as possible, there is no decor. Many options are not placed on the floor, but are mounted on the wall, which makes the atmosphere elegant and airy.
You can purchase a combined option (for example, white-beige, white-gray or white-brown). Contrasts and bright details are acceptable. Built-in lighting is appropriate.
A mirror on the wall may not have a frame at all. A wardrobe would also fit well into such a hallway. Doors can be laminated, made of frosted glass or mirrored.
If you prefer classic or neoclassical style, choose a milky or beige set with a wood texture. Bright colors are not allowed here. Gamma should be calm and noble. Combinations with brown are possible. Natural or artificial leather can be used to trim the panels and seats. Carving is often used as decoration.
If you adhere to a strict interpretation of the classics, a wardrobe will be inappropriate. The doors should be hinged, because the whole environment should recreate the atmosphere of past years. If you prefer neoclassicism, the number of design options increases.
You can decorate the mirror design of the coupe with gilding, elegant patterns, or you can limit yourself to an open set with a soft leather seat and a large wall mirror in a twisted metal frame. Also in this case, the color design possibilities expand. You can combine white furniture with a pale purple, light yellow or muted mint tone.
Provence is another wonderful vintage style. Here, white, beige or light gray furniture with a painted wood texture is preferred. There is no gilding or exquisite decor here, as in the classics. The design is as simple as possible; sometimes the technique of artificially aging surfaces is used. The soft seat is made of foam rubber, upholstered in fabric (often with a floral print or stripes).
It is impossible to fit a wardrobe harmoniously into Provence. Only models with hinged doors are acceptable. Therefore, home owners often limit themselves to a chest of drawers, an open hanger and a shoe cabinet. By the way, some people choose wrought metal sets for a hallway in the style of a French village.
Modernism is a cross between minimalism and classics. There are no strict rules here. The set can have an original shape and color. Often buyers choose models that combine beige and chocolate shades. A good solution would be to combine an open structure with a wardrobe (if the corridor area allows).
The cabinet can be decorated with photo printing or sandblasted drawings, but you still shouldn’t go overboard with the decor. Remember that in a narrow space, an abundance of even beautiful details can create a feeling of chaos.
Puttying
This is one of the most important stages in our work. Puttying will give our product the final look before painting: For those who have never done this before, it is better to purchase a ready-to-use mixture - putty. Craftsmen familiar with this type of work prefer to prepare it directly on the workplace from dry powder.
For beginners, the ready-made mixture is preferable, and in a sealed container it can be stored for quite a long time and can then be used for other projects. The work is done with one wide spatula. The small one is used for scooping putty onto the main tool and evenly distributing it over it, as well as for applying the mixture in corners and narrow places. First, it is necessary to repair large irregularities and potholes, putty the internal and external corners, as well as the edges of our corners overlay profiles with which we protected the edges of the drywall. In order to get a high-quality result, they need to be covered with a special mesh tape.
Paper masking tape is not very suitable; it can then swell along with the putty layer. Do not rush in this work, the putty must be applied in a thin and even layer, where necessary - several layers. Small irregularities and defects, which are inevitable at first, will be covered with applying final layers of mortar and sanding. After preliminary preparation of surfaces and corners, you should take a break so that the layer of putty mixture hardens well. It is better to postpone the final finishing to the next day. Before the main stage of puttying, you need to clean the surfaces of the walls and the areas we previously putty, removing all irregularities and protrusions. This can be done with the same spatula.
The use of sandpaper is not recommended. After it, a lot of dust remains, and we just need to get rid of dust. The surfaces of the walls need to be brushed with a brush or a dry cloth. You need to apply the mixture to the walls during the main passes with a wide spatula - after all, we have already prepared the corners. We repeat these steps several times.
Before each next layer, we equalize the previous one, apply the next portion of the putty mixture, wait for it to dry. We repeat 3, 4, 5 times - as many as necessary, until the result satisfies us. The most difficult and responsible thing here is the high-quality execution of the outer corner of our cabinet. It will catch your eye first and should be done especially carefully. Now you can begin the final sanding. This is done with sandpaper No. 200.
Having folded its piece several times, we carefully level all the corners and surfaces of the walls of our wardrobe. Then, after conscientiously removing all the dust, we can evaluate the final appearance of our project. Tip: For beginners, it is best to start the process of filling walls in an upward motion. It is worth placing paper or cardboard on the floor - drops and splashes will be inevitable.
The solution is applied in several layers until the desired result is achieved. Each layer must be performed changing direction: one - vertically, the next - horizontally, or at an angle: layer from left to right, the next - from right to left. Having laid one layer of putty, before applying the next you need to take a break until it dries. Return to content
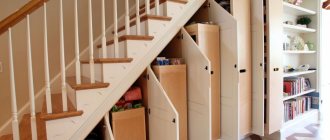
Interesting performance
An example of the arrangement of shelves in a closet, spacious and convenient.
To eliminate standard rectangular shapes, you can use imagination and ingenuity. For example, using stained glass with a pattern to decorate a wardrobe. The use of pliable materials that help create smooth lines will help add futurism, which is especially important for open models.
Decorating the walls of a narrow corridor
Everyone creates a narrow hallway design based on their own tastes and preferences. However, we will try to give some working tips that will make a narrow hallway even better. When doing renovations, do not use white or gray shades to decorate the walls. These colors will make your room look dull and unattractive. Use discreet and harmonious colors that create a feeling of lightness. Green is considered the most optimistic option. If you are decorating the walls with wallpaper, then choose ones that contain a pattern. However, you shouldn’t cover the whole room with them. This will lead to a visual reduction in its size.
Try to provide good lighting. To do this, use more ceiling lights, which can completely change the color saturation. Try to maintain a common color palette. This means that for decoration use no more than three colors. Color oversaturation negatively affects the overall harmony of the design.
Drywall cutting
Before assembling the built-in wardrobe completely, you need to cover it with plasterboard. For such small work it is not necessary to buy a whole sheet of material. You can purchase cuttings of fairly large sizes at a reduced price.
After sheathing, puttying and painting, all joints will be closed and will not be visible to the eye. Tip: To cut drywall, you need to clear a large, flat surface. This material is cut very easily with a sharp knife along a long ruler or strip. Having cut through on one side, you need to bend it, turn it over and then finally cut through the paper on the other side at the fold. Return to contents
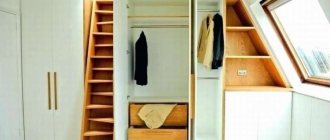
Internal filling
Placing a closet in the hallway in a loft style.
The internal layout can be selected on websites; many options for fillers are shown there and everyone can choose the most suitable one.
Filling is carried out according to certain rules, which, at a minimum, should be taken into account:
- Raw items should be kept to the side, separately;
- Necessary and small things should be in the most visible place;
- Dry items should be higher;
- The most valuable things need boxes.
Performing a build
Built-in wardrobe with open shelves.
For the frame, timber or metal slats are used. To assemble the frame you will need to purchase the following elements:
- Bolts (2 pieces) fixing the support rings;
- Support rings (2 pieces), for the lower guide profile;
- Two supports supporting the door at the top;
- Profile;
- Screws (4 pieces).
At the bottom you can place a shelf for shoes. It is secured with special hooks and clips.
The joints are reinforced using a profile, and the outer side part of the structure is sewn up using sheets. Finally, the compartment doors are secured.
Making shelves
For shelves, you need to mark the level and secure supporting slats or bars to the walls inside the cabinet. We can already do this work, so it shouldn’t cause any difficulties.
Shelves can be cut from any suitable material: chipboard, thick plywood, etc. Tip: When cutting off another shelf, you should once again measure the space for it inside the cabinet. Due to uneven walls, shelf sizes may differ from each other. Return to contents
Photos with design options and ideas
If you need to decide on the possible design of the final result, we recommend taking a closer look at the following photos:
Storage Tips
In addition to the fact that the hallway should be ergonomic and functional, it should also provide places for storing necessary things:
- shoes;
- outerwear;
- bags;
- keys;
- umbrellas;
- gloves;
- hats;
- scarves.
Most often, the layout of old-style apartments does not allow for the installation of a full-fledged wardrobe. Then you will have to be smart to arrange all your things compactly without cluttering the room.
There are many options for replacing furniture in a narrow hallway. But the most successful options are:
- baskets and boxes;
- benches;
- shelves;
- hangers;
- hooks
Let's go in order:
Baskets and boxes
The best option is to use boxes in combination
with shelves or benches.
In the first case, the drawers will serve not only for storing things and shoes, but also as decoration.
In the second case, the drawers can be hidden under the bench without occupying a separate area of the already narrow hallway space.
If the interior of your home is made in country or Provence style, using wicker baskets is the most successful alternative to cabinets.
Benches
Using a bench in the interior of a narrow hallway will be an excellent option
arrangement of a relaxation corner.
You can sit on it while putting on or taking off your shoes. The bench is also convenient because under it you can place boxes and baskets with things and shoes.
It will also be convenient to place bags, keys, hats, scarves, gloves and many other necessary things on it.
The interior of a hallway with a bench will be functional and also have an attractive appearance.
Shelves
Shelves in the hallway in the hallway, when it is not possible to install a wardrobe, are one of the simplest, but at the same time rational and functional solutions.
They will not only decorate the interior, but will also significantly save hallway space.
Designers call this alternative option the “free floor” technique. On the shelves, which are attached to the surface of the hallway walls, a lot of necessary small things will fit.
On such shelves there may also be space for stylish decorative elements, for example, vases, figurines, a beautiful candlestick or lamp.
Hangers
A hanger is a good alternative to a wardrobe for a narrow hallway.
It is recommended to pay special attention to the wall-mounted swivel hanger. Its design has a rotating mechanism
And when turned, the hanger turns into an elegant decoration
Its design has a rotating mechanism. And when turned, the hanger turns into an elegant decoration.
It will also take up little space and allow you to place quite a lot of things.
Hooks
There is a huge selection of hooks on sale for every taste. For example, you can choose forged metal or multi-colored plastic hooks.
You need to make a choice based on the general concept of the hallway interior.
Hooks will be a great alternative to a closet. You can hang outerwear, bags, umbrellas, scarves on them.
You can choose single hooks, but to attach them you will have to drill several holes in the wall.
There is a simpler option - choose hooks that are already attached to the bar. To install it, you only need to drill two holes.
How is the work done?
To make a wardrobe, you must complete the following steps.
- Invite a specialist who will take measurements (you can do this yourself).
- Make drawings of the wardrobe. The project indicates all previously obtained dimensions.
- Calculations of all furniture elements are made, the position of the shelves is calculated.
Decide what specific items you plan to make a closet for. Take their measurements and plan a place for them in the closet. - When working, you can use special programs for designing furniture, which are available on the Internet.
- Send documents to the factory.
- Install finished furniture in the room.
Follow the drawings very carefully and carefully, because then you will have to assemble the wardrobe exactly according to them.
Decor
Do-it-yourself wardrobe decoration is done using various materials. In this case, it is important to pre-prepare the product, that is, degrease, remove any remaining varnish and paint using sandpaper. Many people limit themselves to hanging mirrors and painting furniture to match the color of wood. But others strive to create creative furniture models, in which many tools help them.
Decoupage
A primer and acrylic varnish are applied to the sanded and cleaned surface, then sanded and again coated with varnish and primer, after which the pattern is attached and varnished. You can additionally draw in the details of the image to create a painting effect. The result is fixed with several layers of acrylic varnish.
Drawing
The painting is applied manually or using a stencil. First you need to sand the surface and cover the area with a primer. The finished image is varnished.
Film
One of the most popular processing materials. It is suitable for decorating various surfaces, including furniture. There are many varieties of film, including a holistic pattern, individual elements (flowers, birds, curls, geometry). It is glued to a cleaned surface.
Mosaic
Acrylic and glass materials are used to create fantasy patterns or paintings. The canvas is first cleaned, and markings are made for even gluing of the elements. Fastening is done using liquid nails.
Engraving and matting of mirrors
Performed if you have the equipment and skills to work with glass and sandblasting.
Making a wardrobe is a labor-intensive, but at the same time interesting process. To create a high-quality product, it is important to take a responsible approach to the calculations of dimensions, content, and lighting principles of furniture. It is recommended to record your planning notes in a separate notebook so that important points are at hand. The drawings and tips provided in the article will help you pay attention to the key nuances of design, as well as inspire you to come up with your own interesting solutions.
Materials
The most optimal materials for creating a cabinet are chipboard and high- or medium-density MDF. This material is not very expensive and relatively dense. But when choosing chipboard, be sure to pay attention to its category (must be E-1) and coating (preferably laminated on all sides). When heated, chipboard releases formaldehyde and phenol, so if your hallway has heating pipes, then don’t take risks and choose another material. Another disadvantage of chipboard can be considered the weak retention of screws.
MDF is safe for humans because when heated, lignin, which is contained in natural wood, is released. True, the price of MDF is significantly higher, and it is a fire hazardous material.
Wood is a traditional material, however, if you are planning to make a built-in wardrobe, it is better not to use it. A concrete wall creates additional moisture, and spruce and pine, from which boards are usually made, have low moisture resistance.
It is better not to use drywall, because this material is not for the manufacture of load-bearing structures. It is fragile and if you do not think through the complex design of the base, it will not hold the doors of the wardrobe.
One possible option is to pre-design the cabinet, and then purchase ready-made components in stores, or create such components to order in a workshop (still cheaper than buying ready-made furniture).
Step by Step Actions
Large white closet in the hallway.
- Room measurements and calculations. The top, bottom and middle dimensions of the wall at the installation site are measured with a tape measure.
- Sawing, selection of accessories. According to an extremely accurate drawing, the necessary elements are cut in the furniture workshop.
To assemble the structure you will need the following accessories:
- Dowels with self-tapping screws;
- Spacers for gently screwing in self-tapping screws;
- Corners for furniture (preferably made of metal);
- Rods and rod holders for hangers;
- Hooks.
We fix the drywall
Cutting off the necessary pieces of drywall, we cover the finished frame with it, using screws specially designed for this material. Drywall is a fragile material and is susceptible to impacts, especially at corners. Therefore, we cover them with a special aluminum corner that protects the casing from damage.
Return to content
Lighting
Before working on the frame part, it is necessary to take into account the desired lighting principle. Based on the design drawing, a diagram for connecting the lighting to the wiring is worked out. For a built-in cabinet, a plasterboard structure is constructed on the ceiling, based on a profile support.
The light can be installed in the upper part of the cabinet, having previously cut the required diameter for the lamps. To ensure safety, internal wiring must be enclosed in corrugated tubes.
Assembling a sliding wardrobe with your own hands at home is quite simple if you make the drawings correctly and follow the calculations.
When the main installation of the product is completed, lighting is installed and the furniture is finished. Fluorescent and LED lamps are used to illuminate products.
Such lamps do not heat up, creating safe operating conditions for the product. When choosing to install recessed lighting inside a built-in cabinet, you need to take care of it before installing the frame. You can illuminate furniture from the outside, which is achieved by installing lamps in the furniture's cornices.
Stylistic design
To decorate small rooms with unusual layouts, the same stylistic techniques are used as for standard spaces. Such rules are based on the personal preferences of the owners of the apartment or house. You can create a cozy atmosphere by decorating the room in one of the following styles:
- High tech. Cold shine of metal and glass. Floors and walls are only monochromatic; appropriate 3D designs are allowed. The color of wallpaper or plaster is gray, silver, white. The ceiling can be made suspended or suspended with spotlights. Mirror surfaces will look good. Single decor in purple, green, and blue is used as accents.
- Country. Simplicity and naturalness are emphasized by wallpaper with a floral pattern. You can make one of the walls an accent wall, decorate half of it, from the middle to the baseboard, with decorative stone or practical plaster. A simple single-level ceiling, without modern lighting ideas, would be appropriate.
- Classic and modern. Finishing materials and furniture colors are only natural shades - sand, beige, green, white. A combination of several colors at once on the ceiling or walls looks good.
- Baroque. A stylish modern interior involves the use of antique furniture. The entire room should be decorated in an identical manner. Suitable colors for decorating walls and furniture are gold, bronze, pink, burgundy.
- Minimalism. The walls are decorated in only one tone, with a minimum of furniture and decor. This style does not accept any pathos, only the most necessary items and functional elements.
- Empire style Suitable for narrow and long hallways. In the Empire style it will look expressive and bright. When decorating, use bold, rich shades, for example, red, gold, green, blue. The room must be furnished with appropriate decor.