Metal-plastic or polypropylene pipes are an excellent material not only for household needs, but also for creating homemade fixtures and pieces of furniture. In particular, a reliable and beautiful rack made of pipes can be placed in a garage or auto repair shop, and an elegant shelf made of thin metal-plastic products can also decorate a living space.
Pipe shoe racks
DIY shoe rack made from pipes
A very simple version of a shoe rack made of pipes, the creation process is very simple, so we won’t focus on it, you’ll understand everything from the photo
Unfortunately, the author of the photo could not be identified.
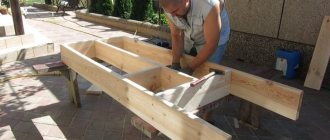
Large shoe rack made of pipes under the stairs
Another option for a shoe rack, only larger in size. The space under the stairs is usually empty unless various unnecessary things are put there. And you take it and make a shelf like this from pipes for shoes .
You will need pipes, fittings, adapters and a full set of plumber's tools. But everything is reliable, thorough, in a real industrial style. First, you make a drawing for a specific location, calculate the crossbars and other details, then select fittings and pipes. All this iron can be painted with metal paint, or you can leave it like that, it will look cooler.
Now we assemble all the parts according to the diagram, and at the end we attach the boards.
It turns out this is a multi-tiered shelf made of pipes
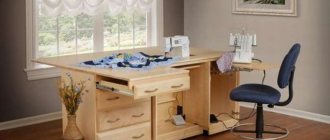
Office desk with plastic frame
Buying even the cheapest office desk can be a big hassle for some people, so we'll show you how to make a desk out of plastic pipes. This project differs from the previous one in its complexity, so you will have to think through some parts yourself, but we will try to explain everything to you as clearly as possible.
READ ALSO: Protection of fiberglass pipes
First of all, you need to decide on the size of the table. In our case, we take a ready-made tabletop (915×2030 mm), under which we will assemble the frame. When choosing a tabletop for your own table, pay attention to its weight and follow the rule: the lower the weight, the better for your table. The best solution for a countertop would be a hollow door leaf. You can also assemble the tabletop yourself using flat boards, fasteners, a saw and a drill.
First of all, prepare 12 meters of plastic pipe and cut it into the following parts:
- 5 parts of 7.5 cm;
- 10 pieces of 30 cm;
- 4 parts of 50 cm;
- And 4 pieces of 75 cm.
Among the other parts for the frame you will need the following:
- 4 T-fittings;
- 4 four-way fittings;
- 2 cross fittings;
- 10 plugs for pipes and fittings.
Having prepared all the necessary parts, you can begin to assemble a table from polypropylene pipes. It is better to perform the first assembly without using glue, and after assembly, glue all the connections one by one. Begin assembly by constructing the sides of the frame on which the tabletop will rest.
Next, assemble the back part, which will connect the two already assembled. To give the table additional stability, we recommend adding a third leg to the back wall. When assembling the table, carefully monitor the parallelism of all elements in order to ultimately obtain an even structure.
READ ALSO: Fire-resistant polymer pipes
At the final stage, it is necessary to connect all the parts into a single structure, obtaining a table frame. Check it for strength, correct any unevenness, and then glue all connections.
Having made the frame, you can begin installing the tabletop. This can be done in many different ways, but we will consider the most reliable and aesthetically correct of them.
= What shelves can be made from:
| made of wood Example: DIY flower shelves 230 | from metal pipes Example: DIY pipe shelves | from PVC pipes |
| made of cardboard Example: Shelf rack made of cardboard boxes | from paper | from plasterboard |
| from glass Example: Shelves in Art Nouveau style 180 do-it-yourself photos | from old boxes Example: DIY drawer shelves 120 photos | from pallets pallets |
| stainless steel | from glass | from old stairs |
| From bars | from bottles Example: Glass bottle shelves | from driftwood and branches Example: Bookshelf made of branches and driftwood |
| made of bricks Example: Bookshelves made of bricks and boards | from newspapers Example: Newspaper shelf | From cans Example: DIY kitchen shelves: 456 photos, drawings, instructions |
Material and its qualities
PVC pipes and remaining mounting elements will make successful crafts. A thrifty owner will not throw them away or litter the balcony or dacha with them. After the plumbing is completed, the skill of processing and joining will appear. Why not use it in creating useful things and improving your living space. Fantasy, skillful hands and ideas in our photos of pipe crafts will inspire you to create unusual items.
The main advantages of pipe materials:
- price, PVC pipes are inexpensive, but you have already paid for the scraps, you may have to buy additional connecting elements;
- environmental safety, plastic water pipes are completely neutral and do not corrode;
- the strength and light weight of the structures are ensured, which is undoubtedly convenient;
- appearance, white plastic looks good in any modern interiors;
- service life - manufacturers confirm a half-century service life of pipes;
- ease of assembly and disassembly, if necessary, repair of structural parts.
How and with what to connect
PVC pipes have become popular due to the ease of installation and assembly work. To connect them, you need corners, couplings, crosses. They are fastened either by hot soldering using an “iron” or simply with glue and screws.
If the structure does not require tightness, then soldering the pipes is not necessary, and without it it is also easy to disassemble the structure. This technique is used when creating greenhouses, when they are installed for the spring-summer period, and then dismantled for the winter and stored in this form.
Metal shelving for the garden
Let's try to do without welding and assemble a rack from a galvanized metal profile of a small cross-section, which is more convenient to process. We will need a tape measure for marking, a hacksaw for metal and a screwdriver, instead of which you can use an ordinary screwdriver.
To simplify the work, we make an exact sketch to which we “transfer” the installation location. We draw a simple diagram indicating the dimensions. Then we calculate how much material – thin profile – is required. If the appearance of the rack is important, we buy a chrome-plated pipe (approximately 22 mm in diameter). For shelves, plywood (10-15 mm thick) is suitable, which we fix with self-tapping screws (8-13 mm).
Use a hacksaw to cut the pipe into fragments. One of the kit options: 4 vertical posts, 8 rear and front crossbars, 8 side crossbars.
We assemble four frames for the shelves, securing the corners with self-tapping screws or additional corner fasteners. Then we fix the frames on the vertical posts - the legs of the rack. We screw the back part of the finished structure to the wall using brackets for stability. We paint the shelving frame (chrome plated is not needed), lay out the shelves, and secure them with self-tapping screws. Convenient for storing things and workpieces, hand-made furniture from a profile pipe is ready.
Procedure for assembling the structure
We make dryer racks from pieces 20 cm long. To do this, we vertically connect 3 such pieces with tees. We get racks a little higher than 60 cm. We insert the legs from below, we get 4 racks of 120 cm in height. We connect two racks with a wide crossbar using corners.
We insert the crossbars into the free horizontal holes of the corners, we get the main and inner rectangle. Using clamps we attach the inner narrow rectangle to the top crossbar of the base.
The dryer is installed like the letter “L”; for stability, you can adjust the angle of the rectangles. The laundry is hung on bars, and the dryer can be placed in any convenient place. The assembled structure can easily be hung on the wall in the pantry.
Important: Similar step-by-step instructions showing how to make a craft from pipes can be easily found on the Internet. The use of leftover plastic pipes is not limited to the ideas presented; this material can actually be used in your own home workshop.