DIY shelves for the bathhouse.
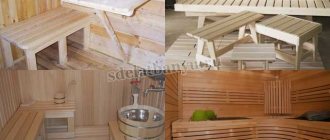
Photo In this article there are more than 10 options on how to make the right shelves in a bathhouse (steam room) with your own hands. Just below >50 drawings, diagrams and models of various designs: corner, folding and removable. Video selections. And also at the end of the article there is a large photo gallery + 200 photos of the most beautiful and simple shelves for a wooden bathhouse.
Layouts of bathhouse linings (sketches and drawings of shelves)
Here are collected layouts of bathhouses with 3 rooms : steam room, washing room and relaxation room. Here you can see the approximate design of the shelves
(Click on photo to enlarge)
Types of shelves in the steam room: common design options
There are several types of bath shelves, which differ from each other in their design features. The feasibility of one form or another, as well as the number of tiers, is determined depending on the size of the bathhouse and its features. This publication contains information about the most common types of canopies.
For a steam bath, complex tiered structures in three stages are often chosen.
Stepped structures. Today, this option for arranging shelves is the most popular. In this case, they are installed along one of the walls (without a window) in two or three tiers. The convenience of this design lies in the increase in the degree of heating from the lower floor to the upper one.
It is important to remember that the upper tier of the stepped shelf in the steam room must be installed above the line of the boiler used to heat the room. In this case, the distance from the top floor to the ceiling must be at least 120 cm. This is necessary in order to ensure maximum comfort for a person while sitting on such a structure. The same rule applies when a traditional stove is installed in the steam room.
Corner (L-shaped) flats. A less popular option than the previous one, however, it is also very often used when organizing the interior of a steam room. It is understood that one side of the structure will be parallel to the boiler, and the second will be adjacent to one of the free walls.
Wooden shelves in the shape of the letter “L” are located on one side opposite the heating stove, and the other on one of the free walls.
The height of the corner structure may vary. This parameter is selected depending on the individual characteristics of the room. Experts advise installing corner shelves when the room is small in size, since they are extremely functional and are not very difficult to do with your own hands. The canopy for this type of bathhouse is best assembled from durable wood.
Coupe curtains. This design is quite rare, but the idea itself is interesting and original. It is suitable for small rooms where it is necessary to save internal space. In this case, two shelves are placed parallel to each other. This structure is very reminiscent of compartment rooms on trains (hence the name).
The upper shelves can be designed so that they recline. The frame structure for such a canopy is usually made of support posts. These elements, similar to the legs of a bench, are joined together by wooden bridges.
Note! If necessary, the shelves can be fixed to the wall without using legs. However, such a device requires proper load distribution.
The canopy-compartment composition turns out to be extremely advantageous spatially for small bathhouses.
In order to choose a design suitable for your situation, it is recommended that you familiarize yourself with the photo of the shelves in the bathhouse. This will allow you to visually evaluate the advantages of one or another option.
To cover the frame, you need to select even and smooth boards from any suitable material. The main thing is that the wood is moisture-resistant, durable and can withstand high temperatures. The distance between the boards should not be less than one centimeter. The maximum recommended distance is 2 cm.
Height - basic calculations
Every man, as a rule, wants to take part in the improvement of his site.
The mere thought that this decision comes from him, that he has the freedom to decide, lifts the spirit and pleases the heart. And what an unforgettable feeling of pride will arise upon completion of construction. “This is my job,” he will say to every guest who comes, and they, in turn, will have the opportunity to envy.
The instructions described below are intended for those who want to understand how to properly build a ceiling in a bathhouse with their own hands.
Calculating the height of the ceiling in the steam room
Options for accommodating people in the steam room
Every lover of a “hot” bath thinks about how to spend less resources on heating, but at the same time not lose money on its heating. Of course, the height of the ceiling will help in this matter, since the lower it is, the higher the temperature. Common sense is that you will still want to stand up to your full height without hitting your head!
So, let's start practicing:
According to the standard, the log frame of a bathhouse is 2.8-3 meters in height, but the height of the ceilings in the bathhouse in this case will be 2.4 meters from the floor.
These calculations will be reflected in a simple and quick way to warm up a steam room, and the consumption of material for heating the room will be kept to a minimum.
- If you are a fan of high ceilings, remember that this requires further increasing the size of the box itself.
- Hot air is rapidly directed upward, so bathhouse ceilings that are too low will make it difficult to breathe in the room.
Note: the height of the bath from floor to ceiling depends on the optimal standardized dimensions, as well as on the height of the benches.
Hot air and steam are concentrated, as a rule, under the ceiling, so shelves in the steam room, at least two or three rows, should suit everyone (photo).
As you can see, the temperature in the steam room greatly depends on the height, so it is necessary to provide shelves for both “experienced” and beginners.
At the top there may be well-adapted people, so to speak “old men”, who do not faint from a sudden temperature change. The lower part is less heated, so for those who want to get used to “hot” procedures, it is better to start with it.
There are three options for placing shelves in the steam room:
Stepped shelves are the standard and most common layout option
- (photo) is a convenient solution for a small bathhouse. The bench is located along the wall, where at the junction of the corner it goes along the other side, visually forming the letter “g”. In this case, the height will not be large. All bathhouse visitors will sit on the same level, which does not require additional calculations. If a person is in a lying position on a shelf and bends his legs, then in this case the distance from him to the ceiling should be at least 160 cm. At this distance, the knees of the person lying will not touch the top.
L-shaped shelves are suitable for a small steam room
- (photo below) is an excellent solution in terms of saving space, so two shelves are located on the wall. Yes, like in a carriage compartment, so when calculating, do not forget to take into account that the room is small, and a person needs additional space in order to climb onto the upper tier. The minimum length of the bench in this case is 150 - 180 cm, and the height from the tier is at least 50 cm.
This layout is a legacy of long-distance trains.
You can often find combined layout options.
Calculation of the height of the dressing room, washing room and locker room
The pleasure of staying in a steam room depends on the temperature of the room, and in other rooms of the bath, on the comfort of being in them. The washing room, locker room and dressing room should be equipped with a high vault, since the “freshness” of the air will be increased by the given height parameters.
Do not make the washing room too high.
A height of 3.5 meters is quite appropriate for rooms. It is better to take care of the low floor, which serves as a barrier, preventing cold air from other rooms from entering the steam room.
The traditional method of determining height has not lost its relevance today.
What to make better from: choosing the material
What is better to make? It is clear that it is made from wood, to which, in fact, there is no alternative, but which species are most suitable? We have already written about this, so now it will be very brief.
Coniferous species should absolutely not be used in a sauna where the temperatures are high, in a Russian bath - if desired, and in mixed modes it is also not worth using at all.
Cheap aspen and linden are worthy competitors of expensive abash, because in addition to low thermal conductivity, it is not highly resistant to water, mushrooms, etc.
You can experiment with other hardwoods, taking into account their thermal conductivity (the higher the density, the higher the thermal conductivity - the easiest way to decide by eye), resistance to rotting and other characteristics. For example, oak is dense, but does not deteriorate in water. Like larch, which, by the way, does not emit resin.
Care instructions
Adviсe:
- The bathhouse must have a good ventilation system so that after the procedures the surfaces dry quickly.
- After visiting the steam room, the surfaces should be wiped with a dry cloth.
- Do not use chemicals to clean wooden surfaces. It is better to choose laundry soap.
- You can clean the wood from dirt with a soft brush. If stains remain, you need to use fine sandpaper, but after this treatment the surfaces must be coated with an antiseptic.
- Every month it is necessary to renew the antiseptic layer.
- If fungus or mold appears on the tree, it is necessary to dismantle the affected part and replace it with a new one.
It is impossible to imagine a classic steam room of a Russian bath or Finnish sauna without wide shelves. They are needed for visitors to sit or lie down when visiting the steam room. Before making your own canopy, you need to select the material and size of the structure.
How to make shelves in a bathhouse with your own hands: a step-by-step guide
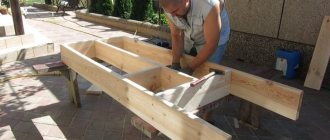
In order to make shelves, you need to make a drawing. If necessary, you can use a ready-made scheme, but it must suit your conditions. Therefore, you need to be very careful when choosing a scheme. Further work is carried out in accordance with the step-by-step instructions. You can assemble shelves in a bathhouse with your own hands only if you have the appropriate material. To install the canopy in the steam room, you will need the following tools:
- regular hammer;
- construction mallet;
- screwdriver;
- hacksaw (for metal);
- chisel;
- yardstick;
- self-tapping screws
Drawing up a diagram for installing shelves in a bathhouse is an important and responsible process.
Note! Fixing the sheathing to the frame can be done in a non-standard way, which involves the use of wooden wedges. However, in this case, some carpentry skills and the ability to make accurate calculations are required.
In order to answer the question of how to make a canopy in a bathhouse, you need to carefully follow the instructions. Any deviations from the general algorithm of actions may lead to installation errors. First you need to determine the location of the supporting elements. This parameter is calculated taking into account their thickness. For example, products with a thickness of 22 cm must be installed at a distance of 60 cm from each other. This will allow you to optimally distribute the load.
A drawing of a shelf in a bathhouse with your own hands, drawn up earlier, should contain information about the geometric parameters of the parts and their quantity. All of them must meet certain standards, namely: have no signs of rotting, be smooth, and free of cracks and knots.
The thickness of the boards that will be used to cover the frame may vary. When choosing this indicator, you should pay attention to the width of the product. The larger it is, the thicker the board will be required, since wide and thin boards may not support human weight. The optimal ratio of width to thickness is 4:1.
Carefully sanded boards are used to lay the shelves.
Optimal sizes
As mentioned above, the optimum depends on what type of bathhouse its owner prefers - Russian or Finnish.
The average data for each type of bath are as follows:
- in the sauna, the width and height should be comfortable for sitting - this is from 40 to 60 cm in seat width and 45-50 cm in height;
- In a Russian bath, shelves are needed for lying and sitting. The minimum width is 60 cm, and the height is somewhere around 70-75 cm, but it is better to determine it anatomically, as recommended above.
The length of the shelf is usually equal to the distance between the parallel walls, since it is usually made along one of the walls
On our website there is a more detailed analysis of the nuances associated with the size of bath shelves.
Steam room interior
Although the main quality of a steam room is its effectiveness and convenience, appearance also matters. That's why:
All elements are finished taking into account not only safety and comfort, but also aesthetics. High-quality surface coatings, including oil-wax, can reveal the texture of wood and emphasize the laconicism of thoughtful forms; the use of one or more harmonizing types of wood for decoration increases the attractiveness of the interior
When choosing materials, it is important to consider the correspondence of the color scheme of furniture, walls (ceiling, floor) and stove; Correctly selected lighting (hidden or semi-hidden lamps of a suitable style) and a rational choice of accessories will help make the procedures more enjoyable.
How to make shelves in a bathhouse with your own hands: choosing a location
After choosing the type of structure, as well as calculating its dimensions, you need to correctly select the place in which it will be located. This decision is influenced by the type of bath. For example, water procedures in a Russian steam room are usually performed while lying down. In turn, the Finnish sauna requires the presence of places that are made as comfortable as possible for a sitting position.
The preliminary drawing must indicate the dimensions of the room, as well as its features. The diagram must include door and window openings, and also indicate the location of the boiler and any other equipment. Based on this drawing, you can determine the most suitable space for installing a shelf in a bathhouse with your own hands. Photos of the finished premises will help you visually evaluate the advantages of one or another option for the location of this structure.
Note! Canopies are not recommended to be installed under window openings. This is due to safety regulations, since the glass may not withstand high temperatures and may burst. As a result, the fragments can cause harm to people relaxing inside the steam room.
Before installing shelves in the bathhouse, you need to create a drawing.
Depending on the individual conditions in the bathhouse and the preferences of the owners, the canopy is installed on the base (legs) or fixed directly to the wall. It is worth noting that the shelves should not be adjacent to the walls, as this negatively affects the circulation of air flow. The recommended distance between the logs and the wall is 10 cm. Slats are fixed to the surface, which will serve as the basis for the vertical structural elements.
To make shelves for a bathhouse with your own hands, you should purchase material suitable for this purpose in advance, as well as prepare tools. When fixing individual structural elements with self-tapping screws, it is necessary to screw them into the wood in such a way that you cannot be injured by them in the future.
When positioning the canopy, it is also necessary to take into account the distance to the doorway so that it does not interfere with free entry and exit. This design should be located at a distance from the boiler and not interfere with free movement around the room. Guided by the rules described above, it will not be difficult to correctly choose a place for a bath shelf.
Shelves in the steam room should be located so as not to interfere with free entry and exit.
Adviсe
If you need to make shelves not in three, but in two tiers, then you need to take into account that the height of the lower level from the floor should be approximately 50 cm, and from the top - 90 cm.
It is necessary to leave a technological gap between the decorative finishing of the floors and the benches. Its size is usually 4 mm on each side, and the expansion coefficient of the wood as it swells must be taken into account.
To make frame bases, experts recommend purchasing 50x70 cm timber. In addition, to prevent the wood from drying out, the thickness of the board should be approximately 4 times less than the width. When making a frame, it should be further strengthened. To do this, you can connect all the supporting parts using boards both below and above. It is recommended to wear special rubber pads on the legs of bath furniture - with such parts the shelves will not scratch the floor or slip on damp boards.
If the steam room in the bathhouse cannot boast of a large footage, then it is permissible to build a lower shelf in the shape of a triangle. Such structures should be placed indoors in such a way that one leg fits loosely against the wall, and the other against the adjacent shelf.
Most often, the lower part of the shelf structure is not secured in any way. Thanks to this solution, the floor under the structure can be washed, and it dries more efficiently. If the bottom of the bench is too bulky and heavy, then special runners can be built under it, moving along rubber guides.
The use of self-tapping screws during the construction of the shelf allows you to firmly and reliably fix the resulting structure. In addition, it will be possible to easily disassemble the bath furniture in order to dry or replace any part
It is not recommended to use coniferous wood for making shelves, despite their environmental friendliness and pleasant aroma. Such materials, when exposed to high temperatures, release a resin that will stick to the skin.
The width of the shelf should not be less than 0.4 m. If you build a narrower structure, then it will be impossible to sit or lie on it - there will not be enough space. When making a shelf, you should use special fasteners made of hard wood.
It is permissible to use stainless steel parts only when constructing a frame base, which will later be covered with boards. This is explained by the fact that metal fasteners can become very hot in the steam room and you can accidentally burn yourself on them if they are on the surface.
Design, manufacturing and equipment
To begin with, after all, a little theory and even linguistics. It’s not a fact that you will read all the materials about shelves, so let’s repeat:
ON A NOTE! It is most correct to say: in the singular “shelves”, not “shelf” and not “canopy” (there is a shelf in our room, but a canopy above the bed), in the plural – “shelves” (shelves in the closet, shelves in the steam room , yes in the army).
The structure of a shelf can be described as a wooden platform, a lounger or even a conditional perch, consisting of one or several tiers, which, in turn, can consist of separate parts, or can form a monolithic stationary structure.
Moreover, parts can be either individual tiers or their components. In the latter case, we are talking about a solid frame and removable flooring.
The simplest shelf is a high lounger with a step for ease of climbing onto it. An excellent solution for lovers of Russian baths, who are frequented by professional steamers.
But the prevalence of the sauna in Russia has led to the fact that the shelves in the bathhouse and steam room began to be multi-tiered, under the ceiling, and the vertical parts of the “steps” were sewn up tightly. All this is correct and appropriate, but only for a Finnish bath.
This is not the place or time to discuss the winning (or losing) of the bathhouse option, in which the owner is trying to combine two modes; for this, you can read something from the section on stoves, where a lot was said about the modes and their compatibility. But, as a fact, many make shelves in the bathhouse with their own hands for both types.
IMPORTANT! In a Russian bath, the preferred position is lying down, but you can also sit. In the sauna, it is preferable to sit higher and sweat profusely, but lying down is also not prohibited. Of course, the difference between a lounger and a seat is only in width
You can’t lie on a narrow shelf; on a shelf that’s too wide, it’s uncomfortable to lean on the backrest; it’s too far away
Of course, the difference between a lounger and a seat is only in width. You can’t lie on a narrow shelf; on a shelf that’s too wide, it’s uncomfortable to lean on the backrest; it’s too far away.
Arrangement of shelves in a bathhouse: this is more comfortable to lie on
And sit on these
As for how to build shelves in a bathhouse with your own hands, more on this a little later, but now we can say that the work is not too difficult, especially if you don’t bother, put everything on screws with a screwdriver and don’t worry too much about the future, in which the metal joints in the wood will definitely become loose.
BY THE WAY! Here is an important point of self-determination - should it be attached to the wall or made as a separate structure? The price of the issue is rot, which forms in a poorly drying joint with the wall.
Multi-stage bath shelves: is it worth making them?
The feasibility of organizing a structure that includes two or three tiers is primarily determined by physical laws. When the room warms up, the hot air rises, and in the floor area the temperature rises, but not so much. In the case of installing a multi-stage structure, it becomes possible to select the required temperature regime.
Making a shelf in a bathhouse with your own hands is not so difficult, but constructing a multi-stage canopy takes more time. Of course, everyone independently determines the need for a two-tier or three-tier structure. If the bathhouse will be used only by household members, then you can make simple one-story curtains, supplementing them with benches.
In small baths that suffer from a lack of usable space, the lower floor may be located slightly above floor level. But in this case there are some advantages. For example, this design is well ventilated, which helps the boards dry quickly.
Arranging shelves on top of each other allows bathhouse visitors to independently select the most suitable temperature for them.
Experts recommend that when drawing up a drawing of a bathhouse shelf, you should take into account that the upper floor should be wider than the lower tier. If the dimensions are properly distributed, it becomes possible to use the second floor as a bed.
Device
Another way to call a shelf is a bench. This is explained by the fact that it is a structure of benches with different heights, arranged in a special pattern.
The standard design of these elements consists of two main components:
Frame. This element of bath shelves acts as a basis for fastening boards of stationary flooring or as a support for collapsible flooring. As a rule, the frame of the shelves is made of support posts, which are similar to the legs of a standard bench. These parts are connected to each other using transverse jumper boards. Less commonly, the shelf frame is made according to the principle of a ladder stringer. Steps are attached to such a base.
Method of assembling a retractable structure
Separately, it is worth dwelling on the technology of assembling the retractable system. To do this, beams are mounted on the end walls. On them and on the side parts of the couch, axles are fixed from the inside, onto which wooden planks-levers are put on. It is advisable to cut the corners on these slats so that the mechanism moves smoothly.
The thickness of the bars in the end parts of the sunbed frame and on the walls should be equal. To securely fix the levers on the axles and allow them to move without play, wooden washers are put on them.
This design allows you to move the shelves only 0.8 times the length of the wooden arms. They serve as a support for the bed when extended or retracted.
