In small apartments, you want to use the space in the most functional way; some layouts imply the presence of ledges and niches. You can fill the resulting space using shelving. The design of the shelf frame itself is not that complicated, so it is easy to find instructions in response to a request on how to make a rack with your own hands.
All you need to assemble the structure are materials, tools and some free time. Photos of do-it-yourself shelving will help you decide on the dimensions and options of the shelving, and it will not necessarily be a banal set of boards.
Requirements for homemade structures
When making furniture at home, the craftsman must remember that the design must meet a number of requirements:
Sufficient strength, both fastenings and the shelves themselves. The best option would be a preliminary calculation of the maximum permissible load on the structure.
Compact dimensions must be optimally combined with sufficient capacity. In addition, it is better to make the shelves themselves at a slight slope to prevent books, toys, and souvenirs from falling.
Resistance of surfaces to moisture, detergents and abrasives. Preliminary impregnation of wooden parts with moisture-resistant oil will provide reliable protection of wood from rotting, and, consequently, from the development of pathogenic fungus.
When preparing for the construction of home furniture, you should definitely take into account the purpose of the future structure.
The rack can be used in the bathroom, hallway, kitchen and pantry. Homemade multi-tiered shelves are very popular in garages, workshops, and in a barn on a summer cottage.
As part of a modern interior, multifunctional furniture with sufficient mobility is welcome. To comply with this requirement, you should consider additional hooks, umbrella stands, and towel hangers for the design (for example, for a bathroom).
The presence of wheels will make the new bookcase movable, which will greatly facilitate wet cleaning or repairs.
Types of wood construction
Racks are divided into: universal and special. The first allow you to store objects and parts in or without containers directly on the shelves. The second ones are intended for storing metals.
According to the functional purpose and nature of cargo storage, they are divided into:
- home use;
- office;
- trading;
- warehouse;
- archival.
Wooden shelving for home
Wooden shelving for the office
Trade wooden racks
Wooden racks are often used in offices and at home, less often for warehouses.
According to design features there are:
- pallet – goods are stored on special pallets – pallets;
- shelf ones are the most common. Used in offices, everyday life and trade;
- console – used for storing large long cargo;
- mobile – made in the form of special pallets placed on trolleys.
Rack of pallets and pallets
Shelf rack made of bars and wood Mobile rack for toys
Selecting material for work
Thanks to the availability of building materials, every craftsman has the opportunity to make a wide variety of shelving with his own hands. The following materials are considered the most optimal:
Wood. As a rule, shelves are made of wood, and the supporting structures are made of metal profiles. Wood is an environmentally friendly material, characterized by sufficient strength and a beautiful natural shade. However, to protect against moisture, it is necessary to carry out high-quality treatment with moisture-resistant oil.
Chipboard panels, MDF, plywood are more affordable materials. The strength is in no way inferior to solid wood. Just like wooden beams, panels made from pressed shavings are absolutely safe and do not cause allergic reactions, but require additional protection from moisture.
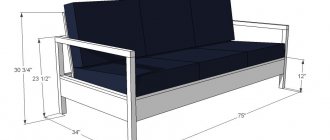
Metal constructions. Racks made entirely from profiles with your own hands are particularly durable, beautiful in appearance, and resistant to moisture (especially after being coated with an anti-corrosion compound).
Rarer models of shelving are built from a combination of wood and plastic, metal supports and tempered glass.
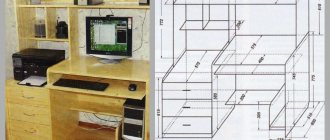
Rack location
The most common location is near a wall or under the stairs. Usually these places are used for the functional placement of structures. The rack can be up to the ceiling; in this case, access to the shelves is provided by pull-out steps in the form of lower shelves.
No one has canceled the outside help of a stool; if you are making a suspended or ceiling-mounted shelving structure, be guided by the available stepladders, otherwise you will not be able to fully use your creation.
The corner location of the shelving is no less convenient; this location makes the space that is usually left empty work.
Step-by-step production of a wooden rack
Shelving at home can be built even from scrap materials; it all depends on the purpose of the future structure. For the living room or hallway, or children's bedroom, it is better to take a new piece of wood of sufficient cross-section.
Tool you will need:
- Jigsaw.
- Drill.
- Metal corners, screws.
- Planer for grinding surfaces and cuts.
Impregnation compositions and decorating coatings will be useful.
Where to start
Of course, the size of the shelving depends on the available space, but if you are not limited by the existing walls, it is better to build a structure of a certain size. The boards used should be no thinner than 20 millimeters; the width of the shelf depends on what will be stored on it.
For books or flower pots, a width of 30 centimeters is sufficient; the length of the shelf should not exceed one meter. If the length is longer, the shelf will simply sag under load, and such a product will not have longevity.
We would like to tell you good news - long TV stands from the manufacturer are a reality.
If the rack is needed to store tools, tires or something else, the width of the shelf should increase. In addition to the width of the shelf, the need to determine the intended purpose of the structure is necessary to calculate the load on the fasteners.
Lightweight structures are secured using conventional self-tapping screws, but heavier structures require the use of anchors and hooks.
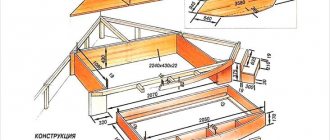
Preparation of the drawing
The most crucial moment in all independent work is preparing the drawing. The following parameters must be displayed on the diagram of shelves and racks:
- Design dimensions.
- Depth of shelves.
- Distance between adjacent shelves.
- The width of the retaining sides (as a rule, their role is played by metal corners).
All available additional parts (hooks, wheels) must be indicated on the diagram in the appropriate scale. Ready-made drawings and designs for interesting shelving can be found and printed before starting work.
Rack made of metal profile
To assemble this option, it is better to use welding; otherwise, you will have to resort to using an electric drill. To collect you will need
- electric drill
- chipboard slabs or boards with a thickness of at least thirty millimeters
- profile pipes with a cross-section of twenty-five millimeters
- corners 40 millimeters
Using a drill and pipes, you need to make frames; they need to be leveled using a level. If the thickness of the shelves is sufficient, there is no need to further strengthen the base, but when the load is very large, it is still worth strengthening the base of the shelves with an additional angle of rigidity, simply install the profile fragment in an angular direction.
Preparing parts for assembly
The next, no less important stage of work is preparing the parts for assembly:
- The metal profile (or PVC pipes, or other material used for support posts) is coated with an anti-corrosion compound, protecting the surface from rust.
- Blanks for future shelves are cut out of wood using a jigsaw. All sharp cuts are carefully ground with a plane and sandpaper. Moisture-resistant oil is applied to the surface of the wood, the exposure time is maintained, and the remaining oil is removed with a dry rag.
After the oily composition has dried on the surface of the wood, you can begin to decorate the shelves (coating with PVC films or decorative veneer).
Final decor of the rack
The finished structure must be painted. Of the various options, the simplest are coating with water-based acrylic paint or varnishing the product.
The advantage of acrylic paint is that it dries quickly and has virtually no odor. It can even be used indoors, although the room will still need to be ventilated. Varnishing is preferable if you want to preserve the structure or slightly tint the surface of the wood. Clear or tinted varnish to resemble oak, walnut, ash and other wood species should be applied two to three times. Each new layer is applied after the previous one has dried.
Before painting the rack, it is necessary to prime the surfaces to be painted, unless two-in-one paint is used. Priming the surface will ensure a good result and will ensure that the paint does not peel or crack over time. If you intend to paint with oil paints, it is recommended to do this in advance outside the living space. We bring all painted parts into the house for subsequent assembly only after complete drying.
So, once the shelving unit is assembled and painted, you can stand back and admire your work. However, your furniture will look more presentable when books, figurines, framed photographs and other household items for which it was made appear on the shelves.
Final assembly of the structure
The phased assembly of the structure is a strict sequence of actions. How to make a rack with your own hands:
- Metal racks are welded in such a way that supports of the required size are formed.
- At the points where the shelves will be located, metal corners are welded, which will later hold the wooden panels.
The panels are laid on the corners and screwed with self-tapping screws. All welding seams, nicks, and irregularities are cleaned off so as not to spoil the appearance of the product.
Kitchen rack - how to choose, how to make and how to organize storage
To solve the problem of lack of storage space in the kitchen, in addition to the furniture, you can hang open shelves or put a buffet, but an ordinary shelving unit will do the best job. What can you store in it? Almost everything beautiful that you want to keep in sight or that you always need to have at hand, namely:
- Baskets for storing vegetables;
- Food and drink supplies;
- Napkins, potholders and towels;
- Spare blades and instruments;
- Spare dishes and utensils;
- Various gadgets like scales, blender, food processor, etc.;
- Cookery books;
- Indoor plants and decor.
You can make a kitchen rack yourself in the size and color you need, or you can just buy it. Today on sale you can find ready-made furniture of various configurations:
- Shelves on wheels;
- Stepladder racks;
- Vegetable cabinets with perforated drawers;
- Corner and standard shelf metal or wooden structures;
- In the form of a cabinet or island table;
- Shelving partitions (pictured below).
In this article you will find simple tips on choosing a ready-made shelving unit and ideas for making it yourself.
6 tips for selection and storage
Tip 1. How to choose color and design
When choosing what color and design to buy a shelving unit for your kitchen, you can focus on:
- Color of the kitchen set;
- Wood table top color;
- Dining room furniture color;
- Wall color.
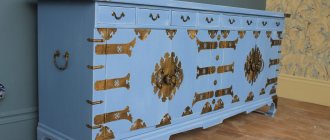
In addition to color, of course, you need to take into account the interior style. So, for example, for a classic kitchen, a rack that looks more like a buffet is suitable.
In a kitchen in Provence or country style, aged or rough wooden furniture, as if made with your own hands and painted by hand, will look organic.
But for a modern environment, you should choose metal or minimalist structures made of wood/MDF/glass. Here are some photo examples of this design.
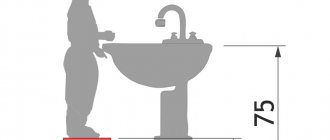
Tip 2. How to choose a height
The following options will be optimal:
- Up to the ceiling;
- The height of the headset, but not higher;
- Below is the headset;
- Approximately the height of the dining table or the lower tier of the set (for mobile shelves, islands and vegetable cabinets).
Tip 3. What solutions for small and large kitchens
For a small kitchen, lightweight structures, such as stainless steel, are best suited. Also pay attention to shelves, corner cabinets and racks with shelves so that they can accommodate items no wider than a dinner plate. It’s good if the shelving can be placed so that it appears built-in.
And for a large kitchen or kitchen-dining room, you can choose furniture that is more massive, taller, wider and more elegant. For example, full-wall shelving is suitable. True, they require more frequent cleaning and beautiful “filling”.
Tip 4. It’s better to store things in baskets and food in jars
Since a rack is a cabinet with open shelves, for convenience, order and beauty, some things must be stored in baskets, and products in jars. This will make it easier for you to wipe dust on the shelves, sort and find the items you need. Keep in mind that it is better to choose the same baskets for shelving, rectangular or square (baskets of other shapes will not be so compact). We present examples of organizing the storage of kitchen items and products on racks in the following selection of photos.
Tip 5. Decorate your rack with a beautiful accessory
To avoid turning your kitchen into a storage space or chef's utility room, decorate your shelving with a few decorations, such as a vase, a houseplant, a clock, or even a painting.
Tip 6. You can look for a kitchen shelving unit in the bathroom furniture department.
If you just can’t find a kitchen shelving unit that is suitable in size and design, look into the bathroom furniture department. Such furniture is usually moisture-resistant and compact.
8 ideas for decorating and making DIY shelving
Idea 1. Use fruit boxes
Let's start with the most budget-friendly and easy-to-make option - a shelf and rack made from fruit boxes. If desired, they can be tinted with stain, artificially aged, added vintage inscriptions, painted white or some bright color. If necessary, boxes at joints must be strengthened.
Idea 2. Turn an ordinary rack into a mobile one
An ordinary small rack or cabinet can be turned into a mobile cabinet if you attach furniture wheels or casters to it. They should be rotary and preferably with a brake. Wheels will add height to the furniture, make it more interesting to look at and allow you to move it if necessary.
Idea 3. Updating the closet with back wall decor
If you already have an old, say, bookshelf, then you can easily update it and turn it into a kitchen shelving unit. To do this, it needs to be sanded, sanded, primed and painted in 2-3 layers with acrylic paint. And to make the shelf look more interesting, its back wall can be covered with wallpaper or painted in a bright color. This method of decoration is especially relevant if the back wall of the cabinet is made of hardboard.
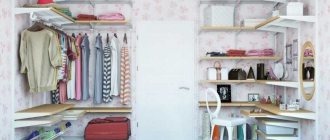
Idea 4. Use a niche
If there is any niche in your kitchen, then it can easily be turned into a shelving unit. To do this, you will only need ready-made or homemade shelves and shelf holders.
Here are other interesting ideas for shelving built into niches.
Idea 5. Shelving above the doorway
Depending on your level of training and the scale of work, you can make such a rack yourself or entrust its design and manufacture to professionals.
Idea 6. Making a rack from perforated sheets
You can buy a perforated sheet of metal or hardboard and use it to make a kitchen organizer like this. The sheet can be painted, then hooks can be inserted into it for attaching dishes and baskets. You can also buy special holders and clamps and use them to build a small shelf as shown in the photo below. By the way, in this example, the sheet and baskets are painted by hand, but you can order the sheet to be painted in any color directly from the company.
Idea 7. Use a wooden stepladder
If you have an old wooden stepladder or ladder, you can use it as a frame, make shelves of different depths, attach them, file the corners of the legs and finish the wood.
Idea 8. Country-style rack for homemade lumber
And finally, for novice craftsmen, we offer a master class on how to make this traditional type of rack out of beams with your own hands, which is just suitable for storing various pickles and homemade preparations.
Roman contemplator
- Activity: 53k
- Gender: Man
Roman contemplator