How to make a book shelf with your own hands
Making a bookshelf with your own hands is not difficult. This is one of the most primitive types of furniture; its design and manufacture does not require special carpentry or other skills. For work, you can use a solid board, chipboard or multi-layer plywood.
If you are going to use an original idea, first evaluate it according to several parameters:
- what type of fastener is advisable to use;
- how your idea fits into the existing interior style;
- what material is better to use;
- where do you plan to place the shelves?
It’s easy to cut shelves made of wood or plywood yourself using a jigsaw or saw, but it’s better to order glass surfaces from a workshop. At home, it is difficult to properly process the edge or perform figured cutting. You might like the ideas of using scrap materials to make bookcases.
Master class: do-it-yourself small wooden bookshelf
A small shelf that can be installed on a windowsill, table or even on the floor is suitable for a children's room. To make it you will need a sheet of multi-layer plywood, a jigsaw, a ruler, sandpaper and wood glue. Step-by-step description of the process:
| Photo | Description |
| On a sheet of plywood you need to draw the outline of a sheep, horse, dog or any other animal, if this is a shelf for a child. For an adult’s room, you can limit yourself to abstract contours. | |
| Using a jigsaw, cut out the main part along the drawn outline. | |
| Three grooves need to be drawn on the workpiece: two at the bottom and one at the top. | |
| The thickness of the groove should be equal to the thickness of the material from which you are making the shelf. | |
| This is what the workpiece looks like with finished lower grooves. | |
| The legs of the shelf are two semicircular parts with grooves cut out on top. | |
| The third vertical part is made with a groove at the bottom. When assembled it looks like this. | |
| For the surface on which the books will stand, you need to mark a perpendicular line on all inserts. Use a building level for this purpose. | |
| On the vertical inserts, guides for the shelf should be cut out with a jigsaw. | |
| The shelf itself is a long piece with three grooves. | |
| During final assembly, all grooves must be treated with wood glue. | |
| The shelf for children's books is ready. It can be painted, decorated with decoupage, or left as is. |
Master class: DIY book rack
The simplest rack can be made from ordinary planed and sanded boards:
| Photo | Description |
| To make a rack you will need a board 2-3 cm thick, preferably made of larch or beech. | |
| Pre-treat all parts with a grinding machine or sandpaper. | |
| Use a jigsaw to cut the boards evenly. All parts are cut out after preliminary measurements in accordance with the drawing. | |
| Use wood screws to attach the shelves to the main rails. | |
| To prevent the heads of the screws from sticking out, and also to prevent the board from cracking during operation, the holes for the fasteners are slightly drilled. | |
| The height of the shelves depends on the size of the books. For children's shelves, it makes sense to make them of different heights - books for children can be large and small. | |
| The fastening of the transverse parts must be checked with a level. The shelves do not have to be located on the same plane. | |
| The finished rack can be painted or coated with varnish and stain. | |
| To securely fix the rack, screw it to the wall using metal corners. | |
| The rack is ready, there is a place on it for books and various small things. |
Modern shelving
This is the most suitable option for currently relevant interiors. It is a rack in a minimalist style, without unnecessary elements and unnecessary fittings. Composed of a durable structure with clean, fresh lines, this shelf will transform any room. Moreover, the design of the rack can be changed in accordance with the interior of the room.
Action No. 3 Manufacturing the supporting structure
Considering the thickness of the boards from which the rack will be made, it is best to cut them using a jigsaw
1
Any carpentry product has a kind of “base” - a structure to which functional or decorative elements are attached. It is the supporting structure that can withstand all the main loads on the entire product.
2
In the case of a rack standing on the floor, the structure will consist of two parallel boards, to which two crossbars are attached. It is these structural elements that must be connected with maximum strength and reliability.
3
Before you begin manufacturing the supporting structure, you need to mark the material.
The top crossbar is screwed to the vertical posts using large diameter self-tapping screws
4
After all the parts of the supporting structure are cut out according to the drawing, they begin to assemble it. To assemble the supporting structure, you must use thick screws (at least 6-8 mm in diameter); tighten the screws using a screwdriver with an appropriate attachment.
Screwing the bottom crossbar to the vertical posts. In this case, reinforced screws are also used
5
Whenever possible, during installation, end connection options should be avoided, or used only in structural elements of one type (for example, in boards located exclusively horizontally).
Fully assembled load-bearing rack structure
6
To give the rack additional strength, you can add an additional vertical board located in the middle to the structure.
How to make flower pots with your own hands: outdoor, for home, hanging | Step-by-step schemes (120+ Original Photo Ideas & Videos)
DIY rack
As mentioned above, there are different types of racks. But nevertheless, you can make each of them with your own hands. Of course, you will need different tools and materials, but the result is definitely worth it.
Budget rack
Required materials and tools:
- wooden boxes – 7 pcs.;
- sanding machine or sandpaper;
- acrylic paint;
- brush;
- screwdriver
First, let's start preparing the boxes. We process the surface of each of them using a grinding machine or sandpaper.
We paint each of them with acrylic paint and leave until completely dry.
We build a rack, changing the location of the boxes. When you are completely satisfied with the appearance, we disassemble it and connect all the boxes together using a screwdriver.
The result is an original shelving unit. If desired, you can paint it a different color or change the location of the drawers.
Laconic shelving
You will need the following:
- wrench;
- boards of the same size;
- galvanized pipes with thread;
- grinding machine;
- wheels;
- drill;
- flanges;
- couplings;
- metal screws;
- roulette;
- wooden screws;
- drill;
- pencil.
To begin, we place flanges in each corner on one of the boards. They should be set at the same distance, so use a tape measure for more accurate measurements.
Make marks with a pencil on each side.
We put all the boards in one pile. Using a drill and an electric drill, we make a hole in the first two boards, according to the mark.
Using a slightly larger drill bit, we make holes on the remaining boards.
We assemble the structure. To do this, attach the flanges to the surface using a screw. We insert prepared metal tubes into the holes. We install the coupling at the top of each guide. To secure the ties more firmly, use a wrench.
Attach the flanges to the top shelf using a drill and wood screws.
We lay the rack on its side and begin installing the wheels. To do this, we make marks with a pencil so that they are located at the same distance and attach the wheels with screws.
A beautiful, but at the same time simple rack is ready.
Shelf for children's room
Necessary materials:
- rack drawing;
- fiberboard sheets;
- confirmations;
- corner clamp;
- drill;
- drill;
- dowels;
- hammer;
- newspapers;
- white acrylic paint;
- brush;
- acrylic lacquer;
- felt pads.
First, we make a drawing of the future rack.
We purchase fiberboard sheets of the desired size.
We prepare all the workpieces and apply markings where the holes will need to be made.
According to the markings, we make holes in each corner and screw in the confirmations.
We take the longest parts, assemble the outer side of the rack and fix it with a corner clamp. This is necessary so that the structure is sufficiently rigid and does not bend during installation of the shelves.
We select a drill of the appropriate size and make marks.
We also determine the drilling depth in advance.
Only after this do we make holes for the dowels.
Insert dowel markers into the holes. This is necessary in order to make marks on the second part.
We use another shelf as a template. We place it and hit it with a hammer to move the marks.
We make small indentations.
We drill holes for the dowels and hammer them in. We install the part in place and make the first row of the rack in the same way.
We install a long shelf and repeat the same thing to make the second row.
We remove the top part and make shelves for the third row. Reinstall the top shelf.
We disassemble the entire rack into parts. Place paper or newspapers on the work area. We paint the blanks with white acrylic paint.
After drying, coat the entire surface with varnish and leave the structure for a day.
We collect all the parts and attach felt pads to the bottom.
If desired, attach the back wall to the rack.
We install a rack in the children's room and fill it with toys or other things.
How to make bookshelves with your own hands
Bookshelves: drawings, photos. How to make bookshelves: step-by-step DIY
Modern bookshelves not only fulfill their intended purpose, but are also part of the interior, adding zest and emphasizing the design of the room.
You can make bookshelves with your own hands from scrap materials; you just need to use your imagination and have minimal skills in working with wood.
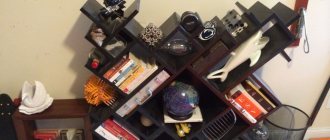
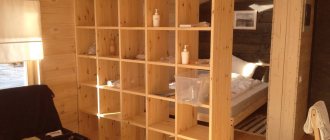
Bookshelves in the interior photo.
Several examples of original book shelves.
How to make bookshelves.
To make a wooden shelf you will need the following materials and tools:
- Chipboard, board or MDF.
- Fiberboard or plywood (if the shelf has a back wall).
- Furniture screws.
- Plastic plugs for furniture screws.
- Edge tape (if chipboard or MDF is used).
- Sandpaper.
- Drill with drill (the diameter of the drill is slightly smaller than the thickness of the screws).
- Knob key for furniture screws.
- Square, tape measure, pencil.
- Fine-toothed hacksaw.
Furniture screws, plugs and key.
Drawing of a bookshelf.
The photo shows several drawings of bookshelves.
Making a bookshelf step by step.
The first step is to make a sketch of the future bookshelf and make drawings. Next, the shelf manufacturing process is as follows:
According to the drawings, you need to cut the material; this can be done with an ordinary wood hacksaw with fine teeth. If boards are used as the material, then sawing them will not be difficult; if the shelves are made of chipboard or MDF, then sawing such material is much more difficult. Things will go faster if you cut with an electric jigsaw, but if you have never held a jigsaw in your hands, it will be quite difficult to saw off smoothly.
Using a tape measure and a square, we measure and mark the cutting lines with a pencil, sawing off strictly along the line. The ends of the cuts must be even.
When all the parts of the shelf are ready, you need to make holes in the side boards for fastening with furniture screws. From the ends of the side parts you need to measure a distance of half the thickness of the board and draw a line with a pencil.
Now you need to make marks on the lines for the holes, retreating 50 mm from the edges of the board for screws. We apply the ends of the boards to the joints, take a drill with a drill, the diameter of the drill should be slightly less than the thickness of the furniture screw, and make holes the length of the furniture screw. We attach the ends of the main boards and drill.
We assemble the shelves with furniture screws, screw in the screws with a multi-faceted wrench, and cover the screw heads with plastic covers to match the color of the wood.
If you used chipboard to make the shelves, then the edges need to be sealed with self-adhesive edge tape to match the color of the chipboard.
If you need to make a back wall for a bookshelf, you will need a piece of chipboard or thin plywood. You need to attach the shelf to a sheet of chipboard, outline the contours of the shelf, cut out the chipboard with a hacksaw and secure it to the shelf with small nails.
As you can see, making bookshelves with your own hands is not at all difficult, and with a creative approach you can make a truly exclusive thing for your interior.
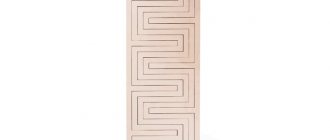
Elegant shelves in the form of triangles
If you are bored with the usual shelves that hang at home, you can move away from the usual banality and make completely exceptional triangular ones. They can be composed in absolutely any sequence and formed into any shape.
Schemes and drawings of shelves for the kitchen
To make anything, even a regular kitchen shelf, you need a plan. A diagram or drawing is already half the battle. Usually difficulties arise with proportions; you can’t always rely on your own eye, so it’s better to use a ready-made, tested scheme.
For example, do you like this cute country style shelf? Interesting solution, right? Cornice with a decorative pattern in the shape of an apple, back wall assembled from clapboard. If you want the same for your kitchen, use this scheme.
Or another option for a beautiful carved shelf in the same style
This collection contains diagrams and drawings of various shelves and cabinets for the kitchen, as well as methods for attaching the shelf to the wall, assembling the bracket and installing the shelf in the bracket. It will also be easier for you to understand the proportions if you have a ready-made diagram
which you can do yourself
You can see all the variety of kitchen shelves in this gallery.
from beer bars do it yourself to the kitchen
Let's look at how to make a kitchen shelf (rack) from glass beer bottles with your own hands. If you already have four beer bottles (or champagne bottles) and two boards, then consider that you have already done half the work. Of course, in addition to this, you will also need inexpensive fasteners, which can be bought at almost any hardware store.
Choose beer bottles with long necks.
The boards for the shelves are sanded and covered with dark varnish.
Surprisingly, these kitchen shelves made from glass bottles are distinguished by their durability, as they can withstand the weight of an adult.
By placing one such shelf on another you will get a kitchen rack made of glass bottles.
See step-by-step photos of the master class:
The source of the photo could not be determined(((
Save
Instructions for making your own bookcases
Now we invite you to consider how to make a bookcase in the interior, as in the photo below.
Indeed, such a rack will be a wonderful decoration in the house. Here the shelves represent the shape of a Christmas tree or tree. Here you can see a diagram of a Christmas tree rack:
The base is made from plywood. Based on this, you can prepare preparations in advance. If you wish, you can change, add or remove something. So, for work you will need an electric jigsaw. Using it, it will be easy for you to cut out all the blanks.
Next, all the blanks should be connected to each other. For connection, PVA glue, nails, screws, etc. are used. Fastening material is used according to size.
To fix the shelves, you need to make and secure these holders.
Important! Before final assembly of all elements, it is important to treat the plywood with an antiseptic composition. Due to this, the wood will be protected from possible destruction.
Moreover, all cut areas should be treated with sandpaper. This will make the rack absolutely safe. The parts can also be painted in the desired color.
= What can shelves be made from?
| made of wood Example: DIY flower shelves 230 | from metal pipes Example: DIY pipe shelves | from PVC pipes |
| made of cardboard Example: Shelf rack made of cardboard boxes | from paper | from plasterboard |
| from glass Example: Shelves in Art Nouveau style 180 do-it-yourself photos | from old boxes Example: DIY drawer shelves 120 photos | from pallets pallets |
| stainless steel | from glass | from old stairs |
| From bars | from bottles Example: | from driftwood and branches Example: Bookshelf made of branches and driftwood |
| made of bricks Example: | from newspapers Example: Newspaper shelf | From cans Example: DIY kitchen shelves: 456 photos, drawings, instructions |
DIY photo of shelves
Read here - Do-it-yourself bar stool - drawings, photos, design choices and video instructions on how to make a beautiful chair yourself
Did you like the article?
0
= Methods for attaching shelves:
| On belts Example: | On brackets Example: Upside Down Bookshelf | On hinges (hidden shelves) or hinged pins Example: Secret door - wardrobe and book shelf |
| On strings | On the ropes | On pins |
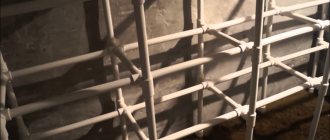
| On clamps Example: Rack of 3 pipes from floor to ceiling. | On perforated guides |
= What types of shelves are there:
| Corner Example: DIY corner shelf 230 photos | Wall mounted Example: Wooden bathroom shelf | Mounted Example: Shelves in Art Nouveau style 180 do-it-yourself photos |
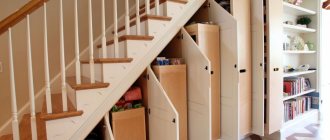
| Hanging | Floor-standing Example: DIY floor shelf in 45 minutes | Under the ceiling Example: Making a shelf for books under the ceiling |
| Shelving Example: DIY pipe shelving: 180 photos, instructions, diagrams | Whatnot | Shelf – Invisible Example: Invisible bookshelf |
Save
Save
Options for attaching shelves from drawers
As you can see, the boxes can be used to create various compositions, and it is very convenient when the design can be changed at will. But even a temporary composition must be fastened somehow, especially if you are making a high floor shelf, then the fastening must be temporary.
To do this, you can use the following options:
- Connect the corners of the boxes with elastic bands or ordinary cords, preferably decorative ones, to make them look beautiful, so that the elastic bands do not come off, make notches at the fastening points.
- If the drawers do not have protruding corners, you can screw in the screws only halfway so that the rubber bands can catch.
- You can also fasten the edges of the boxes with binders (office clothespins); for thick-walled boxes you can make a special recess.
- Or make a small groove along the edges of the drawers that will hold the binder, preventing it from coming off.
In fact, there are many options for using ordinary wooden boxes in the interior. It would seem that the container is also a container network, but if you dream up a little. Of course, it’s all about the decor and placement methods. Not enough ideas? Check out this small selection.
You can come up with something else.
Preparatory work
Before starting the main work, it is necessary to think through the main issues regarding the future product:
- What is the shelf intended for, will it be a simple decoration or should books be placed on it (different, large or small, for reading or for beauty - alas, this also happens).
- What shelf size is needed? Will it be one or two tiers, what should be its length, height, width?
- What is the total weight of the items you expect to place on the shelf? The choice of material from which it is better to make the product depends on the weight.
- Where and how are you going to mount the shelf - on the wall or ceiling?
- It is necessary to consider the design of the structure.
It is difficult to decide immediately on the materials that will be needed during the work, it depends on how you answered the above questions.
For example, if your shelf is wooden, then you will need, first of all, boards. Also get yourself an electric jigsaw or saw, a screwdriver, glue, a sander or sandpaper, and a wood treatment product. It is also necessary to purchase a sufficient number of self-tapping screws, bolts, screws and nails.
Let's start production
After you have decided on the type of shelf and selected the necessary material for its manufacture, you need to create a drawing according to the dimensions of the shelf for books. This will allow you to accurately calculate the amount of material and fasteners required.
The classic bookshelf is a regular rectangle. The instructions on how to make such a book shelf with your own hands are quite simple:
- draw a schematic drawing of the product on paper, determining its dimensions;
- following the diagram, make marks on the tree;
- cut the source material into elements;
- fasten the parts one by one into a rectangle using nails or self-tapping screws;
- Attach fasteners to the rear side walls (to install the shelf on the wall);
- decorate the product if necessary.