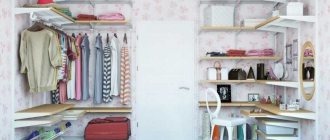
The tradition of having an iconostasis in the house has existed for many centuries. An alternative to purchased products is a homemade shelf for icons. The Orthodox religion allows the use of religious objects to decorate premises. With your own hands, you can make an interior element that best matches the size and color of frames, wallpaper and other surfaces. Let's consider what options exist for choosing the configuration, materials and methods of decorating such furniture.
Shelves for icons + photo
Is it possible to make shelves for icons yourself? What materials are better to choose? Let's try to figure this issue out together. Slavic Orthodox traditions allow the use of icons to decorate living spaces. This tradition testifies to people’s desire for religion and respect for church rituals and traditions.
As a home iconostasis for placing icons, you can consider a corner shelf for icons, as well as various church items. The canons of Orthodoxy suggest the installation of the main icons in the corner or on the eastern wall of the room.
Let's try to figure out how to make corner shelves for icons.
Homemade shelf for icons
By putting love, soul, and heart into the process of creating an iconostasis, you can create not only something useful to use, but also a real design masterpiece. There are many options for making such shelves. But there are certain requirements for them.
Using modern materials and wood, you can make a corner shelf to suit every taste.
Thus, the frames of the images should not overlap. No foreign objects can lie next to them, only things that directly belong to the shrine.
Creating shelves for icons
For work related to the creation of shelves for icons, you need special tools for woodworking: drill, lathe, milling cutter, jigsaw.
The materials needed to make shelves for icons include boards from any wood, pieces of slabs, wax or varnish, silver and black paints, and wood glue. Component materials and hardware require carved slats, a metal or wooden crucifix. Screws and original plugs are suitable as fastening elements. To secure the product to the wall, you need hinges and dowels.
Some of the carved elements can be made with your own hands. For example, start making carved elements and original shelf parts. The crucifix, which is the center of the icon, is made only in carved form.
In addition to such details, the corner shelf for icons should have a back wall in the form of a carved iconostasis. The carving is made with floral ornaments, outlines of saints, and fabulous birds.
To decorate the upper part of the shelf for icons, you can choose the outline of an Orthodox church.
You can cut out bas-reliefs yourself and choose interesting reliefs. To carve a crucifix, you must first select a high-quality sketch, and only after that begin to implement your plans.
The types of wood from which a crucifix can be carved include birch, aspen, spruce, pine, and juniper boards.
Straight single-tier shelving
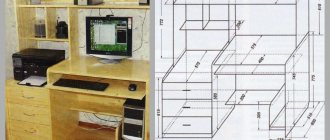
We have prepared the drawing, let's get down to business.
Here is what is useful to create this version of the product for icons:
- transfer the size of the sketch exactly to MDF or chipboard and then simply cut out the templates. It’s not worth using plywood as templates here, because after you cut it out, it’s worth carrying out special processing for it;
- shape each part of the shelf using a jigsaw;
- Then simply carefully process the edges using a cutter and sand them using abrasive paper;
- assemble the product mono only when all the parts have been processed and all the irregularities have been corrected;
- cover the product, when it is ready, with special varnish coatings.
The procedure for making a shelf for icons
On a board, the thickness of which is fifteen millimeters, the outlines, as well as the main contours of the parts, are transferred from a paper sketch to the main board. Next, use an electric jigsaw to cut out the crucifix. Using cutters you need to make convex parts. The carving must be done in layers, carefully highlighting the internal parts with a thin cutter. Once the procedure for cutting the crucifix is completed, you can begin sanding the product, armed with fine sandpaper.
Then the decorative parts are glued together and attached to the sheet of the slab. To remove all excess, you can use a jigsaw or an electric cutter.
Using sandpaper, it is necessary to carry out high-quality sanding of the side of the finished product.
To make beautiful crossbars you will need certain professional skills, as well as certain equipment. After the balusters are made, it is important to carry out high-quality sanding of the product.
For a shelf for icons you will need several parts:
Shelf templates for icons can be made from pieces of wood board.
You will need two side panels for the shelf, and you also need to take care of purchasing high-quality fasteners.
Sequencing
First you need to attach the ready-made templates to the board. Next, the part is formed using an electric jigsaw. The edges are processed using a milling cutter; all irregularities and roughness present on the surface are sanded with abrasive paper. Before making holes, you need to mark them with a pencil. Next, the side panels are prepared using the same algorithm. After assembling the product, it is advisable to varnish the shelf.
Wall fixation
To attach a corner shelf under icons on the wall, you will need dowels. First you need to attach hanging loops to the finished product. Next, the shelf is applied to the wall, and the places where the dowels will be located are marked. The holes for them are made with an electric drill.
How to make and secure a corner shelf
The corner shelf for icons is most often made. Usually it has about 2 - 3 tiers. This is due to the fact that several icons are located in a fairly small space.
A beautiful carved shelf will have to take a long time and be done with great responsibility.
The most suitable dimensions would be a height of 70 cm, and identical shelves 50 cm wide. A product of a smaller size will not be able to accommodate all the church utensils, and a larger one will be very voluminous.
Prepare the necessary materials for the shelf.
How to make a shelf for icons with your own hands:
- assemble pre-prepared panels by gluing or fastening with staples and nails;
- adjust the workpieces if there are any inaccuracies;
- attach or apply decorated elements;
- assemble the entire structure into a whole, attaching parts to each other with nails without heads, glue or corners.
The finished shelf must be firmly attached to the wall to avoid falling due to possible awkward movements. But it must also be removed from its hinges freely for cleaning. The number of loops is calculated according to the scheme 3 pcs. for 1 product.
You can always make the shelf simpler.
For fastening, it is better to choose hardware with hidden fastening. Before hanging the finished product, it is important to check the strength of the installed screws and their resistance to removal from the wall. Then hang the finished iconostasis.
Master Class
Currently, the tradition of decorating your home with Christian icons is returning; even in city apartments you can find a homemade “red corner”, which is often called a shrine. If you choose the right materials for the shelf, it can be made into a functional decorative element of the apartment’s interior. The priests say that icon shelves should be in the home of every believer.
In the manufacture of such products, you can use wood, plywood, polymer materials, and metal.
Depending on personal preferences, shelves for icons can be single-tiered or multi-tiered structures. Icons for the iconostasis can be mounted on a table or placed on a shelf.
To create a three-tier structure, stock up on a hand-held milling machine, a jigsaw, a ruler, a pencil, nails or screws, abrasive material, a hammer, and wood glue.
In order for the shelf to be beautiful and delight its owner for a long period, it is important to carry out preliminary measurements of the width, height, and depth of the planned structure.
To ensure that there are no rolling pins or irregularities on the surface of the shelf, the surface is sanded with sandpaper.
To connect the parts together, you can use nails or screws. For strength, you can also arm yourself with glue designed for wood. You can varnish or stain wood to protect it from high humidity and temperature changes, and also to give the product an aesthetic appearance.
Basically, shelves for icons are arranged in three rows, but there is one main row - deisis. In order for the created iconostasis to be made correctly and reliably protect the apartment and its inhabitants, it is important to arrange the icons in a clear sequence.
The upper part is the deisis, in its center there should be an icon of Jesus.
To the left of her is the image of the protectress - the Most Holy Theotokos, and to the right side is always the icon of John the Baptist.
Ideally, the number of icons is 12 pieces - according to the number of major Christian holidays. On the bottom shelf of the iconostasis you create yourself, you can place any icons that are revered in a certain region.
Location of icons
Adhering to the traditions of the Orthodox Church, it is advisable to equip the structure for the images with three shelves. In such a product there is a main row called Deisis. Compliance with the canons requires the arrangement of holy faces on a shelf in a certain sequence:
- On the top row (Deisis) there is an icon of Jesus in the center, on the left there is an image of the Blessed Virgin Mary, and on the right - John the Baptist. If there is free space, an image of the Archangel Michael is additionally placed on the shelf on the left, and Gabriel on the right.
- Holiday icons are placed on the middle shelf. These are images of the most significant Christian holidays; ideally there should be 12 of them.
- The lower shelf of the iconostasis is filled with the favorite holy faces of the residents of the house; it is usually called local.
The corner design of the shelf is preferable to a straight one, as it corresponds to the traditions of Orthodoxy to place images in the “red corner”.
In the Orthodox tradition, it is customary to have at least one icon in your home. And often there are much more of them and a special place is needed to store them. Church traditions recommend hanging icons on the eastern wall of the house or setting up the so-called “red corner” - a corner also oriented to the east. To install such a reduced copy of a church iconostasis, a special shelf is usually required.
Difficulties in making a shelf
There are no strict rules and requirements for arranging a shelf for a red corner, so you can safely try to make a corner wall shelf for icons with your own hands. However, a difficulty may arise in the fact that such shelves are usually decorated with intricate carvings and openwork balusters. But you can completely do without them or purchase ready-made parts from wood carvers. We will talk about how to make a simple shelf for icons with your own hands and the point that shows cutting out an ornament can be completely skipped.
Making a wooden shelf for icons
Of course, to make this, it is better to take planed wooden boards, since solid wood looks much more noble than, for example, chipboard. Moreover, our shelf is single-tiered, which means it is quite light, so there is no point in making it additionally lighter.
The finished shelf can be painted or varnished for longer service life. Then you just need to fix it on the wall and place the icons on it.
A corner shelf for icons is a necessary item in the homes of Orthodox Christians.
You can also adapt an ordinary shelf purchased in a store to arrange images of saints. But a hand-made icon case seems to be the best for a master.
Traditionally, wood was used to make a corner shelf for icons. It can be a smooth pine board, or valuable wood (bleached oak, cherry, etc.). The appearance of the finished product will depend on the quality of the material.
In the modern world, materials have appeared that imitate valuable types of wood, but their acquisition will not cause difficulties or large financial costs.
Plywood or laminated chipboard are just as easy to process as solid boards; they allow you to make openwork overlays and decorative balusters with virtually no experience or special machines.
In addition to solid wood or sheet materials, you will need:
- jigsaw and hand-held sawing device;
- drill with a screwdriver attachment;
- self-tapping screws, furniture dowel, wood glue;
- sandpaper with coarse and fine grains;
- varnish or paint.
You can develop a sketch of a corner shelf for an icon yourself, using drawings and photos. The dimensions of the product must be chosen arbitrarily, based on the size of the icons and their number.
Corner shelf for icons - a sincere gift and a home-made interior element
Home iconostasis made of natural wood with carved patterns
The tradition of arranging a home iconostasis has existed for more than one century. Although in modern homes icons are often placed on bookcase shelves or hung on the wall, it is best to set up a separate special place for them.
Single-tier straight rack - shelf for icons
A good option would be a hanging shelf, which according to the canon should be placed on the eastern wall of the house. Often such a shelf is made corner, two or three tiers high.
Beautiful wooden shelf for icons in the corner of the room in three tiers
Do you need an iconostasis at home?
Of course, believers need it, because they probably have images of various saints, but it is not always possible to allocate a worthy place for such relics. Icons most often stand in sideboards, on shelves with books, or are completely hidden in a closet. A shelf for icons is not something new and unprecedented for church parishioners. Our great-grandfathers also equipped a small prayer space in their homes. Icons were placed in the corners, decorated with embroidered towels, bouquets of dry ears of corn and flowers.
Within the access zone of any family member there were always small shrines on which miniature images and the Bible, prayer books, candles blessed in the church or bottles of water were placed. There is nothing strange in this, because in the old days people prayed every day in the morning and evening, and it was important for them to have a separate cozy corner for this, where they could concentrate entirely on communicating with God. This special place was a shelf for icons: corner, straight or icon case. Nowadays, more and more people are converting to faith, so these light traditions have become popular again.
Varieties
Shelf for icons “Home mini-iconostasis corner”
In workshops you can order a stand for home icons of any size and configuration, but this is quite an expensive job.
Corner shelf made of fiberboard, made in three tiers
An easier option is to use a regular corner shelf from a hardware store, but this may cause sizing issues. In addition, you will have to look for a model that will “fit” better into the interior. All these difficulties can be avoided if you make a shelf for icons yourself - this is quite feasible even with little experience in carpentry.
Wall-mounted corner shelf for wooden icons
A do-it-yourself icon shelf can have any convenient design. Corner shelves are made single-level or in several tiers. To connect several levels, supports carved from wood are usually used. The finished shelf is often decorated with carvings, openwork overlays, and covered with special carpentry varnish and wax.
Small corner shelf for icons, two tiers
DIY home iconostasis
The right place for privacy
Where is the best place to place the shrine? A straight shelf for icons will not fit into every interior, because it will catch the eye of everyone in the room. If there is not much space in the house and its owner does not have the opportunity to allocate a separate room for prayers, it is better to opt for a corner iconostasis. You can hang it in the bedroom, living room and even in the kitchen, because people often pray before eating. The shelf itself is attached high enough, but not right under the ceiling, but so that you can easily take something from it.
Required materials and tools
To make a corner shelf, wood of various decorative species is used - for example, oak or cherry. A less expensive material would be pine board. In addition to wood, you can also use plywood or chipboard. The thickness of the board can vary from 1.5cm to 2.5cm. You will also need boards of small width in order to carve the supports.
To work you will need the following tools:
Required Tools
To attach the finished shelf to the wall, you will also need masonry drills, metal corners or hinges, and self-tapping screws with dowels.
Wall mount
The corner shelf is secured with dowels. First we attach the loops to the product. Then we attach the shelf to the wall and mark the mounting locations. Drill holes with a drill and screw in dowels.
How is the finished shelf attached?
Location requirements:
- The shelf should hang at or above a person's eye level.
- There should be no paintings or other decorative items near the icons.
- When using candlesticks, there should be no flammable or combustible materials (fabrics, curtains, paper) nearby.
Manufacturing stages
Carved corner shelf for handmade icons with a drawing
Before starting work, you should make a drawing of the project. The size and number of shelves depend on the type of icons that will be placed on the finished home iconostasis. To make a simple two-tier shelf, you will need two 1.5 cm thick pine boards, as well as four supports.
We cut out three parts using a jigsaw according to the template - sidewall, side and bottom
The workpiece is milled using a stencil using special equipment
To turn decorative parts you will need a lathe or take them ready-made
We assemble the shelf - the bottoms are screwed to the turned elements using self-tapping screws
When connecting the sidewalls to the bottoms, the screws should hit the middle of the ends of the bottoms
The sides are screwed on using cylinders - self-tapping screws are inserted into the holes from the bottom, the cylinders are put on, the hardware is screwed into the side
The final stage is coating the finished product with drying oil and attaching it to brackets in the corner
After completion of the work, the finished shelf is treated with stain and varnish. Both colorless varnishes and those that give the board the color of different types of wood are suitable. When choosing a quick-drying varnish, the product is ready for use in a few hours.
Small shelves for icons of different colors - pine, walnut, mahogany
Tradition and modernity
Even in ancient times, when the authorities persecuted Orthodox peasants for their faith, they still set up a revered place in the house for icons. It is also popularly called the “red corner”. As a rule, such a corner was located diagonally from the front door. This was done specifically so that those entering the house could immediately see the holy images, cross themselves in front of them and bow.
This place has always been treated in a special way in the house:
- It was always clean;
- They put flowers there and decorated it as best they could;
- In addition, church candles were placed there and lamps were lit if necessary.
Quite a lot of time has passed since then, but the contents of the red corner in the house have remained virtually unchanged. Holy images are still placed in it. It is also decorated with embroidered towels and both fresh and artificial flowers are placed. As mentioned above, sacred church candles and lamps are also kept next to the icons. It is also customary to store sacred oils here.
But regarding holy water, that is at the discretion of the owner. It can stand either next to the icons or in another place. The main thing is to drink it to strengthen the spirit in the morning on an empty stomach, immediately after prayer.
The best article for you, go to: Public conversations before baptism, interview before baptism
A very important point is the lamp for the home iconostasis. It should be lit during prayer, as well as on Sundays and major church holidays. Under no circumstances should photographs of famous priests, elders and righteous people be placed next to icons. From the point of view of the clergy, this is wrong. Since photography is an imprint of a person’s earthly life.
Decoration
Depending on the complexity of the elements for decorating a shelf for icons, you can make them yourself or purchase them ready-made.
The most common way to decorate a home icon case is wood carving. You can do it yourself using a jigsaw. If you do not have the necessary experience, carved elements can be bought at a hardware store or ordered in a workshop. The finished carved plates are attached to the shelf with wood glue.
Soft wood is selected for carving: birch, spruce, pine, aspen or juniper
Another way to decorate is to burn out the ornament using a special device - for this, you first apply a drawing of the pattern to the wood with a pencil. The shelf can also be painted - special wood paints are sold in construction departments. An alternative to strict monochromatic painting is to apply a pattern to the enamel with paint of a different color.
You can burn out the ornament and then open individual fragments of the image on the shelf with enamel
To further strengthen and decorate the shelf, its back walls are covered with a wooden panel. It can also be decorated with carvings, painted with varnish and enamel.
Shelf for icons with a beautiful back wall
To decorate the upper part of the shelf for icons, you can choose the outline of an Orthodox church
When using a plywood board, these methods will not work - but painting with acrylic paint with the addition of gilding will look impressive on such a panel.
Design options
There are various ways to make stands for images. The main condition is the absence of objects not related to religion. The frames should not overlap each other vertically and horizontally and be placed one on top of the other. It is recommended to provide a place for a candle or lamp. If you plan to purchase new images, then the shelf for icons should have a reserve place for their installation. It is possible to provide the possibility of attaching an additional level.
The following design options exist:
The choice is made based on the layout, interior and size of the room, the number of images and their configuration.
Materials and components
Traditionally, religious items are made from wood and materials produced from it. But there are no strict prohibitions regarding the use of metal or plastic. Craftsmen recommend wood because of its ease of processing and presentable appearance.
To work you will need the following tools:
To protect your hands, vision and breathing organs, it is advisable to purchase fabric gloves, assembly glasses and a gauze bandage.
To make a shelf for icons with your own hands you will need the following materials:
Depending on the choice of finishing method, you may need paint, stain or colored film.
The simplest stand for an icon
A single-tiered corner white shelf consists of only two parts: a corner element and a figured cornice (barma), which simultaneously serves as decoration and fencing.
The figured outline of the cut must first be drawn on paper, then the sketch must be transferred to a sheet folded in half to obtain halves that are symmetrical relative to the center. Using the pattern, draw the outline of the edge and cut out the pattern using a jigsaw. If desired, the corner shelf for icons can be decorated with burning, painting or carving.
To create a pattern for a corner element, you need to draw a right angle on a sheet. Its sides should correspond to the size of the icon, if there is only one, or be larger to accommodate several small images of saints, a lamp, etc.
Having set aside the required dimensions on the sides of the corner, you should connect the extreme points with a straight line. From the resulting triangle, you need to remove the part in the area of the right angle so that the shelf for icons can be conveniently installed on the wall.
Drill holes for the dowel in the edge of the long side of the corner. Part of it should protrude above the edge at a distance less than the thickness of the board from which the cornice is made. Lubricate the dowel with glue and insert it into the hole. Depending on the size of the corner, there may be 2 or several dowels for fastening.
The reciprocal recesses in the underside of the cornice must be drilled so that the holes do not end up through. The connection is made with glue; after gluing, the parts must be pressed tightly together until completely dry.
The simplest corner shelf for icons can be fixed to the wall with metal loops on the edges of the short sides of the triangle. You can nail planks to the wall, on which the corner element will rest. The length of the planks should be slightly less than the sides of the corner so that the cornice does not interfere with the shelf lying flat and horizontal.
A do-it-yourself icon shelf can be painted with acrylic and other paints, coated with clear varnish, or carefully sanded and waxed.
A corner two-tier shelf can be made just as simply. Its difference from the previous version is that the corners are not mounted on the wall, but on shaped supports, which at the same time have an aesthetic function.
The backdrop of such a shelf consists of two identical parts that mirror each other. Their pattern and size are chosen arbitrarily. You can connect them with self-tapping screws or dowels using glue, placing one on the edge of the other and drilling the corresponding holes.
The white shelf for icons can additionally be decorated with cornices. To make other corner shelves for icons, corners with a rounded front part were used. It is most convenient to secure the shelves with self-tapping screws screwed into the edge from the inside of the backdrops. If you need a shelf for icons with three tiers or more, you can increase the length of the backdrops and install another row of corners of any shape and size.
The two-tier corner shelf for icons looks very complicated only in appearance. Making it is not much more difficult than previous options. The drawings will help the home craftsman make a corner shelf for icons with his own hands in a few days, using only a jigsaw.
Thick plywood (8-10 mm) can be used for backdrops; thinner material (3-4 mm) is suitable for overlays. Transfer the decorative design onto a sheet of thin plywood and carefully cut along the contour using a hand jigsaw. Make the base of the backdrops from thick plywood. There should be 2 side parts.
The wooden corner shelf for icons is assembled like this:
- Sand the backdrop details on saw cuts and paint them dark.
- Cut out 8 mm corners from plywood according to the diagram (2 pcs.).
- Varnish the prepared decorative overlays or paint them with golden acrylic paint. Glue to the base of the backdrops.
- Lubricate the spikes on the edges of the corners with glue and insert them into the corresponding holes on the backdrop parts.
The corner shelf for icons is almost ready. Multi-tiered structures can be made in the same way, increasing the number of corner elements.
A self-made shelf for icons, wooden or made of chipboard, will look neat if, after sawing the parts, you process the front cuts with a grinder, chamfering or rounding the cuts.
If such a tool is not available, this operation can be done using a file and sandpaper. The edges can be highlighted by painting them in a contrasting color or gilded.
The peculiarity of a do-it-yourself icon shelf is that it should not be wall-mounted, but corner-mounted, since icons should be placed in the eastern corner of the brightest and largest room.
You can make a shelf for icons from boards, chipboard, or thick plywood. You can also use old wooden shelves, window sills or table tops for this purpose, for example, the top of a desk where your son or daughter once studied.
Or you can buy a suitable board at a hardware store.
Decoration methods
Self-made shelves for icons need finishing and decoration. This will give them a fresh and solemn look that matches the purpose of the products.
There are the following decorative options for stands for images:
It is allowed to combine several finishing methods in one product. The main thing is that it does not look too colorful, overshadowing the image.
Wood carving
Each shelf should have a crucifix. It is made in a volumetric version by carving solid wood. In most cases, such work is entrusted to craftsmen and it is expensive. You can make an Orthodox cross yourself, using a set of well-sharpened cutters. In addition to the crucifix, relief images of domes, images of saints and martyrs, fish, birds, animals and fairy-tale characters are applied to the walls and sides. It is allowed to cut out patterns and bas-reliefs.
Execution of volumetric fragments is carried out in the following sequence:
The crucifix and overlays are glued to the back wall. To do this accurately and without distortions, you should make outlines with a pencil.
Simulation process
Natural wood and good quality metal are not always at hand. Often craftsmen have to improvise to give image shelves an attractive look.
The following methods are used for this:
Manufacturing of parts
You can make shelves for images with balusters under the crossbars. To do this, you need to buy or rent a portable lathe. It is advisable to use a pattern so that the side is made of identical symmetrical fragments.
Do-it-yourself home iconostasis is made in the following sequence:
Finally, the finished product is tried on the wall. Screws are screwed into it, and the shelf is hung on them.
Single tier straight shelving
Shelves of this type are chosen to accommodate a large number of images or if all the corners in the room are occupied. The shelves are hung on the east wall of the room. Even for such a relatively simple rack to manufacture, drawings are necessary. Preliminary planning will allow you to fit all the details with high accuracy and calculate the required amount of building materials.
For a single-tier structure, it is necessary to take boards with a thickness of at least 15 mm. The height of the back wall should be more than 30 cm so that the images do not protrude above it. The iconostasis should be placed at eye level, provided that there are no other bright or decorative interior items nearby. To install a candle or lamp, a non-flammable stand should be provided. In order not to clutter the product with the side, you can run a low threshold along the bottom crossbar to fix the frames.
How to arrange icons in a home iconostasis
According to ancient traditions, the iconostasis in the house should have five rows. According to this, there is an order of icons. It is quite difficult for an incompetent person to take into account all the nuances and the correct hierarchy of holy images. Therefore, there is a clear diagram of a home iconostasis:
- It is recommended to place an Orthodox cross at the very top above all icons,
- It is customary to place an icon of the Savior in the center of the entire iconostasis. It is customary to place an image of the Holy Trinity above it.
- On the right side of the Savior is an icon of the Mother of God. On the sides of the listed icons or above them, you can place other images of saints.
The best article for you, go to: Where do they put a cross on the graves of Orthodox Christians?
As a rule, all recommendations for arranging a red corner state that it should be designed in the same style. But theory is one thing, but practice is completely different. As practice shows, sticking to a single style is quite difficult. Because sometimes they give us icons, or when we go to an icon shop, we choose the image we need, but we don’t need the same design.
In such situations, you should not refuse an intentional purchase. After all, in fact, the framing of the image does not play a big role. The main thing is not to turn your home iconostasis into an interior item. It must be created only with faith in the heart.
The Lord is always with you!
Watch the video from which you will learn about the place of icons in the house: