In order to conveniently store the shoes of all family members, and this usually means dozens of shoes, shoes, boots, sneakers of different sizes and seasonality, you need a specially designated place. In small apartments, such a task turns into a real problem. A shoe rack, the functionality of which is difficult to overestimate, will help solve the issue. You can purchase this device in a specialized shopping center - the variety of models, colors and designs allows you to choose an option to suit any needs. And if you want, you can create a shoe rack with your own hands, which also has advantages - a finished product with a unique design and saving on the family budget.
Kinds
There are shoe racks:
- metal;
- glass;
- plastic;
- from PVC pipes;
- wooden;
- fabric.
Each of these products has pros and cons. But only craftsmen who have enough experience in furniture production can make such shoe racks on their own.
Beginners in this business most often make shelves:
- cardboard;
- from plywood;
- from chipboard;
- fabric.
Since these materials are easy to process and do not require special skills to work with them.
They are also made quite quickly, and the consumables are affordable and not difficult to process. Just what beginners need.
Manufacturing materials
When purchasing a shoe rack, it is important to pay attention to the material of manufacture.
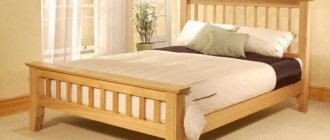
Tree
Wooden options look beautiful, are strong and durable. Cons: high price and sensitivity to moisture. Wooden structures must be regularly treated with protective compounds, otherwise mold and other fungi will appear in the cabinet.
Wooden models are the most durable and reliable
Plastic
Furniture comes in open and closed types. Closed models must have holes for air penetration. Pros: low price, light weight, ease of care and moisture resistance. Cons: quick wear and unattractive appearance. Plastic models look most harmonious in high-tech style hallways.
Plastic furniture is quite cheap, but not durable
Metal
Leader in technical characteristics. Metal racks and shelving are reliable, durable and long lasting. Maintenance is simple - just wipe the surface with a damp cloth. Metal models are mainly made in the form of a bench with lattice shelves. Often the design is laconic, so it is suitable for different interior styles. There are also complex models with forging elements.
Metal shelving is strong, durable and can last for years
laminated chipboard
This is a laminated particle board. The most optimal material for hallway furniture. Pros: low price, moisture resistance, different colors, easy to care for, durability.
The disadvantage of furniture made from chipboard is the presence of formaldehyde resins, which are harmful to health.
This is a persistent stereotype. Class E1 chipboard, which is used to make furniture, contains 10 mg of formaldehyde per 100 g of composite. This amount is absolutely harmless to humans.
Furniture made from chipboard is not entirely environmentally friendly, but is completely harmless to humans
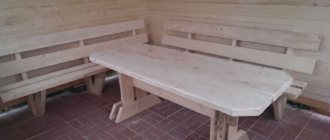
Simple wooden cabinet
Making such an interior item is quite simple. The four boards are connected to each other using furniture screws. Thin wooden planks are attached to the cabinet fronts. Water-based paint is best for painting.
If desired, the upper part can be made contrasting and adapted for sitting.
To make a simple wooden shelf you will need the following:
- two long boards 1.5-2 cm thick and 20-35 cm wide;
- wooden slats;
- saw;
- a simple pencil;
- ruler;
- self-tapping screws;
- screwdriver;
- metal corners.
The operating procedure is as follows:
- Mark the boards with a pencil, indicating the cut lines. For production you will need: two sidewalls of 70-90 cm each, a top, a bottom and several transverse strips of 60-90 cm each, slats (a pair per shelf) of equal length to the sidewalls.
- According to the planned pattern, cut the pieces to the required size. If the cuts are uneven, they need to be sanded with sandpaper.
- Mark the sides for the shelves.
- Secure the metal corners with self-tapping screws using a screwdriver.
- Attach the top and bottom surfaces to the corners.
Note! If you don’t have the skill, you can cut the boards straight in hardware stores and workshops.
In the resulting box, you can either fix the shelves or insert them. The latter option will be more convenient if you plan to wash the shelves frequently.
To protect the wood, the shoe rack must be opened with a special varnish. It can be decorated using colored varnish or stain, and also annealed with a soldering iron.
Shape and size options
Choosing a shoe cabinet for a spacious hallway is not difficult; in this case, the choice of model depends only on the taste preferences of the owner of the house. Not every shoe rack is suitable for a small room or a complexly shaped corridor. Here the emphasis is already placed on the size and design of the piece of furniture. The product is selected in such a way that it is as compact and functional as possible.
For a spacious entrance area, a straight model, which is placed along the wall, is perfect. If there is a shortage of square meters, preference should be given to a corner cabinet. It fits in any free corner, saving space.
Rules for placing a narrow shoe cabinet in the hallway, the nuances of choosing it
Depth
Popular models are called “slim”. These are narrow, deep shoe racks that can accommodate many pairs of boots and sneakers. Most often they are equipped with hinged doors. Their main disadvantage is the inability to store high shoes. The average depth of standard bedside tables is 25 cm. According to experts, for a family of 4 people, furniture with a depth of 30 cm is more suitable. However, in general, the choice is determined by the parameters of the hallway.
To freely place large men's shoes, you should choose shoe cabinets with a depth of 35 cm.
Narrow
Standard
Wide
Height
The height of the shoe racks depends on the number of people living in the house. Low overshoes (up to 50 cm) are suitable for storing shoes of one person. Such models usually have one, less often two, shelves. The advantage of the shoe shoe is that it is not just a bench for shoes, but a full-fledged piece of furniture with a comfortable seat.
Chests of medium height reach 120 cm. They have a sufficient number of shelves for shoes and boots; such models are suitable for a family of 4–5 people. Shelves designed for light shoes should be approximately 20 cm high. To store boots, the distance between the structural elements is made at least 40 cm high. Such models often have drawers for small items and compartments for umbrellas. Manufacturers often offer shoe chests combined with a mirror or hanger.
A high closet for storing shoes is good because you can put boots or sandals that are unnecessary until the next season on the topmost and hard-to-reach shelves. Tall shoe racks come in standard width or narrow, no more than 30–40 cm. The latter are called shoe cases.
Low Medium height
High
Width
The width of standard models is 50 cm. Bedside tables with a seat are made wider - 60 cm or more. The maximum width of shoe chests of drawers is 120 cm. If you need to store a large number of shoes, it is better to purchase two regular cabinets rather than one large one. If the width of the shoe rack exceeds 90 cm, the load on the fasteners increases, which can lead to structural failure.
Standard width 50 cm
Width 60 cm
Width over 90 cm
From scrap materials
Shoe shelves can be made with your own hands from almost any available materials, for example:
- laminate;
- old furniture;
- wooden or plastic boxes;
- drywall;
- plastic bottles;
- pallets;
- shoe boxes;
- piece of tin.
A rather interesting solution is a shoe rack made of fabric, which consists of pockets located vertically one above the other. To make it you need small pieces of fabric and sewing supplies.
The structure is attached to nails and can be easily moved if necessary.
Design and color
In order for the interior of the room to correspond to one style direction, all furniture must be decorated in the same style. Manufacturers offer many options for shoe shelves that are part of hallway sets, which allows you to maintain stylistic unity. Meanwhile, no fewer models can be purchased separately:
- The most common option is the classic style. Shelf models are made from traditional materials, mainly wood. They are often decorated with carved patterns, decorative shapes, and interesting ornaments. Such shelves are most often of a closed type, their sizes are quite impressive, so they may not fit into a small room. Very often, in the classic style, models are made for the hallway with a seat, the upholstery of which is made of natural materials: taffeta, leather, satin. The colors of the furniture are calm, and floral patterns, checks or stripes can be used on textile elements.
- High-tech style is characteristic of a modern active lifestyle. Metal, glass, plastic are the main materials for making shelves suitable for this area. The shapes of the furniture are simple and concise, and the main requirement for it is practicality. The design of the shoe racks is minimalistic. There are no elaborate decorative elements here, so the products are perfect for small spaces. A winning solution would be a tall and narrow metal structure with glossy doors. The color scheme is neutral. The colors can be beige, white, gray, black, but the most characteristic color for the high-tech style is metallic.
- The style used in a rustic interior is called “Provence”. The main manufacturing material is wood. The design of such shelves can be supplemented with a seat with a backrest, as well as hangers for outerwear. Wicker shoe boxes will look stylish. When decorating furniture, wood patterns or shades of aged wood are used. A characteristic feature of the Provence style is the imitation of abrasions on the surface of the products. The seat upholstery can be lavender, turquoise, brown, green.
- Furniture decorated in country style is also made of wood; the main requirement is the use of natural materials. Shoe racks in this style are rough in appearance, with a rough surface and curved lines. A “carelessly” put together shoe rack without doors or a bulky chest of drawers with doors that open wide are characteristic of this style. Metal handles are used, but without shine or pretentiousness. The furniture is decorated in wood tones, although this style also allows for the use of bright colors.
Classic style
High-tech style
Provence Country
To surprise guests with the design of a shoe rack, you can use non-standard solutions:
- A shoe rack made from plastic bottles that you can make yourself will look interesting;
- the rotating shelf is quite bulky, but it can accommodate a large number of shoes;
- made of cardboard - short-lived, but at the same time quickly produced and the most budget model.
There are many options, depending on the imagination of the apartment residents. Not the least role in choosing a shoe rack is its design. Everyone wants this piece of furniture to fit in with the overall picture, so it’s worth choosing a shoe rack to match the style of the room.
Made from plastic bottles Rotating shelf Made from cardboard
From plywood
This is a more affordable alternative to natural wood. It is easier to process, so working with it does not require special skills. At the same time, plywood is heavier than wood and also absorbs moisture, and therefore requires special processing.
From plywood you can make not only a simple shoe shelf, but also a modular shelf. In this case, it will be attached to the wall, which will save space. In addition to sheets of plywood, you will need:
- jigsaw;
- drill;
- perforator;
- hammer;
- pins;
- glue.
The procedure is as follows:
- Cut the plywood sheets into equal rectangles, for example, 20*30 cm, and sand them thoroughly.
- Mark the workpieces by drilling holes at the fastening points.
- Attach the rectangles into U-shaped blocks with wooden pins.
- Connect blocks by nesting them inside each other to form a labyrinth-like structure.
Note! Plywood cracks easily, forming chips when cut.
You can use any number of blocks, depending on the size of the hallway and the number of shoes that need to be stored.
Types of opening mechanism
Manufacturers offer the following types of bedside table opening mechanisms:
- Swing. These models are equipped with doors that open outward. They are attached to the cabinet with hinges. The swing mechanism is considered the simplest and most convenient. However, additional space is required in front of the furniture to open the doors.
- Folding. The doors can be raised or lowered using a lifting mechanism. Low models are usually equipped with folding doors. Often additional shelves are attached to the doors, which allow you to conveniently place shoes and shoe care products.
- Sliding. In demand among owners of narrow hallways. The mechanism is designed on the principle of compartment doors. The doors slide to the side along special guides, opening the cabinet, but only part of the shoes can be seen.
- Retractable. Used in models similar to cabinets with drawers. To properly organize the space in such furniture, you need to purchase special dividers.
All types of mechanisms are equally in demand, while folding and hinged doors are appropriate only in spacious rooms.
The advantages of different types of cabinets with a mirror in the hallway, their design
Swing
Folding Sliding Retractable
From pallets
Shipping pallets are readily available materials that are easy to work with.
You can make a shoe rack from it as follows:
- Disassemble the pallet and cut the strips to the dimensions required for the shelf.
- Assemble the base of the structure, using self-tapping screws to connect boards and 5×5 cm wooden blocks necessary to impart strength.
- From the same bars, form supports at the corners of the base. Fill the space between them with planks, attaching them with self-tapping screws.
- Make the top panel by attaching the horizontal strips to the supports. Place a thin sheet of plywood on top, secured with self-tapping screws.
- Treat the structure with a moisture-proofing agent.
Note! The planks should be fastened in such a way that there are no gaps between them.
Unusual uses of pallets
A pallet is a universal thing; you can do anything with it. One of these products is mini shoe boxes.
To assemble such a product, we perform the following algorithm of actions:
- we disassemble two large pallets into slats;
- we file the parts to the required size and grind them;
- We assemble the so-called mini-pallet from the planks;
- we treat the boxes with special impregnation, water-repellent paint or varnish;
- We install mini-pallets on top of each other.
One box, one pair of shoes. By making a shelf for shoes from pallets, you save time and effort. Since the material for it is almost ready, you only need to make a small adjustment.
Folding
The folding design can be used as additional storage space when there are especially many shoes. It is equipped with a folding mechanism: textile inserts, door hinges, plastic or wooden slats, belts or bolts.
In addition to this, the work will require:
- boards or plywood;
- jigsaw;
- self-tapping screws;
- drill;
- sandpaper.
The easiest way is to use door hinges. With them the process looks like this:
- Cut out a back wall measuring 50 x 100 cm and shelves measuring 20 x 50 cm from the material. Sand the parts with sandpaper.
- Attach the back to the wall.
- Attach the shelves to it using hinges.
- Secure the shelves to the sides using chains or straps. This will keep them horizontal.
A latch is used to secure the folded shelf.
Shoe ladder
A wooden shoe rack in the form of a ladder is quite compact and does not take up much space.
For its manufacture, a ready-made staircase or one made independently is suitable.
When making such an original shelf, the main thing is that the steps are inclined, otherwise the shoes will stain the wall.
Location options
The dimensions of the apartments are varied. Homes with separate walk-in closets make it convenient to store items that are not worn very often. But most apartments are still not large enough to allocate a special room for storing your favorite shoes and boots, so shoe shelves are installed right in the hallway.
In the hall
Small open shelves for shoes in the hallway are usually used to place items for everyday wear. Bench models are best suited for this. They are convenient for placing wet or dirty shoes on. High racks are more suitable for storing seasonal items that are not worn every day, but are periodically taken out at this time of year.
Large hallways allow you to install full-fledged storage systems. For this purpose, it is better to use closed built-in cabinets, which will protect against excessive accumulation of dust and will allow you to place the whole family’s shoe wardrobe. Many users prefer a multifunctional wardrobe, in which, among other things, you can store casual and seasonal clothes. If desired, it can be additionally equipped with retractable shelves and slim systems, which save space and allow you to accommodate more shoes.
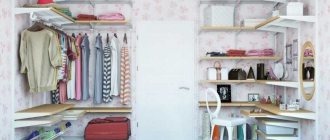
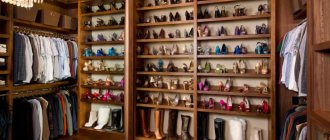
In wardrobe
A walk-in closet is an ideal solution for storing seasonal, holiday and casual shoes. If the apartment does not have a special place, you can allocate a small space in the pantry or large closet for these purposes. The height of the shelves should be different so that you can put both shoes, boots, sneakers and high boots there.
To ensure pairs of shoes are clearly visible, it is recommended to make shoe shelves in the dressing room in light colors.
Open shelves on holders are especially convenient to use. These devices allow you to adjust the height of the shelves depending on your shoe model. To save space, you can also use slim systems and drawers. Special metal mesh shelves allow air to circulate, making the shoes well ventilated. To make finding the right pair as easy as possible, you can install lighting in the closet. Although many manufacturers offer products with a built-in touch lighting system.
Making a shoe rack-bench
Step 1. From wooden boards in accordance with the diagram of the future shelf-bench, it is necessary to cut the shelf elements into appropriate sizes. In this case, you should get several parts - two supports, a seat and a crossbar for shoes, which will be attached under the seat between the two supports.
Step 2. Next, you need to make holes for the bolts from the edges of the seat. This is where the supports will be screwed.
Step 3. Now you need to round the corners - this will make the shelf safer. You need to select some object that will allow you to draw a semicircle of the desired shape. Next, along the drawn line, you need to saw off the corners so that the corners of the seat are rounded.
Step 4. All wooden parts of the shelf need to be sanded. The most convenient way to do this is with a grinding machine. The surface must be perfectly smooth.
Step 5. Next, all the parts of the shelf need to be assembled together using screws or dowels - whichever is more convenient.
Step 6. Now the shelf needs to be cleaned of dust and coated with protective varnish, then let it dry. That's it, the product is ready for use.
Cardboard shoe rack
To make a cardboard shelf for shoes with your own hands you need:
- Cut the box of the required size into two parts;
- seal the bottom;
- using parts from another box, strengthen all the walls;
- cut out the shelves and secure them in the body;
- decorate with paper or film.
The shelf is ready for use.
As you can see, you can make a shelf for shoes at home. At the same time, the work takes little time, and the consumables are affordable.
From cardboard
From strong cardboard boxes you can build a narrow wall structure consisting of individual pockets. For this you will need:
- ruler and simple pencil;
- glue or tape;
- cord;
- decorative material, such as self-adhesive film, wallpaper or fabric.
The manufacturing process is as follows:
- Cut out rectangles measuring 65*60 cm.
- Mark the long side into strips 20, 25 and 20 cm wide. On the short side, draw a line with an indent of 25 cm. This will form a rectangle and a square.
- Cut off the sides of the resulting rectangle to form a T-shaped piece.
- On the wings of the workpiece, set aside 11 cm along the border of the upper side of the square. Draw diagonals connecting the corners of the “T” and the marked points.
- Bend the workpiece along the lines.
Note! To make working with thick cardboard easier, you can use a metal ruler.
Assemble the structure by attaching a square to the rectangle so that the bent triangles turn into sidewalls. Secure with glue or tape. Decorate the blocks and attach them to the wall.
From copper pipes
A shoe rack made of metal pipes can have any size depending on the dimensions of the hallway. For example, in a spacious corridor it can be installed along the entire wall, providing a large number of tiers. To work you will need:
- pipes cut into pieces of the required length;
- metal flanges;
- corners for pipes;
- die for cutting threads.
The working process is as follows:
- Attach the metal flange to the desired location on the floor or wall.
- Apply a die to the pipe threads.
- Build a zigzag structure, the elements of which are fastened with corners.
- Secure the end flange.
How to make a shoe rack with an ottoman
A shoe rack made with a rack can be equipped with a pouf. This should only be done when making the main structure from durable materials like wood. For a soft seat you will need foam rubber and thick fabric for upholstery. These materials are fixed using a mounting stapler.
You can make a shoe rack in the hallway with your own hands if you have a design plan and the necessary materials are available. The resulting product will be distinguished not only by its ease of use, but also by its original appearance.
Wooden shoe shelves
Wooden products, although not the easiest to make, are in any case much easier to make with your own hands than metal shelves.
However, everything will depend on the design project you have chosen and the materials you will use.
If practicality comes first for you, we recommend making a shoe rack with your own hands in the form of a folding bookcase.
This design is compact in size, but at the same time holds a lot of shoes - there are three shelves for them at once.
Due to the fact that the bookcase folds, it is easy to transport (which is important if you move), and when it is not needed, it can be put away on the balcony or in the utility room.
You can find step-by-step instructions for making a folding shoe rack here.
If there is enough space in the hallway, you can make a regular wooden shoe rack with three tiers for storing shoes.
You can put flower pots or some decorative items on the top shelf of the bookcase.
You can make such a shelf from 18 mm thick boards (alternatively, you can use plywood).
The author of the idea suggests using calibrated wooden sticks as legs - cheap and cheerful. You can see the detailed manufacturing process here.
If you like massive designs, we recommend making your own shelf from pallets.
The labor intensity of making such a homemade shelf is slightly higher compared to previous options. But the end result is worth it.
If you are interested in the idea of making a shoe rack from pallets with your own hands, you can read the step-by-step process of assembling it in this article.
From wooden slats
To make a shoe rack from wooden slats, you will need the following tools:
- Sandpaper.
- Screwdriver.
- Self-tapping screws for wood.
- Hacksaw.
- Paint or varnish.
You can get by with slats alone or combine them with bars that will play the role of sidewalls. Let's consider the first option:
- First, measurements are taken and a drawing of the future structure is drawn.
- After this, marks are made on the slats for cutting.
- The material is cut into the required number of modules. You will need four racks for the sidewall, paired supports for each shelf, and the shelves themselves.
- The modules are connected to each other in accordance with the drawing. Work should begin from the bottom shelf.
- The structure is coated with varnish or paint. If necessary, the cut areas are pre-treated with sandpaper.
- After the composition has dried, the shoe rack can be used for its intended purpose.
How to make it yourself
Despite the diversity of the factory assortment, quite often lovers of exclusive furniture cannot choose a shoe model that matches the design for their closet. In this case, you can make it yourself. The undeniable advantage of such a product is its uniqueness. There are several popular materials from which you can build a shelf.
From pipes
To begin with, you will need PVC pipes with a diameter of about 25 centimeters. Each of them is cut with a hacksaw into pieces 30 cm long, so that the result is cells for one pair of boots. The edges of the pipes must be polished until smooth. To hold all the cells together you will need glue. Tape or rope may also be suitable for these purposes. If desired, the pipes are coated with paint of the required color or covered with self-adhesive film. Sections can be assembled in any order, creating any shapes and sizes. For example, you can build a flower or a sun, or simply arrange elements in the shape of a honeycomb. The finished product can be installed on the floor or attached to the wall.
This design is not suitable for high shoes, since the tops of the boots will fall out.
Take a PVC pipe with a diameter of about 25 cm
We measure 30 cm
Cut into pieces with a hacksaw
We process the edges until smooth and paint them.
We prepare the required number of parts
We tighten it with a belt, and the shoe rack made of pipes is ready.
From the boxes
A wooden shelf made from drawers is an interesting idea for storing shoes. The main advantage of this design is mobility. In its manufacture, you do not need to use fastening material. If desired, the drawers can be easily rearranged, as a result of which the design of the shelf can change depending on the mood. In order to make such a model with your own hands, you need to find several boxes, their sizes may be different, and paint the products with paint that matches the color of the interior of the room where this structure will be located. If there are children or animals in the apartment, it is better to fasten the drawers of an improvised shoe rack with screws or even nail them to the wall so that the structure is as stable as possible.
Made of wood
The most difficult thing to make yourself is a wooden shoe rack. To create it, it is recommended to first draw up a drawing, which will greatly simplify the assembly process. It will also be useful to ensure that the product ends up smooth.
Algorithm of actions:
- The work begins with cutting out parts from the prepared material in accordance with the drawing.
- The resulting parts are sanded with sandpaper, treated with a protective agent and decorated.
- To fasten the parts, holes are drilled, and all parts are connected with screws. You can also use furniture ties, metal corners or euroscrews.
- The top shelf is attached last. If desired, you can make a soft seat out of it. To do this, the product must be upholstered with foam rubber and covered with durable material or leather.
- You can decorate a homemade shelf with varnish, paint or stain.
In order for a wooden shoe rack to serve for a long time, it must be treated with a special protective agent that will increase moisture resistance and prevent the product from rotting.
We prepare the drawing. We cut out, sand and process the parts.
We take measurements and prepare the material
Drilling holes for fastening parts
We connect the parts using screws
Shoe rack is ready
From plywood
Working with plywood is in many ways similar to making a chipboard shelf. However, the material has several advantages compared to its main competitor:
- Plywood has better moisture resistance than chipboard. After getting wet, which often happens with “street” shoes, the material will dry out and not deform. Chipboard may lose its shape.
- For many aesthetes, plywood is more visually attractive than chipboard. It is quite often used in its raw form for final repairs.
- Plywood has higher abrasion resistance than chipboard, which begins to crumble over time.
- Large, full-fledged semi-closed plywood shelves (with a backdrop) look best, which are filled with numerous shelves of different sizes in random order.
Made of metal
To make a simple metal shelf, you don’t need to pore over in a forge. Laconic shelves made of thin tubes are very popular in modern interiors. Modules of different lengths are cut out of them, which are then fastened together using fittings (tees, angles).
The edges are sealed with plugs, and the structure itself is fixed to the wall.
Pipes must be coated with a special anti-corrosion compound, which will protect the material from the harmful effects of moisture. You can use special paint with the effect of bronze, silver or gold. This shelf is ideal for interiors in steampunk, retro and loft styles. For minimalism, an even simpler design is used in the form of a “bare” frame. Hooks are attached to its crossbars, on which shoes will subsequently be hung.
Varieties
The design of this product is not limited to several options. The shapes of shoe racks and design features can be both classic and unusual, fully consistent with the Art Nouveau movement. The following varieties are most common in everyday life:
- floor;
- wall;
- shelf-bench;
- rack.
Each apartment owner decides for himself which form to choose, taking into account the size of the room and the required functionality. In any case, before purchasing, you must carefully study the features of each type.
Floor
This is the most popular type of shoe rack in the hallway. Products are offered in a variety of designs with completely different styles. Installation of such models is carried out directly on the floor. Freestanding shelves are easy to move from place to place. It is also quite common to find a shoe stand combined with a wardrobe for clothes. Floor systems can be used to store seasonal pairs of shoes that are not worn for a long time, or for specialized ones, such as dress shoes, that are worn on special occasions.
In order to make the most functional use of a high floor shelf for shoes, it is recommended to put seasonal pairs upstairs, where they will not interfere, and place everyday items below.
The floor design can be equipped with drawers, which helps to quickly and easily remove shoes. It is no less convenient to use slim shelves with a folding door system. Their design differs in that the shelf itself is attached to the door with rotary hinges. Models come in different configurations: hinged, sliding, folding, with or without doors. Floor products can be used both in large and small rooms.
Wall-mounted
One of the shelf options for small spaces is wall-mounted. These are narrow devices of small size for storing different pairs of shoes. They can be hung on the wall at any height. Such structures can be stand-alone or combined with a hanger or rack. There are models that harmoniously combine with a bench or seat. The manufacturing material can be metal, plastic, wood.
The design is most often classic - in the form of a narrow rack, but there are also quite unusual models - vertical, wavy, where each pair of shoes has a separate cell, for example, like the Nest company. In addition, modern manufacturers offer plastic shelf holders, but they are more designed for indoor or summer shoes - flip-flops, flip-flops, ballet shoes, low-rise sandals.
The disadvantage of any wall design is that such a shelf is quite narrow, so it is not suitable for oversized shoes.
Shelf-bench
This look is ideal for those who like to wear comfortable shoes. The design differs in that on top of such a shelf for shoes there is a seat, which can be either soft or hard. The model can be complemented with a backrest, a bedside table or a hanger. Typically, bench shelves for shoes do not have doors, and shoes are stored open. Thanks to this, sneakers, sandals or boots that are worn constantly are ventilated and dry. The dimensions of such furniture are small - it can easily fit into a hallway that is small in square meters. But it should be borne in mind that this design will not accommodate a lot of shoes.
An interesting design solution would be a shelf-bench with a removable fabric cover that will protect your shoes from dust. If desired, it can be removed and washed.
Rack
The structure of the rack is similar to the previous version, but differs in dimensions. This shoe rack is usually quite high, which allows you to fit quite a lot of shoes. The top of the rack can be used as a place to store gloves, hats and other small items. The designs are:
- open - provides quick access to the desired pair;
- closed - the doors prevent dust from getting inside.
In addition, inside they can be equipped with horizontal shelves or separate cells designed for one pair of shoes. The number of tiers can vary from two or three to ten. The depth of any rack is quite narrow, so it will not take up much space.
From boxes
This may seem surprising, but quite strong, wear-resistant furniture can be made from thick cardboard. The only drawback of this material is the lack of protection against moisture, which cannot be compensated for in any way.
A structure is assembled from several modules, which are cut out of boxes. Each part is manufactured separately.
A piece is cut off from the box along with the bottom. The height of the module will be equal to the depth of the future shelf, since it will be located horizontally (i.e., the bottom will “look” at the wall). Each part is covered with a second layer of cardboard to give additional strength. After all the modules are ready, they are connected to each other, placing them on top of each other.
It turns out to be a compact bookcase. Since the cardboard surface has a rather unsightly appearance, it is additionally covered with paper.
Made from PVC pipes
A shoe rack made of PVC pipes is quite simple to make. To work you will need the following tools:
- Special knife for cutting plastic.
- Glue.
- Pipes.
The structure will have a “honeycomb” shape. This shelf is assembled according to the principle of a designer: it is convenient to add new modules to it and easily give it the most bizarre configuration. The pipes are cut into pieces of equal length so that the shoes fit. Then these models are connected to each other by gluing them on their sides. The finished structure can be coated with paint or pasted over with any available material.
Even not very clean shoes can be placed in a PVC shelf, since the material, unlike wood and metal, is not susceptible to moisture.
Photo of DIY shoe shelves
Read here - Do-it-yourself chair bed: step-by-step description of manufacturing. 140 photos and video master class on building a stylish and comfortable chair
Did you like the article?
1+
Round rotating cabinet
Making a round rotating shoe rack is not as difficult as it might seem at first glance. For work you will need sheets of chipboard or plywood at the choice of the master. You need to make several preparations:
- Round for shelves.
- In the form of rectangles for internal cross-supports on which the entire structure will be supported.
To carefully mark circles on a sheet of material, you can use a special compass or use the old “old-fashioned” method using a thread, which is fixed in the center of the future circle, and then the outline of the figure is traced with a pencil attached to the other end. Uneven cuts should be sanded with sandpaper or a sanding machine.
After this, they are decorated with edge tape, which is glued using a hot iron.
Then the rectangular elements are connected to each other, forming crosses. The number of these parts depends on how many spaces there will be between the shelves, that is, on the number of storeys of the shoe rack. Every two adjacent circles are connected using crosses. Work begins from the lower tier. Finally, a special rotating stand mechanism is attached to the bottom.
DIY corner cabinet
To make a corner cabinet, it is better to use plywood, chipboard or wood. The shelf will have backdrops, from the connection of which work on assembling the structure will begin. You also need to cut two identical parts for the tray and lid.
It is better to smooth out concave areas and make them semicircular. You will have to tinker with cutting the material, but the result is worth it.
Soft, wavy lines are suitable not only for the Art Nouveau style, but will also organically blend into any modern or classic direction. The lid and tray are connected to the sides, after which they begin to work with filling the shelf.
Original ideas for storing shoes
If there is not enough space in the hallway of your home to compactly place floor shelves or cabinets, you can go the other way - make wall-mounted folding shelves.
You can make such “organizers” for shoes from scrap materials: scraps of furniture board, boards, plywood. Alternatively, you can disassemble old furniture made of chipboard, cut out blanks of a suitable size, and then assemble shelves for shoes.
The basic tools you will need are an electric drill (for drilling mounting holes) and a jigsaw.
The author made a storage system of four shelves, each of which has three compartments. That is, you can store 12 pairs of shoes. But if necessary, you can increase or decrease the number of shelves.
Another interesting option is a shoe rack made from pipes for installing a water supply system.
This design has several advantages:
- ease of assembly;
- reliability;
- durability;
- not afraid of moisture;
- light weight.
A shelf made of polypropylene pipes is the simplest option for storing shoes. To make it, you don’t even have to use a soldering iron for polypropylene - you can get by with glue.
Despite the external flimsiness, the structure is quite stable.
You can also make a shoe rack with a seat from an unedged board. A rather unusual and original design is a good option for a rustic-style interior.
The frame is made of square profile pipes, the shoe rack is made of round pipes (and in this case, both metal and plastic pipes can be used).
Indoor shoes must be stored separately from street shoes. And that’s why we recommend making a simple wall-mounted slipper shelf for storing slippers.
The design is quite compact, and also foldable. Designed for three pairs of slippers. It can be made from scraps of plywood, chipboard or boards.
And here is another rather interesting option, but for street shoes. We advise you to take note of this idea.