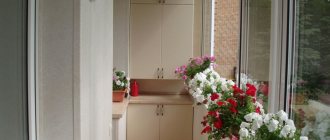
Options for sandblasting patterns for sliding wardrobe mirrors, photo examples
A mirror is considered an essential attribute of every apartment. Not a single woman can live without it, and the same can be said about men. You can look at the sandblasted pattern on the mirror of the wardrobe in the photo to understand how it allows you to diversify the interior and add a touch of originality to it. To choose the right decor, you need to know how it is applied and what varieties are available in modern production.
What is
The placement of such decor on wardrobe doors makes them unique and exclusive. Drawings for each case are selected individually, in addition, you can use ready-made catalogs. Modern processing devices allow you to apply decor in the form of trees, animals, landscapes and people to the surface of the mirror.
The essence of the technique is to use a special apparatus to apply an image, which is included in the program, to the surface of the mirror. The treated surface is characterized by durability and strength. Drawings significantly change the appearance of the room, adding originality and plot to it. It is worth highlighting the main advantages of this work:
- large selection of aesthetic images;
- resistance to abrasion and ultraviolet radiation;
- the presence of a sandblasting pattern on the mirror of the wardrobe, a photo of which can be seen in this material, gives the product dirt-repellent properties;
- the treated surfaces are environmentally friendly for human health, so patterns can be used in children's rooms;
- doors with a pattern are moisture resistant - they can be placed in rooms with increased moisture;
- Due to the availability of work, any user can order sandblasting drawings.
When ordering work with the mirror surface of cabinets purchased in advance, make sure that the mirror fits neatly into place. For this purpose, special fasteners and glazing beads are used.
Varieties
Today, sandblasting mirrors involves the use of several types of artistic work. The very essence of the process is that a jet of abrasive particles under high pressure is applied to the surface of the material. She draws an image according to a given stencil. This is how mirrors are matted and subsequently pictures are formed. Let's highlight the popular types of work:
- mirror with matte pattern. In this case, the background of the image is not painted over, that is, the owners can easily see their reflection. The design itself, made on the stencil, is covered with abrasive substances;
- matte mirror with a transparent pattern. Craftsmen sandblast most of the surface of the mirror. The drawing remains transparent: only small parts of the reflection are visible;
- bronze mirror with sandblasting. Bronze paint is used for matting. This option is perfect for classic interiors, where the decoration is done in brown and beige tones;
- matting the entire surface to varying degrees. The finished stencil is painted over with a jet under different pressures. Some areas of the drawing are painted more than others. In this way, you can highlight individual details of the picture;
- deep sandblasted patterns. To do this, first the entire surface of the mirror is matted, after which a stencil is pasted and with its help three-dimensional images are applied, creating a 3D effect.
Drawing a drawing of a cabinet in the Compass 3D program
We will not fully study its capabilities, but will analyze only those tools that we will need directly to create a cabinet diagram. Now you will be surprised how simple it is.
So, launch the program and click the “Create” button, then “Drawing”. A new document appears in the window that opens, on which we will draw. Since we will be drawing on a modified scale, we need to start not on the sheet itself, but in any empty space, and then we will simply transfer it to the sheet and print it.
First we need to display the cabinet view not from the side or top, but from the front.
Drawing cabinet dimensions: procedure
- You need to start from the top border (the roof of the cabinet). In the “Geometry” panel, select the “Segment” tool and start drawing a line - in the free area we set the beginning of the segment and enter the required length of the segment (in centimeters) from the keyboard, and press “Enter” twice - the segment is ready.
- Using the same principle, we draw the lower border, which can be measured using the “parallel straight” tool - this is a conditional line that can then be deleted.
- We select a parallel line, indicate our segment and enter the indent distance from the keyboard (we set all numbers in centimeters) at which this parallel line should be located from the segment, then “Enter” twice and the conditional line is ready.
- Now, using the “segment” tool (having previously enabled the necessary snaps), we draw the remaining sides, and we will get a rectangle - these will be the external dimensions of our cabinet.
- Next, we will draw sidewalls with a thickness of 16 mm on the top, right and left sides. We select the same “parallel line” tool and make an indent of 1.6 cm inward from the borders, on the top, left and right. We draw lines along the conditional line using the “segment” tool. The cabinet sides are ready.
- Using the same principle, vertical partitions, shelves, drawers and other cabinet parts are drawn.
I think you already understand that “segment”
and “parallel line” are the two most important tools with which drawings are created in this program.
But to create a full-fledged drawing, you will need other tools, which we will discuss below.
Toolbars of the Compass 3D program
Geometry panel
- “Segment”—draws a segment (you can select the line type in the “style” property). You can also use a segment to measure the required distances for yourself.
- “Parallel line” is a conditional parallel line at a given distance from a segment. There are two modes - one or two lines on opposite sides of the segment.
- “Perpendicular straight line” is a conditional line perpendicular to the segment.
- “Circle” is a circle along a given radius.
- “Arc” is an arc along two or three points, as well as an arbitrary arc.
- “Fillet”—rounding a corner along a specified radius.
- “Rectangle” - a rectangle is immediately drawn (you can use either pre-created parallel straight lines or specified dimensions from the keyboard).
- “Equidistant curve” is a tool similar to a parallel straight line, but along a curved or rounded segment.
- “Fill” and “Hatching” - you can fill with a gradient or shade the desired area.
Features and Benefits
This kind of “tattoo” for a wardrobe will harmoniously fit into any type of interior, from baroque to classic, from avant-garde to modern hi-tech. Before the application itself, you should carefully select a high-quality material, a sketch of the future design, process it using special computer programs, and apply it to a perfectly flat, mirror-like surface.
A sliding wardrobe with sandblasting is an individual project that has no analogues. A combined version with sandblasting and elements of stained glass art will look harmonious in a classic, avant-garde, Provencal style. Unique effects will be provided by glass engraving, as well as models of finished facades, complemented by original lighting.
Sandblasting also has the advantage of protecting metal surfaces from corrosion and rust. It greatly increases the performance characteristics of the structure and provides a huge degree of protection for the treated surface. Using this method you can design the most complex areas of mirrors and be sure of:
- increased image durability;
- resistance to moisture, sunlight, temperature changes;
- unlimited selection of images;
- incredible sculpture effect, 3D effect with proper lighting of built-in lamps;
- the highest uniqueness of the work of masters based on sketches;
- the ability to adjust the pressure force of the air stream, obtaining unusual images;
- affordable price, which is much less than such techniques as Tiffany;
- impossibility of erasing, peeling off during operation;
- prompt drawing of any complexity;
- environmental friendliness of the selected technology;
- easy maintenance, removal of dust and other contaminants.
In what section should the cabinet drawings be shown?
For comfortable assembly, as well as to measure the dimensions of parts that will need to be indicated in the specification for cutting, the following views will need to be displayed on the drawing:
- Front view - from here we will take the length and width of the cabinet parts for specifications, and also, using the “Auto Size” tool, we indicate here the dimensions on which shelves and partitions need to be mounted. You should not indicate the dimensions from shelf to shelf, they will not give you anything, show the dimensions from the edge of the part and directly to the attachment point (this should be the middle of the perpendicular chipboard).
- Side or top view - in this drawing we must display the overall depth of the cabinet, as well as the depth of the internal shelves and all other contents, drawers (this should be done with a different type of line - for example, a dotted line or a thin line).
We also show the curly shelves here and indicate their size and rounding radius.
If a shelf or any other part has a complex geometric shape, then it is drawn separately and all the dimensions necessary for cutting are indicated.
In fact, this whole procedure is ordinary drawing, the material of the eighth and ninth grade of school.
In general, do it so that you can understand your drawing yourself. Imagine how you will attach this or that part, and what dimensions you will need to fix it.
Here's the cabinet drawing I came up with:
Direct download link: Download wardrobe drawing
If you are planning to make another sliding wardrobe for yourself, you can view other assembly drawings of cabinets
Contents of previous and subsequent episodes of the project:
What it is?
A wonderful solution for decorating a mirror for a wardrobe is a sandblasted pattern. It can be performed, among other things, on glass. The application method is quite simple, but requires the intervention of specialists, provided that you want to get a real artistic painting in the bedroom, living room, etc. Any print can be obtained thanks to the action of a strong stream of air, which is pre-mixed with quartz sand.
Sandblasting technology for applying a design to a furniture set is one of the most popular decorative methods. Using it, you can obtain different levels of frosting of glass by changing the pressure and size, grain size of the sand itself. There are only two varieties of this pattern - matte on a mirror surface, and vice versa. Often, in-depth printing of images is used, which allows you to get a voluminous, beautiful print on the front side of the mirror.
Utility "Astra Furniture Designer"
Allows you to design furniture efficiently and quickly, using tools that make your work easier.
Mastering the program is not difficult, since it contains standard tools that you could use when working in other similar products. Using this editor, it’s easy to draw a wardrobe and other furniture elements from pre-prepared parts.
A prerequisite for a professional designer is the ability to view the project from different angles. The program developers provided the possibility of using three projections: plan, front and side view. It is also proposed to immediately place fasteners to facilitate the creation of furniture. Fasteners can be taken from a growing library, or edited manually.
Application nuances
Decorating a wardrobe with a sandblasting pattern is carried out in several stages:
- choice of pattern;
- creating a stencil;
- preparing a mirror base;
- securing the stencil;
- sandblasting the surface using air pressure;
- coating the finished drawing with varnish.
Features of sliding systems for sliding wardrobes, their varieties
Thanks to the versatility of the technology, you can select a design of any complexity - from simple elements to entire compositions. Sketches in the Japanese style are widespread, as well as floral designs. To create a stencil, you can use a ready-made photo of a sandblasted pattern on a wardrobe mirror, taken from the manufacturer’s catalog or on the pages of numerous thematic resources. The sketch can be left in its original form or changed according to personal preferences. To create an exclusive stencil, you should use the services of a designer.
The template is made of special film, plastic, and thick paper. The material must be of high quality in order to accurately convey all the outlines. You can create a stencil manually or using a plotter.
To fix the stencil on the mirror, use a temporary adhesive film. Surface treatment is carried out by professionals using a sandblasting machine. During the process, the abrasive substance and the intensity of the air supply change. Upon completion of the work, the finished drawing can be painted with special paints and varnished.
Sliding wardrobes with sandblasting can be installed in any room. This decor is durable and strong. Despite this, instead of aggressive compounds, you should use a soap solution or liquid detergents. Careful care will preserve the original appearance of the furniture and extend its service life.
Camera for sandblasting mirrors
Universal technology allows you to select a pattern of any complexity
At the final stage, the finished drawing can be painted with special paints and varnished
Combination of facade materials
In furniture design, composite elements and combinations of surfaces are used. Chromed plastic is combined with ornaments on glass, polished wood with mirrors and patterns, laminated chipboard with photo printing.
Before choosing a wardrobe, you need to determine the harmonization of the materials of the body and facade with the overall style of the apartment’s interior. Not every surface is suitable for photo printing.
Glass, mirror, plywood with laminate, MDF and fiberboard, and metal are suitable for ultraviolet application. Vinyl film can only be applied to a smooth sanded surface, so untreated wood is not suitable for decor from the photo. The silk-screen printing method can be used to decorate a façade made of dissimilar materials.
Elite built-in wardrobe with a photo of a beautiful girl's face on the facade of three doors
Interior design ideas
Some interesting ideas for designing compartment structures:
- A facade with 4 doors can be decorated with a symmetrically placed strip in the middle of the panels. The insert will divide the surface into equal zones, decorated with floral patterns or without decoration.
- An interesting way to decorate is to draw stripes of different widths in one part of the door or along the entire panel.
- The combined elements on the doors look elegant, combining inserts with patterns, mirror and matte areas.
- Colored sandblasting with a golden tint looks equally good in a classic interior, Provence style and any other style.
Sliding doors with a sandblasted pattern will complement the facade of the closet in any room. The high quality of the pattern ensures the preservation of the finish for many years. Proper cleaning will keep the canvas in its original condition.
Sliding wardrobe 2021 – smooth façade is trending
If we talk about the popularity of certain models, then today the trend is a completely smooth matte facade. However, if this option seems too boring and restrained to you, you can add beautiful decor to it. These can be parallel lines in the horizontal direction, they will divide your wardrobe in the very middle, you can divide the doors into identical rectangles or create a small geometric pattern.
Advice! The 2021 wardrobe with a simple and smooth facade can be placed in any room, not only in the hallway or bedroom, but also in the living room, office, and dining room.
Interesting cabinet model with laminate fronts
Sophisticated and elegant white cabinet with wood accents
A special trend is the inconspicuous (hidden) wardrobe 2021. This is considered the most fashionable option today. The structure of the model, invisible to the naked eye, is created by the facade, which imitates the covering of a wall.
The cabinet can be finished with mirror, wood or plastic panels, even covered with wallpaper, but a minimal number of seams will make these surfaces look like a wall in any case. The design depends only on the style in which the entire room is made.
On a note! Using the sliding design of the doors, you can store your personal belongings even in the front living room, saving space. At the same time, the interior design will not suffer at all. Only your family members and closest friends will know about the presence of a wardrobe in your home.
Built-in hidden furniture set
Black, gray and orange will be in fashion in 2021
Application technology
The method of applying a sandblasting pattern to a mirror surface involves the use of a special stencil that covers a certain part of the mirror. At the next stage, it is necessary to treat the open area with fresh air, which contains a large percentage of quartz sand. From this moment on, all unprotected parts will acquire a matte texture.
You can choose a pattern for your interior in accordance with ready-made samples, patterns of the company or store you contact. It is possible to prepare individual sketches, the most non-standard images, which are so easy to implement with the help of professionals. You can paint individual sections of a wardrobe mirror using this method, create laconic patterns, or completely fill the available space. Pop art prints, floral motifs and any curly designs will always look great on cabinet doors.
You can place such art not only on a wardrobe, but also on a separate mirror, dressing table and other furniture with transparent surfaces. Exquisite matte images can be simple, strict. Fantasy themes, original national patterns, oriental motifs, etc. look great on glass. You will also be able to depict a real plot that will add zest to the interior of a classic, avant-garde, or retro style. Create a real illusion that visually increases the space and brings a special mood to the overall ambiance of the room.
Cabinet drawings. How to draw a closet with a pencil step by step
If I move a stack of sweaters from place to place thirty times a year. If I can't find the skirt I need. This means one thing - the closet is not thought out. Let's draw again! And in order not to make any more mistakes, and especially not to throw money into the abyss, I wrote words about how to come up with each person’s own dream closet. For work projects, I draw cabinets down to the last cubic centimeter. Together with our customers, we seriously discuss every storage system in their home.
It doesn’t matter if it’s a closet or a dressing room, a small pantry or built-in shelves in niches. All cabinets are made at the factory. The algorithm is simple: I prepare sketch solutions, then surveyors go to the house or apartment.
Next, the designer develops a storage system in accordance with the selected materials and filling of the cabinet. Then we coordinate again, sign the drawings, send them to work, wait, receive and rejoice at finding happiness. But what if it is impossible to ask for help from professionals, and there is no hope for a manager in a furniture salon. Everything is quite simple here. Carefully study the presented images and follow the instructions. In the future, this lesson will help you create an individual design for a wardrobe for clothes, books and much more.
Let's take the picture below as an example. Without exaggeration, such an instance can be found in every apartment, and sometimes more than one.
This is due to several reasons: - Firstly, practicality and convenience.
Now there are many programs for correct and accurate calculation of any type of furniture with dimensions suitable for your home. Furniture design programs are designed for semi-automatic design of models. This is not just a tool for the furniture maker or professional assembler. In fact, any person who has decided to furnish a house or apartment with their own hands will be able to use this software to create a project of any furniture, for example, draw a cabinet the way you want, or design the entire kitchen.
In such a closet you can place a bunch of interesting and varied things: hide them from prying eyes or, on the contrary, put them on public display. For example, surprise your guests with some unusual collection of toys, figurines, etc. And there is nothing surprising in this! A closet, like many other things, can clearly show what a person has achieved in life. Some people store books, clothes in it, or even put a TV in a special niche.
In general, there are many options. It all depends on the taste and personal preferences of the owner. Of course, when you come to visit a friend, you shouldn’t immediately run and look through his closets. This is somehow impolite, ugly and may well arouse suspicion. You don't want to look a little crazy.
Therefore, it is better to wait a while, well, at least minutes. It is possible that your friend himself will want to demonstrate the decoration of his own home. Agree that such a development of events is not excluded. But we have moved a little away from the main topic. Let's get back to our tutorial on drawing a cabinet for beginners.
By the way, then you can contact, for example, a specialized company for the production of custom-made furniture and order yourself an original cabinet based on an individual project. Below we will look at a cabinet not only with books, but also with other decorative elements. To do this, you need to count the number of walls and shelves, as well as decide on the appearance of the structure.
Here you can experiment and give free rein to your own imagination. Let it be, for example, photographs in frames, books, vases, jugs and other interesting vessels. In general, there is no difference! Post whatever you like. The main thing is to decide what exactly you will use your closet for and what you plan to store on its shelves.
It should be a little darker than the others because it gets less light. It's best to start adding shadows from this part. Be sure to follow this point, otherwise the future cabinet will not be as attractive as you expected. For greater clarity of the drawing. Carefully correct the contours, but do not overdo it, so as not to accidentally erase something unnecessary.
What to do next?
Calculation of the overall dimensions of the wardrobe
Decide for yourself. But, as mentioned earlier, you can safely go to the store with your drawing. Show it to the seller and demand that they make you exactly the same cabinet! Agree, a thing that you were personally involved in creating is very nice.
Few people would refuse to be the designer of their own furniture. Using a similar scheme, you can create not only an original wardrobe, but also, for example, a table, bed, chair, or even a project for a private house or cottage. My secret.
Your email will not be published. Leave this field empty. How to draw a wardrobe. Corner wardrobe in the hallway!
In general, the drawing needs to show two main views: Front view Side or top view Front view In this sketch, to indicate the size of the width and height of the sliding wardrobe, as well as the height of the cap, the width of the section and the distance between the shelves, the size is set directly at the attachment points along the length side wall. Top or side view In this sketch, which will display the estimated depth of the cabinet, as well as the depth of the internal shelves, which, by the way, must be at least mm.
On a piece of drawing paper, use a simple pencil to draw a rectangle. We mark the shelves in the rectangle with horizontal lines. We mark the cabinet doors with a vertical line in the middle. Using a light gray felt-tip pen, you can use oblique strokes to show the reflections of the glass cabinet doors. There is only one answer: you need to prepare and draw the closet yourself. Photo of the cabinet. Completed project by Oksana Panteleeva’s studio It doesn’t matter what type of wardrobe or where you plan to put it, the main thing is that it meets the objectives: convenient storage and quick search for things. 10 steps to draw the perfect wardrobe.
I divide the closets according to this principle: The closet is common for husband and wife. A closet just for him or just for her. Children's wardrobe. The closet is shared by the whole family. Wardrobe for outerwear only. Wardrobe for all clothes, excluding outerwear. Wardrobe with mezzanines or without mezzanines. Sort all items for storage. Throw away everything unnecessary. Read Diana's full article about love for space on the blog. Step 7. Think about how blankets, pillows, and large out-of-season items will be stored.
Step 8. Think about where we store suitcases and large bags. We are different. When possible, I prefer a separate shallow closet just for shoes over all options. The standard size of hangers is cm.
Part I. Person: It is important to know how much space a person takes up on average when: trying to reach the top shelf of a closet, or looking for something on the lowest one, or if he stands on a stool. Look at the illustration: I redrew the pictures from textbook E. Part II. Clothes: We measure all clothes. This is a great and smart article.
As a result, she ended up with this drawing: The drawing is conditional, it is not a guide to action, but a basis for further work. Wardrobe for individual execution. Today we had a conversation on a super topic: how to plan and draw a closet yourself.
You have learned: 10 steps that you need to go through to achieve your goal - a good, comfortable wardrobe. We received a visual aid in the author’s unique illustrations by Oksana Panteleeva. We were inspired by beautiful drawings and tips. Postscript: This article received its second edition this year. We draw a cabinet with a pencil in several stages. Stage 1 First of all, create a template for the future cabinet. That's all. You drew a beautiful closet yourself.
Believe in your strength and don’t be afraid to create beautiful things! Interpretation of the dream amputation in dream books. Profitable business: how to open a sawmill. Why do you dream of a dead uncle alive? Why do you dream about Lava in a dream, what does it mean in a dream book to see Lava? Rose, Rosalia. Meaning of the name Rose. You can draw a drawing by hand, but this is not very convenient in terms of measuring details, and it will be more difficult for you to calculate different distances and indentations.
I will make the drawing in the Compass 3D program.
This is a product of Russian developers, the program is very easy to learn and will not require much effort and time from you. We will not fully study its capabilities, but will analyze only those tools that we will need directly to create a cabinet diagram.
Application technology
There are several techniques for applying a pattern using sandblasting:
- Sandblasting matting. First, the stencil is applied to the surface. The motif for it is chosen from manufacturers’ catalogs or made individually. Under pressure, the mixture with quartz sand is sprayed onto the working surface, leaving a matte mark underneath. This type of processing allows you to obtain a clear image with smooth edges. Deep matting is used for three-dimensional drawings with a 3D effect;
- Artistic matting. It differs in that the pattern is applied unevenly, due to which the surface becomes heterogeneous. This gives the image life and naturalness.
Amalgam technique
To achieve a noble translucent surface, the design is applied on the inside of the canvas. The mirror layer is removed by sandblasting, and a matte image appears in its place.
The design is applied on the inside of the canvas.
Colored matte finish
Color matting. Dyes are used here to apply the image. By using deep matting, you can achieve interesting artistic effects.
Colored surface matting.
Rules of care
Mirror inserts require careful care. After processing, the structure of the material becomes thinner and becomes brittle. Glass parts are afraid of sudden temperature fluctuations. If you plan to transport it during the cold season, you will need to prepare packaging in advance that can maintain the optimal temperature, this will protect the canvas from cracks. After transport, the doors should only be unpacked after a few hours.
https://youtube.com/watch?v=d362MXcUsYo
Expert opinion Bashir Rabadanov Technologist at the furniture company Woodband
Regular cleaning of dust is sufficient with a damp, thin cloth. All manipulations should be carried out slowly and carefully. For thorough cleaning, non-aggressive compounds or regular soap solution are suitable. Surface treatment is carried out with a cotton rag and foam sponge. It is recommended to buy proven detergents from well-known manufacturers. The use of alcohol solutions, gasoline, acetone, powders, and alkali is prohibited.
Popular prints
The doors of sandblasted wardrobes are decorated with different types of prints. Drawings on the mirror can cover most of the surface or be done laconically on part of the glass. Common patterns when decorating surfaces:
- pop Art;
- floral motifs;
- abstractions;
- foreign motives.
Abstraction
Sandblasting patterns with abstractions are universal, suitable for different types of premises, and can be done in monochrome or with contrasting combinations of shades. The apartment features optimal images of water, the surface of a lake with iridescent shades, stone, flowers, and trees. Drawings allow you to refresh the interior and add variety to the typical environment.
For bathrooms and bedrooms, images of bamboo, reed leaves, and solid wood are optimal. The design will highlight Provence, country, and Scandinavian styles.
For abstractions, smooth lines, rounded outlines, and shade transitions are used. Clear contrasting color combinations and complex chaotic patterns are not recommended. Calm color combinations will create an accent in the room and visually expand the space. Abstractions are not suitable for office spaces and a study made in a strict classical style.
Floral motifs
Sliding doors with a sandblasted pattern with plant motifs are popular in the design of living rooms and bedrooms. Floral images, openwork leaves and vines on a mirror or glass help decorate the room. By using similar shades and lines in the decoration of other pieces of furniture, a harmonious interior is created in bedrooms, living rooms, recreation areas and children's rooms. Graphic images of lilies, orchids, and daisies look original. Flower arrangements are complemented by leaves, stems, and tree fragments.
The trend is botanical print, which reproduces naturalistic designs with detailed drawings of leaves and flowers, reminiscent of images in botanical reference books. Floral motifs on the glass complement the rooms in Japanese and oriental styles.
Pop Art
Mirrors with sandblasted pop art patterns are suitable for modern interiors in high-tech, loft, minimalism, modern styles
When choosing color combinations, it is important to choose shades of a restrained range or use 1-2 bright colors on a light background. Saturated images are suitable for a room in light colors with a monochrome interior, because
will allow you to create an accent zone and visually expand the space.
Photographs of stars, sculptural compositions, self-portraits, logos, slogans, etc. are used as drawings. To create a harmonious interior, the motifs of the image on the glass should echo the paintings and posters on the walls, the design of textiles (pillows, bedspreads).
Foreign motives
Sandblasting patterns on the mirror can be made with foreign ornaments and motifs. The image will highlight the interior design of the room. Aztec motifs in the form of zigzags, complex lines, circles, triangles, and waves are original. The image must be geometric and clear. It is recommended to use color toning to emphasize national motifs.
A wardrobe in a room decorated in a Scandinavian style can be complemented with exquisite northern ornaments; the color scheme is preferably restrained.
A room in an oriental style can be decorated with motifs on glass with images of fish, dragons, floral stylizations and ornaments. The application of hieroglyphs and plants is popular. Arabic motifs are transferred to glass in beige, brown, sand, brick, and mustard tones.
Foreign themes can be emphasized by painting images of historical landmarks on glass. The silhouette of the Big Ben, Eiffel, Pisa, etc. towers looks original. Images, depending on the style of the room, can be plain, embossed, or made in color.
Care and recommendations for use
Glass wardrobe doors with designs using engraving, screen and ultraviolet printing can be cleaned and washed with water and detergent.
Vinyl films cannot be rubbed with a sponge or soap; cleaning with microfiber or damp furniture wipes is allowed.
Surfaces covered with the three-layer method can be washed like laminated panels, without allowing them to get wet for a long time.
In order for the design on the film to retain the brightness and saturation of colors longer, you do not need to place the cabinet on the sunny side of the room.
When ordering vinyl for gluing, you need to take into account the service life: after a year and a half, the ink without a protective coating will fade. For long-term use, you should choose multilayer or uv printing.
Sandblasting techniques
When creating decor, stencils, quartz sand, and protective solutions are used, which are used to treat surfaces during the design process. Sandblasting glass is performed in several ways:
- standard matting;
- artistic matting;
- color toning;
- amalgam.
Sandblasting matting
When performing matting using the sandblasting technique, sand is laid out on the glass according to a stencil, which is pre-positioned on the surface. The parts of the glass not covered by the insert become dull. The pattern is flat, does not trap dust, does not leave stains on the surface, and cleaning is quick. The image is graphic, with clear boundaries. Matting can be made voluminous by applying several layers of sand.
Artistic matting
Matting, performed using artistic techniques, allows you to create transitions of shades, colors, and textures. The image looks naturalistic and aesthetic. Manufacturing technology requires more time, because applied in stages. The technique is performed on glass of different thicknesses. There are several template options for matting:
- film;
- metal.
Film templates allow you to create original paintings, ornaments, and drawings. Using this method, you can prepare original sketches and transfer them to the surface. The method requires a lot of time and money.
Colored sandblasting
Glass with a sandblasted pattern made using the color tinting technique is original and aesthetically pleasing. The method allows you to obtain the shade necessary for the room. Decoration is carried out at the stage of completion of the project, applied to the inside, the front part will remain smooth and will ensure easy care of the furniture. For long-lasting use, the interior design can be protected with film after tinting is completed.
Amalgam technique
A common technique for decorating a mirror surface, amalgam, is aesthetically pleasing and original. The image is applied from the inside of the structure according to the reflection on the mirror. When using LEDs or spotlights, you can create a visual effect of expanding the space.
What it is
Let's start with the fact that you should definitely leave reviews and write a comment regarding sandblasting if you have personal experience with it. Write if you made such drawings to order, decorated mirrors and glass with your own hands, sought professional services from specialists, or created a template yourself in Vector (Vector Glass).
Sandblasting is a technique for applying drawings and images to glass and mirror surfaces. This is a decoration method that has become widespread in furniture production. To create an image, you must first draw a sketch. Next, measurements are taken on a specific mirror or glass, and a quartz sand print is applied to the surface by exposing it to a strong air stream. This technology allows you to control the density parameters of the image dimensions by changing the pressure.
The grain size of the sand mixture also plays a big role in creating a specific pattern.
The sandblasting method allows you to change the color palette by adding special components to the mixture. If you apply several layers in succession, a multi-layer effect will be created.
All materials used in sandblasting are exclusively natural and do not cause allergic reactions.
Popular patterns
When choosing a motif for a sandblasted design, you need to take into account the style of the hallway. Among the many subjects and trends, there are topics that are especially popular.
A cabinet with a sandblasted pattern that fits perfectly into the interior.
- Abstraction. Circles, smooth lines and other free images are universal. A cabinet with such decor will fit into the interior of any style and will not get boring over time;
- Natural motives. Images of plants, animals, insects and birds, depending on the style in which they are made, can decorate many interiors: from scandi to art deco;
- Architecture. Panoramic views of cities and images of streets look impressive and unusual. Such a cabinet with lighting will look especially interesting;
- Pop Art. The current trend of contemporary art can also be supported by sandblasted images in this style;
- East. The matte doors of the cabinet evoke associations with rice paper panels, originally from Japan. That’s why a wardrobe with images on the theme of traditional Japanese art, be it a sprig of bamboo or a scene from the life of a samurai, looks so harmonious.
Floral ensembles
The flower theme is one of the most popular sandblasting designs. Depending on the chosen style, these can be large poppies, small sakura flowers, orchids, roses and even daisies.
Floral motifs on cabinet doors.
Geometric designs
Geometry in the interior has remained at the peak of popularity for several years. Vertical lines of varying widths look unusual
They visually raise the ceiling, which is important for small rooms
Geometric pattern on the closet in the hallway.
Circles, diamonds, smooth lines and sharp angles - the choice of geometric design can only be limited by imagination.
Geometric patterns visually lift the ceiling.
Drawing an assembly drawing of a sliding wardrobe
So, in the last lesson we made a design project, and now, based on it, we need to create an assembly drawing of the sliding wardrobe, according to which we will do the detailing and, in fact, carry out the assembly.
You can draw a drawing by hand, but this is not very convenient in terms of measuring details, and it will be more difficult for you to calculate different distances and indentations.
I will make the drawing in the Compass 3D program. This is a product of Russian developers, the program is very easy to learn and will not require much effort and time from you.
What it is?
Sandblasting a pattern on glass to decorate sliding-type cabinets is an effective technique for decorating surfaces. To create an artistic image, a sketch is created on the glass; after measurements, specialists apply the print with quartz sand under a strong stream of air.
The technology allows you to adjust the density and dimensions of the pattern by varying the degree of pressure and the level of grain size of the sand mixture. The method allows you to change the color scheme by including additional particles with glitter. It is possible to create a multi-layer effect by sequentially applying 2-3 layers. The materials used are environmentally friendly and hypoallergenic.
Prints
The main directions of decoration: abstract, floral, in the style of modern art movements, in foreign themes.
Abstract prints
Nature-themed decor works well for the home. Images that imitate water, plants, landscapes would be appropriate in the bedroom. The main rule of abstraction is to stick to smooth lines and rounded shapes. A neutral pattern without sharp transitions will not cause irritation.
Flowers
This is the most win-win topic. The design method and shade are not significant. Images of orchids, roses, and daisies are considered the most universal. Sakura is perfect for filling the entire canvas.
In pop art style
The modern direction is widely used in the arrangement of apartments and private houses.
Features rich colors and bright prints that attract attention
Healthy! When using pop art elements, it is important not to overdo it. Catchy accents are best placed on a cream or white background
Photographs of show business stars, fancy sculptures, and images of animals can be used as decorative compositions.
Foreign topics
Lovers of oriental motifs use images of exotic plants and hieroglyphs. The four-door canvases easily accommodate fragments of your favorite travel destinations. Images of the Eiffel Tower, Big Ben, and Burj Khalifa are often posted.
What does it go with?
The universal sandblasting finish goes well with various decorative elements: paintings, curtains. Used to dilute the abundance of wooden furniture. Mirror inserts lighten and expand the space.
Wenge color is suitable for furnishing rooms in a simple style. It is better to match the glazing of the cabinet to match the filling.
Marine motifs are also combined with sandblasting techniques. In Mediterranean, exotic, oriental interiors, doors are decorated with images of small fish, stars, and shells. The translucent texture blends organically with tiles and vinyl wallpaper.
Monochrome filling with graphic elements is well suited for apartments in a classic or high-tech style.
Decorated doors are combined with parquet flooring and cladding with stucco inserts. An additional decoration of the room will be outdoor flowers in massive pots.
Original lighting designs also highlight the beauty of the design. Lighting can be installed both on the front side of the wardrobe and on the inside.