The installation of drawers is planned when drawing up cabinet drawings. In some standard models they can be purchased as options upon request. But more often this applies to cabinets 2 meters wide or more with three doors. What should the owner of a small wardrobe do?
If there are no drawers in the purchased cabinet or there is a need for them during operation, build in an additional unit yourself. To do this, calculate the dimensions and select components. We'll tell you how to add drawers to your linen storage cabinet with your own hands.
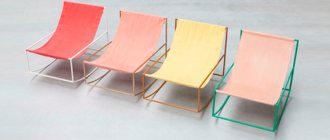
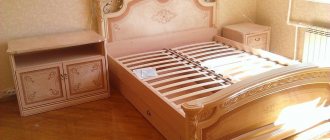
Location of drawers in the closet
The main advantage of assembling drawers in a ready-made cabinet is that you do not need to disassemble things, take it to a service center or call a specialist to your home for reconstruction. It's easy to do it yourself.
Selecting the location of the boxes:
- Separately from each other.
- In a module that is built into the wardrobe.
The disadvantage of the first type of arrangement is the difficulty of adjusting the guides after several years of use. When using the cabinet over time, the walls may bend. This leads to curvature of the compartment geometry and makes it difficult for the box to move freely along the guides.
The block-modular option is better because:
- assembled outside the cabinet, makes work easier during installation;
- Less dust is generated when built into a wardrobe, so you don’t have to put things away.
It is advisable to install the module no higher than 1 meter from the floor. If there is no space in a compartment with shelving shelves, then place it in a niche with a barbell under the hangers. When determining the location, remember that the door side hinges should not interfere with the extension of the box. Therefore, consider the distance between them. And in wardrobes, do not place the block-modular structure close to the intersection of the sliding doors.
Self-assembly
I don’t think it’s worth telling you how to take measurements and draw a diagram of the future drawer for your kitchen furniture. Arm yourself with a tape measure, ruler, paper and pencil. Measure all distances clearly, write them down and don’t throw them away.
The step-by-step assembly of the drawer is as follows:
- First, the main preparatory work is done in the form of measurements and drawing up a project. If desired, use ready-made sketches and adapt them to your kitchen dimensions;
- Buy all the necessary panels made of MDF, chipboard or wood. They can be cut out on site and the cut areas can be covered with veneer or protective film;
- Next, prepare a set of guides. Telescopic ones are a priority due to their higher load and long service life. Additionally, you will need furniture confirmations or Euroscrews;
- According to the diagram, the parts of the box are connected to each other. Here you can use confirmations, or go along the classic path with screws and corners;
- After assembling the side parts, bottom and front wall, where the handle for the drawer will be located, the guides themselves are mounted;
- One part is attached to the drawer, and the second to the inner walls of the kitchen furniture itself.
The most important thing here is to make accurate measurements and not deviate from them when making structures. Otherwise, you risk getting serious distortions and unevenness. As a result, the drawer will not open correctly or will begin to interfere with the opening of other elements of the kitchen furniture.
I strongly recommend starting with simple designs. Having gained the necessary experience by personal example, you can go further and create more complex and multi-level drawers. You are limited only by your imagination.
Thanks to everyone who reads us! Subscribe, leave comments and ask relevant questions!
Source: vmk-mebel.ru
Calculation of the lengths of walls and drawer fronts (block-modular version)
Before you start making parts, take measurements of the finished cabinet and make calculations based on them (see the instructions for an example). To eliminate errors in the lengths and heights of retractable boxes, calculate them separately.
Instructions for calculating the lengths of walls and facades
As a basis, we will take the design of a wardrobe niche with dimensions (VShG): 400 mm x 500 mm x 500 mm. Calculation steps for manufacturing a block of drawers:
- Make the upper and lower parts of the compartment 500 mm in length and width, in the amount of 2 pieces.
- Calculate the length of the walls at 368 mm. From the total height, subtract the thickness of two chipboard sheets. Make calculations using the formula: 400 mm - (16 mm x 2 pieces = 32 cm).
- Take 480 mm for the width of the module sides (allocate 20 mm for the façade).
Knowing the dimensions of the compartment walls, make boxes.
- Take 450 mm for the length of the side of the box.
- Make the rear panel 410 mm. Calculate this size using the formula for adding the thicknesses of all chipboards and the gaps for the guides: 500 mm - (16 mm x 4 pcs. + 13 mm x 2 pcs.). 13 mm is the gap for installing guides on both sides.
- Subtract 4 mm from the dimensions along the outer perimeter for the gaps: 500 mm - (2 mm x 2 pcs) = 496 mm.
- Make the bottom smaller than the box by 1 mm on each side.
Important! The bottom of the drawer can be made of fiberboard, but if heavy items will be stored in it, plywood should be used.
Calculation of the height of drawer parts
After determining the lengths of the module walls and drawers, calculate the height of the latter.
- Make the minimum gap between the fronts of two drawers 30 mm. This distance will allow your fingers not to touch the next shelf when opening, if the front is without handles. If they are provided, then reduce the gaps to 3 mm.
- Make the side and back walls the same height. The height of the drawers depends on how many of them there will be in the compartment. For example, for the dimensions of this module, make two drawers with walls from 80 mm to 150 mm.
Important! When all the parts are ready and fastened, roll up the end ends with melamine edge.
Installing the bottom
We screw the bottom of the HDF box to the assembled frame. Since in my example the drawer is quite wide, I used 4 3x16 mm screws on each side - a total of 16 pieces for each drawer.
We will install the fronts of the drawers later, when the drawers are already in place in the frame of the wardrobe.
This is what I got (see photo).
In the bottom photo you can see 5 through holes in the front wall of the drawer. I drilled them in advance for screws for installing the facades. This will make it more convenient to install the facades.
Let's move on to installing the guides
Calculation of drawers (built-in version)
As an example of calculation, let's take a cabinet niche with dimensions W*D*H=600*550*784mm. The calculation is made for internal boxes of the same size in the amount of 4 pieces.
Facade dimensions
The minimum allowable gap between drawer fronts is 2mm. You need to retreat another 2mm from the top and bottom shelves, between which the drawers are located. Thus, the maximum height of the facade is:
Vn – niche height;
Kf – number of facades.
In our case we get:
It is not advisable to make drawer fronts larger than this value, since they can cling to each other.
Side wall height
If the bottom of the box is overhead, and 3mm thick HDF will be used as the material, then the minimum distance from the bottom of the facade should be 5mm (3mm on HDF+2mm of gap).
If the bottom of the drawer is inserted into grooves, or is made of laminated chipboard, then the minimum distance from the bottom of the facade to the bottom of the sidewall can be reduced to 2 mm.
The minimum distance from the top of the facade is 2mm, but usually it is made a little more, from 10mm. This does not play a significant role in storing things, but it allows you to reduce the weight of the box and, accordingly, the load on the guides, which increases their service life. In addition, the height of the sidewalls and back wall can be varied to obtain optimal cutting.
Drawer guides
- Roller. This is the cheapest type. Its disadvantages lie in the incomplete removal of most of the box. They also make loud noises when leaving or entering.
- Ball. This is a telescopic type of guide. There are two subtypes: regular and enhanced. The height of regular ones is 35 mm (for light laundry: socks, belts, etc.), reinforced ones are 45 mm (for heavy laundry).
Marking for guides
The thickness of the guides is the same and equal to 13 mm. Select the length according to the side wall, a multiple of 50 mm in the smaller direction. For example, if the width of the above compartment is 480 mm, then select the guides at 450 mm. Install them after assembling the box and bottom.
Attach roller-type guides to the bottom of the drawer. And install telescopic ones in the center of the sidewalls.
Mark the location for the guides on the inside of the module walls, and on the drawers - on the outside.
We cut parts and purchase fittings
The author of this article did not stir up dust at home and found a workshop on Avito for cutting chipboards. It turned out to be very convenient to select the appropriate color and on the day of ordering, parts in individual sizes were already ready.
We also managed to purchase fittings for the drawers there. Namely:
Plastic and adhesive plugs for confirmations in the color of the furniture.
It is also advisable to buy a special drill for confirmations with a sting. With its help, you can drill holes for confirmations with a special seat for the head in chipboard parts.
Drawer handles
Furniture handles for a closet can be made in three ways:
- Cut-out. Oval cutout at the top of the drawer front. Cover the cut with melamine edge.
- Railing. For facades longer than 450 mm. Attach them with screws to the facade. When determining the length of the drawer walls and the front, take into account the distance between the front and the handle so that it does not stick out and allows the cabinet door to close.
- Mortise. Save useful cabinet space. Installation: make a cutout in the facade with a milling cutter. Insert the handle into the groove and secure it from the inside.
Last but not least, we should mention the castles. To lock the drawer, use a furniture lock. It is more reliable than overhead and looks aesthetically pleasing.
Instructions for manufacturing a vertical retractable module:
- Determine the dimensions based on the interior niche of the cabinet. The height of the structure can be from 1 to 1.5 meters. Depth up to 50 cm. Now you can attach drawers to it.
- When making boxes, take into account the dimensions of the chipboard board, so make the length of one box less than the entire finished structure by 3.2 cm (1.6 cm on each side). The shelf width varies from 30 to 50 cm.
- Screw the wheels to the bottom.
- Make the back wall and sides. Drill grooves for future shelves. At the same time, fix the wheels so that they do not move while working on the walls.
- Attach the shelves to the structure using nails or use two timbers on either side of the structure on which to install the shelves. Now take it off, clean it from dust and put it back on.
Attention! To make the drawers and cabinet, laminated chipboard was used as a base, but such structures can be made from wood, MDF or plywood.
Drawing programs
To independently calculate furniture dimensions, the following computer programs will help:
Table of advantages and disadvantages of these programs:
| Name | pros | Minuses |
| PRO 100 | Clear interface. |
High-precision calculation of materials.
Libraries with a rich information base.
High quality visualization.
Low cost of licensed software.
How to calculate and make a chest of drawers with your own hands
The design of furniture should be practical and durable. Manufacturers offer a variety of retractable systems that can be used to equip drawers. If you don’t have much experience in independently designing and assembling cabinet furniture, I recommend focusing on the following materials and components:
- The body of the product, the frame of the drawers, will be made of laminated chipboard with a thickness of 16 mm. Melamine tape or PVC with a thickness of 0.4-1 mm is used as the edge of the open ends. The back wall and bottom of the drawers are made of fiberboard; they can be attached with an overlap, on small nails or inserted into a groove.
- In budget options, the do-it-yourself chest of drawers and the fronts are also made from laminated chipboard, only with a more “serious” wear-resistant edge around the perimeter - 2 mm thick PVC. The chest of drawers will look like an expensive designer product if the tabletop and fronts are made of solid wood, milled MDF, or glossy material - acrylic or plastic.
- Roller guides have already outlived their usefulness. It is better to use ball guides for drawers; their movement is much smoother and their load capacity is higher. It is not recommended to make chests of drawers with your own hands with ball guides wider than one meter. If the drawers are deep, the bottom should be reinforced with a stiffener.
Reinforcing wide and deep drawers
- Narrow tall chests of drawers, as well as those that will be installed in a children's room, must be attached to the wall. It's all about shifting the center of gravity when opening loaded boxes. If, for example, a child pulls out all the drawers at the same time, the chest of drawers may tip over directly on him. It's scary to think about the consequences. Therefore, at the design stage, the housing design should include a stiffening rib along the rear wall, which can be secured to the wall unnoticed.
List of required tools
- A drill or powerful cordless screwdriver with a chuck sharpened to at least 10 mm.
- An electric jigsaw or someone you know from a furniture manufacturing company. Precise sawing will be required, so in this case it is better to find a friend. Right angles in future parts are required, and you should not risk the material for the sake of self-affirmation.
- Roulette.
- Pencil.
- A straight construction angle, preferably with a measuring ruler.
- Iron.
- Drill bits 5 and 8 mm for wood.
- Bits for a screwdriver. Among them there must be a hexagonal one - for confirmations.
- Dull knife, rag, sandpaper.
Such tools will always come in handy. If you don’t yet have the necessary arsenal, you can safely buy a good one right away - so that you don’t have to throw it away later.
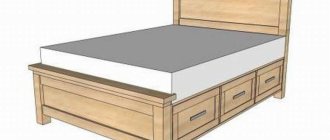
DIY chest of drawers diagram and drawings for calculating the details
The design of the chest of drawers is extremely simple. It is a body of the following type:
DIY chest of drawers assembly drawings
- The top of the chest of drawers is made deeper by 20 mm (minimum) so that it “hangs” over the facades. The depth of the cabinet depends on the desired depth of the drawers. The calculations are based on the dimensions of the guides:
- Ball and roller guides come in 50 mm increments, starting from 250 mm and ending with 600 mm (250 mm, 300 mm, 350 mm, ..., 500 mm, 550 mm, 600 mm).
- In order for the drawer to extend completely, its depth must correspond to the width of the guides (250 mm, 300 mm, etc.). The body is made wider. Usually a margin of 30 mm is made (taking into account the possibility of installing the back wall of the fiberboard in the groove and stiffeners).
The detailing for a do-it-yourself chest of drawers with dimensions 900x800x400 will look like this:
DIY chest of drawers detailing
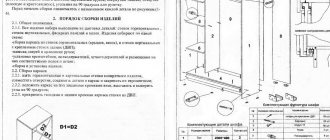
DIY chest of drawers diagram and drawings for drilling the body and drawers
In order to make a chest of drawers with your own hands, a diagram and drawings of drilling (arrangement of fasteners) by detail will also be needed. The general scheme will look almost the same, regardless of the overall dimensions of the product itself. If you decide to mount the furniture to the wall, the back bar for fastening the table top will simply turn perpendicularly.
DIY chest of drawers - general drilling diagram
In terms of details, the markings for drilling will look like this.
DIY chest of drawers, marking the drill bits by detail
It is better to take the markings for the guides (roller or ball) from the instructions, which will be included inside the package. Or on the websites of furniture fittings suppliers. For example, an MDM kit. Markings for fastening roller guides:
marking for fastening roller guides
Markings for fastening ball guides:
markings for fastening ball guides
Roller guides are attached under the bottom of the drawers, ball guides are attached along the center of the width of the drawer box. In general, experienced assemblers rarely bother with accurate calculations. Usually they make things simpler:
- Visually divide the height along the interior counter by the number of drawers (in our case, four), mark the center - the place where the guides are attached.
- The guides are divided into two parts, one is screwed to the box from the inside, the other to the side of the box.
- They push the drawers into the chest of drawers. If alignment is maintained and there is no distortion, the boxes will move easily, without obstacles.
- Using double-sided tape, the facades are evenly attached, not forgetting about the technological gaps (between the drawers - 3-4 mm).
- After all the fronts on the chest of drawers are evenly distributed with your own hands, you can drill holes for the handles (they are placed right through, on long screws with silicone or metal washers).
We count the dimensions of all structural elements
An insightful video on drawing up furniture specifications was very helpful:
We cut out future boxes. To do this, you can use any free online furniture cutting program on the Internet or calculate all the details yourself.
When performing calculations, you need to take into account the gaps between the drawers, the edges and the dimensions of the retractable mechanisms. Each of them has its own dimensions, which affect the final dimensions.
Next, you can begin marking and sawing the parts.