how to make a tile countertop
So you suddenly find yourself with some ceramic tiles left over from a recent home improvement project. What can you do with all this goodness, don’t throw it in the trash? Making a tile table with your own hands is a good way to use up the remaining material, and as a result you will get an almost new table! It's a win-win situation. You don't have to make a table with tiles from scratch; you can use any old table with a sturdy frame. There are many options, you can make a table from tiles with your own hands for the street , for the kitchen, or a coffee table with tiles . This collection contains several visual examples where you will learn how to cover a tabletop with tiles for almost any table. And also how to replace tiles and lay out mosaics from tiles.
Garden table tiles
Do you want to restore a garden table and are looking for a good idea? Then you have come to the right place. Here's a fun project that will turn your garden table into a Pinterest star! Basically, here you will learn how to lay a garden table with Portuguese tiles ! You've probably seen them, Portuguese tiles. They are mainly used to decorate bathrooms and toilets. But such tiles are also suitable as a decoration for a garden table!
It's not difficult, the whole process is shown in this collage.
Depending on what material the tile table is made , you may be able to leave it outside in the summer in the sun, in the rain or in bad weather. During the winter months, it is better to cover it, otherwise the tiles may come off and damage the table. It will be a waste of all your work!
Photo source: ideefabriek.com/vrije-tijd/eyecatcher-betegel-je-tuintafel-met-portugese-tegels-diy/
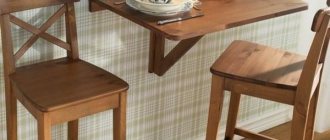
Table top pedestal
Before making a tile countertop, carefully measure the dimensions and select a tile of the appropriate size (format) so as not to cut pieces.
The easiest way is to use an already made pedestal frame - from a kitchen set.
If the pedestal is made outside the kitchen unit, the best option is painted chipboard furniture panels. They are cut to size using a circular saw. Hand saws and jigsaws do not provide a smooth edge and can be used as an alternative.
The edges of the sawn chipboard are treated with a moisture-resistant impregnation for wood - for example (Senezh, Belinka, Pinotex, Tikuurila, etc.) after drying - a polymer tape is glued for the edges or a layer of oil putty is applied. It is better to apply the putty in 2-3 steps. Without immediately applying a thick layer
After complete drying - this can take up to 7 days - it is processed first with coarse and then fine sandpaper stretched over a block.
Before applying the putty, be sure to stick masking tape along the edges of the chipboard board.
The sanded ends of the fiberboard are painted with oil paint.
Assembly is carried out using furniture fittings:
- Metal corners;
- Plastic dowels;
- Shurupov.
You can use wooden or screw metal furniture tenons.
Before assembling the base frame, do not forget to use a Forstner drill d-35 mm to drill holes in which the door spring hinges will be placed.
Doors for the pedestal (if provided), it is best to use ready-made ones. Their selection is very large in furniture and construction stores.
Grouting joints
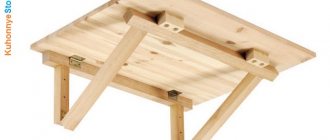
DIY folding table: 20 wall-mounted tables with step-by-step instructions
Give the solution time to set - this will ensure the tabletop is strong and reliable
The last step is to grout the joints between the tiles. First, we wipe off any excess glue that has come through during installation from the tile itself.
Remove excess glue with a sponge or damp cloth. We also remove excess cement mortar.
Dilute a small portion of grout so that it has the consistency of sour cream. Thin only as much grout as you need for this area of work. If you dilute the entire composition at once, the mass will set before you finish the work. Using a rubber putty knife, fill all joints with grout. Try to fill the seams evenly, without depressions or gaps. Excess mass is transferred to another place with a spatula, and stains are removed with a damp cloth or sponge.
When the grout is completely dry, your countertop will be completely ready for use.
Kinds
When choosing, it is important to pay attention to its size. The standard one is easier to install, and it won’t look too massive. In some cases, preference can be given to small materials (for example, mosaics), but in this case it is unlikely to be possible to cover the surface without prior experience.
In some cases, preference can be given to small materials (for example, mosaics), but in this case it is unlikely to be possible to cover the surface without prior experience.
In some cases, preference can be given to small materials (for example, mosaics), but in this case, it is unlikely to be possible to cover the surface without prior experience.
Traditionally, 15x15 ceramics are used to lay the countertop, if this does not contradict the features of the interior. Typically, small details are used for small-sized kitchens, where too large tiles will simply look out of place.
Much depends on the choice of surface. It should be level enough so as not to interfere with cooking or make cleaning difficult. The main types of kitchen surfaces are presented in the table below.
| Surface option | pros | Minuses |
| Embossed | Unusual appearance, the ability to create a unique design | Dirt quickly accumulates in the folds, which is quite difficult to remove. |
| Polished | Does not require special care, easy and quick to clean, can be used as a decorative element | Over time, the shine of the surface disappears; without the use of special products, it becomes dull and inconspicuous |
The larger the tile, the easier the installation process. However, materials should be selected not only for convenience, but also correspond to the design idea and look neat.
Ceramic
Standard option for covering kitchen countertops. The main pros and cons can be considered below.
| Advantages | Flaws |
| Easy to install, this type of repair work can be done even by beginners | Over time the shine is lost |
| Repels moisture well | All cracks and scratches are clearly visible on the glossy surface. |
| Resistance to thermal effects, high temperatures | Not as durable as porcelain tiles or natural stone |
| Ceramic tiles are easy to care for | May crack under heavy objects or impact |
Mosaic
Mosaic tiles are usually made from appropriately sized ceramic tiles. It looks bright and original, but only an experienced craftsman can install it. A beginner will have to give preference to another material. For example, standard ceramic tiles.
Particular attention should be paid to the seams. If handled incorrectly, dirt will accumulate in them, which will not be easy to remove.
Mosaic tiles must be the same shape and size so that the picture looks holistic
Mosaic tiles must be the same shape and size so that the picture looks holistic.
Granite
The material is not found very often. Granite tiles are very durable, but are rarely used for countertops. The surface requires special care, otherwise its shine and smoothness will disappear over time. In addition, granite tiles are quite heavy, which is reflected in their appearance and the complexity of laying the material.
Porcelain tiles
It is best to finish a kitchen countertop made of tiles with porcelain stoneware. The material has excellent strength, resistance to moisture, mechanical damage and heat. A wide variety of textures and shades, as well as availability. Porcelain tiles do not look as sophisticated as ceramic tiles, but they do not pose any particular problems during installation.
Selection of tools and materials
To make a table with ceramic tiles with your own hands, the first step is to prepare all the materials required for the work, as well as tools. If you don’t have a tool, you can easily replace it with an analogue one, or ask your friends for it.
Table selection
The table frame can be made of metal or wood. Metal frames are very reliable, but heavy and susceptible to rust. To bring such a frame to normal condition, it must be cleaned and painted.
As a basis for the future table, you can use some old dining or coffee table made of wood. If there is already a countertop on it, and it is in good condition, has no delaminations or cracks, then a new slab does not need to be made. If it has defects, unevenness, bends or springs, it is recommended to lay a new table top on top of it. Or remove the old stove and put a new countertop in its place.
If there is no frame, you need to make it yourself from wooden blocks or chipboards.
The tabletop is made of chipboard (preferably laminated), multi-layer moisture-resistant plywood or OSB. OSB board is definitely the best option as it is moisture resistant and does not require impregnation. The same can be said about laminated chipboard. Conventional chipboards can be used, but it is not advisable, since, despite the impregnation, over time they will collapse from moisture that gets on them. The thickness of the slab for the countertop is selected to be at least 16 mm. The most optimal thickness is 20-25 mm. This will ensure the reliability of the table even when using heavy porcelain stoneware.
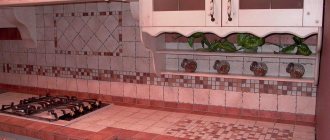
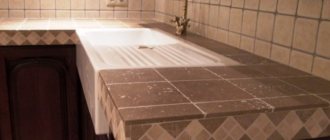
DIY table with ceramic tiles (photo)
Choosing ceramic tiles
To decorate a table with tiles yourself, almost any wall or floor tile with a thickness of more than 5 mm, as well as mosaic, is suitable. Porcelain tiles have proven themselves to be quite good in this regard. The size of the tiles, in principle, does not matter. But it should be borne in mind that small tiles are easier to lay, and there is less waste. A small tile is easy to calculate without leaving any residue. The advantage of large tiles is that the countertop will have fewer seams.
You can choose any tile pattern. It’s not just plain tiles that look great, but ones that have a specific pattern or structural composition. There may be a drawing or a decorated insert on a uniform background.
Assortment of ceramic tiles
Other materials and tools
As additional materials we will need:
- Silicone balloon and syringe for it.
- Impregnation for wood (if chipboard is used).
- Cement-based adhesive for wooden surfaces.
- Grout based on epoxy resin.
The following tools will be used:
- Grinder for cutting tiles. In a pinch, a tile cutter will do. Prepare a diamond wheel as well.
- Jigsaw for cutting wood boards.
- Spatula for applying tile adhesive.
- Rubber spatula, which will be used to rub joints between tiles.
- Tape measure and pencil.
- Level.
- Self-tapping screws for wood, 55 mm long.
- Decorative strips for decorating the border of the table top.
How to make a table from tiles with your own hands (video):
Preparing the tabletop for gluing
The main problem of chipboard and other wood-based materials is their high hygroscopicity - susceptibility to moisture. Therefore, before gluing ceramic tiles to the outer surface, it is necessary to carefully treat the surface of the countertop with moisture-repellent impregnations.
You can use those already mentioned, or you can take the cheaper route and use Oxol brand drying oil. Before applying to the surface of the countertop, drying oil should be heated to a temperature of 90-95° C in a water bath.
It is best to apply with a wide natural hair paint brush.
Drying oil is applied twice, with an interval of 12-24 hours.
After the impregnation or drying oil has dried, which is determined by touch: the surface should not be sticky. You can start laying ceramic tiles.