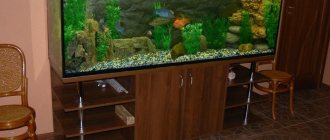
A beautiful and large aquarium in the house is a stylish addition to the interior, helping to create a unique and cozy atmosphere. A living area with a complex ecosystem requires special care, and a do-it-yourself aquarium cabinet will be an excellent addition to the arrangement.
A stable and practical piece of furniture ensures that the tank is installed in one position and will facilitate maintenance procedures. Before starting the creative process, you should carry out detailed preparations, select a project or draw it up yourself, and prepare materials.
Why do you need a cabinet or stand for an aquarium?
The easiest option for aquarium owners is to purchase a ready-made structure, but it is important to take into account several points. The furniture in the room must correspond to a single style, be comfortable and have an ergonomic design, so its choice is associated with certain difficulties:
- a stable cabinet must be made of reliable and high-quality materials, which ensures a long service life;
- depending on the volume of the water tank, it will exert a certain static load on the load-bearing and frame elements of the structure;
- For medium and large tanks with special equipment, ordinary coffee tables and bedside tables cannot be used.
It’s not difficult to make a cabinet for an aquarium with your own hands, but to do this you need to understand the nuances of such a design. It is used to install the tank itself with water and equipment, and in the internal storage systems you can place food and additional accessories.
Varieties
When choosing a stand for an aquarium, you need to pay attention not only to the shape of the product, but also to its material. You should also not neglect the size of the product. The result of the acquisition will depend on the owner’s preferences, but it is worth considering in more detail each of the listed indicators.
By shape
Modern manufacturers offer to purchase cabinets in the following shapes:
- rectangular;
- square;
- angular;
- curly.
Curly
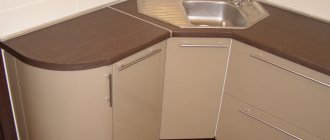
Corner
Rectangular
Square
Rectangular cabinets are considered classic, since most containers are produced in this form. This product is universal and can be placed anywhere in the room.
A square-shaped cabinet will be appropriate for a container in the form of a circle or square. Installing an aquarium on this model of cabinet will be simple, in addition, it will fit perfectly into the interior of a room with small dimensions. Such a piece of furniture would be well placed in a recreation area.
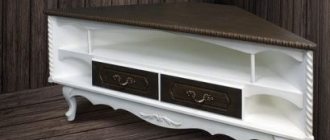
A corner cabinet means its location in the corner of the room. By purchasing such a model, the consumer significantly saves space. The device is suitable for both corner and rectangular aquariums. Using a cabinet for a corner aquarium assumes that it has rounded shapes that do not protrude beyond the model.
Figured products are made to order, according to the user’s individual sizes. The model drawing is made strictly in accordance with the dimensions of the glass container; this shape is selected to suit the style of the room and the specifics of the interior.
The best option for a small room would be corner tables fitted into a free corner. They will not take up much space, but a triangular-shaped aquarium will have its own design nuances.
When choosing a product, remember that the water tank should not protrude beyond the bedside table or hang over it - this is contrary to the rules for using a glass fish container.
To size
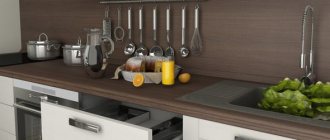
When installing a water tank on the surface of the bedside table, the product must stand level. In this case, the load from the container is evenly distributed along the entire perimeter of the tabletop. Depending on the displacement of the aquarium, the length and thickness of the top bar varies. For a cabinet for 200 liter aquariums, you will need a wide tabletop with a reinforced base; for a product with a volume of 60 liters, a regular cabinet will be enough.
According to size, furniture for a fish tank can be divided into the following categories:
- small - these models include products designed for an aquarium capacity from 70 to 100 liters. The length of such cabinets varies in the range of 60-70 cm, the width is often 30 cm. The height of the cabinet depends on the manufacturer, usually it is made comfortable so that the user was able to go to the cabinet under the 100 liter aquarium and feed the pets;
- medium - this includes aquarium cabinets with a length of 70-80 cm. On such products it is convenient to place a tank with a volume of 120 liters, as well as aquarium models with a similar length and a capacity of 150 liters;
- large - models related to large-sized products are distinguished by their large length. They are available in sizes from 100 cm. When placing a 300 liter aquarium on such a bedside table, you need to be careful, checking the furniture for stability. It will also be comfortable to install a product with a smaller volume, for example 240 liters, on a large cabinet.
Most manufacturers adhere to standard length and width dimensions; only the height of the models may differ. It is advisable to purchase a panoramic aquarium with a stand as a set, because problems may arise with finding a suitable stand for such a large tank.
According to the material of manufacture
The materials from which these pieces of furniture are made must be waterproof. Constantly getting water on the surface of the aquarium cabinet will cause the base of the product to swell and be damaged.
Modern manufacturers use the following materials for models:
- tree;
- chipboard;
- MDF;
- metal.
MDF
Chipboard
Metal
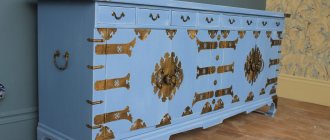
Wooden
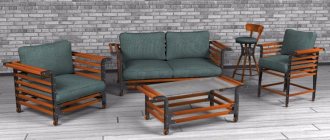
A product based on solid wood is considered durable and environmentally friendly. Such models most often have a high cost and decorate rich and elaborate interiors. Often, wooden stands for an aquarium are made by hand and framed with original carvings. They can be made from any solid material, and can also be painted with varnish to repel water.
Chipboard models are distinguished by their simplicity and affordability. Often products are complemented by side open shelves or glass in the door area. Chipboard bedside tables are considered reliable, but it is not recommended to install panoramic aquariums on such devices.
MDF panels are excellent as raw materials for cabinets. Their main difference from previous products is the extensive possibility of decorating facades, which allows you to choose a model of an aquarium cabinet that is in harmony with the existing interior.
The last option is a metal cabinet for aquariums. This design is considered the most reliable of all listed, because metal is a durable material that can withstand any load. The tabletop of such a product can be made from any raw material. For example, a cabinet for a 300-liter aquarium must in any case have a metal frame, otherwise the base will not withstand the weight distribution.
Regardless of the volume of the aquarium, choose furniture products whose structure is additionally reinforced with metal stands.
What material is better to choose for construction?
Before designing a structure, it is necessary to decide on the materials of manufacture, not forgetting the quality requirements. A good cabinet for a 60-liter aquarium or for tanks with a large volume should be as durable and stable as possible, and have a long service life.
If ordinary home furniture can be made from any materials, then for aquarium cabinets it is better to opt for more durable and reliable building materials.
Wood and lumber
Laminated particle board has good strength and the ability to withstand heavy loads. Such materials lend themselves well to processing using simple, household tools that are in the arsenal of any craftsman, and they can be supplemented with decorative elements.
Metal constructions
The most durable metal structures are suitable for creating cabinets for large tanks or several models. Most often, home craftsmen use metal corners; they are easy to weld and create an elegant structure of any design that creates the illusion of airiness.
Accessories and fasteners
The service life of the entire created and assembled structure directly depends on the quality of fasteners and fittings. It is important to select these elements so that their visible parts are fully compatible with the design solution of other furniture installed in the room and complement the interior.
Important: When choosing a sketch and drawing up a project for a future structure, you can combine several elements using glass and polycarbonate for finishing. This will help to completely unique the design of the cabinet and make a real work of art that will fit perfectly into the recreation area.
Basic design elements and their combination
The work of making an aquarium cabinet is no different from the process of assembling any home furniture. If necessary, a cabinet for a 100-liter aquarium, which I had to buy to arrange a large living area, can be assembled in a maximum of 1-2 days, subject to the preparation of the project.
Before the design stage, the design of the model takes place; you can include various elements into it as you wish, without forgetting about the practicality and aesthetics of the future piece of furniture.
Back wall
Cabinets for water tanks should be as durable as possible and most often these are attached, floor-mounted structures. The back wall, made of wear-resistant and reliable material, will help increase the stability of the structure, making the entire product as durable as possible and will look attractive.
Frame and tabletop
A frame base with reinforced attachment points for various elements will help to properly distribute the load from a filled tank. It is recommended to make the tabletop from dense and unstructured materials; natural wood, metal or monolithic polycarbonate are suitable for this.
Doors and legs
The design of the cabinet can include internal shelves and drawers, hinged doors that will hide the internal filling. The legs in any model play a more decorative role and their design depends entirely on similar elements that complement other furniture in the room.
Stages of manufacturing and assembly of the finished structure
The first step in making an aquarium stand is to create a project and choose an idea, then you need to select materials and purchase them in sufficient quantities. You should not start assembly if the craftsman does not have fasteners or other elements, because this process can take a long time:
- cutting the material into parts and processing them; during the process it is important to observe all the dimensions indicated on the preliminary design;
- the assembly of the main, load-bearing frame, its strength is checked already at the design stage in a practical way, to assess the strength;
- installation of the tabletop on the frame; for this purpose, special good quality furniture fasteners made of durable materials are used;
- installation and fastening of doors, fastening of horizontal shelves, installation of drawers used as a storage system.
The entire assembly is carried out in the room where the cabinet will be installed, using pre-prepared fasteners. After finishing the work, the structure is checked for strength, an empty tank is installed on it, which is filled with the necessary equipment and water, after which the fish can be released.
A simple stand for an aquarium with your own hands can be decorated with glass doors or sliding panels made of polymer material. A stylish design design will fit perfectly into the interior if you carefully consider its design and use additional decor.
You can assemble and decorate furniture with your own hands using various techniques, from painting and decoupage to stamping and opening wooden elements with a special varnish.
Making a large frame aquarium
©
,
2000
This material may be distributed freely in its entirety without changes or deletions, as a whole, including this paragraph. It is prohibited to use the document for commercial purposes without the permission of the author. The information in this document is presented “as is” and the author is not responsible, directly or indirectly, for its use.
 I’ll say right away that I decided to make a frame. Why? In general, I can say that I didn’t even suspect that simply glued cans exist in nature. and since they exist, an alternative arises.
 (click to see large image)
In my opinion, the disadvantages of frameless jars are as follows - since the bottom of such a jar is directly glass, the stand must be perfectly level (that’s what I was told), otherwise all this load will be placed on these irregularities (points). I considered another disadvantage of glued ones to be that it is more problematic to make stiffening ribs for them than for an iron frame. and the last, biggest minus for me. I CAN'T KNOW GLUE CANS! Of course, I found out the prices for ready-made cans - it didn’t work... I tinker with iron all the time. This finally convinced me of my choice.
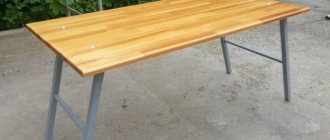
The next step is to measure the room, doorway, ceiling, etc. When I determined the size of the jar, I found a company selling corners through advertisements. There are many of those. The frame was welded by a familiar welder. Here we must make a reservation right away. Finding perfectly straight corners is a big challenge. And the metal “takes away” from welding. Vertical partitions made of six steel are welded into the frame.
Solid glass had to be abandoned immediately. Judging by the table, the tonneau requires very thick glass. I didn’t find anything like this, so my jar consists of 16 double-glazed windows. The side glass units have 2x6 mm glass, and the bottom glass has 3x6 mm. I cut six pieces of glass (there are also many such offices), but when measuring glass it is necessary to take into account the thickness of the glass so that there is enough space for pouring tar.
Yes, I forgot to say - along with the frame, they also made me a stand from the same corner. You have to imagine two aquarium frames placed on top of each other, only the top frame is used to make a jar. The stand should be no less durable than the jar. and have vertical stiffening ribs to protect against deflections.
In general, I had a ready-made frame at home - already primed and cut glass lying around. It is necessary to make double-glazed windows. This is using silicone. Only for silicone you need a gun, it costs 40 rubles in total, and is very convenient. (if you don't have double glazed windows, don't read). Gluing does not cause any big problems - just degrease the glass and carefully - evenly - squeeze out the sealant so that you get a mesh. I made a step of 12 cm, squeezed out the mesh and covered it with a second glass. And so are all double-glazed windows. It took me a little more than 4 tubes of silicone to make a toner.
After that, it's time to glue these double-glazed windows into the frame. And it’s also very important. Glass is very heavy when there is a lot of it, so the jar will also be very heavy. I didn’t bother with cement, even though it’s cheaper. I don’t know how to handle it, but the white car sealant is a nice thing. Thirty tubes - it’s like a cow licked it :) It takes a lot - after all, the frame is not perfectly flat. I started gluing from the bottom. The operating principle of all glasses is the same. Degreased it, coated it evenly with sealant, and laid the glass. The good thing about auto sealant is that it is soft enough for a while to spread a little. I didn't have any air bags. I glued one side and it sits for a day, then you turn it over.
Once all the glass has been glued, it needs to be filled with tar. You melt tar right at home, in the kitchen, in an old kettle. It is very convenient to then pour it from the kettle, when the tar has completely melted (to liquid milk), added sunflower oil (any) in a proportion (1:10) if there is too much oil, there will be problems. And exactly the same - you fill one side, move to the other. And when it was all completely dry, it was time to add water (with a hose, of course, not buckets)
It is better to install the jar not close to the wall so that the back wall is visible. You never know... It stood for several days - everything is fine, drain the water, put the aquarium in its place. And then it’s up to your taste. After that, I also covered mine with self-adhesive film - marbled. I hung artificial vines along the edges. The vines look good against the background of marble. But this beauty seemed not enough to me and I decided to find a professional artist to paint the back wall with an underwater landscape. Moreover, the landscape is painted only to the level of the water filling, and above are rocks, a boat, palm trees, clouds and everything that is probably above the water, someone... If anyone says that this is all nonsense, then I won’t argue too much. Perhaps this is so. But I wanted it that way, and it looks really cool
Finally, I’ll tell you how much such a bank costs. I won’t split hairs and write it as it is.
- Corner 50 mm - 27 meters (corner itself, delivery, frame production) - 1450 RUR
- Glass 6 mm - 11 square meters (glass itself, cutting, delivery) - 1650 rub.
- Silicone sealant (five tubes, gun) - 450 rub.
- Auto sealant - 30 tubes - 700 RUR
- A couple of grottoes, several bags of artificial soil - 800 rubles
- Pasting film - pale green marble (10 linear meters) - 270
- Artist services - 2200 rub.
- Artificial plants for a jar – 500 RUR
- Plus a few weeks of running around and various problems, although I think it was worth it..
| Rate this section | View results |
| to the top of the page back to the table of contents |