Not everyone has the opportunity to purchase a large apartment in order to easily fit all household items. However, this is no longer a problem, because even a small space can be used as efficiently as possible. This creates additional shelves in the hallway, niches under window openings and mezzanines of different sizes. You can also get some benefits from a balcony in a small apartment. It can replace a workshop, a place to relax, a garden and even a small warehouse for storing things. Proper planning of the balcony space will help combine all these functions.
Not everyone has the opportunity to purchase a large apartment in order to easily fit all household items.
The plan of such a room must necessarily include a built-in closet made of clapboard, which will allow you to conveniently arrange all the necessary things. Making a cabinet out of clapboard with your own hands is not at all difficult if you follow the step-by-step instructions.
This creates additional shelves in the hallway, niches under window openings and mezzanines of different sizes.
You need to use pine beams.
What are the advantages of creating a cabinet from clapboard with your own hands?
| Making your own furniture | |
| Advantages | Flaws |
| Saving money | Labor intensity |
| Unlimited design possibilities | Time consuming process |
| Individual selection of shapes and sizes | |
| The opportunity to show your imagination | |
You can also get some benefits from a balcony in a small apartment.
All walls and the bottom of the structure must be attached to the walls of the room with anchors.
Creating such furniture yourself is a simple but labor-intensive process. However, by taking a little time, you can build a spacious, functional and original cabinet from lining for household items. It cannot be compared with the monotonous furniture that is presented in stores and hypermarkets.
Proper planning of the balcony space will help combine all these functions.
To make a cabinet from clapboard yourself, you need to stock up on materials and tools.
Manufacturing stages
This design is made from different materials. Plywood, thin boards, or any lumber are useful for this task. You can use old cabinets.
When manufacturing, it is important to remember first of all about the quality of the future invention.
You can make a box for the balcony with your own hands according to the general scheme:
- install a heating device, start with a thermometer;
- next comes foam;
- fasteners for light bulbs;
- electrical wiring is installed;
- bars.
The walls of the box are made double, and the walls are insulated with materials. The lids are also insulated.
Thanks to these actions, your cellar will be reliable and functional.
Preparing for work on the balcony: deciding on the type of structure and design
Before you begin the actual production and installation of lining furniture, you need to prepare. To do this, several key points need to be addressed.
- Choose a location. Everything is simple here, because the balconies have special niches for installing built-in wardrobes.
- Decide on the type of structure. To make it easier, you need to create a plan for the future cabinet on a regular piece of paper. In the plan, indicate the dimensions of the structure, the number and type of shelves, the presence or absence of doors. To facilitate this process, you can look at the photos for examples of such furniture.
- Select material. Without proper experience, working with expensive wood or glass is not worth it. It is better to make it from cheap lining. However, there is one condition - such a cabinet can only be used in a glassed room. The material does not tolerate temperature changes. In addition, the lining is fragile, so you need to work with it carefully.
- Decide on a design. Lining is a universal material in terms of decoration (paste it with wallpaper, paint it or leave it as is).
Making a cabinet out of clapboard with your own hands is not at all difficult if you follow the step-by-step instructions.
Lining is a universal material in terms of decoration (paste it with wallpaper, paint it or leave it as is).
Choice
Depending on the design features, choose a storage box for the balcony. Before purchasing or building it yourself, decide on the parameters of the box. What is its volume, configuration, what vegetables will you store in it in winter.
This design will serve as an excellent cabinet for canning and vegetables. The main factor is good ventilation.
In the standard sense, a vegetable box on a balcony is a box made of wood without the use of electricity. If you don't install additional heating, then your supplies may suffer in fairly cold weather.
For long-term and high-quality use of the cellar, it is worth observing the temperature regime. Therefore, think in advance about electric heating and a thermostat.
Note! It is clearly seen in the photo of the box on the balcony that a simple design made for practical purposes can be decorated in a certain style and decorated in an original way.
Nowadays, not only the functionality of a thing comes to the fore, but also its aesthetic suitability.
What materials and tools will be needed?
To make a cabinet from clapboard yourself, you need to stock up on materials and tools.
- Pine beams. For the construction of the frame, beams of 40x40 millimeters are suitable, and for doors you need to select beams of a smaller thickness.
- Metal corner. It will be needed to fix the wooden parts.
- Chipboard sheets. The thickness of the sheets directly depends on the future load on the shelf.
- Furniture fittings. Little attention is paid to it, which is in vain, because the service life and appearance of the structure depend on the quality of the fittings. Hinges, latches, locks and handles for the cabinet must be made of metal that is resistant to corrosion.
- Nails. They will need to be used to connect wood elements.
- Several strips of lining (its number and thickness will depend on the choice of shape and design of the structure).
- Construction tape, pencil, level, screwdriver, hammer, hacksaw and hammer drill.
Creating such furniture yourself is a simple but labor-intensive process.
Decide on a design.
Where to begin
Before you start building a rack with your own hands, you need to carefully calculate everything, choose the right place and material. The shelving structure should be strong and the shelves should be wide and spacious to provide ample storage space
In no case should the rack block the natural light entering through the window, and its dimensions should correspond to the area of the balcony in order to leave enough space for movement. Fire safety rules should be observed, and if there are heaters on the balcony, then the wooden shelving should be placed away from it.
Before you start building a wooden shelving unit, you need to properly treat the wood so that it is not exposed to moisture or dryness. You also need to sand the wood very well and make sure it is dry before use. If you use unfinished material, the quality of the shelf fastenings may suffer and then you will have to start the work all over again.
Made of wood
A wooden rack is made from rectangular or square boards with a thickness of at least two and a half centimeters. You can also use plywood for shelves, the main thing is to calculate the expected load so that the shelf does not collapse under the weight. You will also need nails, screws and metal corners for the job.
First you need to install a wooden frame at the end of the balcony. The frame consists of vertical boards along the height of the balcony and horizontal ones located on the ceiling and floor. The distance between the boards will determine the depth of the shelves. In order to secure the beam, you need to drill holes on it, and then mark places on the wall through them. After this, holes are drilled in the wall, and then the beam is placed in the desired place and secured with self-tapping screws.
The racks are fastened with metal corners. Between the vertical posts you need to install special slats on which the shelves will be supported. After the entire structure is installed and its strength is checked, you can insert boards for the shelves and cover the rack with drying oil, and then with varnish for greater shine of the wood. You can simply varnish the cabinet according to your wishes or to match the design of the entire balcony.
In order not to spoil the aesthetic appearance of the balcony, it is still better to close the shelves with hinged doors. The doors are hinged to the side bars. Doors are usually cut out of plywood to fit the dimensions of the shelving frame, then hinges are attached to them and hung on the doors. It is advisable to install a magnet or latch to prevent the doors from opening on their own. For greater practicality, you can install two pairs of doors, one on the upper mezzanine part, and the second on the main one.
If part of the rack is intended for seedlings and flowers, only half is closed with doors for things that should be hidden from prying eyes.
Metal
A rack made of metal pipes is much stronger and more practical than a wooden one; it can easily support heavy and large items. Such racks are made according to the same principle as wooden ones. A frame is mounted from metal pipes, and then shelves are inserted inside. By the way, it is still better to use wooden shelves to slightly reduce the cost of the cabinet. As a rule, doors are not installed on the frame of a metal shelving unit and it serves as a stand for flowers or other decor.
For seedlings and flowers
In addition to storing things, many people use shelves on the balcony as a stand for growing seedlings and flowers. Such shelves can become a real decoration of the loggia, thanks to the landscaping and coloring of plants. Such a rack, as a rule, is made in the form of free-standing shelves, and the number of tiers is determined directly by you.
First you need to make markings on the wall and drill holes for the brackets, and then attach them to the surface and secure them well. After the strength and quality of fastening have been checked, the shelves can be installed. For shelves, it is better to use either painted boards or laminated chipboard sheets, since wood that is not covered with a protective layer may suffer from moisture.
If you only need a rack for growing seedlings, then the shelves can be made removable or foldable. This is very convenient, as it will save space on the balcony, and the shelves themselves will neatly await their season.
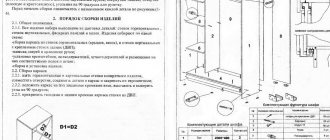
Step-by-step instruction
Step 1 – creating the frame.
You need to use pine beams. First you need to make the rear frame. Horizontal bars are attached to vertical bars in increments of 60 centimeters. You can use regular nails to join wood. The frame must be attached to the balcony wall with anchors. After this, you can attach the strips to the rear frame (the length is equal to the future depth of the cabinet). They are fixed at right angles with metal corners. Then the lower frame (bottom frame) is created in the same way. All walls and the bottom of the structure must be attached to the walls of the room with anchors.
It cannot be compared with the monotonous furniture that is presented in stores and hypermarkets.
In addition, the lining is fragile, so you need to work with it carefully.
Step 2 – covering the inner wall of the frame.
For the back of the cabinet frame, it is better to use a sheet of chipboard. He will be a reliable wall. It is attached to the back wall using ordinary self-tapping screws. If you have a construction stapler at home, you can use that too.
However, by taking a little time, you can build a spacious, functional and original cabinet from lining for household items.
The material does not tolerate temperature changes.
Step 3 – installation of shelves on the frame.
You just need to cut out suitable size chipboard sheets and install them on horizontal wooden guides.
Before you begin the actual production and installation of lining furniture, you need to prepare.
However, there is one condition - such a cabinet can only be used in a glassed room.
Step 4 – making the door.
The design of the furniture and its functionality will largely depend on the quality of the door made. To assemble the door, you first need to prepare the frame. To do this, we take thin beams and fasten the frame to the required height and width. To make the frame strong, we use a diagonal jumper. After this, the frame can be sheathed with clapboard. We fasten it using ordinary nails. Next, we complete the canvas with locks, hinges and handles, and then attach it to the cabinet itself.
Choose a location. Everything is simple here, because the balconies have special niches for installing built-in wardrobes.
It is better to make it from cheap lining.
Assembling the cabinet structure
In order to make the structure you will need a hacksaw, a building meter and a beam. Most often, each balcony room has a niche into which a cabinet can be mounted. Due to this, the entire work process will be accelerated. To properly arrange the structure, you must follow the sequence of work:
- We assemble the rear and front frames, that is, the bars with a size of 1.5 and 1.8 meters are fastened. The structure is fastened together using iron squares.
- You can use plywood for the bottom of the cabinet. The bottom is attached with screws, the size of which does not exceed 75 mm.
- The back wall is covered with clapboard, but in some cases ordinary plywood is used to make it lighter and save material.
- The side walls of the body are covered with clapboard using nails.
See a video illustrating the assembly process below:
The final touch in the manufacture of the balcony structure is considered to be an additional coating of varnish. It will protect your furniture for many years of service.
Decorating a lining cabinet - the final stage
After completing the installation of the structure, you can begin the final stage - decoration. It all depends on the interior of the balcony and the personal wishes of the owners of the house.
Decide on the type of structure.
Select material. Without proper experience, working with expensive wood or glass is not worth it.
A lining cabinet can be left as is if the balcony design also contains wooden decorative elements. However, to extend the life of the cabinet, it must be coated with a protective varnish. Before doing this, you should thoroughly vacuum all wooden surfaces, and only then coat them with several layers of varnish.
To make it easier, you need to create a plan for the future cabinet on a regular piece of paper.
The cabinet can be painted in one color, or you can create an original pattern or ornament on its doors.
If you want to make the cabinet on the balcony brighter, you can use oil or acrylic paints. Oil paints are cheaper. They dry quickly and will be able to repel moisture, which is necessary for lining. However, after five years, a wooden surface coated with oil paints will begin to fade and crack. For these reasons, it is better to give preference to acrylate paints.
In the plan, indicate the dimensions of the structure, the number and type of shelves, the presence or absence of doors.
The cabinet can be painted in one color, or you can create an original pattern or ornament on its doors.
To facilitate this process, you can look at the photos for examples of such furniture.
Decorating a bench-box for a balcony
Since the main task of such a bench is to bring coziness and comfort to the balcony interior, its seat must be made soft. This can be done in several ways:
- place a couple of comfortable pillows on the lid of the bench-box;
- sew an oblong dense pillow with elastic bands at the corners, which will easily attach it to the lid and remove it if necessary;
- cover the upper part of the bench with a pleasant-to-touch fabric or other material, use foam rubber as a soft filler.