Types of mirrors
All mirror canvases are usually divided into two categories:
- with a functional purpose;
- decorative plan, which are usually used exclusively to improve the design.
| Functional | They are used so that a person can look in them while controlling his appearance. They are installed in visible and easily accessible places: bathrooms, hallways. There are cases when living rooms are equipped with mirrors to make them look larger visually. |
| Decorative | They don't look like people. They are intended to become a decoration of the room. |
There are many types of mirrors, and there is no shortage of choice. It all depends on individual preferences, the size of the premises, and financial capabilities. Today, retail outlets can offer the following unusual types of mirrors:
- mirrors patinated look (made in antique style). In this case, special chemicals are used;
- mirrors beveled (having beveled edges, most often in the form of diamonds);
- mirrors tinted or colored (look great in modern interiors);
- mirrors with ornaments, patterns, drawings and all kinds of inscriptions.
DIY materials for mirrors
To start making a mirror with your own hands, you need to decide what it will be made of. The following materials can be used:
- plastic;
- glass;
- cardboard;
- foil;
- metal.
Currently, plastic is in great demand as a reflective surface. But the technology for manufacturing such items is quite complex, and special vacuum equipment is used, the storage of which at home is impractical, unless the family has a mirror manufacturing business.
As for glass and metal, they can be used at home; highly professional equipment is not required. When silvering a mirror, you will need certain chemical reagents, but they can be easily purchased. The metal is replaced by its analogues - foil. It will be almost impossible to achieve a special quality mirror, and it will be inferior to metal and glass specimens.
Foil - a budget replacement for a mirror surface
Mirror production
Sheets of glass
for mirrors A mirror requires a base, which consists of a flat sheet of glass. All components necessary for its production are ground and thoroughly mixed until a homogeneous powder is obtained - glass batch. It is moved along a conveyor belt into a furnace, where it melts into a homogeneous liquid glass mass. It is baked at temperatures above 1500°C to be able to obtain a smooth surface. A web 3-4 meters wide with a thickness of about 4 mm comes out of the oven and is sent to the cutting stage. The cooled glass is cut and checked for defects. Suitable sheets are sent to the metal deposition stage, and rejected ones are sent for recycling.
Interesting: What is a snap and a shot in hockey?
Glass polishing for mirrors
To obtain a reflective surface on a glass base, it is necessary to apply a chemical solution using a special technology. The glass is polished with brushes and a perfectly smooth surface is obtained. It is washed from dust, dried and a chemical composition is applied using a spray bottle. Over the course of 20 seconds, oxidation of aldehydes occurs with an ammonia solution of silver oxide. As soon as the chemical reaction is completed and the solution dries, a mirror surface is formed on the reverse side.
The quality control inspector uses a directional light to check each mirror for defects. To protect against accidental damage, dark green paint is applied to the reflective layer. The dried fabric is finally checked for defects and minor damage, after which it is packaged and sent to the customer.
Fun fact : The first timely mirror was designed and mass produced in 1279. It was invented by the Italian Franciscan monk John Peckham, who conducted experiments with glass and metals. He coated a piece of clear glass with a thin layer of liquid tin, resulting in the prototype of a modern mirror.
For a person at all times, a mirror has been an assistant in establishing social relationships. Previously, it was made of polished metal, coated the glass with tin or silver and always strived to get the perfect reflection. The technology has gradually developed, as a result of which today you can buy a mirror with a 99% reflective surface, which was previously an unthinkable dream. But few people realize the secrets of their mirror when they once again see their ideal reflection in it.
Metal mirrors
It must be remembered that not all metals can be used in the manufacture of mirrors. It is worth using only those that tolerate grinding well. These include:
- steel;
- bronze;
- aluminum;
- silver;
- gold;
- special alloys;
- beryllium.
To find large silver or gold plates, you need to try hard, and their cost will be exorbitant. Moreover, expensive alloys are classified as soft and will not be able to rigidly hold the shape of the mirror. Therefore, they are mainly used only for spraying a surface reflective layer.
Bronze has been used since ancient times. Due to its hardness, it withstands polishing. And this is enough to make a mirror surface.
Steel is considered a younger material compared to bronze. It is widely used to produce reflective surfaces. The principle of working with steel is the same as in the previous version: a cast whole mirror surface is purchased and simply polished. To ensure that the surface has a sufficient reflective effect, it can be silvered, but you don’t have to do this.
Do-it-yourself polishing of stainless steel to a mirror finish
You can watch the video for more details about the process of polishing the material to a mirror-like appearance (in English, but it’s not important here):
Aluminum mirrors are also common. Products made from it are light and cheap, but they have a lot of negative aspects:
- aluminum is quite difficult to polish due to its soft structure, so this procedure takes a lot of time and nerves;
- softness does not allow the mirror to maintain its correct shape.
Beryllium and other special alloys are used in the production of mirrors at industrial enterprises with specialized equipment. Beryllium is very hard and toxic, so it is usually only used to coat objects.
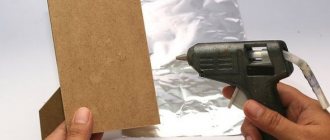
My light, mirror. Cardboard version
Oh, shouldn’t we know that there can never be too many mirrors! Yes, we can adapt them anywhere, because a mirror is a woman’s favorite device and it always comes in handy. I’m sure that you’ve already seen a million different design options for mirror frames, well, here’s the first million way for us all to turn a simple round mirror into a stylish piece of furniture without losing its working qualities, and even vice versa.
It all started with the fact that the author of meijo's JOY from the site https://meijosjoy.blogspot.ru/2011/07/do-you-ever.html
I saw this way of decorating a mirror with scraps of plastic pipes and got the idea to repeat it
And I propose to make it out of ordinary cardboard, like this
And for this you don’t have to painstakingly saw plastic pipes, and you don’t even have to cut cardboard spools of toilet paper either; the frame is made of sheets of ordinary cardboard 3 mm thick. All that is required is to apply 1 cm wide lines on it and cut more blanks, which will need to be glued into rings of two different sizes.
Source
Choosing glass for a mirror
If the choice is made of glass, then it should be selected carefully. Bohemian quality is best - it has a well-polished surface and is practically not subject to mechanical damage. It costs expensive.
But you can also take a regular window option, only there are certain requirements for it: its surface should not be covered with shells, cracks and visible scratches. The glass sheet must have perfect evenness and this is checked in the following way:
- The glass is placed on a flat surface covered with a dark cloth;
- A lamp is installed nearby;
- The metal measuring ruler is carefully applied to the surface so as not to cause damage;
- The lamp is directed onto the glass so that the divisions of the measuring instrument are visible on the glass surface;
- If the glass is smooth, then along the entire length of the ruler there will be no gaps between it and the surface, and its divisions will clearly correspond to the reflection without breaks.
Once the choice of glass is made, it must be cut along the contour. It is worth using a sketch that is cut out of cardboard. Such actions require a little experience, and if you do not have it, then let a specialist do the pruning. When performing such actions, precision is necessary to avoid chips and nicks.
But if you decide to carry out all the work yourself, use a glass cutter with a cutting disc. It's better than diamond.
Glass cutting
Materials
Before you start making plans about where the mirror will be located and in what style it will be decorated, you need to familiarize yourself with the most popular and available materials. After all, the cost of a mirror often exceeds the initial allocated amount. In order not to get into trouble, you need to know in advance the characteristics of each material used .
What can be used to make?
The best material used to create a professional and high-quality mirror is silver. The material does not deform and is not prone to corrosion. However, not everyone can afford the cost of such a mirror. Therefore, it is worth considering the most available options and their characteristics.
Bronze and steel
Sputtering of bronze, steel or silver is necessary in order to give the future mirror its main feature - reflection. After all, without it, the mirror could be considered an ordinary ownerless piece of glass. The service life will also depend on the material .
Today we can highlight a number of main nuances of each material:
- Bronze - there is a large selection of shades and colors. For high-quality reflection, a coating technique of at least 3 layers is used. Well suited for decorating an apartment or room. Designers often use a combination of titanium and bronze to create a sophisticated tone.
- Steel - spraying, although cheap, has a number of positive aspects: high-quality steel is easier to find, and the ability to create shades is also used.
The only disadvantages of the coating are that the cheaper it is, the more layers you will have to use when spraying. Therefore, sometimes it will be cheaper to purchase high-quality material than to use a large amount of what is available.
Aluminum and others
If the quality of the mirror is not important, and it is created solely for decorative purposes, you can use cheap analogues of bronze and steel . More affordable:
- aluminum;
- acrylic;
- copper sheet using oxides;
- plastic;
- foil;
- cardboard.
The most current and affordable option is aluminum . It is easier to find, you can even use whole sheets. The only negative is the quality of reflection, short service life and a minimal palette for creating an individual shade. However, the metal is quite easy to use, it is easier to polish, and the future mirror will even be able to hold its shape on its own. The most convenient option for a beginner.
How to make a glass mirror with your own hands
In order for the mirror to turn out to be of high quality and to serve for a long time, it is necessary to strictly follow the following manufacturing technology:
- Select a table with the correct horizontal surface and place glass on it. To avoid breaking it during the wiping process, you need to place something soft under it.
- Pour polishing liquid over the glass surface. A ready-made “Polish” will do. Then the glass is thoroughly wiped with soft felt, felt or leather.
- Wipe the glass with gauze, previously soaked in distilled water containing a suspension of crushed pumice powder. Afterwards the surface is washed with distilled water.
- Take a wet sponge and wipe the surface with it. Then do the same using gauze swabs that are moistened with a 15% tin chloride solution, repeat the procedure several times. Rinse and wipe thoroughly using a swab.
- After completing these actions, the glass will first become dark, and then quickly lighten due to the fact that silver begins to precipitate. If dark spots appear on the glass surface, they must be removed immediately by wiping with a swab soaked in a pumice suspension, and then using gauze soaked in a solution of stannous chloride. At the end, fill the area again with freshly prepared solution.
- After 7-10 minutes have passed from the start of using gauze or suede for silvering, heavily moistened in distilled water, carefully remove the liquid from the glass in order to pour the mixture there again.
- After 15 minutes, the surface is washed with distilled water. In this case, one edge of the glass rises and the surface is filled with liquid. To determine whether the thickness of the silver deposit is sufficient, you need to look through a mirror at an electric lamp (60W). Its contours should be slightly visible.
- For a mirror to be durable, it must be subjected to high temperatures. In this case, the mirror is given a vertical position and kept in this form at 100 - 150 degrees.
- The “baked” silver film is coated with a mirror-like waterproof varnish. This is done using a spray bottle. As soon as the varnish dries, a thick layer of paint or asphalt varnish is applied to the surface. Coating on mirrors should be done in one direction.
- The final touch is to remove silver stains from the front side using a weak solution of hydrochloric acid using a swab. The making of the mirror is completed.
- If, during the manufacture of the product, droplets of silver get on the skin and clothing, then the stained areas are wiped with sodium hyposulfite and then thoroughly washed off with warm water.
You can also watch an interesting video on how to make a glass mirror using paint and enamels:
Making your own makeup mirror
The options proposed above are not suitable for professional activities. However, this is not a reason to worry; you can make a decent option on your own.
How to make a makeup mirror:
- The first thing to do is choose a shape and find a frame for the future mirror.
- Cut quality glass to the shape of the frame.
- Buy the necessary raw materials - silver nitrate, alcohol, respirator, plasticine.
- The glass must be treated - it is advisable to wash it with a degreaser or alcohol.
- Make small sides using plasticine - it’s easier to remove it later.
- A glucose solution is sprayed onto the glass and allowed to dry on its own.
- After this, a solution of silver nitrate is poured onto the glass and left to dry.
- After 15 minus, the remaining solution is poured into a special container.
- After this, the mirror is washed with clean water and left to dry in an upright position for 24 hours.
- The finished mirror is removed from the plasticine sides and washed a second time.
The better the glass is treated before coating, the fewer bubbles and errors it will have. For professional activities, it is better to use silver spraying, as it guarantees long service.
How to make a metal mirror with your own hands
Bronze and steel sheets can be purchased from a foundry. The Internet can also be used, but you should pay attention to the evenness of the surface in the information. The polishing process takes quite a long time and requires significant labor costs, but the surface layer will be perfect.
The surface is polished using abrasive powder. For a larger binder, solid oil is used. Grinding occurs using a flat iron plate with a smooth surface or a thick sheet of glass. The steps should be like this:
- The sanding pad is placed horizontally.
- An abrasive mixed with grease is applied to the workpiece.
- The workpiece moves along the grinder in various directions, but it should not be brought to the edges.
- The workpiece and grinding pad are freed from the abrasive composition using a flannel rag.
- A soft-grain abrasive is applied on top and the procedure is repeated.
The abrasive is applied up to 6 times, with each subsequent application using a softer fraction. Once the surface is ready, it is polished with GOI paste without using a grinder.
How to make a mirror from foil with your own hands
The most affordable way to become the owner of a hand-made mirror. Retail outlets can offer a huge selection of this material, but it’s worth focusing on the thinnest foil that exists in nature. The most suitable option would be window foil, which protects rooms from sunlight in the summer.
Manufacturing does not require special skills or effort. The glass must be smooth. Take a sheet of foil and cut it to the shape of glass. Then it is glued on the sides. The mirror is inserted into the frame and the product is ready. No complications or negative impact on human health. You can also attach the foil to the glass with tape.
Cardboard mirror
The cardboard must have sufficient density and thickness. It can also be attached to a more rigid material, such as plywood. It is worth purchasing mirror auto enamel in a can and coating the workpiece with it. The finished product will not last long, and its strength will be minimal, and the reflective surface will be of poor quality. But there is a main advantage of such a mirror: it can be given any shape and decorated in any style.
Mirror cardboard
How to make a frame for a mirror with your own hands
You can make not only mirrors, but also frames for them yourself, using all your imagination. The choice of materials for manufacturing is so wide that you should be guided only by your own preferences, the style of the room and financial abilities.
An example of making a frame for a mirror
Don't think that the frame is a very expensive part. You can even use cardboard and paper tubes for a beautiful frame. Moreover, such a miracle can be done with the participation of all family members, even the smallest. Let's look at some interesting options.
- Frames made of polyurethane. They are durable and lightweight, and are not afraid of excessive humidity. You can always change its color by simply repainting it. Polyurethane molding is used for round and oval mirrors. This frame is easy to make.
- Metal frames. You can use aluminum as a thin and manageable material. If forging will look beautiful, it requires a professional approach, although the look will be unique.
- Mirror glass for frames has gained well-deserved popularity. You don't need any great skills to make it. You can purchase special coated glass or use many small glasses.
- The leather frame is quite original. It can have a voluminous appearance if filled with padding polyester. Instead of leather, you can use good quality leatherette. It is more profitable and not everyone can distinguish it from natural canvas.
- Rope frame. A rather non-standard proposal, but it will make the room more comfortable. Disadvantages include fear of moisture, temperature changes, and impracticality.
- Wooden frames. If you have already worked with this material, then building a frame will not give you much trouble. You can make a carved product, choose a specific design.
How to make a mirror with your own hands - instructions with photos and videos
5 (100%) 1 vote
LiveInternetLiveInternet
Wednesday, June 20, 2021 11:44 + to quote book Source https://zapivo.net/vtorayazhisnveshey/item/zerkalo-solntse-svoimi-rukami-mk
MATERIAL Chinese chopsticks Material parameters TYPE OF WORK Remaking old things. EVENT Birthday TYPE OF MATERIAL SUPPLY Master class VIEWS 3314 TOOLS AND MATERIALS Round mirror; Glue gun; Cardboard circle; PVA glue and super glue; Loop for attaching to the wall; Double-sided tape; Protractor; Set of bamboo skewers; Brass craft ring; Spray paint. MIRROR-SUN WITH YOUR HANDS A mirror in the shape of a sun is not just a mirror in which you can look, it is also a stunning decorative element that can decorate even the most boring room. The round shape of mirrors has always been considered a symbol of harmony, some kind of internal completeness and constancy. And the smooth mirror surface, like clean water, gives a person a feeling of freshness and calm. Recently, round-shaped mirrors in the shape of the sun, from which numerous rays emanate, have become increasingly popular. It is difficult and expensive to buy such a mirror, but making it with your own hands will not be difficult. DESCRIPTION OF THE MASTER CLASS 1. First, make a stencil. To do this, cut a circle out of cardboard with a diameter the size of a mirror. Then, using a protractor, divide it into 24 equal sectors, placing marks every 15 degrees. On the same circle, draw another inner circle, 2.5 - 3 cm away from the edge.
2. Now take wooden skewers, skewers or wooden sticks, which can be taken from old roller blinds, approximately 30 cm long, in the amount of 96 pieces. Divide them into 4 piles, 24 pieces each. Trim off the pointed ends on one side. Place the sticks from the first stack to the side, and shorten the sticks from the other three stacks by 7, 10 and 13 cm. 3. Take the longest sticks and glue them from the center along the lines drawn onto a round cardboard base with hot glue. These will be the longest rays of sunshine.
4. Take sticks from the second stack and start gluing them to the circle, but not from the center, but from the border of the inner small circle, one on each side of every second long ray. Glue sticks from the border of the inner small circle, one on each side of every second long ray
5. In the same way, glue the shortest sticks from the third stack, and then from the fourth stack. Paint the finished dried workpiece with spray paint in gold color.
6. When the paint on the piece is dry, glue a round mirror on top of the golden rays so that the mirror matches the round cardboard base. 7. If the mirror does not have a rim, glue a brass ring with a diameter slightly larger than the diameter of the mirror to make it easier and more convenient to glue it to the mirror and to the rays.
8. On the back side of the sun, glue a mount for which the mirror will be hung on the wall. If you want the rays not to come into contact with the wall, you can glue a saucer with a fastener or a loop from an old photo frame to the cardboard base. The sun's rays will look even more spectacular.
9. Your sun is ready and can be hung on the wall. 10. Or you can turn this mirror into the universe by gluing small round mirrors to the rays. If you don't have small mirrors, you can cut them from plastic mirror panels. The view is amazing. The mirror sun along with the stars will shine and shine like real ones. You can glue them in different ways using double-sided tape. You can glue them symmetrically and vice versa, giving them unusualness and mystery.
| Categories: | WITH YOUR OWN HANDS/Paintings, panels DIY FURNITURE |
Cited 2 times
Like share
0
Like
- I liked the post
- Quoted
- 0
Saved
- Add to quote book
- 0
Save to links
Liked
0