Compared to a classic one, a kneeling chair, especially one made by yourself, not only looks more original, but has a number of advantages.
In particular, it helps in the fight against incorrect posture. Regular sitting on a kneeling chair trains the back muscles and strengthens the lumbar spine.
EVERYTHING YOU NEED FOR THIS ARTICLE IS HERE >>>
Before you begin manufacturing the selected product, you need to familiarize yourself with the sketches and drawings. To understand whether I can do everything on my equipment and what difficulties I might encounter along the way.
Having considered the sequence of operations, you can begin.
First you need to make beech blanks. It is necessary to saw parts from long boards with an allowance. To do this, I used a hand-held circular saw, popularly also called “parquet.”
There is one caveat! When purchasing boards, the ends are usually coated with paint. This is done to reduce the number of cracks during drying. But they still meet. Therefore, in order to reduce the likelihood of cracks in my product, I cut about 5 cm from the board, and then saw it to the required size.
Many people say that “carpentry” begins with a jointer. And one cannot but agree with this. After all, without creating the base side, we are unlikely to get something beautiful and functional.
Therefore, the next step will be the jointing process on the machine.
After jointing the boards, we move on to the surface planer. This machine allows you to calibrate boards to a given thickness with the condition that the two planes are parallel.
After I cut out all the blanks, measuring 40 x 30 mm, I went to the miter saw and sawed off all the parts cleanly to size according to the drawing, except for parts numbered 2, 5 and 9.
If you look closely at the drawings of these parts, you will notice that the center of the hole is located outside the workpiece itself. Therefore, I first drilled holes with a diameter of 42 mm according to the markings, and then sawed them to the size I needed.
Drilling was carried out on a floor-mounted drilling machine using a Forstner drill with a diameter of 42 mm.
DRAWINGS IN DETAIL
History of appearance
In 1970, the Danish scientist Mendel observed and studied the postures of people leading a sedentary lifestyle, office workers, and schoolchildren. Considering the way they sit, he came to the conclusion that the most comfortable position for sitting on a regular chair is to tilt the body forward relative to the pelvis. It is this constantly repeated body position that leads to curvature of the spine and other back diseases.
For many decades, scientists have been trying to find a design that would fully meet all the requirements.
From this, he designed a chair whose seat was tilted downward by 15 degrees. This structure helped maintain correct posture, but had its drawbacks. A person sitting on such a chair constantly rolled off it.
The most useful chair is one whose seat is located at an angle of 15° relative to the horizontal.
A number of researchers from Norway became interested in Mendel's work and in the course of development, they improved the kneeling chair by inventing a knee rest. Thus, they were able to evenly distribute the load on the buttocks and knees, and the spine began to serve as the center of gravity. The body of the person sitting reflexively straightened at the slightest tilt forward.
The result was a chair with a footrest in a half-bent position, on which one stood with one's knees.
One of the developers of such a chair was the owner of the furniture factory, Peter Opsvik. It was thanks to him that such a chair hit the store shelves.
COMPONENTS AND MATERIALS FOR THE KNEEING CHAIR
| Name | Quantity |
| DOMINO spike 10×40 | 2 pcs. |
| Dowel f 12 x 40 | 5 pieces. |
| Screw f4x20 half-crown head | 8 pcs. |
| Screw f4x40 countersunk. head | 10 pieces. |
| M8 nut with locking ring | 6 pcs. |
| Washer f4xf8mm | 8 pcs. |
| Washer f8hf16mm | 6 pcs. |
| Upholstery fabric | 1m2 |
| Hard foam rubber | 0.5m2 |
| Hard foam rubber | 0.5m2 |
| Sintepon | 1m2 |
Therapeutic effect of orthopedic structures
An orthopedic knee chair is recommended both for healthy people who want to maintain their supporting apparatus into old age, and for patients with medical prescriptions:
- In case of osteochondrosis, osteoporosis, intervertebral hernias and prolapsed discs, by relieving tension with the correct position of the back and spine, there is a significant reduction in pain symptoms and a retreat of the disease.
- Correct posture helps restore the natural curves of the spinal column in mild to moderate scoliosis, completely preventing its development in the future.
- Since the load is transferred from the buttocks to the legs, the use of a kneeling chair reduces to zero the development of hemorrhoids - a disease of people leading a sedentary lifestyle. If present, the symptoms weaken over time, and complete recovery may even occur.
Despite all the positive characteristics and health benefits, in some cases the use of this piece of furniture is not possible:
- Due to standard sizes, it is impossible to choose a chair for small children.
- If a person has bad knees, using such a chair will lead to pain and aggravation of the condition of the joints.
- Individual characteristics of the body that do not allow loading the leg muscles.
Many owners of this wonderful invention recommend alternating its use with conventional orthopedic chairs so that the frequency of loads in the sitting position changes.
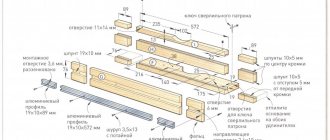
KNEEING CHAIR PARTS
| Part no. | Name | Thickness, mm | Width, mm | Length, mm | Material | Qty |
| 1 | Rear cylinder | F42 | 400 | Beech | 1 | |
| 2 | Support horizontal | 30 | 40 | 540 | Beech | 2 |
| 7 | Spacer | 30 | 40 | 90 | Beech | 1 |
| 8 | Knee support | 12 | 260 | 360 | Plywood | 2 |
| 5 | Spacer | 30 | 40 | 298 | Beech | 1 |
| 6 | Small cylinder | F42 | 200 | Beech | 1 | |
| 7 | Seat | 12 | 300 | 350 | Plywood | 2 |
| 8 | Triangle | 30 | 70 | 150 | Beech | 3 |
| 9 | Rack | 30 | 40 | 665 | Beech | 2 |
| 10 | Spacer with hole | 30 | 40 | 90 | Beech | 1 |
| 11 | Front cylinder | F42 | 400 | Beech | 1 | |
| 12 | Hairpin | F8 | 170 | Steel | 2 | |
| 13 | Hairpin | F8 | By | Steel | 1 | |
Details
Equipment
Today there are models on sale that are equipped with the following elements:
Backrest for additional spinal support.- Wheels for easier movement.
- With an arched support that allows a person to swing on a chair.
- With a static type support and one that can be changed.
When selecting a particular model of orthopedic specialized chair, it is important to consider the following:
- Individual human parameters (weight and height).
- Recommendations from doctors.
- Features and personal wishes.
pros
An orthopedic chair has several advantages at the same time:
- Helps eliminate stress from the back.
- There is no pressure on the thoracic region.
- Preservation and maintenance of correct posture.
- Blood circulation in the thighs is significantly improved.
It also happens that due to prolonged sitting on a chair, the feet begin to become numb, and pain in the knees also appears. You can prevent discomfort if you take short breaks every hour.
Preparation of tools and materials
Orthopedic furniture items are sold in most retail establishments. But its price is sometimes so high that not everyone can afford to buy such a chair. You can also use alternative suggestions and make an orthopedic chair with your own hands. To begin with, during production there is no need to interrupt and delay the finale if you prepare all the materials in advance. It is advisable to have all the tools in the workshop, but it is still worth checking that everything is available. To make an orthopedic knee chair with your own hands according to the drawing, you will need to prepare:
- Plywood sheets.
- Wooden blocks (it is important to give preference to hard wood).
- Upholstery fabric.
- Soft filler.
It is also necessary to prepare materials for fastening in advance. The finished product must look as attractive as possible, and for this it will not be superfluous to prepare a varnish composition in advance, which you can use to cover all wooden elements. In addition, you also need tools:
- Electric jigsaw.
- A pencil for marking.
- Electric drill.
- A screwdriver (if you can’t buy one, a screwdriver will do).
- Grinding machine (the grinding process can also be carried out manually using sandpaper).
Next, let's move directly to the process.
Step-by-step instruction
Making an orthopedic chair with a knee rest will not be accompanied by any particular difficulties. But in order to prevent even small errors from appearing, you should be sure to follow these instructions:
From pre-prepared bars, blanks should be cut in accordance with the dimensions indicated in the drawing.- The cross bars must be attached to the lower support, which acts as legs in the structure.
- A single bar should be installed on the back side of the backrest, and then connected to the seat support.
- Cut grooves on the bar through which you can adjust the height.
- Attach a base to the seat on which the knee rest will be attached so that it protrudes slightly forward.
- You also need to install a jumper for the grooves on the back.
- Using an electric jigsaw, you should cut out two rectangular shapes from plywood (the first will be used to make a seat, and the second will be a footrest).
- Cut out a couple of pieces of foam rubber, which are important to stick on the blanks.
- In order to give the seat a complete look, it and the footrest should be covered with upholstery fabric.
Let's move from theory to practice
According to the drawing, we need to prepare wooden blocks. Wood should be used without knots, preferably hardwood.
If you don’t want the chair to start creaking in a month, then use furniture dowels and wood glue to connect the beams.
The procedure for making a chair will take a little longer due to the long drying time of the glue. For reliability, additionally, the connections can be fastened with self-tapping screws or confirmations.
We cut out the seat and knee rest from 20mm thick plywood. And we attach it to the frame of the chair using confirmations and furniture dowels.
Of course, without soft upholstery it will be completely uncomfortable to sit on such a chair, so the plywood will need to be covered with foam rubber.
It is advisable to use several types of foam rubber, hard at the bottom and softer at the top. This is done so that the knees do not press through the soft foam rubber and do not rest against the hard plywood.
We cover the foam rubber with elastic decorative fabric.
For ease of movement, we attach wheels to the base of the chair.
Since we use a square beam at the base of the chair, and when unfolded the chair stands on its edges, to attach the wheels it is necessary to make a recess in the lower beam. To ensure that the wheels are installed strictly vertically, we place the chair in the unfolded state on the floor. We put a ruler on the side (a block 15-20mm thick), and from the end of the base of the chair, with a pencil we mark where exactly to make a selection for the wheels.
Kneeling chair ready for use
When folded, it does not take up much space, and it can easily be stored in the pantry.
Therapeutic effect
The knee orthopedic chair model allows you to adjust the seat height, adapting to everyone. With a correctly adjusted chair, the load is distributed approximately 60 to 40. Of this, 40 percent of the load goes to the knees and only 60 to the pelvis. This allows you to significantly relax your back muscles and take a comfortable position without tilting your body forward. Those. You will feel comfortable sitting on such a chair with a straight back.
A feature of the kneeling chair is the redirection of the load from the lower part of the spine to the muscles of the legs, while maintaining a vertical position of the back, the shoulders remain straightened.
Doctors and orthopedists advise purchasing such a chair for schoolchildren and students who have to spend a lot of time sitting in class.
Since its inception, when the chair had only a seat and a knee rest, its design has acquired many innovations.
Now about the improvements
1. After upholstering the knee pads, the thought immediately came to me that making three rectangular pads would be much easier
2. I cut the planks into the support bars by 20 mm, plus glue and confirmations. On the first pine chair we had to put corners, because my daughter somehow managed to loosen the glue.
3. I strengthened the part of the support bar that comes from the seat. That is, I have not 2 strips there, but 5. And they are also embedded into the beam by 20 mm.
4. Made the seat and knee pads composite. There is a supporting part, and there is the seat itself and knee pads already with foam rubber and covered. To connect the seat and knee pads, I inserted M8 bolts (M6 is also possible), the heads of which were filled with epoxy (you can use liquid nails or other reliable glue with filler).
5. Seat angle adjustment system. Already tried it and am satisfied. The chair became a little higher than before, and I had to change the height for my daughter using a bar. It was so easy to set a comfortable angle, which could not be done in the basic model. You can supplement the system with a series of holes along a different radius and thereby obtain an almost perfectly smooth adjustment of the seat tilt.
Well, I’ll just share where I found the beech. It’s easier for those who have such boards, but I couldn’t find them in my region. And I found beech steps in a large store and right there in the store they gave me one meter (1000*400*40, it seems) step on 40*22 slats and several 40*45 bars and I happily went home to make chair No. 2. And now I want to make chair No. 3, making the parts not prefabricated, but solid.
My daughter went to first grade and I see that the child’s seat in such a chair is really different than in a traditional one. The child has a straight back without any effort. For an adult, IMHO, you need to make a chair out of iron. I (100 kg) carefully sat down on the first pine chair, but there are still doubts that it would have supported me for a long time.
Orthopedic chair for kneeling - Instructions
I am an architect by profession, so I have to sit at a computer all day, straining my back and eyesight. And while hourly exercises help me maintain my vision, things weren’t going well with my back. Standard chairs do not allow you to sit properly, and after 10 hours your back becomes very tired. Therefore, after looking at the design on the Internet, I decided to make an orthopedic chair for working on my knees. Working in a reclining position greatly relieves the back, does not disturb your posture and does not allow the intervertebral discs to compress too much. In general, there are a lot of advantages! Except for one thing - it’s almost impossible to buy this. But many can do it! So let's get started.
Step 1. Looking for a design. Orthopedic chair for working on your knees on the Internet.
There were few interesting designs on the Internet. I chose the ones I liked. And you can also look at them in the picture above. Why I liked them: they are made of wood (I'm not very friendly with metal), they have a simple mechanism for adjusting the position of the pillows, and almost all of them have wheels for easy movement around the house.
Step 2. Designing an orthopedic chair.
parts and dimensions of the rack
Using one of the design programs, I made a drawing like this. You can take my sizes, or you can customize them for yourself.
Step 3. 3D view.
In these images you can see 3D renderings of our upcoming folding orthopedic kneeling chair. Looks good, right?
Step 4. Construction process.
we try on the sawn-off parts and insert the axles.
After we saw off all the blanks according to the dimensions indicated above and drill holes in the required places, we will check the resulting parts. By inserting long wooden pins into the holes, we will check that everything fits together.
In this same step, you can glue some of the planks together with wood glue. Which ones you can understand from the pictures above.
Step 5. Prepare holes for wooden dowels.
drill holes for dowels dowels
A very important step. The most loaded connection is between the diagonal planks and the horizontal crossbars on which the furniture wheels will be attached. Drill two holes in each board as shown above, then add a little glue, hammer in the wooden dowels, attach the parts to be connected to each other and tighten them tightly with wood screws.
Step 6: Seat base.
glue the support board from the back side
At this step you need to glue the base for the seat to the boards. The technology is simple - apply glue and squeeze tightly with clamps.
Step 7: Knee rest pad.
Glue the knee stand
Now you will need to glue a board that will serve as a knee stand. Apply glue to the surfaces to be glued and secure them with clamps or self-tapping screws.
Step 8. Connecting the parts.
connecting parts of an orthopedic chair connecting parts of an orthopedic chair
While our bases are drying, gluing them to wooden planks, we can assemble the structure together. As an axis, you can take either a thick wooden handle or a metal bolt.
Step 9. Check and sand the orthopedic chair.
We check that our orthopedic chair folds and unfolds properly. Then we sand all surfaces with sandpaper, removing irregularities and burrs. Next, to prevent the wood from darkening, you need to cover it with paint or varnish. I coated it with clear varnish to highlight the wood structure.
Step 10. Making pillows.
apply glue under the pillows applied glue
In order for us to sit softly on our orthopedic chair, we need to glue soft pillows to the bases. The material I chose was polyurethane foam.
We apply glue to the surface and apply strips of polyurethane foam, nothing complicated.
Step 11. Cut and glue additional layers.
we cut the pillows, the general appearance, we add more softness.
We cut our foam along the perimeter with a sharp stationery knife to the shape of the base. After testing (I sat down on an orthopedic chair), I realized that my weight was pushing this layer of polyurethane down to the wooden base. After that, I took and glued an additional layer of foam rubber on top for greater softness.
Step 12. The pillows are ready.
stretch the fabric ready-made pillows ready-made pillows
In order to give the pillows a finished look, you need to cover them with good fabric. I used a piece of blue stretch fabric that I stole from my wife.
To stretch the fabric, you can use a furniture stapler or glue, or a combination of both.
Step 13. Wheels.
we mark the surfaces for the wheels, we make a cut for the wheels, we screw the wheels screwed on.
To begin with, use a long and flat strip to mark the planes for installing furniture wheels. Then we cut down the excess tree, according to our markings. We screw our furniture wheels onto the resulting platforms with self-tapping screws. They will allow you to easily roll your orthopedic chair around the room and generally provide a lot of advantages (you can arrange chair races, for example).
Step 14. Have a seat!
folded chair for kneeling work unfolded chair for kneeling work
That's all! Get comfortable in our brand new DIY orthopedic kneeling chair! Believe me, it is very, very convenient! Even after ten hours of work, nothing hurts in my back.
Manufacturing materials
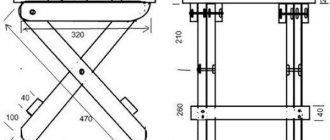
Do-it-yourself bench press bench
In the production of chairs that provide an orthopedic effect, metal or wood is used.
The use of metal increases the reliability, stability, and service life of the product. This design has more possibilities for adjustment. The steel base is chromed, painted with special paint or coated with Teflon.
Wooden models are usually made from solid natural oak, beech or multi-layer plywood.
For home use, when choosing, preference is often given to products made of wood, as they fit into the interior more easily and are lighter in weight.
However, if you need a chair with maximum service life, you should buy a model with a steel frame.
Drawing with dimensions
The design of an orthopedic chair consists of a seat and a knee rest, which can be solid or consist of two pads.
An important stage in the execution of the product is the preparation of the drawing. Specialists and folk craftsmen have developed many designs for kneeling chairs with standard sizes, but it is better to make them with sizes that will meet the needs of a particular person. How suitable and convenient the design is to use depends on a correctly executed drawing.
Advantages and disadvantages
Almost no invention is perfect, and even the most perfect design will have flaws and shortcomings.
Pros of a kneeling chair:
- posture improves;
- back muscles are trained;
- the load on the spine is reduced;
- prevention of scoliosis;
- blood flow to the lower body improves;
- the chest straightens, breathing improves;
Models with wheels and a back, with static support and in the form of a transformer, with an arched support that allows the sitter to swing, corset chairs appeared.
Minuses:
- the appearance of pain in the knee joints;
- it takes a period of getting used to;
- feet may go numb;
- possible slipping from the chair;
- it is necessary to adjust the chair for each person sitting down;
- unsightly appearance;
People who use this model of chair for a long time get so used to it that they no longer want to change to a regular one.
The most suitable model is selected taking into account the person’s weight, height, medical recommendations and individual preferences.
Although there are disadvantages, this does not mean that all of them will be relevant to you. Some people with bad knees do not experience discomfort or pain in the joints when sitting on an orthopedic chair with this design. It all depends on whether you distribute the load correctly and what model of chair you choose.