Installing a sink on a vanity is a common type of work ordered from plumbers. However, sometimes even masters make offensive mistakes, as a result of which sinks begin to leak, crack and quickly lose their appearance. The only way to avoid such dire consequences is to take matters into your own hands.
And if the installation of a bathtub or toilet is hardly accessible to a non-professional, but even an uninitiated person in the secrets of plumbing can cope with the installation of a sink and even the cabinet itself, with the proper skill. We'll talk about how to attach a sink to a bathroom cabinet below.
How to attach a sink to a bathroom vanity
Accessories
Before you start fixing the sink, you should make sure that you have all the components, which include:
- sink or sink;
- mixer (the connections of which can be either flexible or rigid);
- siphon;
- fastening elements (bolts, FUM tape, dowels, pipes, sealant and other items, which we will describe in step-by-step instructions);
- cabinet.
Accurate knowledge of the necessary components will significantly facilitate the process of assembling and securing the cabinet with sink
Among the tools that will be needed when installing a sink, we outline the main ones:
- drill;
- screwdriver;
- building level;
- adjustable wrench;
- wrench (for installing the mixer).
The tools at hand may vary depending on the method of work of a particular master.
Installing a nightstand and sink
It is important to understand that there are no universal instructions for fixing the sink and preparing the cabinet. There are different types of washbasins, which we will talk about later, which require a different approach. Below we will describe the option of installing a sink for a floor-standing cabinet on adjustable legs.
Step 1. Before starting work, you need to turn off the water supply in the house, and then remove the plugs from the water valves that are intended for the future sink. To cope with this task, you can use an ordinary adjustable wrench. Make sure that the internal threads of the valves are free of plaque and other contaminants.
Removing plugs from water outlets
Step 2. Screw the instrument taps (inlet taps) to the socket. Wind plumber's tape clockwise around the faucet. If you have chosen a high-quality tape, then 5 turns is enough for it to completely cover the thread. Even before installation, press the material firmly onto the threads.
Coating the threads of the instrument tap with FUM tape
Step 3. Screw the water line tap clockwise into the prepared hole. When using corner taps, make sure they face up.
Tightening the instrument tap
Step 4. Using a similar technology, install the second tap. Once you have leveled the taps, turn them off.
After installing two instrument valves, you need to turn them off
Step 5: Install the hoses and hand-tighten them. Upon completion of installation, supply hot water and drain some of the dirty water from the pipes, then check the structure for leaks.
Installation of hoses
Finished hoses
Step 6. Move the washbasin to the wall.
The cabinet must not block the installed hoses
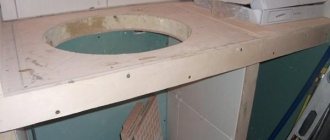
Step 7. Under the cabinet you will find a drain, the width of which is 50 millimeters. To immerse the hose in it, you will need to drill 2 holes in the cabinet.
Sewer slime under the cabinet
Step 8. Measure the distance from the wall to the drain opening and measure the same distance from the edge of the cabinet.
Measuring the drain neck
For measurements you will need an ordinary ruler
Step 9. Make the first hole.
Drilling a hole for the drain neck
Step 10: Mark a hole on the interior partition of the cabinet and drill it using a drill with a smaller diameter bit.
Drilling the internal partition of the cabinet
Step 11: Level the cabinet. For this task, most cabinets are equipped with special legs that can be adjusted if necessary.
Aligning the cabinet
Sink installation
Step 1. Install the siphon pipe with the wide end into the drain. In this case, the upper end of the tube will need to be connected to the siphon body. Avoid applying excessive force—all hand-held operations do not require forceful pressure, which could damage materials.
Corrugated tube
Upper end of the tube
Step 2: Place the sink on the cabinet and adjust the length of the top siphon tube.
Siphon adjustment
Step 3. Mark two holes for fastening on the wall, which you will later need to install two plastic dowels and drill the tiles in the marked places using a special drill.
Making holes for dowels in tiles
Step 4. Install the prepared dowels into the holes and screw the threaded rods into them. The sink will be fixed on these two pins.
Inserting threaded rods into dowels
Step 5. Attach the siphon grille (its upper part) to the sink, and then place the sink and screw it through the plastic bushings with nuts.
Screwing the sink
Step 7: Take the O-ring that connects the sink to the trap and hand tighten the trap.
A rubber ring will allow you to secure the siphon to the top of the sink
Step 8. Install the faucet and screw on the two supply hoses and the fixing bracket by hand.
Screwing the hoses
Installing a faucet on a washbasin
Installing a faucet is considered a fairly simple procedure compared to installing a whole sink and includes a number of simple steps. In order to install the faucet, you will need: a flexible hose (usually sold complete with the faucet), a mounting pin, a mounting plate, an adjustable wrench and a socket wrench (its presence is desirable, but not required.
Step 1: Make sure the water supply is turned off, and then unscrew the aerator using an adjustable wrench or any other suitable tool.
Unscrewing the aerator
Step 3. Screw the mounting stud into a hole that matches its diameter.
Installing the Mounting Stud
Step 4. Screw in the flexible hose. This liner is screwed in by hand, since using a tool increases the risk of damage to the gaskets.
Screwing in flexible hose
Step 5: Install the O-ring.
Installing the O-ring
Step 6: Thread the flexible line through the hole in the sink. It is recommended to thread the eyeliners one at a time - this way they will go in more smoothly.
Immersion of flexible wiring in a washbasin
Step 7. Secure the faucet from the bottom.
Securing the mixer
Step 8: Finish installation with an adjustable or socket wrench.
Fixing flexible hose with a key
Step 10. Connect the flexible wiring to the water sockets and tighten them tightly.
Tightening water sockets
Step 11. Turn on the water supply and run the water to rinse the faucet from minor dirt and deposits.
Cleaning the mixer
Step 12. Screw in the aerator.
Return of the aerator
Video - Installing a washbasin yourself
Types of sinks with cabinets
Today, there are a huge number of options for bathroom cabinets, which can differ significantly from each other and have their own nuances of installing a sink. There are three main types of such shells:
- floor;
- hanging;
- corner
This classification is made based on their location. The most traditional option, most often found in construction and furniture stores, is a floor stand. Hanging and corner ones have a more complex design, often requiring an individual approach and the hands of an experienced craftsman.
Basic classifications of bathroom cabinets
The above division of shells into three categories is not the only possible one. There are other varieties based on other criteria, for example:
- washbasins with built-in mirror;
- washbasins with basket;
- narrowed washbasins;
- asymmetrical washbasins.
All this variety of washbasin models, which at first glance seems chaotic, is aimed at adapting to the parameters of a particular bathroom, which often does not fit the traditional “style” of a cabinet with a sink. In this chapter, we will briefly highlight the main types of cabinets and their key features.
Floor stands
Floor-standing bathtub cabinets are a set that traditionally includes two elements:
- the cabinet itself (located either on legs or having a base;
- sink (can be of various shapes - square, oval, round).
Such cabinets are easy to install, which, as a rule, does not require special preparation. With due diligence, even a beginner can handle their installation. The wall design does not imply additional fastening systems that are necessary, for example, for a hanging system.
Classic floor-standing cabinet with sink on legs
The choice between a base and legs is individual, since each option has its own positive and negative sides. The base prevents dust from accumulating under the cabinet, while the legs allow you to adjust its length. If you opt for cabinets with legs, be sure to pay attention to the presence of silicone pads, which help preserve the floors in the bathroom.
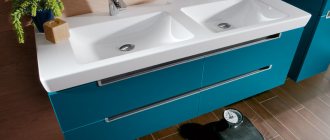
Base cabinet with double washbasin
Hanging cabinets
Wall-hung washbasins are much less common than floor-mounted washbasins and have two main advantages:
- saving space in the bathroom (a rather controversial argument, since floor cabinets equipped with drawers can also be used to clean up free space);
- simplification of the cleaning process - due to the fact that the hanging cabinets do not come into contact with the floor, cleaning the bathroom is easier.
Hanging cabinets often require built-in drawers
In addition to the utilitarian side of the issue, there is also an aesthetic one. Some people opt for suspended structures due to their visual lightness and laconicism, which many floor options do not have.
Hanging washbasins are attached to a solid wall, and it is important to use only high-quality fasteners, otherwise the likelihood of the entire structure falling and damaging the wall increases. The shape, color, material and components of wall-hung washbasins can be very different depending on the specific manufacturer. Such cabinets include:
- single or double sinks;
- shelves of various widths and depths;
- boxes;
- countertops.
Wall-hung cabinet with countertop washbasin
Corner cabinets
The main purpose of corner washbasins, like corner kitchens, is to save space by using corners in the bathroom. It should be noted that corner structures are not the opposite of floor or suspended ones; on the contrary, they can be either the first or the second. It is with corner washbasins that the main emphasis is placed on the cabinet, which, due to its coverage of a larger area, can be effectively used for storing various items. The sink in such washbasins is usually located in the middle.
Floor-mounted corner cabinet
Custom washbasins
There are two main types of non-standard “augmented” washbasins:
- washbasins-“modules” - such washbasins require the presence of additional accessories, be it mirrors, shelves or even combined cabinets. The dimensions of such structures can be very different - depending on the number of parts combined with it. Such kits allow you to save money - storage elements built into one system are usually cheaper than those purchased separately;
Bathroom cabinets can combine the functions of a chest of drawers, washbasin, laundry basket and other items
- asymmetrical washbasins - this type of washbasin does not have a particular practical orientation, being rather a stylistic delight that violates traditional rules. The non-standard design involves mounting on the surface of a pipe or even partially cutting into it. Often such washbasins do not have a hole for the faucet, which forces the master to mount the faucet to the wall. It is not recommended to install asymmetrical washbasins yourself, as there is a high probability of making a mistake.
Asymmetrical sinks are difficult to install
Manufacturers, price range
When choosing, pay attention to well-known companies.
Manufacturers of high-quality bathroom furniture are the following companies:
- Villeroy & Boch. Producing countries operating under this brand: Germany, Italy, Austria.
- Roca. This furniture is produced in Spain and Russia. The brand itself is Spanish.
- Cersanit. Manufacturers: Romania, Poland, Russia.
The furniture from these manufacturers is durable and of high quality, suitable for furnishing bathrooms. If comfort is important to you, feel free to rely on these brands. However, the cost of such cabinets is quite high. The price of products starts from 8,000 rubles, and on average – 22,000 rubles, which not everyone can afford.
If you are expecting a lower cost, there is a way out. There are Russian manufacturers of bathroom furniture. They also offer good quality. The most famous Russian manufacturers are Triton and Aquaton. In terms of quality, they are on par with European manufacturers, but their cost is much lower and ranges from 4,000 rubles, the average cost is 9,000 rubles.
The choice of manufacturer generally depends on preferences and financial capabilities. Naturally, the leaders will provide the greatest quality and guarantees, but the cost of their products can stop the buyer.
Our range
Cabinet with sink Aquanet 00245255 RUB 22,328
Washbasin cabinet Comforty Barcelona-70 P with sink 00003128161 9662 RUR
Cabinet with sink Aquanet 00254700 RUB 26,099
Cabinet with sink Aquanet 00245256 RUB 28,094
Cabinet VOD-OK Abbot Black 70 Floor-standing under washbasin Malta 70 RUB 18,900
Which material to choose
Simultaneously with the choice of the design of the cabinet itself, the question arises of choosing the material for this piece of furniture. We talk about the materials that are most often used in the manufacture of cabinets, as well as their features, in the table.
Table 1. Types of materials for cabinets with sinks
| Material | Description |
MDF or chipboard | These materials involve the use of not solid wooden elements, but compressed sawdust, which can significantly reduce the cost of production and reduce the final price. It is believed that MDF has a higher level of quality compared to chipboard and is not prone to deterioration even with high humidity and temperature changes. Both MDF and chipboard require pre-coating with a protective layer (whether acrylic or varnish), which will significantly extend the life of these materials and make them more attractive |
Tree | Despite the fact that in most cases natural wood outperforms chipboard in terms of durability, in the bathroom all these merits fade. The fact is that wood does not tolerate temperature fluctuations (inevitable in this room), and constant humidity threatens the wooden washbasin with deformation and swelling. To save the situation, the wood should be periodically treated with varnish or oil, which will require additional funds. Among the species that can be recommended for a bathroom are oak, teak and beech. |
Plastic | Plastic is a universal material whose practicality has been repeatedly proven. In addition to the lack of reaction to temperature fluctuations, this material is also distinguished by its affordable price and extremely easy care, without requiring coating with various protective substances. Another advantage of plastic is the large number of models from which you can easily choose the appropriate option. The main disadvantage is its soilability - the plastic is easily covered with scratches, which does not affect its “direct responsibilities”, but spoils the appearance |
Metal | Washbasins made entirely of metal are practically never found in home bathrooms. Rather, we are talking about the presence of metal parts that are aesthetically integrated into the overall concept. Since metal vanities are a design choice and fit a very limited number of styles, they are difficult to find publicly available in stores - such items are most often made to order. It is important to keep in mind that only stainless steel can “stand” in a bathroom, while other types of metal quickly begin to rust and become corroded. |
Glass | Glass can be used both for making sinks and for making the cabinets themselves (which is quite rare). Like metal, glass is considered a luxury and is not a common material for sinks. Unlike metal, glass is much more practical, since it is not afraid of any moisture. Its weakness, as in the case of plastic, is that it gets dirty - streaks, dirt, dust, and so on very quickly become visible on the glass surface. Fans of glass cabinets should opt exclusively for tempered durable glass, which can be used without fear |
Connections
The mating of parts is a key stage of the technical process. Laminated chipboard and MDF are assembled on confirmaments, pre-drilling holes with stepped drills. The connection is technologically advanced, but not reliable enough due to the pressed structure of the slabs. Drywall is fastened with self-tapping screws to the galvanized sheet, and the trim is glued.
Connection by confirmations.
Long boards of the shield are held together using a tongue and groove method. Shields with sidewalls are assembled on dowels, dowels, and in a mustache.
Joining panels using dowels.
The sides of the boxes are mated with tenons; the labor-intensive dovetail joints are durable.
It is difficult to make a high-quality tenon joint with a hacksaw and chisel; it is best to use a router or tenon cutter. Fastening with confirmations, reinforced with fixing dowels on glue, helps.
Decoration of sinks
There are three main ways to “combine” a sink and a cabinet:
- built-in sink. This option is the most classic (and for most people, the only one), suggesting the placement of a sink over the entire surface (or most of) of the cabinet, in which a recess of the required size has been prepared for this purpose. The inconvenience of this option is the need to seal joints and seams, since the likelihood of moisture getting into the cabinet is high;
A built-in sink is the easiest option to install.
- semi-recessed sink. As you can easily guess, the peculiarity of such a sink is that it is only partially immersed in the cabinet, while the second part protrudes out. This option is ideal for compact bathrooms, in which placing a large countertop that completely accommodates the sink will “eat up” the lion’s share of the space. In addition, semi-built-in sinks are more convenient to approach from all sides;
Semi-recessed sinks extend beyond the edge of the countertop
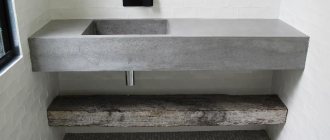
- countertop sink. This type of sink requires the presence of a countertop, which we discussed above. Overhead sinks are quite rare and attract with their unusualness, however, when choosing them, it is important to take into account the dimensions of the product, since a washbasin that is too high or too low will be inconvenient to use. The height of the upper cut of the washbasin should be about 90 centimeters from the floor.
Overhead sinks are installed complete with a countertop
You can read about the types of sinks according to the method of their fastening below.
Types of sinks by mounting method
Design
There are floor-mounted and hanging versions of the lockers. The first ones do not need to be fastened; the legs organically fit antique wooden models. The latter are more compact, do not interfere with the feet, look modern, and the structures are removed from floor dampness.
Combination console.
Floor-standing installation, drop-in sink.
The washbasin is embedded into the countertop or placed on top. The last case is easier to implement. An insert without a countertop minimizes the size of the cabinet, but takes up useful space; the shelves have to be lowered below the bottom of the sink. When placing the washbasin on top of the panel, make do with a cutout for the drain pipe.
Shelves with open shelves are more reliable - there is nothing to break, they are well ventilated, and it’s easier to do it yourself. Disadvantages: basket with towels, folded accessories will be splashed. It is convenient to store the necessary little things in drawers; you will have to tinker to achieve stable movement without jamming or distortion. A compromise approach is shelves covered with doors.