Glazed balcony
In winter, frozen food and semi-finished products can be stored on such a balcony. In the summer, snowboards and skis are stored there without the risk of loss of performance.
Balcony furniture materials without insulation should not include wood, chipboard and MDF due to high humidity and significant temperature fluctuations.
In such conditions, metal or plastic furniture should be used.
Step-by-step instruction
Step 1 – creating the frame.
You need to use pine beams. First you need to make the rear frame. Horizontal bars are attached to vertical bars in increments of 60 centimeters. You can use regular nails to join wood. The frame must be attached to the balcony wall with anchors. After this, you can attach the strips to the rear frame (the length is equal to the future depth of the cabinet). They are fixed at right angles with metal corners. Then the lower frame (bottom frame) is created in the same way. All walls and the bottom of the structure must be attached to the walls of the room with anchors.
It cannot be compared with the monotonous furniture that is presented in stores and hypermarkets.
In addition, the lining is fragile, so you need to work with it carefully.
Step 2 – covering the inner wall of the frame.
For the back of the cabinet frame, it is better to use a sheet of chipboard. He will be a reliable wall. It is attached to the back wall using ordinary self-tapping screws. If you have a construction stapler at home, you can use that too.
However, by taking a little time, you can build a spacious, functional and original cabinet from lining for household items.
The material does not tolerate temperature changes.
Step 3 – installation of shelves on the frame.
You just need to cut out suitable size chipboard sheets and install them on horizontal wooden guides.
Before you begin the actual production and installation of lining furniture, you need to prepare.
However, there is one condition - such a cabinet can only be used in a glassed room.
Step 4 – making the door.
The design of the furniture and its functionality will largely depend on the quality of the door made. To assemble the door, you first need to prepare the frame. To do this, we take thin beams and fasten the frame to the required height and width. To make the frame strong, we use a diagonal jumper. After this, the frame can be sheathed with clapboard. We fasten it using ordinary nails. Next, we complete the canvas with locks, hinges and handles, and then attach it to the cabinet itself.
Choose a location. Everything is simple here, because the balconies have special niches for installing built-in wardrobes.
It is better to make it from cheap lining.
Insulated glazed balcony
In such a room there are no significant temperature changes, and therefore you can store clothes, shoes, tires and bicycles there all year round.
Furniture should be comfortable and evoke positive emotions with its appearance.
Storage systems
Despite the small area, effective storage systems can be created on most balconies.
Note!
Sofa on the balcony: functions and advantages of a sofa on the balcony. Selecting a model, size and shape. DIY instructions (photo + video)Brick balcony - modern projects and recommendations on how to decorate a balcony with brick (175 photos)
Decorating a balcony with clapboards - detailed instructions on how to decorate a balcony quickly and beautifully (135 photos)
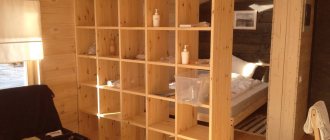
Shelving
The least complex system consisting of open shelves. Craftsmen make such shelves from chipboard or MDF panels.
Unlike cabinets, due to the lack of side partitions, a room with shelving does not feel cramped.
It is better to store things on racks in packaging, which will save them from dust and give the balcony greater aesthetics.
Open shelves are often covered with curtains to protect things from contamination and to decorate the room.
What tools will you need?
Carpentry tools
- hammer drill or drill with a set of drill bits for concrete and wood
- saw or jigsaw
- hammer and chisel
- screwdriver set or screwdriver
A hand-held electric router will be very useful. This tool is used for processing the edges of wooden parts; you do not have to take them to a carpentry workshop, but do this work yourself. With its help it is convenient to make recesses for loops. In a word, the thing is extremely useful.
You can cut out the necessary grooves and recesses for the hinges and process the edges using a hand-held electric router and a grinding machine.
In the modern world, many tools have been invented to make carpentry work easier, so all work should be done carefully and carefully so that the result is pleasing at any stage of its implementation.
In addition, you need:
- accessories
- metal and plastic furniture corners
- door or furniture hinges
- fasteners
- nails, screws, dowels or anchors
A carpenter cannot do without a metal ruler, a square and a pencil. You will need a building level and a plumb line.
Wall shelves
Just like the previous option, they have a minimal cost, and their installation does not require professional knowledge and experience.
Note!
Clothes dryer for the balcony - 105 photos of modern models and video instructions for their installation- Shelves on the balcony - practical ideas and detailed instructions on how to install and where best to place the shelves (115 photos)
Furniture for balconies - 125 photos and video descriptions of real examples of design of balconies and loggias
Preparing parts
It is necessary to carry out the process of creating a design step by step in order to avoid significant mistakes. It is recommended to carry out all work on creating the structure on the loggia, where the finishing has already been completely completed.
The design of a standard cabinet is considered simple, so you only need to prepare the parts correctly:
- parts of the future frame are being prepared, and we make them from wooden beams or metal profiles, and their dimensions must fully correspond to the pre-made diagram;
- the lining elements are cut out so that they have the required dimensions for fastening;
- fasteners are prepared for fixing parts of the sheathing to the frame.
If you do not have experience in this area, then it is recommended to first watch a video of creating a cabinet on a balcony with your own hands in order to take into account the main nuances and rules of this process.
Compartment door components
Required Parts
Cabinets
The result of choosing a ready-made cabinet for a small balcony is always unpredictable. The issue is resolved with the help of custom-made furniture, available in a wide range.
Wardrobes, although they visually reduce space, are ideal places to store household items.
In the case of a balcony with an atypical configuration, built-in wardrobes can correct the situation. For example, on a long balcony, built-in wardrobes are placed against short walls.
Note!
Wardrobe on the balcony - features of the wardrobe on the balcony. Advantages and disadvantages. Varieties of cabinet models for balconies. Manufacturing and installation of a cabinet by hand (photo + video)- Window sill on the balcony - functions and advantages of a window sill on the balcony. Types of window sills. Choice of material. Methods of fastening and installation (photo + video)
Decorating a balcony with stone: 145 photos and video description of how to decorate a balcony in a stylish and beautiful way
Preparatory stage
Before making a wardrobe on the balcony, you should carry out some preparatory steps, these include:
- formation of a drawing;
- determination of materials to be used for construction;
- it is decided which design will be used, and it must correspond to the chosen style for the balcony;
- fittings, drawers, fasteners and other elements are selected to create a truly beautiful design.
After the preliminary stages, you should prepare all the elements for work.
Cabinet elements
Closet
Most in demand when there is a niche. There is space under the window sills that remains unused.
Small cabinets with sliding doors in such places will not only create additional storage volumes, but also improve the thermal insulation of external walls.
What are the advantages of creating a cabinet from clapboard with your own hands?
Making furniture with your own handsAdvantagesDisadvantagesSaving moneyLabor intensityUnlimited possibilities in designTime-consuming processIndividual selection of shapes and sizesAbility to show your imagination
You can also get some benefits from a balcony in a small apartment.
All walls and the bottom of the structure must be attached to the walls of the room with anchors.
Creating such furniture yourself is a simple but labor-intensive process. However, by taking a little time, you can build a spacious, functional and original cabinet from lining for household items. It cannot be compared with the monotonous furniture that is presented in stores and hypermarkets.
Proper planning of the balcony space will help combine all these functions. To make a cabinet from clapboard yourself, you need to stock up on materials and tools.
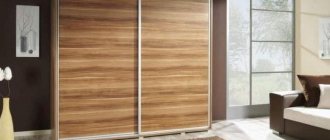
Hinged and sliding doors
When ordering a cabinet, you should consider how its doors will open. With hinged doors, the contents can be seen much better than with a cabinet with sliding doors.
However, sliding wardrobes do not require space for opening doors. This is their main advantage.
Roller shutters
Such blinds smooth out temperature changes even in the case of an unheated balcony.
They have the following advantages: they can rise to any height, their installation does not take much time and is inexpensive, they go well with loft and hi-tech styles.
Homemade balcony boxes
You can make a box for the balcony with your own hands. In this case, polystyrene foam, mineral wool and other similar materials are used for thermal insulation.
You can learn how to make a box for a balcony yourself from publications on specialized Internet sites.
Dimensions and markings
Rack with tools
- Using a tape measure, you need to measure the dimensions of the future cabinet - height, depth and width. The laser tape measure that designers use is very convenient in this regard, but a regular one is also quite suitable. If we already remembered about designers, then the first rule for them is to take an extremely responsible approach to taking measurements, because the final result will largely depend on this.
- You need to be prepared in advance for the fact that the angles will not always have the required 90 degrees and the distance from floor to ceiling will have different meanings in different places. But knowing this in advance, you can eliminate some of the flaws.
- In order to maximize the use of usable space , as well as increase the rigidity and stability of the entire structure, most often they make a cabinet that is as high as the ceiling, on which ceiling bars are fixed.
- Its depth is determined by the distance to the window , because the cabinet elements should in no case overlap the window space. It looks untidy and prevents sunlight from entering the room.
- The width of the cabinet is determined by the width of the end part of the balcony.
- Based on the measurements, you need to make a drawing. Yes, it’s still necessary, even if we don’t know how to draw at all, it will come in handy. Because the next step is marking.
- Marking begins from the ceiling. Having drawn a “beam” on it, using a plumb line, you need to transfer the drawing to the floor, and then draw vertical lines on the walls connecting the “beams” of the floor and ceiling into a closed rectangle - this is the place where the future frame frame will be attached.
- To avoid mistakes, the most meticulous ones make a life-size model from cardboard, and then cut out all the details of the future cabinet from it. This is a long and labor-intensive process, but subsequently it pays off by saving materials.
- And yet, you need to be prepared to adjust parts during the work process.
Advantages of balcony boxes
The use of cabinets and drawers for storing vegetables from the garden plot, seasonal clothes, shoes and other things on the balcony helps to unload the living spaces in the house, and place the necessary furniture in the free space or use it at your discretion otherwise.
Among other things, improving the overall design of the room, including boxes on the balcony for flowers, transforms the interior of the balcony and makes staying in such a place pleasant and calming.
Making balcony boxes on your own is not burdensome even for people who do not have the relevant experience, and does not require large financial investments.
If you encounter any difficulties in your work, it is recommended that you familiarize yourself with video master classes on making balcony storage systems, and photos of the most successful boxes on the balcony, made by yourself.
What types of cabinets can be used for balconies and loggias?
Cabinets can be of two types:
- A cabinet cabinet, which is an independent structure and is not attached to the walls of the balcony in any way. Such a cabinet takes up quite a lot of space, but can be moved or removed at any time.
- A built-in wardrobe, which, as a rule, is created according to an individual project, therefore fits perfectly into all the “inconvenient” places of the loggia or balcony. But in such a cabinet, the walls of the house are used as load-bearing structural elements, to which the side racks and shelves are attached, so it is impossible to move or remove it without completely dismantling it.
The following types of doors are used in cabinets:
- compartment doors;
- accordion door;
- roller shutters;
- swing doors
The final choice of the appropriate option depends on specific conditions. For example, you can install a built-in wardrobe in a loggia. In this case, the walls will simultaneously serve as its back wall. But on the open balcony it is better to place a regular cabinet.
A properly placed closet will organize the space on the balcony or loggia.
Particular attention should be paid to the choice of doors. If there is little space on the balcony, it is more practical to install roller shutters, sliding doors or an accordion. Hinged doors will be more convenient in a large loggia, where there is no need to save space and you can access all shelves simultaneously by opening the cabinet. Doors can be installed to the full height of the cabinet, but sometimes it is more convenient to divide the structure into 2-3 functional zones, each of which will have its own doors.
Hinged doors are the simplest and cheapest. To assemble them, you only need door panels and hinges, and installing them in the opening yourself will not be difficult. Sliding systems are more expensive and time-consuming to install. In addition to door panels, they will require guides and rollers. But when opened, such doors do not go beyond the dimensions of the cabinet, which can be attributed to the advantages of such a system.
The most expensive door option is roller shutters. They are a made-to-order kit and are assembled by the manufacturer.
Door options - photo gallery
Hinged doors are the simplest and relatively cheapest option, but they are not always convenient
Convenient and economical option - sliding doors
The folding accordion door will not take up much space when opened.
Roller shutters as doors to a balcony closet - a convenient but expensive option
The most suitable and cheapest materials for building and arranging cabinets
Before you start making a cabinet, you need to decide on the material from which it will be made. The most popular and accessible materials are:
- plastic;
- Chipboard - chipboard;
- tree;
- drywall.
When choosing a material, they usually take into account the overall design concept of the balcony, as well as their own financial capabilities. Plastic is very convenient here - it is practical, goes well with the interior of the balcony and is easy to use.
In general, the design of a cabinet consists of a frame, doors and the so-called filling - shelves, drawers, hangers. If there is a side stand, then it will also need casing. Often all these components are made of different materials.
How and from what lumber to build a frame for a cabinet
Most often, frame racks for a cabinet are assembled from wooden beams with a section of 40x40 or 50x50 mm. It is necessary to take into account that wood changes size under the influence of humidity - the timber swells, deforms, joints move, so such a cabinet would not be the best option for unheated balconies.
Here a frame made of galvanized profiles, which is not subject to deformation under high humidity, can help out. Plywood, drywall, chipboard and other materials are easily attached to it.
Shelves can be made of thick plywood, chipboard, or OSB. If it is expected that the closet will contain heavy things that provide a load of more than 5 kg (for example, cans of preserves, heavy tools, dishes, books), then it is better to use a wooden board.
Original, beautiful and easy-to-make built-in furniture for the balcony - photo gallery
A long closet placed under the window along the balcony will accommodate even more things.
Tall two-level wardrobe with hinged doors and an attached cabinet
Small cabinet under the window, covered with plastic
A low cabinet under a window or a cabinet for a balcony will also serve as a table
Complete solution: tall cabinet with doors and open shelves along the loggia
Built-in corner wardrobe