Shelf placement options
For independent implementation, there are quite simple ideas on how to make a shelf for books, but any of them requires preparatory steps.
The shelf design itself is already a kind of interior addition. There are a number of advantages of this furniture product:
- Practicality of use. The shelf can be fully used as a system for storing various kinds of items: small parts, souvenirs, book products and more. It will also fit well into the arrangement of a small library or other area.
- Accents. Shelves help add the finishing touch to the overall style of a room.
- Zoning. Serves as an advantageous alternative against the backdrop of massive cabinets and other furniture.
The entire process of creating comfort inside the house begins with a plan, namely with the selection of a suitable furniture design.
If you have an idea, you can make shelves of different shapes and configurations with your own hands. To do this, you will need affordable, high-quality budget materials. The photo of do-it-yourself book shelves shows various implementations of the author's ideas.
= What can shelves be made from?
| made of wood Example: DIY flower shelves 230 | from metal pipes Example: DIY pipe shelves | from PVC pipes |
| made of cardboard Example: Shelf rack made of cardboard boxes | from paper | from plasterboard |
| from glass Example: Shelves in Art Nouveau style 180 do-it-yourself photos | from old boxes Example: DIY drawer shelves 120 photos | from pallets pallets |
| stainless steel | from glass | from old stairs |
| From bars | from bottles Example: | from driftwood and branches Example: Bookshelf made of branches and driftwood |
| made of bricks Example: | from newspapers Example: Newspaper shelf | From cans Example: DIY kitchen shelves: 456 photos, drawings, instructions |
Flower shelves
This type is very often used to decorate living spaces. Although some owners choose artificial flowers, most are still interested in having live plants at home.
For this purpose, an entire wall can be allocated, where various kinds of flowerpots will be fixed. You can also create an original shelf for them. Playing with a floral theme allows you to bring your personal approach and design vision to life.
What types of fastenings are there?
If you make shelves with your own hands, then you need to choose the right fastenings for them. There are different types of such products. Let's look at the most popular of them.
What products can you attach homemade shelves to:
- There are special hidden fasteners. They hold up the shelf by being inside it.
- Brackets are the most common mounting method. You just need to calculate the load they can withstand.
- You can place the shelf on hinges and corners. There are decorative options for such products.
- There are special mounts for glass options. They are called shelf holders.
- There are also mounts with special perforations and guides for shelves.
Such fastenings can have a very decorative appearance. You need to be able to choose them correctly.
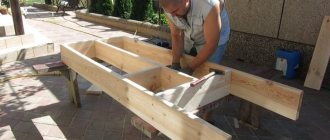
Algorithm of actions
The following is an instruction on how to make a book shelf with your own hands, which will help everyone. To make it, you will need a wooden board no shorter than 130 cm. It should be approximately 120 by 25 mm. First, the whole board needs to be sanded, this is more convenient for the master.
After the preparatory work on the board, you need to trim one of its edges so that it is 90 degrees. Then you should mark places every 20 cm at the same angle. For these purposes, a construction corner or any other object made of solid material with a similar angle is suitable. For example, a fragment of ceramic tile.
The part must be cut so that the hacksaw is positioned at an angle relative to it. If the hacksaw is positioned straight, the cut will not be neat and even.
In total, 6 parts will be needed for the shelf, each 20 cm long. All six planks should be processed using sandpaper. For work, it is better not to use a coarse-grained cloth, as it contributes to the appearance of scratches on the fiber.
For future placement of screws, you need to immediately prepare the necessary holes with a thin drill; this will protect the board from splitting, because the screws will be at the very edge.
The assembly process consists of connecting parts to each other using self-tapping screws. It is recommended to first lubricate the holes with PVA glue and let it dry. You need to fasten the parts together after this. Screwing in the screws should be done without much pressure so that the material does not split; the head of the screw should be flush with the board.
To place the shelf on the wall, additional fastenings are required.
Due to its height, the shelf structure is not particularly suitable for placing too heavy objects on it, but medium-sized flower pots can be placed on it quite calmly.
The resulting shelf is suitable not only for pots, and a varnish coating is recommended for its preservation.
How to make a bookshelf yourself?
A bookshelf is one of the most popular options for homemade wooden shelves. It fits organically into the interior of a small room, is comfortable and practical. Wood is an easy-to-work material, and shelves made from it are practical, comfortable, durable and easily fit into any interior.
Classic wall shelf
One of the classic options will be a shelf with three cells measuring 100 * 40 cm. The design provides a small upper side 10 cm high for additional placement of a number of books.
To work you need to stock up:
- jigsaw,
- sanding machine or sandpaper,
- drill, screwdriver or screwdrivers,
- screws or self-tapping screws,
- square,
- brush,
- varnish for wooden surfaces.
The calculation of the dimensions of the parts was made for a board with a thickness of 2 cm.
Step-by-step instruction
First of all, you need to cut out 2 long pieces:
- 50 cm,
- 96 cm,
- 26 cm.
Then they get to work.
- The wooden parts of the future shelf must be sanded or sanded.
- Assembly begins from the bottom, which is fixed in the side walls at a distance of 1 cm from the edge. This will make the product look more interesting. Fastening is done using self-tapping screws.
- On the inside of the fixed base of the shelf, you need to mark the places for attaching additional supports. With the same cell size, the step will be 32 cm from the side wall on each side.
- The inner walls are attached to the base strictly at right angles.
- I secure the top lintel of the shelf.
- If the design does not provide a back wall, then it is recommended to reinforce the shelf with metal corners.
- The shelf is treated with stain, dried and varnished. Varnishing usually occurs in 3 stages with an interval of 12 to 48 hours for surface drying.
Taking this option as a basis, you can make a bookshelf yourself.
Necessary materials
In this regard, it is necessary to note the boundlessness of imagination, thanks to which craftsmen are constantly expanding the list of materials suitable for creating shelves. The whole point is that almost anything can be suitable for DIY work. The most classic models are created using wood and its other derivatives.
The tree itself acts as a material that is easy to process at home. To do this, you do not need additional tools or special-purpose devices: you only need a small amount of self-tapping screws, a hacksaw and metal corners. These three points will already allow you to create the shelf of your dreams.
So often wood is chosen as a material because of its durability; the shelf will not change color under the influence of the sun and will not break even under the impressive weight of the objects that will stand on it. If you plan to place something bulky on it, it is better to take care of the thickness of the selected material in advance.
It is worth remembering that even wood should be additionally protected with varnish or other special solution; this will protect it from changing color and texture during use.
How to choose the right shelf
Agree, hanging shelves in the interior always look impressive. If, of course, you choose them correctly and place them in the right places where they will look good. Now, fortunately, the choice of shelves is huge and their variety is simply amazing.
A shelf is not only a useful and necessary piece of furniture, but also an excellent design element that can bring beauty to your home.
In order to make a choice, let's remember what types of shelves exist:
- One of the most popular shelves is the wall shelf, which is attached directly to the wall;
- Also popular is a corner shelf that is placed between two walls. This allows you to save space in the room;
- Floor shelves that are placed on the floor are also very effective. And if they are also on wheels, then at the right time they can be moved, removed or rearranged;
- No less popular are hanging shelves, which are attached to the wall or ceiling using a variety of chains, cables, and belts.
- Folding shelves are also a great way to save space, as they can be folded down when needed.
- The shelf-table, the name speaks for itself, can take two forms: the table itself and the shelf. This is a great option for a small room.
- If the size of your room allows you to use more space, then shelving is perfect here.
Yes, as you can see, the variety of shelves is great, and there are quite a lot of them today. All you have to do is decide on the type of construction. The main thing is not to clutter the entire room with shelves. They should go well with the overall look of the room in which you plan to hang them.
Beautiful shelf in the form of a suspension bridge
Shelves stylized as suitcases will fit perfectly into the interior of a person who loves to travel.
A shoe rack is a great place to store shoes.
If you need shelving to store important things: books, documents, photographs, then try to make them stable and strong. Especially if they are intended for children.
In this case, the shelves should not be placed too low, since children are very active and mobile. Also, don't opt for glass shelves. And their corners should not be sharp.
Any teenager will be happy with this room design
The marine theme in the interior of a children's room will always be relevant
If you think the design of the room is boring, add bright colors to it
Soft and calm tones would be more appropriate for a girl’s room.
Various forms of designs help the development of children's perception
Hanging shelves and racks in the children's room will never be empty
As for choosing shelves for the living room. Here you can give free rein to your imagination. Tetris shelves, shelves of unusual shapes, spiral shelves, frame shelves will look good here.
In the bedroom you can get by with regular classic shelves. They will look most impressive above the bed, where you can place family photos.
Wall-mounted bookshelves and wooden shelving are the latest in fashion.
White color is an excellent background for wall decor
It will be better for the kitchen if the material from which the shelf is made matches the material of the countertop. This will give the kitchen its own specific style and elegance.
Snow-white kitchen in a modern style
Shelves can serve as an excellent place to store not only kitchen utensils, but also other small items
Hanging design will help save free space on the wall
If natural wood is used as a material for shelves in the kitchen, its surface must be reliably protected with a product that is resistant to moisture and temperature changes
Video: beautiful shelves in the interior
As you can see, there are plenty of types of shelves and their shapes, so the main thing is not to overdo it, but to focus on quality and durability.
The main thing to remember is that shelves on the wall should look very good in the room for which they are intended. But no one forbids you to add something new and unusual to their design. After all, with a successful choice of wall shelves and racks, your room can sparkle with new colors.
Similar articles:
- Attached terraces and verandas to the house are the best way to increase space
- How to create the perfect bedroom interior: advice from experienced designers
- Living room with a fireplace: 77 creative ideas that will decorate the fireplace in the interior
- High-tech style in the interior of an apartment and house
- Decorating a children's room - how to create comfort for your baby
- The combination of colors in the interior or how to create the best design
Instructions for creating a shoe rack yourself
Homemade shelves can be made from materials such as mirror surfaces, plastic, and metal. You can, if desired, combine them with each other, creating original design solutions for your home. Glass and metal are more capricious to work with, but with care, even a novice craftsman can handle them.
Both mirror and glass can be used in structures where heavy things are not intended to be placed. Such shelves will harmoniously fit into your home interior and will serve for a long time if handled with care by residents.
Plastic acts as the lightest, but not particularly strong and durable material; damage to it remains very easily. Shelves made of plastic look cheap. It is better to use them for bathroom equipment, as they will be resistant to water.
Metal is a durable material, but it is worth remembering that without a certain type of protective treatment there is a risk that it will become rusty. Working with metal will require additional tools, which is why it is considered heavier for household work. However, metal shelves have truly proven themselves to be high-quality products; with proper maintenance, they can last more than 10 years.
The process of attaching a shelf to a wall is carried out in different ways. The main criterion: reliability of fixation. This is necessary, since if the fastening is poor, not only the shelf that will fall will be damaged, but also everything that was on and under it.
A common option is a shelf secured with straps.
In addition to the listed materials, you can use many others; in some cases, the material itself will act as an additional decorative element in the space. The following are some of the options available for implementation.
Where to start?
First of all, you need to think about the purpose and location of future shelves.
For small items, it makes sense to make neat, lightweight shelves or a modular system united by one style solution.
If it is necessary to store large or weighty items, it is important to correctly calculate the overall dimensions of the shelves and their strength. Bookshelves should be strong enough and securely fastened, for example.
The shelf is part of the interior and can be decorated in any style. In order for this simple piece of furniture to organically complement the design of the room, you need to think about the appearance of the shelf and the material from which it will be made.
A simple wooden structure will be a good addition to a kitchen interior and a room decorated in a folk style.
Bright colors for a homemade shelf are permissible only if there are similar color accents in the design of the room.
A good visual effect is created by shelves whose color matches the overall tone of the walls or furniture.
The shelf is an important detail of the interior, for this reason its appearance is very important to think through in advance.
In addition, you should take seriously the choice of placement of the shelf and decide on the option for its fastening.
Shelves are usually secured using metal furniture strips with slots.
Taking into account all the nuances, it is necessary to draw a sketch of the future shelf, take careful measurements, calculate the overall dimensions of the product and complete a competent drawing.
Drawing
No matter how simple the model of the planned shelf may seem, it is necessary to spend time on drawing work.
This work will help to correctly calculate both the dimensions of the future structure and the material consumption.
When making a drawing, you should additionally consider the functional features of the design. The shelf must be strong enough to withstand future loads.
Supporting elements are placed taking into account the characteristics of the material. In any case, the maximum step between the supports should not be more than 90 cm. The thinner and softer the material from which the shelf parts are made, the smaller the distance between the supporting elements.
Careful preparatory work will allow you to avoid annoying mistakes when making your own home shelf.
Wall shelves
Shelves intended for placement on the surface of walls may or may not have an addition in the role of a partition (rear). The design is entirely distinguished by its elegant component.
The hanging shelf can have any shape, as well as any size. You can make a standard shelf or make a shelf of complex geometric shape.
Variety of shelves
You need to decide on the type of shelf before starting assembly.
Open shelves. They lack walls on the sides and back, as well as front doors.
Closed shelves. They are a miniature hanging cabinet that is less deep and tall:
- Corner shelves. They are placed at the junction of the walls; the corner can be internal or external.
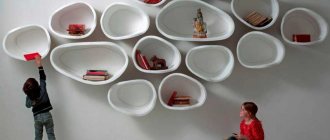
- Asymmetrical shelves. Such elements do not have an axis of symmetry; the main thing is to maintain their functionality and stability.
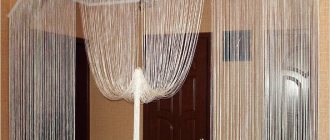
- Hanging shelves. Various types of harnesses, cables, belts, and materials made of dense fabric are suitable for them. In this case, the ceiling is the support.
- Decorative shelves. Main purpose: to complement the decor and place for placing small elements such as figurines or souvenirs.
The stand can also be made of different materials; the same ones that were used to create the shelf are also suitable - plastic, metal and others.
Types of shelves
The variety of types of shelves today is very large. If we take as a basis the material from which the shelf is made, then they can all be classified as follows:
- Glass and mirror;
- Wooden (chipboard, MDF, plywood);
- Polymer and plastic;
- From other materials that can be combined with each other.
If we take the design, appearance, structure and method of fastening as a basis, we can distinguish the following types:
Wall mounted
Wall shelves supported by other stable furniture or the floor. A positive feature of such shelves is that their special design allows them to withstand quite a large load, which makes them indispensable assistants in the house when you need a place to store something large and heavy.
Most often they are used for all kinds of equipment or storing shoes in the hallway. These shelves take up minimal space, which is also a positive feature, especially for small apartments.
A rack for books and other small items will never be superfluous, especially if it fits perfectly into the interior
Built-in “niche-shelves” in a plasterboard structure will look advantageous in any interior
A huge bookcase will be an excellent addition to the living room interior
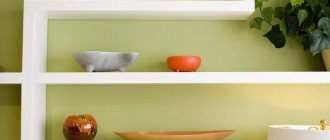
Classic (rectangular)
Classic rectangular wall shelves attach directly to the wall. The advantage of this structure is that you can use both internal and external surfaces. The back wall may be missing, leaving the wall exposed.
You can put various interior items on top: vases, clocks, photographs, lamps, books, night lights and figurines. It is precisely these shelves that, due to their functionality, add coziness to the apartment.
The original black shelf contrasts perfectly with the white wall
Recently, open wall shelves in the kitchen have become a vital necessity when developing retro interior design.
Simplicity and conciseness are the main strength of the interior in the style of minimalism
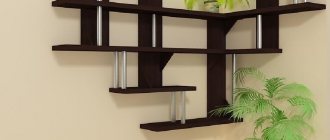
Multi-tiered
Multi-tiered shelves on the wall look very original and also combine many different functions. This type of shelves can combine a combination of various horizontal, vertical and inclined planes, which turns out to be very convenient in everyday life.
However, they often simply make identical horizontal planes, which, firstly, have an equally beautiful appearance, and secondly, are very functional. In this case, you should give free rein to your imagination to make something that is both comfortable and beautiful, matching both your preferences and the surrounding interior.
Yellow goes well with black, use this color harmony on your wall
Classic rectangular shelves with hidden mounting type
Stylish multi-level shelf in a modern living room interior
Corner
Corner shelves make it possible to use all the empty corners in the apartment. They are most often used in bathrooms, but this type of shelf can be used anywhere. They are reliable and stable. They can even be made transparent, which will look very modern.
Unusual shelf design in loft style
Having the necessary tools at hand and using ingenuity, you can make a corner shelf from scrap materials with your own hands
A wall-mounted model for storing books will look good next to the column shelf in the corner.
Floor-standing
Otherwise, such structures are also called attached; they should not be confused with a cabinet or chest of drawers. This type is often chosen by modern designers and lovers of comfort.
They are suitable for storing books that are quite heavy.
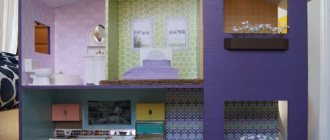
To the nursery
While the child is very small, I want functional shelves, but with children's drawings. But where can you get these? Do it yourself. Any shelf of the configuration you like can be covered with non-woven wallpaper or thick wrapping paper (glued with PVA). After drying, coat twice with water-based varnish. Such shelves can be washed, but what’s most interesting is that the shelf can change with the child. You tear off the old decor, glue on the new one. The idea is simple, it works perfectly.
Here's what can happen
For children, the shelves are not very different in design. If we talk about floor or shelving, then they must be strong, taking into account the fact that older children will definitely want to climb on them. Therefore, often even those shelves that stand on the floor are additionally attached to the wall: so that they do not collapse and crush young climbers. Based on these considerations, they are not made tall: even if they fall, it’s not scary.
The shelves in the children's room also differ in color - they are brighter, can be made in the form of letters, and boxes for toys can be installed in them: this makes it easier to keep them in order. In general, functionality and security must be combined.
System with drawers - cleaning will be quick
Children grow, designs and colors change Combination of open and closed shelves - convenient for preschoolers
The fairytale town will appeal to both boys and girls
Read about developing a children's room design here.
Corner shelf: creation process
This shelf will fit well anywhere; it helps save space and increase coziness.
The step-by-step description of how to make a shelf for beginners is in many ways similar to that posted before. The main feature is that for a corner shelf it is necessary to connect two parts (top and bottom) from two parts, the ends of which must be cut at the desired angle.
Next steps are as follows: you need to glue the two parts for the top to each other and place them under a press. Perform the same actions with the lower parts. Then the result must be polished and a primer mixture applied on top, then left until completely dry.
Hanging shelves
They are distinguished by special grace and originality, harmoniously complementing the space. You can even attach such a shelf to the ceiling using good quality fasteners. Such a solution will look like a real art object.
Sequence of work
The sketch must initially be transferred to the selected material. The recommended thickness is about 1.6 cm, and the wall height is 26.8 cm. The standard amount is 30 cm.
Next, the wood is sawn using a jigsaw. The final result should be two boards for the sides and two main ones. All of them need to be sanded and then covered with varnish or stain.
Then you can begin assembly; two holes are drilled on the bottom board at a distance of 0.8 cm, they should be located parallel. Similar actions are performed with the upper shelf parts.
Then the resulting side boards are attached to the bottom with self-tapping screws, after which the upper part is attached. The brackets are secured to the sides. After this, you can make holes directly in the wall itself with a gap of about 0.5 cm from the wall. The shelf is ready for attachment and further use.
Expert advice: how to hang a shelf evenly and quickly the first time, even on a plasterboard wall
To properly organize space, shelves are a must in the house. These convenient devices are most often used to store books. But even if you are not a big book lover, interesting trinkets, decorative ornaments, potted flowers or family photos look very impressive on the shelves. In addition, they do not require large financial costs.
And hanging a shelf on the wall is not at all difficult. Of course, this work requires a little skill and experience. No one wants to stub their toe or litter the wall with unnecessary holes. However, if you use our tips and apply a few little tricks, even a beginner can nail a shelf.
How to hang a shelf evenly on a brick wall
The first step is to decide where exactly you will mount the shelf. Evaluate the chosen location in terms of aesthetics and convenience. You should not nail it to a great height, otherwise it will be difficult for you to get things out of there. In addition, the shelf should not interfere with free movement around the apartment.
The next step is to find screws for fastening, let them be at hand. Measure the distance between the hinges that are on the shelf. Cut the electrical tape to the exact size. It should be kept in mind that it is better to use electrical tape if you have a brick wall. Then it sticks easily and then can be removed without any problems.
Determine the point on the wall where the first screw will be located. Attach a level to the mark and glue a piece of electrical tape prepared in advance. Now your shelf will hang straight.
All you have to do is drill holes closer to the edge of the electrical tape, drive in dowels there and screw in the screws. That's all, nothing complicated! Just be sure to remove the tape before hanging the shelf.
How to hang a shelf with a hidden mount
From the outside, this option looks very impressive. It seems as if the shelf is not supported by anything, but is simply glued to the wall.
However, this method will require you to be very precise in your markings. Here the slightest error can affect you at the very end of installation and nullify all your efforts. If you do not have additional fasteners, then the shelf can only be installed in the very corner of the room. Drill holes for dowels.
We bite off the caps of dowels or screws with pliers. We drive them into the holes so that a significant part remains outside. We place the shelf on these spikes and mark their location with a pencil.
We drill small holes in the shelf; at the end it would be good to mill them out with the edge of the drill. Now we firmly fix the shelf on the spikes. This shelf will be very reliable. It can easily support a significant weight of several kilograms.
Shelves on plasterboard, installation features
Generally speaking, it is quite difficult to hang a shelf on a plasterboard wall; this material is quite delicate. When installing shelves, cracks may occur and this will seriously detract from the appearance of your room. But with the right approach to the matter, negative consequences can be avoided.
If the shelf is quite heavy, it is best to attach it to a metal frame found on any plaster partition. If the screw is screwed directly into the metal, then such a mount will withstand any load. You can find a metal profile using a magnet.
A neodymium magnet is best suited for this; due to its high adhesive force, it can easily find the frame even under a thick layer of finishing.
For work you will have to use only special screws that do not destroy drywall. They have an unsightly appearance, but there is simply no other option. Screw them into the profile using a screwdriver.
In this case, you must remember that the metal profiles are located at a distance of 60 cm from each other. So it is advisable to opt for shelves of the appropriate size.
But it happens that the arrangement of furniture in a room makes it completely impossible to attach a shelf to metal. Then your only choice is to take a butterfly dowel. Simply drill a hole in the desired location and then hammer the dowel into it. When a self-tapping screw is screwed into it, the dowel petals open and firmly hold the product in the drywall.
Guided by our recommendations, feel free to get down to business. And let your interior become even more beautiful and comfortable.