Features of planning storage systems
The most important thing when arranging a storage room in an apartment or private house is to decide what things it will be intended for and correlate the load with the dimensions of the room.
- For a small pantry, several rows of shelves located one above the other are suitable. It is better to leave space at the bottom for boxes and drawers: this way the area will be used optimally.
- The dimensions of the compartments must be made in accordance with the dimensions of the items that will be stored in the pantry.
- If the room has a high ceiling, it is worth providing space for a stool or stepladder: it will be more convenient to get things from the upper shelves.
- Some pantries have enough free space to create deep shelves. This is not always convenient; moreover, you should leave a distance for passing and bringing in objects.
Features of metal shelving for a pantry in an apartment
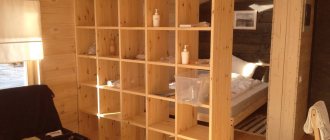
A metal rack in a pantry is a set of various mezzanines, which are united by one common box - a frame. Their sizes are different and everyone has the opportunity to choose one that will correspond to the dimensions of the pantry being equipped. Also, a shelving unit can help zone a storage room.
Metal storage system
Although they do not take up much space, their shelves can accommodate a large number of things.
The advantages of this furniture are appreciated by many, because it is so convenient to store cans of preserves, vegetables, dishes and various household items.
Shelves are either open or have a back wall.
In such furniture everything is used to the maximum.
The biggest disadvantage of this type of pantry furniture is its openness. It is for this reason that a lot of dust accumulates there.
Space calculation
You can rationally use the pantry space by properly placing shelves and racks in it. The process of making shelves with your own hands will not take much time and will not require additional knowledge; the main thing is a well-organized layout of the shelves in the pantry.
You can fill the pantry with different furniture and accessories. When arranging this room, shelves, various bedside tables, chests of drawers, mirrors, and hanging shelves are often used.
Having organized a small closet in your apartment, you should decide how to properly place the shelves in the pantry and thereby save space. It’s not worth breaking down the walls and expanding the room in an already small apartment; it’s better to make shelves with your own hands.
If your pantry serves as a utility room for storing preserves and all kinds of jars, then try to make the maximum number of wide and stable shelves from high-quality wood with metal reinforcement that can withstand the load.
For books and other things, you can make hanging shelves and shelves with glazing.
To prevent the wooden material from rotting and collapsing under the influence of time, during manufacture it must be covered with stain, varnish or paint.
You can see what standard wooden shelves in a pantry look like in the photo below.
Assembling the rack
A simple drawing of the product with dimensions will greatly simplify the work.
So, the rack itself will be assembled in the following sequence: first, the side racks with partitions are made, and then the shelves will be mounted on them. In order not to get confused about the sizes of the elements, be sure to make a preliminary drawing at least on a piece of cardboard.
Advice! Don’t forget to consult with your owner to clarify the height of the shelves, in case she wants to keep something specific there. But usually the shelves are made a little larger than a three-liter jar.
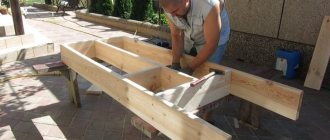
Side racks
The beams and boards most often have a length of 3 or 4 meters - buy this option so that when cut in half you get 2 racks at once.
Adjustment of racks to one size
- So, we take the purchased beam and cut off four absolutely identical pieces from it using a circular pendulum saw, which is also called a miter saw.
- Trimming helps to make the cuts strictly perpendicular, which is important for the stability of the rack. If this is not available, you can use a miter box and a hand saw.
Advice! To make the edges of the cut more even and smooth, the timber can be pre-wrapped with masking tape.
Sawing timber lengthwise
- We make jumpers from the remaining timber, dissolving it into two identical parts. For such work you will need a circular saw; if you don’t have one, then buy a ready-made solution right away.
Marking the slats
- Using a tape measure, we mark the resulting blanks, for example, 50 centimeters each - this value will correspond to the depth of our rack. We clearly draw the marks using a carpenter's square so that we can see the cut lines.
- Next, using the same pendulum saw, we cut the slats.
Marking the racks for the crossbars
- At the next stage, you need to mark the racks according to the height of the planned shelves.
- We take one of them, place it on a flat horizontal surface and draw a line at the required height. Then we apply a strip to it and, in order not to make a mistake in the measurements, we simply make an outline. We draw horizontal lines on the sides, indented from the edge to a slightly smaller thickness than the lintel.
- The design of the side post will be such that the lintels will be recessed into the beams - this will be more beautiful, and everything will hold much stronger.
- Next, we take all the other racks, lay them all side by side, resting their ends against something flat, and transfer the marks with a square to all the elements.
Grooves for jumpers
- We take a miter box, preferably a professional one, of course, and according to the markings we make cuts in the timber, without going beyond the horizontal line, repeating the manipulation the required number of times for all the grooves.
Grooving
- Next, the unnecessary part between the cuts is selected with a chisel and hammer. You need to work carefully so as not to go beyond the intended boundaries, and the resulting groove should have a clearly rectangular shape. If necessary, you can use a file or sandpaper to bring the geometry to perfection.
Connecting racks with jumpers
- We check how the rail fits into the prepared recess; if everything is in order, then we make a major fastening.
Drilling holes on the connection
- First of all, in the pre-assembled sidewalls, at the joints, we drill two holes. They are needed so that when tightening the screw, the wood does not crack.
Coat the joints with glue
- Then we remove the jumpers and apply a layer of glue on the bottom and sides. The groove also needs to be coated.
Fastening with self-tapping screws
- We return the jumper to its place and tightly tighten the connection points with self-tapping screws. In this case, the parts will be pulled towards each other, which will allow the glue to set properly.
- Remains of squeezed out glue must be immediately removed with a sponge soaked in water.
Pantry rack: finished side panel
As a result, we got these two absolutely identical ladders, which, if necessary, can be used exactly like this. But that’s not why we started assembling furniture. To slightly reduce this direct resemblance of the rack, you can decorate it using a hand router.
Milled counter corner
Installing shelves
We continue to make a shelving unit for the pantry with our own hands! The next step is to manufacture the shelves and assemble the entire structure into one whole.
- We make blanks for the shelves - we take the boards, mark them on a tape measure to the required length and cut them on the already familiar miter saw. Calculate the number of boards for the shelf so that when laying there are small gaps between them for better ventilation.
Pantry shelving: decorative edge
- To make the shelves look more attractive, the edges of the resulting blanks can also be processed with a router, well, at least those that will be at the top.
- Before starting assembly, we take a grinding machine and carefully process all the parts so that there are no burrs left.
First shelf board
- Those boards that will be installed at the edge are trimmed in such a way as to create a rectangular recess for the racks.
- Please note that the workpiece has a self-tapping screw screwed into a pre-drilled hole. We will use this solution as a temporary fixation. Subsequently, the screws will be unscrewed and replaced with dowels.
Shelving for storage rooms: the connection is also coated with glue
- We take the board and coat it with glue along with the place on the crossbar where it will lie. Afterwards the element is fixed using self-tapping screws.
- The manipulation is repeated with all boards.
- The structure is left to dry, after which we will make major, very strong connections on the dowels.
Masking tape limiter
- We take dowels - the 8x40 mm option will be enough, and a wood drill of the required diameter. We put electrical tape or masking tape on the drill, which will serve as guides when drilling.
- Next, we unscrew the screws and drill new, wider holes in their place.
Advice! Don't forget to blow the dust out of them.
- We fill the resulting holes with glue - not all at once, but as the dowels are installed. Lubricate the dowel itself with glue.
Dowel installation
- Well, and, in fact, we hammer in the dowel, removing the squeezed out glue with a damp sponge.
- That's it, the connection is ready, and after the glue has dried, you can bring it to perfection - sand it, putty.
Shelving in the pantry: the result of the work
In the photo above you can see the finished rack. Agree, he looks very interesting. In order for the product to last longer, it must be coated with protective impregnations, laid with oilcloth, or used liners for shelving.
So, we figured out how to make a shelving unit in a pantry. The procedure took a little time due to the use of glue, but the result was very high quality, able to withstand quite good loads without deflection. Be sure to also watch the video in this article, where the master shares another way to assemble such a structure.
A self-made shelf is the best option, ideal for storing specific items with certain parameters. Making shelves in a pantry with your own hands is quite possible, you just need to decide how it will look and choose a building material. This piece of furniture will allow you to rationally use the space of the room. If preserves are stored in the pantry, then you need a structure with wide, durable shelves on metal supports or a rack. Hanging shelves are suitable for arranging lighter items.
Catalog of prefabricated metal shelving for pantry from the manufacturer Region-Snabzhenie LLC in Moscow
A storage room (or a utility room on a summer cottage) is the dream of any real owner. Having such a keeper, you will always have everything in its place, from hardware and tools, to light bulbs and products, and most importantly, all materials will be organized by application and size.
Our company LLC Region-Snabzhenie in Moscow always keeps ready-made shelving for placement in storage rooms and other furniture in stock at the central warehouse. We present several series that differ in the dimensions of shelves and racks and the loads on the storage tier.
Shelving for utility units by series
- SLK series: are lightweight models for cans, which are perfect for small warehouses, offices, libraries, archives, as well as private use. The series allows you to produce corner shelving for the pantry. L-shaped racks, height: 1500, 1900, 2200, 2300 and 2500 mm, with a perforation pitch of 30 mm and a thickness of 1.5 to 2 mm. Shelves are available in widths of 1500, 1000 and 700 mm, suitable for depths of 300, 400, 500, 600 and 800 mm, with a metal thickness of 0.7 mm and a load of 60, 120 or 170 kg. – the load depends on the number of stiffening ribs: for example, for shelves up to 60 kg. – there are no stiffening ribs, the shelves have a weight of 120 kg. – 2 stiffening ribs, and shelves weighing 170 kg have 3 or more stiffening ribs. This type of racks is painted with gray polymer powder paint (RAL7035) to protect against moisture and mechanical damage. The most inexpensive of our representatives due to their size and large production volume. The minimum installation level of the bottom shelf (tier) should not exceed 500 mm from the floor. The minimum number of tiers for this series is 3.
- LF series, designed for warehouse, retail and industrial premises with a load per tier up to 220 kg and a maximum load per rack up to 1000 kg. The entire structure consists of galvanized L-shaped racks 30x30mm with a perforation pitch of 38 mm and beams 30x25mm 2 mm thick with plywood flooring (plywood thickness 10 mm). Since this type of shelving does not use bolts and nuts, assembly and disassembly of this series takes less than 10 minutes. Size range: height 1520, 2014 and 2508 mm, width 1016 and 1220 mm, depth 507, 610 and 760 mm. The minimum installation level of the bottom shelf (tier) should not exceed 500 mm from the floor. The minimum number of tiers for this series is 3.
- HP series, which can withstand loads per section up to 1200 kg, and per shelf up to 300 kg. This series is intended for installation in warehouses and enterprises. The racks of this rack are made of an L-shaped complex profile 59x59 mm, with a perforation pitch of 50 mm and a thickness of 1.5 mm, have several sizes of 2000, 2500 mm, painted with blue polymer powder paint (RAL5015), and the 3000 mm rack is made of galvanized steel, the rack beams have a figured complex C-shaped profile 92x21 mm, and a metal thickness of 1 mm, painted with gray polymer powder paint (RAL7035). They have the following dimensions: longitudinal dimensions 1520 mm and 1830 mm, transverse dimensions – 500, 610, 760 and 910 mm. Also, for maximum load on the tier, threaded ties (Ф6 mm) are provided. On the beams of this rack, plywood 10 mm thick is placed in special grooves on the beams and has dimensions: 1830x910 mm 1830x760 mm, 1830x610 mm, 1820x500 mm, 1520x910 mm, 1520x760 mm, 1520x610 mm, 1520x500 mm, Minimum installation level for the bottom shelf (tier) not must exceed 500 mm from the floor. The minimum number of tiers for this series is 3.
- SGR series (SGR), as they can withstand a load on a rack of up to 4000 kg, and on a tier - up to 600 kg. Scope of application - industrial and small warehouses, workshops, etc.. The galvanized frame of the cargo rack consists of a U-shaped profile and connections, thickness from 1.2 to 1.5 mm (with a height range from 1500 to 4000 mm, with pitch 500 mm and perforation pitch 50 mm). The rack beams, painted in gray polymer powder paint (RAL7035), are Z-shaped, with a metal thickness of 1 to 2 mm, attached to the frame using hooks or bolts, and have a length of 900 to 2100 mm (in increments 300 mm), into which shelves made of painted or galvanized metal with a thickness of 0.7 mm are placed, which have dimensions (depending on the depth of the rack) 500x300, 600x300, 700x300 and 1000x300 mm. The minimum installation level of the bottom shelf (tier) should not exceed 500 mm from the floor. The minimum number of tiers for this series is 3.
- Custom pantry shelving.
Options for assembling shelving for the pantry and their load capacity per shelf
- Bolt-on is a classic assembly system known since ancient times. Durable, but you will have to spend time to assemble a universal iron rack. There are corner shelves;
- On hooks - the most convenient design and the fastest to assemble, but there are no racks with low loads;
- Collapsible - yes, this is important if your warehouse is not located in your own premises and there is a possibility of moving;
- Prefabricated – convenient for transportation to the regions. All our universal shelving belongs to this item;
- Lightweight - an inexpensive, but very high-quality position for storing cans of preserves and other household goods, when in a domestic environment there is no need for a heavy load on the shelf;
- Medium-duty trucks are a very common SGR series, which has been in our catalog for more than 15 years. Convenient to store wheels and other heavy items;
- Reinforced - metal structure with powerful beams and racks.
Material for making storage shelving
- From laminated chipboard;
- Made of stainless steel;
- Made of galvanized steel;
- Metal;
- To order;
- With plywood shelf.
How to make shelves in your pantry with your own hands
Before proceeding with the main actions, it is necessary to determine the design of the structure, shape, and method of attaching the shelves to the wall. All these manipulations relate to preparatory actions.
Preparatory activities
First of all, the rack is depicted on paper. In this way, future furniture will be visualized taking into account the size and wishes for the storage system for household items.
The box can be open on both sides or have a back wall.
What to make shelves from
The main materials for making shelving are steel and wood. These components are characterized by the reliability and durability of the frame. But the only drawback is the lack of resistance to moisture and steam.
Metal or wooden frames withstand mechanical stress and heavy loads.
Rack shelves can also be made from various raw materials. For example, they use wood, metal, including galvanized metal, MDF, glass, and chipboard profiles. All the options mentioned have their advantages and disadvantages. They must be taken into account when choosing material for making your own storage system for the pantry.
Despite the wide range of materials used in the production of pantry racks, only the most reliable ones remain a priority.
Required materials and tools
To properly make shelves in the pantry, you need to prepare the following tools:
- electric jigsaw or regular hand saw;
- hammer;
- a measuring device, such as a tape measure;
- screwdriver. Two types of profile may be required - linear and cruciform;
- fasteners (screws or nails);
- screwdriver
Other tools may be required during production.
The set depends entirely on the master’s preferences in working materials, method of fastening the shelves and frame.
Manufacturing options
The principle of manufacturing a storage system is entirely based on the mass of materials that have been selected for the process. The location is also selected based on this factor.
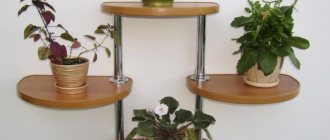
Wall shelves
Lighter structures can be installed with fixation to the wall. In most cases, wood and metal are used, which are connected to the wall using special fasteners, for example, hidden shelf supports, decorative brackets, hangers or hanging ears.
Such structures are considered hinged.
Wall shelves do not require labor-intensive manufacturing; it is necessary to properly prepare and process the material. After sanding and painting, you can begin installation.
Installation is carried out according to a pre-planned scheme to avoid errors and inaccuracies.
Rack
Massive frames that are designed for heavy loads are preferably placed on the floor. Such structures can be fixed to the wall surface or in the form of stationary furniture. It all depends on the intensity of use of the rack and shelves. Such storage systems can be represented by a simple structure made of chipboard and wood.
If necessary, the rack can be painted: this helps extend the service life of the material and allows the product to look most harmonious in a small space.
The production of a rack most often begins with the arrangement of the frame. Subsequently, the craftsmen fill it with the necessary components in the form of shelves, drawers with or without doors. In the process of performing actions, it is important to choose the right fasteners, as this solution will help minimize the risk of damage to the structure and its integrity. This approach is important, because very often racks are used to store fragile household items (cans, bottles, dishes).
All models are united by the fact that they are selected based on the specific footage of the pantry.
Types of shelf designs
The main classification of furniture is based on design features. In the store you can find three varieties - linear, U-shaped and corner racks. Proper arrangement of space depends on the dimensions of the pantry.
INTERESTING! Most often, when choosing a shelf, the guidelines are the features of the room. Shelving should fit into the room and create proper organization of the storage system.
At the same time, you can separate types of products according to the dimensions of the shelf and the rack itself. Various manufacturers provide their products to suit customer needs, for example, equipped with closed drawers and doors. They are performed similarly with display cabinets.
A distinctive feature of such furniture is its spaciousness with relatively compact forms.
Modern designs can also be equipped with compartments for jars, a glass facade, shelves with baskets, compartments with metal fasteners for bottles, and drawers for vegetables.
Such options are selected on a case-by-case basis to suit the needs of property owners.
Benefits of shelves in a pantry
Shelves allow you to store things in a certain order, which makes them easier to find in the future.
The advantages are obvious.
- The storage rules are followed.
- Items are placed in a certain order. This makes it easy to find any tool or product.
- The number of things that can be left in the pantry increases noticeably. After all, the total area of the shelves is much larger than the floor area in the room.
- On the timber racks you can leave not only things, but also canned goods, groceries, and bulk products.
Shelves are used in a variety of types:
- open - that is, without side parts;
- closed - rarely glazed, but with sides and top;
- hanging - fixed to the wall with hooks or anchors;
- shelving – a series of shelves placed on a frame.
The number and type of shelves depends on the purpose of the pantry. If a dressing room is equipped here, shelves for knitwear and shoes, as well as compartments with hangers, are installed. If they are going to hold sports equipment, they add hooks and brackets.
Options and drawings of shelves for pantry
Before choosing any shelving option, it is important to know the dimensions of your pantry. Armed with a tape measure, you can easily measure all the necessary data and build on them in the further selection of the scheme.
Dimensions for each structure must be calculated individually, depending on the available space
Based on the individual dimensions of the pantry, it is important to understand the height and permissible width of the shelves, the distance between them, and the most comfortable depth of the entire product. Thus, making a rack will not be very difficult. Furniture manufacturing, like nothing else, is subject to the principle “Measure twice, cut once.”
The design can be either simple or intricate - it all depends on the imagination of the manufacturer
Leaving aside the classic shelving, you can allow yourself to go a little wild in the design of your storage space. By putting more effort into the drawing and measurements, you can make with your own hands not empty shelves in the pantry, but a work of carpentry art.
Sizing
As mentioned earlier, the dimensions of the rack depend directly on the dimensions of the room
To make shelves in a closet in an apartment, it is important for a home craftsman to consider several parameters before drawing up a diagram:
- width, length and height of the pantry - for the basic layout of the drawing;
- convenient access to the shelves and low height of the rack - for comfortable use of the product without the use of stands and ladders;
- the expected number of items that will be stored on the rack, their sizes, from height to width;
- load capacity - the higher it is, the more stiffeners there should be to ensure the strength of the structure;
- The slope of the floor is an important parameter, without taking it into account you can get an unstable product.
Based on the listed parameters, the home craftsman should sketch out the most detailed drawing, or take a ready-made diagram and substitute his own dimensions. Such a thorough and responsible approach will bring successful carpentry results.
Important! If the floor is uneven, then both stands for the shelving supports and additional fastening of the shelves to the wall of the pantry can help. The load capacity of the rack directly depends on the distribution of load on the shelves
The load capacity of the rack directly depends on the distribution of load on the shelves
Design
Before you start doing anything with your pantry, you need to draw up a detailed diagram of it. And first of all, write a list of things that you will store there. Consider what you will need the pantry for:
- store preparations, food from the garden, etc.;
- store various spare parts, household appliances, tools;
- store things you rarely use;
- will you use it as a dressing room;
- Will you store your bike and other sports equipment there?
Consider how you will store these items and whether the shelves are up to the task.
After you have created a plan and understood what you will store in the pantry, you need to measure its walls with a tape measure and draw a detailed plan of the room. This will help you understand how to place shelves, even in a small, narrow pantry, and how much space should be between them.
Here are the average parameters that you should focus on:
- the size of the closet in which a person can move freely is 1x1 meter;
- shelf depth – 35 cm;
- the distance between the shelves as they increase (from the top to the bottom) is 25-40 cm.
Remember, the size of the pantry depends on the room in which it is placed. For example, in a small kitchen you can make a pantry in a niche or on the mezzanine.
In a living room or bedroom, a storage room can take up a significant part of the room.
Shelving manufacturing technology
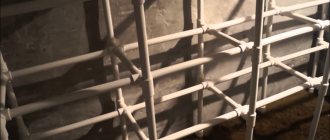
The technology depends on the rack option you choose.
Let's consider an option where the frame is rigidly fixed to the wall. First of all, beams are attached horizontally to the wall - a section of 50*50 is sufficient. The beams are fixed in pairs - on each pair there will be one tier of the rack. The distance between them will determine the height of the shelves. After that, shelves are laid on them and attached. This completes the process.
Now let's look at the design of a U-shaped rack.
"U-shaped" rack layout
To begin with, bars for the racks are selected - the cross-section is suitable 50*50, and the length can be taken 20-40 centimeters less than the height of the room - there, on top of the rack, it will be possible to arrange another shelf.
If necessary, beams are also installed in the middle so that the shelves rest on them and do not sag under load. The length of one span is selected for the required load. As a rule, one meter is enough.
Frame made of beams
Jumpers are installed on the side of the bars on which the shelves will rest. Their number depends on the desired number of shelves, and the distance between them determines the height of the shelves.
In principle, the assembly of the rack is almost complete - if you attach the shelves to the jumpers, you will get a fairly rigid structure. If necessary, you can strengthen it further. You can also make sides on the sides of the rack - in some cases this is more convenient.
Hanging shelves in the garage
Shelves for the rack can be made from ordinary wooden boards. If you plan to use chipboard, keep in mind that such boards are not very resistant to moisture.
It is better to place shelves with a greater height at the bottom - things that have large dimensions are more convenient to store in the lower part of the rack.
Frame for shelves on the balcony
The thickness of the shelves ranges from 10 mm to 30 or more - it depends on the weight and number of items that are supposed to be stored in the pantry.
After installing the frame, boards are mounted on it. If necessary, they are sanded and painted. The technology is similar to making a frame for a podium. This completes the production of the rack.
↑ back to contents
Necessary materials
When deciding how to make shelves in a pantry, you need to decide on the material from which the structure will be made. There are several options.
- The budget option allows you to make shelves from the material included in the furniture. If you have an old wall or an unnecessary chest of drawers, then you can disassemble them and get a fairly durable and, at the same time, free canvas for making boards.
This will be enough to ensure that the pantry has good and reliable shelves on which you can store anything. - The second option involves purchasing material for shelves in the pantry. The choice must correspond to the list of intended items for storage, their dimensions, and weight.
It is advisable to make a rack directly in the pantry, since if it is large, then it will be difficult for you to bring it inside.If it is expected that the racks will be loaded with conservation, then a solid board about 30 mm wide will be the best choice.
Any boards will do - the main thing is that they are of sufficient length and can withstand the expected load.
In addition to wooden materials, you can choose others, the main thing is durability and the possibility of self-assembly. In addition to the shelves, you should stock up on the fasteners on which the shelves will be installed, and the consumables necessary for the work.
In order to make wooden shelving for a pantry, you will not need a lot of materials and serious tools.
How to make a metal rack with your own hands
Before you start manufacturing, you need to imagine what such a structure will look like and what fasteners will be used.
Rack drawing
Next, take the necessary measurements and draw your idea on paper. It is possible to find a suitable drawing and assembly diagram on the Internet or draw it yourself. The design can be of any size and shape that will fit into a given pantry.
For fastening, it is better to choose metal fasteners, as they are very durable and can withstand any weight.
Necessary materials
When starting to select a material (metal, wood, plastic) for manufacturing and fastening materials, you need to know what will be stored on them, the expected weight, dimensions.
For the frame you should take a metal corner or pipes.
In addition, you will need connecting elements for assembling the frame, brackets, screws and self-tapping screws.
For manufacturing, you need to select a material, the thickness of which depends on the expected weight of the luggage (the greater the weight, the thicker the shelf fabric).
Tools
For assembly you will need the following tools:
- pencil;
- drill;
- screwdriver;
- building level;
- hacksaw for metal;
- roulette.
When starting assembly, it is better to wear special clothing so as not to get dirty or get injured.
How relevant are they?
As already mentioned, today few people buy printed publications, go to libraries and read them in printed form. After all, modern technologies are used today to obtain basic information. But despite this, today you can find many who love the rustle of paper pages. Therefore, the question of the relevance of book shelves is quite acceptable.
Book racks are an excellent alternative to traditional bulky bookcases and shelves that can spoil the interior of the room. Taking this into account, we invite you to consider original solutions for book shelving that will definitely not spoil the interior of your room.
Our advantages:
- Large selection of shelving available.
- Own warehouse and showroom in Moscow.
- We have our own team of assemblers, they will assemble quickly and efficiently, the work is guaranteed.
- Preliminary measurement is free!
- Save your time and money! We work without intermediaries, at the manufacturer's price.
- Our racks are not only about quality, but also about aesthetic appearance.
Selection and preparation of a site
Most of the worries fall on the preparatory work. Before building the shelves, you need to empty the storage rooms. Any foreign objects will interfere. Next, carefully inspect the walls. Thin partitions will not support bulky filled shelves. A surface covered with plasterboard is also not suitable. The solution is to use a hammer drill and insert dowels.
Options for making shelves in the pantry
The second point is curvature. It is not advisable to place shelves parallel to the floor or ceiling. We recommend using a level for marking. This will provide stability to the items. The banks will not roll down.
Selecting a location
The first step in getting started is choosing a location for the shelves. You can’t just attach them to the wall at will; it is very important to take into account certain factors so that when the work is completed you are happy with the result, and your pantry will serve you for many years. The wall intended for fastening must be load-bearing, since ordinary partitions may not withstand high loads, and all the shelves will simply fly down.
The mounting location must be prepared in advance: it should be sanded, leveled and, if necessary and desired, plastered. This is necessary so that the shelves stand up straight and there are no problems with their installation.
And of course, it is important to think about the proper lighting of the storage room for your convenience. This must be done before installing the racks.
Final decor of the rack
The finished structure must be painted. Of the various options, the simplest are coating with water-based acrylic paint or varnishing the product.
The advantage of acrylic paint is that it dries quickly and has virtually no odor. It can even be used indoors, although the room will still need to be ventilated. Varnishing is preferable if you want to preserve the structure or slightly tint the surface of the wood. Clear or tinted varnish to resemble oak, walnut, ash and other wood species should be applied two to three times. Each new layer is applied after the previous one has dried.
Before painting the rack, it is necessary to prime the surfaces to be painted, unless two-in-one paint is used. Priming the surface will ensure a good result and will ensure that the paint does not peel or crack over time. If you intend to paint with oil paints, it is recommended to do this in advance outside the living space. We bring all painted parts into the house for subsequent assembly only after complete drying.
So, once the shelving unit is assembled and painted, you can stand back and admire your work. However, your furniture will look more presentable when books, figurines, framed photographs and other household items for which it was made appear on the shelves.
Some tips for beginners
If you're just starting to decorate your home, there are a few things you should know. First, the longer the structure, the stronger the material should be. Otherwise, it may simply break under load. If you are not sure that the canvas will not withstand the load, then you should use a transverse fastening in the middle, this way you will significantly strengthen it.
If you decide to implement a separate rack, then it is best to make it from wood, since chipboard or fiberboard can be destroyed by moisture and crumble. Therefore, over time, if there is moisture in the pantry, a shelf made of such materials will simply crumble. The tree will withstand tens of times longer; both pine boards and harder woods are suitable - oak boards, birch boards can also be used. Of course, the shelves may bend a little, since wood has this property when humidity changes frequently, but you can be sure that the shelf will not fall at the most unexpected moment, and all the jars with blanks will remain intact and safe.
Shelving is a simple task; even someone who is not particularly versed in construction can handle it. The most important thing is to use high-quality fasteners. This is a guarantee that the shelves will be reliable and durable.
Don't think about things like interior and design. The most important thing in a pantry is that it is convenient and practical, and of course reliable, so that nothing falls. Therefore, first of all, strive for these parameters, and only then about all other aspects. After all, guests don’t go there, and usually only family members use it, so its decoration has practically nothing to do with the design of the apartment or house.
Doors to the pantry: is there any point in masking them?
If the doors are of a hidden type, then you can create the most unique interior.
Doors of this type do not stand out from the walls and look like additional decoration.
At first glance, it seems that a hidden door is a complex element to install, which cannot be installed on your own, but if you put in a little effort and use your imagination, you can install hidden doors without the services of a specialist.
To disguise the door to the pantry, you must fulfill the following basic requirements:
- The door frame should be camouflaged as a wall and have the same finish, and in order to perform everything better, it is better to line the doors with plasterboard and then glue wallpaper on them;
- Such a door must have hidden hinges, otherwise the hidden structure will be revealed by the hinges;
- The rest of the door fittings should be just as invisible;
- In order for the door to be completely hidden, it is necessary to install a plinth under the door;
- If a hidden door is disguised with a picture or mirror, then such a door is installed flush with the wall.
Fulfilling such requirements will give you the opportunity to hide the door from prying eyes. Such a door can simply be installed flush with the wall or made into a decorative element. You can get a hidden door in different ways, but regardless of the methods, you must adhere to the basic requirements.
Shelves in pantries - 50 photo ideas:
Previous
Shelves and racksTips on how to choose the ideal shelf above the bed
Next
Shelves and racksWe make a shoe rack for the hallway with our own hands.
How to make shelves for flowers on a windowsill Complete harmony of the interior of a room is achieved with the help of indoor flowers. Green plants fill the room with oxygen and decorate the house every day. Flowers of extraordinary beauty saturate the lives of household members...
How to hang a shelf on the wall? Very easy! Regardless of age or interests in life, there comes a time when you decide to do something with your own hands. In this impulse, a person purchases a shelf, but then the question arises: “How to hang a shelf on...
How to make a shelf for a TV on the wall with your own hands In every apartment you can find a variety of shelves designed to accommodate equipment and various accessories: books, photographs, souvenirs. It is preferable to have such shelves in…
Choosing a shelf for wine A glass of good wine during a meal can not only lift your spirits, but also saturate your body with nutrients, vitamins and antioxidants. If you are a fan of European cuisine, then for sure...
How to make a bookcase with your own hands? A DIY shelving unit is not only simple, but also economical. If you have never made something with your own hands before, then a bookcase is the first step for a novice craftsman. What is a bookcase?...
Making a convenient rack with your own hands Preparing tools for the rackIs there a mess in the house? Most likely, you simply don’t have enough shelves to store many useful things. Cans for canning and ready-made preparations for the winter, electric…
Photo ideas for homemade shelving
Sources
- https://comfort-da.ru/stellazh-svoimi-rukami/
- https://mebel-expert.info/stellazh-derevjannyj-svoimi-rukami/
- https://2proraba.com/other/stellazh-dlya-knig-svoimi-rukami.html
- https://svoimirykami.info/kak-sdelat-stellazh-svoimi-rukami/
- https://berkem.ru/polki-i-stellazhi/kak-sdelat-polki-v-kladovke-svoimi-rukami/
- https://vdome.club/materialy/svoimi-rukami/kak-sdelat-stellazhi-v-kladovku-svoimi-rukami-iz-dereva-profilya.html
- https://postroika.biz/24568-stellazh-iz-dereva-svoimi-rukami.html
- https://dnevnikmastera.ru/stellazh-svoimi-rukami
- https://clubsamodelok.ru/stellazh-svoimi-rukami/
- https://bouw.ru/article/kak-sdelaty-stellazh-dlya-knig
- https://stroy-podskazka.ru/stellazh/svoimi-rukami/
- https://svoimirykami.guru/stellazh-svoimi-rukami/
- https://molotokmarket.ru/stati-instrumentah/stellazh-svoimi-rukami/
- https://gidrukodeliya.ru/stellazh-svoimi-rukami
[collapse]