A crib is the first and most important piece of furniture for a new family member. The crib should become a cozy and safe place for the child’s growth and development, because this is where he will sleep, play, learn to roll over and stand on his feet. Therefore, young parents take full responsibility not only when choosing a bed model, but also want to carefully assemble it with their own hands. If the question is how to assemble a pendulum crib instructions, photos , and knowledge of the specifics of the pendulum structure will help
Pendulum crib
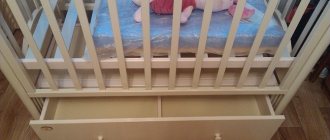
Assembling the crib
Practice shows that modern cribs mostly have multifunctional parts. Standard parts are:
- bed frame;
- supporting part of the mattress;
- special sides (can be soft or made of fabric);
- niche for linen or without a drawer;
- pendulum mechanism.
Let's start with the preparatory work:
Please note that it is better to assemble the crib in the child's room. This way, you don't have to drag it around the entire apartment. After you have removed the packaging, set the larger pieces aside and place the smaller pieces on a light-colored fabric. Place all the necessary tools near you
Be sure to read the instructions before assembly. Make sure that all the necessary parts, bolts and operating systems of the crib are present. Do not neglect studying photographs, drawings or diagrams. This will greatly facilitate your work and speed up the assembly itself.
Once all the above preparations have been completed, we move on to the assembly process itself:
- We always start work with the main structure, namely the fixed back wall. Define top and bottom. All side walls have legs.
- Place the back wall on the floor with the inside facing up. This way you will see the necessary grooves for fastenings. Tighten the screws correctly to avoid stripping the threads and damaging the furniture itself.
- After this, we move on to the bed - the supporting part of the mattress. This is a kind of wooden or plywood rectangle made of transverse slats. The supporting part itself should be secured with screws. But don’t rush to screw them tightly. First, choose the optimal height. Professionals advise choosing a higher position, as it will be easier for the mother to position the baby. As soon as the child learns to stand, the bar should be lowered.
- As for the moving parts of the bed, insert it into the guide grooves of the two side elements.
- We turn the entire structure over for subsequent assembly and attachment of the swing mechanism.
Finishing work
The moment the crib is assembled with your own hands, you can begin decorating it. You don't need any special tricks for this. Natural wood is absolutely harmless to the health of the child. To ensure that its surface is well preserved and has a smooth surface, the wooden parts must be coated with a non-toxic varnish. If the design includes bright colors for the crib, it can be painted with acrylic paint.
You cannot paint the crib in a residential, unventilated area where there are children.
Instructions for assembling a crib on hinges
Smooth monotonous movements and rocking help the baby quickly calm down and fall asleep. And a crib with hinges is best suited for this. This furniture is intended for children under three years of age.
The lower part of the crib is usually orthopedic and has two levels. Thanks to a special mechanism, the child can be rocked parallel to the floor surface.
The bed assembly process is as follows:
- Assembling the base of the crib. To do this, we attach each of the three guides to the bottom of the structure. The grooved sides should extend to the outside of the crib.
- Using screws (three on each side) we attach the front and rear backrest (Fig. 1).
- Installing the bottom. It can be installed in two different positions, this allows you to change the depth of the crib (Fig. 2).
- Install the sidewalls (Fig. 3). We connect the moving elements on the sides with the base of the crib (Fig. 4-7).
- To prevent the crib on hinges from rocking, you can install special clamps at the bottom of the sides.
Installation of the pendulum mechanism
Let's look at how to assemble a crib pendulum system using the most common model as an example.
- Start by assembling the swingarm support. It usually includes four parts that need to be fastened together.
- Next, use bolts and washers to assemble the hinges on the wooden plates.
- Secure the resulting hinges with nuts to the base of the pendulum device. Place the nuts on small washers; do not tighten them tightly yet. If the model of crib you purchased is equipped with a drawer for linen, it’s time to install and attach it according to the included instructions.
- We place the body of the crib on top of the support of the pendulum mechanism, fasten it with bolts on the legs of the crib, and fasten it with nuts and washers. Secure the side of the crib with screws. Install the bearing mechanism. It is important to check that the fasteners match the holes. After securing the fasteners, cover the screws with caps, which play a decorative role.
Pendulum mechanism for a baby crib
The finished pendulum crib should swing without much effort.
After assembly, it is necessary to check the safety and reliability of the structure. When rocking, the bed should not wobble. Test how firmly the base is installed and how easily the movable wall moves up and down. Make it a rule to check the crib every week, as the bolts may become loose, gaps, and sharp corners may appear.
It is necessary to periodically lubricate the elements of the pendulum crib
Lateral rocking
Externally, the entire structure resembles a cradle for comfortable rocking from left to right and vice versa. It is easy for parents to rock their baby to sleep, even while lying in their own bed. But even in this case, the baby can independently set his crib in motion, turning over from side to side.
As for the disadvantages, a crib with a transverse pendulum also has them. Such furniture requires quite a large space. Otherwise, due to lack of free space, the body of the crib will constantly hit the wall, which, in general, is undesirable.
In other words, it cannot be moved close to the wall, as is the case with a longitudinal pendulum. Another disadvantage is the lack of physiology of the swinging process itself.
Interesting fact
There are three types of cribs with a pendulum system: with transverse swing, longitudinal movement and universal. Despite the fact that transverse motion sickness seems more common, longitudinal motion sickness is more beneficial for the child’s health. In this case, the newborn's head will not dangle from side to side, which can negatively affect the vestibular system.
There is a special mechanism, powered by electricity, rocking the crib
Did you know?
The distance between the walls of the crib and the mattress should be no more than 2 cm so that the baby can roll over and move in a safe environment.
Pendulum mechanism with lever element
They stop using the crib when the child’s height reaches 80-90 cm and the baby can get out of it on his own.
You can beautifully decorate a crib with a pendulum
Assembly diagram of a transformable crib
First you need to buy all the necessary materials. Most often, transforming beds are made of wood, because it is environmentally friendly. The only tool you need is a screwdriver. All necessary fastenings are sold complete with the bed. The design assembly process is as follows:
First, make a project with drawings. Prepare a place where the bed will be placed. Cover it with a light cloth so as not to lose small parts (bolts and cogs). Assemble the bed frame. To do this, connect the lower sides with the backs. Secure the frame so that it does not bend during operation. First you need to attach a fixed wall to both walls of the crib. All necessary fasteners are included. Please note! Correctly install the top and bottom of the wall. Now let's take a place to sleep. Very often it is already ready, in the form of a bed, and all you have to do is just put it on. But if there is no bed, then it is in the form of lamellas. They need to be inserted into the grooves on the sides and secured with screws. Now you need to install the façade wall
It is important that it is mobile. Everything is held together with screws. Now you need to assemble the bedside table from the parts included in the kit
It is secured with screws. It will be level with the crib. Now you need to assemble the second bottom for the small bed. It is necessary to check all the grilles on the sides again. If the structure is on wheels, it must be turned over to mount the wheels in the grooves. If there are pendulum runners, they need to be assembled and installed. We collect boxes where clothes and other items for the baby will be stored. Attach the side wall (where the drawers are). We install boxes. We place the structure on the pendulum. Don't forget about the fasteners. We close all the screws and nuts with plugs (so that the baby does not get scratched while sleeping). We screw a table to the bedside table where we will change the baby's films. We assemble all the shelves and insert them into the structure.
Assembly of the transforming crib is completed. All that remains is to prepare the bed for the baby.
Depending on the kit chosen, slight differences in assembly may occur. Most often, the kit comes with instructions that will help you assemble the bed.
Required Tools
To assemble a crib correctly and efficiently, you will need to prepare the following tools:
- scissors or a stationery knife - for unpacking boxes;
- a set of screwdrivers and a ring wrench (a screwdriver with a set of attachments would be a convenient replacement);
- durable equipment, hexagon, cross bit;
- tape measure for accurate sizing;
- pliers for removing incorrectly inserted fasteners.
Many modern cribs are equipped with Euroscrews with hidden heads and internal hexagons, so special keys are useful when assembling them. The level will help to achieve perfect evenness of the connected parts. Depending on the type of children's furniture, the components vary, so the composition of the tool set may vary.
Features of decoding drawings and instructions
Assembly diagrams for cribs - the main document that comes with the furniture
It is important to understand all the symbols correctly in order to avoid mistakes, otherwise the work will have to be redone, otherwise the child’s safety will be in question
The instructions for assembling a children's bed with a pendulum clearly show how to connect all the elements together. The backs, fence, bed, base, as well as the parts of the drawers are marked with numbers, so they are easy to recognize on the diagrams. Components and fittings also have their own designations.
The installation process of a popular model with a pendulum mechanism can be demonstrated with drawings. They show how the half-arches are installed, the sidewalls and the rear wall are connected, the bottom is fixed, and the front part is attached. Diagrams are provided to show the correct installation of the bottom and assembly of the box. Often reading them causes certain difficulties. To understand the main stages, to understand what a particular image conveys, it is necessary to correlate the drawings with the text of the instructions - each type of furniture has its own characteristics that should not be forgotten.
The process of assembling cribs must be carried out in compliance with all the rules of the attached printed manual
During installation, do not rush, and after completion it is important to check the quality of the installation and the furniture’s compliance with safety standards
Here are the main steps
Prepare your work area. Usually it is covered with a light material, on which even the smallest details such as screws will be easily visible (this is done so as not to lose anything); Assemble the frame. To do this, first connect the back guide and two side walls together, and then the front
Don't confuse where is up and where is down! Important: if the front wall is assumed to be movable, it should be installed after the base has been installed; According to the attached instructions for assembling the crib, install the bottom (usually it consists of a lattice base and a plywood sheet); If the model has wheels, now is the time to turn it upside down and install the wheels in special grooves or simply screw them on; Now you can assemble and install the pendulum mechanism on those cribs that have it; Basically, everything is ready. All that remains is to check the reliability of the assembly, the operation of the mechanisms and equip a cozy and safe sleeping place for the baby
To do this, we invite you to visit the Sleep Therapy website, where you will find a wide range of different mattresses and bedding. Comfortable, modern, high quality!
Remember that assembling a crib is always based on the instructions. Follow the sequence of actions, carefully monitor the fastening of parts - and then everything will definitely work out! There is no rush to complete this task. A correct, thoughtful and unhurried approach is the key to its successful solution.
The crib assembly diagram is the fundamental document when purchasing this piece of furniture. Let's figure out how to read it correctly so as not to make a mistake in the end.
Here is one example of such a scheme that we will work on:
Here we show how to assemble the most common model of a bed for a baby: with a mechanical pendulum system (the wheels are removed and the swing is carried out by means of semi-arcs located at the bottom of the side walls), wheels and a removable front part. The first picture shows how to install the half-arches. On the second - fastening the side and rear walls. The third image explains how the bottom is installed, in the fourth we see the attachment of the front part. Figures 5 and 6 are more specific and show how to properly attach the bottom and make the box.
In fact, reading the diagram is perhaps the most difficult task in the entire assembly process
It is important to understand each stage and understand what conventional images convey. That is why we recommend that you carefully read not only the schematic images, but also the accompanying text.
Preparatory stage of installation
Although the design of a children's pendulum bed is somewhat different from a transforming model, rocking chair or children's furniture on hinges, the assembly process of any of these products consists of two stages: preparation and installation work. To create comfortable working conditions and improve its quality, you will first need:
- Remove unnecessary things from the nursery, move furniture, freeing up the space necessary for ease of installation. Correctly carry out the assembly in the room where the crib will subsequently stand, in which case there will be no need to drag it to another room after completion of the work.
- Carefully examine the available components. Their quantity must correspond to the data reflected in the instructions. If a shortage is discovered, you must immediately call the store and report it.
- Make sure there are no defects. To do this, all furniture elements are carefully inspected for their integrity. If chips or cracks are found, it is better to issue a return, as this threatens the safety of the child.
- Sort the components. All walls, planks, sidewalls, as well as fittings are assembled into separate groups, based on their shape and size.
Each point described in the instructions for assembling a children's bed must be strictly followed. A certain model has its own characteristics, so its installation does not always comply with the basic rules. It is always recommended to start by connecting the largest elements.
Assemble the crib in the room where it will subsequently be located
Follow the instructions strictly
Group components
Check components for defects
Types and advantages of pendulums
There are several types of beds for children, they differ in the direction of movement of the furniture itself. For worried parents, it is worth noting that thanks to a special wooden mechanism on a hinge and a limiting sleeve - a special spare part - motion sickness will not occur, nothing will disturb the baby's sleep. Three options: with a longitudinal pendulum, with a transverse pendulum and a universal bed.
The first option is considered the most common and popular, because only thanks to the longitudinal pendulum is the natural swing of the mother transmitted. The child has the feeling that he is being calmed by his own mother, holding him in her arms. According to pediatricians, thanks to this, the child is guaranteed to have normal intracranial pressure, and therefore no headaches in the future.
Models with a transverse pendulum are reminiscent of the cradles in which our ancestors rocked their children. Like the old version, modern cribs move from side to side. This type of furniture is perfect for families with a small bedroom due to the fact that, thanks to the transverse pendulum, the furniture takes up little space. Special clamps will help stop the movement of the crib.
Universal models not only allow you to change the swing direction, but can also change their functionality. When the child grows up, the wooden walls can be removed and the bed itself can be lengthened using a chest of drawers. Sometimes manufacturers include a changing table, which is incredibly convenient for mothers. And while the child is still in infancy, parents do not need to put in much effort to return the crib to the standard position or change the direction of rocking.
The difference between a transverse pendulum and a longitudinal one
The main differences lie only in the direction of swing.
A longitudinal pendulum differs from a transverse one in that it most accurately reproduces movements aimed at rocking when the child is in the arms of mom or dad or other adults. Taking the baby in your arms, rock him from head to legs (back and forth). Similar manipulations are performed when rocking a baby in a stroller. This method of calming down and falling asleep is more familiar to a little person.
But this does not mean that the transverse option is worse.
When choosing a particular mechanism, you need to take into account the location of the crib. If it stands close to a wall or some piece of furniture, then the direction of movement of the pendulum should be such that even at its maximum amplitude the crib does not come into contact with anything.
The location of the adult who will rock the baby also matters. It is more convenient to rock the crib from you to yourself than to the right and left. Your hands will get less tired. If you plan to place it on the side of the baby, it is recommended to give preference to a transverse pendulum.
The direction of swing of the transverse mechanism is in many ways reminiscent of the movements of cradles that were used in the old days and rocking chairs equipped with runners. Many years ago, newborns were successfully rocked in them, and they quickly and soundly fell asleep.
I like
Beds / Bed arrangementRelated articles:
Varieties
Different types of cribs differ from each other, first of all, in reliability and service life. You should take a responsible approach to choosing a crib so that it lasts as long as possible and does not endanger your children.
Cradle
A cradle is ideal for a newborn baby. Your baby will sleep more comfortably in a small cradle than in a large bed. This crib takes up little space and can be moved freely around the room. However, it is worth remembering that the cradle is suitable for a baby no older than six months, and when he begins to stand on his feet, the child will need a larger crib. Many parents use a stroller cradle instead of a cradle. The shape of the cradle resembles a mother's tummy, so a recently born baby will sleep peacefully and pleasantly in such a crib.
Among other things, the cradle can be easily placed right next to the parents’ bed so that the mother can hear the baby’s call at any time. In addition, thanks to its lightness, the cradle can be moved anywhere at any time without disturbing the baby’s sleep.
Classical
The classic design of a baby crib will fit into any room design. Such cribs are usually quite simple and functional. The sleeping area is fenced on all sides with lattice walls, one of which can be dismantled. Most classic cribs are designed for children under three years of age.
Transformer
The advantage of transformers is the ability to adjust the size of the bed depending on the height of the child. Therefore, this bed has an increased service life. Transformers also have shelves for diapers and bottles. Thanks to the sides, the baby will not fall out of the bed while sleeping. Most models have a built-in mattress and storage cabinets.
The disadvantage of such models is their significant weight, which creates inconvenience when moving. In addition, their width cannot be changed - increasing the space is only possible along the length. The transformers have small shelves, so you won’t be able to put absolutely all of your baby’s things in them.
Manege
The playpen is a special folding structure. The playpens are suitable for children from six months to three years. As a rule, playpens are made of lightweight materials such as plastic, metal, fabric, due to which they are light in weight and can be moved from place to place without problems. Playpen models are equipped with a protective net that will protect the baby from midges and mosquitoes.
A playpen is a lightweight type of bed, so it is quite easy to move it from place to place. It is usually equipped with wheels for moving around the house. It will be easy for a young mother to move the crib with her baby without outside help, without distracting the child from sleep.
The playpen has a folding design, it can be easily folded so that it does not interfere with cleaning. The bottom of the structure is a stretched fabric, so you don’t have to purchase a separate mattress for it. The surface of the fabric is smooth and soft, which will have a beneficial effect on the child’s posture. Caring for the crib is very simple, since the fabric elements can be easily removed and replaced, and can be washed at any time.
Video material
The appearance of a child in a family is an incredible joy for parents. Accordingly, all work to prepare the children's room for the baby's arrival is carried out with special enthusiasm and scrupulousness. This is especially true for a baby crib. Therefore, it is very important that it is comfortable for the baby and functional for parents. Using the above tips and recommendations from experts, you can easily assemble a crib of any complexity in a short time and be ready to welcome your beloved child!
Assembling a rocking crib
Prepare the necessary tools, such as a screwdriver, screwdriver, bolts. A rocking chair is much easier to make than a transformer and a pendulum bed.
- Using special self-tapping screws, the main panels for the drawer are secured.
- Next, the bottom with guides is screwed on.
- A mattress pad is connected to the backs of the crib.
- Self-tapping screws are used to fix the upper level for the place where the child will sleep.
- Curved runners are screwed to the bottom of the backrests.
- Fixed fences are attached using screws or self-tapping screws.
- To fix the movable fences, they should be inserted into the skids using rollers.
A little time and effort and the assembly is complete.
Assembly process
How to assemble a crib with a pendulum? Usually, to assemble a cabinet or kitchen cabinet, they use the services of professional furniture assemblers. However, you can assemble a children's bed yourself, without outside help. Moreover, it is more convenient to assemble the crib on site, that is, in the children’s room or in the parents’ room.
The process itself, in turn, also consists of several steps:
- Stage 1. The assembly process of the crib begins with the installation of a fixed fence. The side and bottom parts are connected using screws. After this, the headboard is attached to them.
- Stage 2. Now the bed is attached on 4 sides, and only then the movable grille is installed. There are recesses on the non-side walls of the structure. The grille is simply inserted into them and secured with screws.
- Stage 3. How to install a pendulum on a crib? Now it’s time to tackle this mechanism. To do this, you need to secure 4 guides between the backrests. A wooden bottom is mounted in the gap between the top two. After this, you need to fix the lower part of the pendulum with screws.
- Stage 4. At the final stage, the box is assembled in the same way as the pendulum. Movable elements are attached to the top of the pendulum, and the legs of the crib are fixed to them.
If wheels are provided, then you need to secure them in the designated places, after turning the crib over. But here it all depends on the situation and preferences on how to assemble a crib with a pendulum - if there is a need to move furniture, then it is much easier to do this with wheels.
However, when the crib will stand in one place, the wheels do not need to be attached, even if they are included.
Step-by-step instruction
Before proceeding with direct assembly, you need to carefully study all the diagrams, as they may differ from the instructions presented below:
- The work begins with connecting the fixed parts, namely the side part. The headboard must be connected to the side and bottom with screws.
- The upper bottom is secured on all sides.
- A movable sidewall is mounted. It is inserted into special grooves located on the side walls. Fixation is done using screws.
- The next step is assembling the pendulum. The guides need to be secured between its backs. In the span between the two guides in the upper part, the lower bottom is mounted.
- The back of the pendulum is placed in the lower part. Screws are used for fastening.
- The box is assembled in a manner similar to that of the pendulum.
- Checking the reliability of all fastenings.
If the design does not have a box, the procedure is greatly simplified. The process of assembling a transforming crib with a pendulum is carried out as follows:
- A frame consisting of a back and sides is assembled. Special slats for the bottom are installed.
- The middle bottom is placed on slats.
- A cabinet or chest of drawers is assembled, depending on the model.
- The cabinet is attached to the back of the crib using screws.
- Shelves are installed in the cabinet.
- The top bottom, side bars and headboard are installed.
- The lower part with the pendulum is mounted using screws.
After work, it is important to check for depressurization of holes, reliability of fasteners and resistance to loads. Then you can start using it
It is recommended to regularly check the condition of the crib to ensure the safety and comfort of the baby. The finished structure should move without much effort, but should not tip over.
After reviewing the presented material, we can conclude that a crib with a pendulum is the best option for a child, having a positive effect on his sleep and health in general.
Parents can assemble the structure themselves using the instructions. This requires a minimum of tools and components. If all manipulations are carried out correctly, comfortable and safe use of the bed is guaranteed, regardless of the model.
Inspire us - share the material with your friends on social networks:
Real photos of children's rooms:
General rules for choosing cribs
For many mothers and fathers, the decisive factor when buying children's furniture is visual appeal, however, this approach is fundamentally wrong. The main selection criteria are the convenience and safety of the little man. There are many things to consider when choosing a crib, including:
- material of manufacture;
- baby protection elements;
- features of the sleeping place arrangement.
Shapes, materials and sizes of frames
One of the main structural elements of a crib is the frame. Today, furniture manufacturers offer a huge selection of cribs for newborns; the range includes traditional rectangular models and somewhat non-standard products with a round or oval frame.
The strength and durability of a crib directly depends on the material used. In the production of furniture for small children, natural wood, MDF, plastic, laminated chipboard, and metal are used.
Of course, for a baby it is better to choose a crib made of natural material. Furniture with a wooden frame looks expensive and presentable, is characterized by a long service life and the ability to “breathe”. In the segment of wooden children's furniture today you can find quite affordable models; budget options include products made from pine, spruce and birch. More durable, expensive cribs are made from hard trees - beech, ash, oak. Wooden cribs vary in style and design. The market offers classic models made from unpainted wood and wooden cribs coated with paint and varnish, decorated with printed images.
Plastic frames are easy to maintain; the weight of a plastic crib is much less than its wooden counterpart. The affordable cost of plastic furniture also attracts buyers.
Metal frames are famous for their strength and long service life. However, metal cribs are not widely used due to the “coldness” of the material.
Sides - types and rules of choice
Another important element is the sides of the crib; the main purpose of the design is to protect the baby from falling. The sides can be:
- stationary and removable;
- blind rack or combined (two solid sidewalls, two rack).
Most often, furniture manufacturers make the side walls of the sleeping bed in the form of a lattice structure; the side walls consist of a frame and cross bars installed at a certain distance. The crossbars can be made in the form of a round rod or be represented by wide slats.
When choosing a sleeping place for a baby, it is important to take into account two main requirements for enclosing structures:
- the distance between the vertical slats of the side parts should not exceed 5-6 cm;
- The height of the sides should be at least 60-65 cm, measurements are taken from the mattress to the edge of the side.
Additional protection for the baby will be provided by special silicone pads on the edges of the side and soft removable sides fixed around the perimeter of the crib. Elements of protection are especially relevant when the baby begins to actively move and during the period of teething. Silicone pads will not only protect the child’s gums from damage, but also maintain the integrity of the tree.
Some models of cribs are equipped with a front folding side. The folding sidewall allows you to move the child's bed close to the parent's bed; when the child grows up, he will be able to independently climb into his sleeping place. Unlike cribs equipped with runners to adjust the height of the side, folding designs use piano hinges. If necessary, the side can be folded down to the outer side and, when raised, is secured with latches.
Sleeping place - types and arrangement of bases
The base for the mattress of a baby crib can have a solid covered or slatted bottom. A solid bottom is considered more durable, and the cost of cribs with a solid base is lower than their slatted counterparts. A significant drawback lies in the design features; the solid base does not have gaps or holes, and therefore there is no air circulation between the mattress and the bottom. The mattress does not dry well and can quickly become unusable.
The slatted bottom consists of transverse strips fixed to the frame. The lattice design does not retain moisture inside the mattress and provides intense air circulation. The slatted base helps to properly distribute the load on the baby’s fragile spine.
The difference between a transverse pendulum and a longitudinal one
The main differences lie only in the direction of swing.
A longitudinal pendulum differs from a transverse one in that it most accurately reproduces movements aimed at rocking when the child is in the arms of mom or dad or other adults. Taking the baby in your arms, rock him from head to legs (back and forth). Similar manipulations are performed when rocking a baby in a stroller. This method of calming down and falling asleep is more familiar to a little person.
But this does not mean that the transverse option is worse.
When choosing a particular mechanism, you need to take into account the location of the crib. If it stands close to a wall or some piece of furniture, then the direction of movement of the pendulum should be such that even at its maximum amplitude the crib does not come into contact with anything.
The location of the adult who will rock the baby also matters. It is more convenient to rock the crib from you to yourself than to the right and left. Your hands will get less tired. If you plan to place it on the side of the baby, it is recommended to give preference to a transverse pendulum.
The direction of swing of the transverse mechanism is in many ways reminiscent of the movements of cradles that were used in the old days and rocking chairs equipped with runners. Many years ago, newborns were successfully rocked in them, and they quickly and soundly fell asleep.
I like
Beds / Bed arrangementRelated articles:
Instructions: how to properly assemble a crib.
All manufacturers of children's furniture recommend assembling cribs strictly according to the instructions. The complexity of assembly depends on the type of product. The easiest way is to install a rocking bed or a structure on wheels of a standard modification. They are not equipped with chests of drawers and linen drawers. For example, the Cinderella 1 rocking chair from the Agat brand can be assembled in 20-30 minutes. You just need to fix the backs and sides, install the bottom, and then attach the wheels to the rocking runners.
It is more difficult to install a crib with a pendulum. This part rocks the entire structure, so it makes placing the baby much easier. To correctly position the pendulum crib, you should:
- check the diagram for the presence of all parts and blocks;
- first attach the side frame to the rear backrest, then drive the berth into the grooves of the walls;
- attach the front removable part to the structure;
- install the housing on the floor to which the pendulum slats are attached;
- securely screw the pendulums, and then place the finished crib on them;
- adjust the side walls in height, screw the wheels onto the legs;
- if there is a canopy, secure it to the headboard using fasteners.
Important!
When assembling the pendulum part, we must not forget about the clamps. These details prevent arbitrary swaying. If they are not installed, the child will rock with the slightest movement, and this can disturb sleep.
Assembling a transforming crib
The most practical, but most difficult to install, are transformers. In addition to the main part, it is necessary to install a chest of drawers and lower drawers for linen. You need to start assembly from the bottom. First, the backs are placed, and blocks of drawers are attached to them. Then all the elements of the bed are installed on top, and a removable chest of drawers is mounted near the folding back of the crib.
Such models can be easily expanded as the child grows up. Transformers of the SKV-Company brand are very easy to unfold. To make the sleeping area longer, you just need to remove the chest of drawers and lower the front backrest. Despite certain difficulties during the assembly process, anyone can install a transforming bed.
conclusions
A modern crib can be installed independently. Each model comes with detailed instructions. The easiest way to assemble classic rocking chairs. Products with blocks for things and transformers are more practical, but have a design that is difficult to install. Consultants call the models from Agat, Feya, SKV- and Promtex the easiest to assemble.
Types of children's beds
Furniture of this type is divided into ordinary and multifunctional: a transforming crib, a pendulum crib, with drawers, with a chest of drawers, with a changing table, with wheels and a rocking crib. The main ones will be discussed in detail below:
- Transformable children's bed. It combines several elements and is suitable for a long period of time. One of its functions is transformation from a cradle to a sleeping place for an older child. Part of such furniture includes attributes for the convenience of caring for a newborn - drawers or a chest of drawers. They can also serve as a place to store toys and things for an older child. Manufacturers most often equip such cribs with a rocking mechanism, music and lighting. The disadvantages are the high price.
- Pendulum. It has a convenient design and takes up little space. It is divided into several types - according to the mechanism of motion sickness. The advantage of the longitudinal mechanism is the similarity of its vibrations to the natural movements during motion sickness. A baby in such a crib should calm down and fall asleep faster. The transverse pendulum moves left and right, but, according to some reviews, not all children like this method of motion sickness. In order not to make a mistake in choosing, it is best to purchase a universal mechanism. In this case, if your baby does not like the type of rocking, you can change it to another. Many models have the function of changing the height of the bottom of the bed. They can be equipped with electronic controls and removable walls, which is very convenient for mothers who want to place their child’s bed next to their own.
- Rocking bed. In terms of functionality, it is no different from a pendulum cradle, only it does not have automatic functions. This type of furniture is more environmentally friendly compared to other types.
How to assemble a crib with a pendulum
The pendulum bed is very popular among buyers and the choice most often falls on it. It has a complex design. To assemble it you will need patience, some skills and time.
Where to begin
You need to make sure that you have everything necessary for this work: all the elements of the crib are in place, there is a screwdriver, screws, plugs. Before you begin, decide on a work area and cover it with paper to avoid damage during assembly. It is best to carry out the entire process immediately in the baby’s future room, so that there is no need to move it later.
Build process
It is important to be careful and be patient. It is important not to make mistakes, because because of them you will have to start all over again:
- First of all, start creating the main stationary part. To do this, place the back wall horizontally on the floor with the inside facing up and screw the sides.
- Next, you need to install a bed that will support the mattress. From the very beginning, you shouldn’t tighten it too much, because then it will be problematic to make the front wall.
- The front part of the crib is secured to the side walls. After which you can move on to firmly securing the place where the newborn will sleep.
- Before you start making a pendulum, secure the wheels or place for laundry, if you have them. If there are none, you can immediately start working with the mechanism.
- You need to install the pendulum under the bed using metal plates in the side walls. The last step is to attach bearings and clamps that will ensure the safety of the baby in the sleeping place.
- You will need plugs to prevent the screws from being visible. You can use them as you wish.
Pendulum bed
This type of bed is made of natural wood, which is coated with water-soluble varnish. This type of furniture consists of the following elements:
- frame;
- sleeping area;
- backrests;
- legs;
- pendulum mechanism.
Some manufacturers produce cribs with drawers, chests of drawers and height adjusters.
It can be transverse, longitudinal and universal. If it is necessary to stop the movement of the pendulum, it is secured with special clamps.
Assembly of the structure
In order to assemble a pendulum bed, you need to prepare the following tools: a screwdriver, assembly diagram, crib elements, screws and plugs for them. Once everything is prepared, the process can begin.
To begin with, the workspace must be covered with paper or cloth to prevent scratches and damage. The fabric should be light and plain so that structural elements and screws do not get lost. The fixed rear part is screwed to the side walls using the included screws
Particular attention should be paid to the back wall. Its lower and upper parts are very similar, so they can be easily confused
It’s easier with the side parts, since they have legs.
Next, the bed is installed. In some models it is made whole, while in others it consists of several boards fastened together with a cord. They must be laid in holes located in the rear wall and in a special separate block. At the first stages, the stock is not secured very tightly, but is simply pushed onto the screws. After this, the movable front part is inserted into the guide holes on the side walls. Now the lower part of the case can be secured properly.
Having turned over the fixed body, you can begin to assemble the pendulum mechanism. Linen boxes are inserted inside the pendulum itself, after which the side wall of the pendulum is secured with mounting screws. The assembled crib body is placed on a pendulum using bearing mechanisms. The holes for installing the clamps must match. After installing the clamps, all screws are closed with plugs. Plugs are installed solely for aesthetic reasons.
It is not necessary to call a professional to install a crib. If you have instructions, assembling the pendulum bed will take a little time and effort.
We can safely say that a bed for a child is the first and most important furniture for a newborn. It should be as comfortable and safe as possible. In a word, furniture must include all the necessary features for the growth and development of the baby. It is not surprising that parents not only choose it wisely, but also want to assemble it correctly. To understand how to assemble a pendulum crib, instructions and videos will help you best.