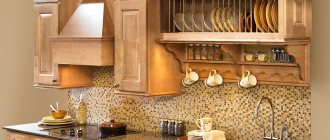
Types of dish dryers in the cupboard
Every kitchen simply needs such a thing as a dish drainer. It is used not only for drying your plates, salad bowls or dishes, but also organizes a storage system for kitchen utensils. A large, one might even say simply huge, range of dish dryers for closets is presented by different manufacturers from different countries. Such a huge variety of types of drying racks for dishes in the closet will help the most demanding housewives to arrange a system for storing dishes, even in large quantities.
Varieties
There is a huge selection of different drying racks for kitchen cabinets. Whatever design you choose, each has a number of compartments that are designed for cups, plates, saucers and other items. The surface of the dish dryer has an additional enamel coating in order to simplify the process of cleaning the device. There are options with decor, and the most popular are dryers with an additional rubber coating, which ensures silent installation of dishes in place.
Freestanding
Over the sink
Built-in cabinet
There are two main groups into which dish dryers are divided: free-standing and built-in. There are also wall-mounted fixtures, which are often placed above the sink so that water flows directly into the sink. For models that require installation in another location, there are special trays into which water flows and must be cleaned periodically.
Main types of dryers
As a rule, a dish dryer consists of several independent sections. This is a section for storing and drying plates and a section for cups. Each element of the system is made of durable material. The material must be coated with enamel so that it can be easily cleaned. In addition to enamel coating, dryers can be painted or rubber coated. virtually silent in use , because... rubber dampens the contact of dishes with the storage system.
Dryers can be divided into several types, depending on the type:
- dryers made as a separate system,
- dryers that are built into the kitchen cabinet or bottom of the sink.
Separate dryers, also called open ones, must be mounted on the wall, usually above the sink itself or simply installed on its surface. This installation location allows the water that remains on the dishes after washing to drain directly into the sink or a special tray. As a rule, dishes go to dry immediately after washing them and water remains on them in any case.
The advantage of such dryers is that they can be placed absolutely anywhere in your kitchen, simply by attaching it to the wall or placing it on any surface. Open dryers are easy to use and unpretentious , in addition, they have a fairly low price.
Dish dryers for closets can also be divided into several types:
- single-tier - such systems are suitable only for drying and storing plates, saucers or salad bowls.
- two-tier , also called two-tier - used for drying both plates and cups.
- and, finally, there are also specialized drying racks for dishes - this type is suitable for organizing a system for drying and storing almost all kitchen utensils: plates, cups and cutlery.
Now a little about built-in drying racks for dishes in the closet. Such systems are mounted directly in the cupboard using special plastic fasteners. It is possible to build dryers into both the upper and lower sections under the sink. Mounting the dryer under the sink will be very convenient if there is a dishwasher in the house. In this case, you do not have to carry the dishes from the sink to the top of the cabinet and open its doors, but put them right next to it, i.e. hand movements with utensils are kept to a minimum.
Thanks to the built-in drying racks for dishes in the cabinet, your kitchen will take on a more aesthetic and well-groomed appearance , because... The dishes will be neatly folded and will not take up much space. In addition, the advantage of a built-in dryer is that dust will not settle on the dishes, because... it will be in the kitchen cabinet.
The most popular and common dish drying system is the hanging system. As mentioned a little earlier, it can be of two types: independent and built-in. Built-in type dryers, in turn, are divided into subgroups according to their shape and type:
- with or without frame,
- single-level and two-level,
- and corner ones.
The most important requirement for embedded systems is the presence of good cabinet ventilation . This is due to the fact that moisture flowing and evaporating from the dishes can damage the cabinet itself. The best ventilation can be provided by two drilled holes on opposite sides of the kitchen cabinet. Holes are usually best placed on the sides of the cabinet. There is no need to drill holes at the top or bottom, because... dust will fall onto the dishes through the hole on top.
There is another type of dryer called troflex dryer .
Such systems are produced in unusual shapes and can perfectly serve as an element of the decor of your kitchen. In addition, such systems can be placed absolutely anywhere: for example, on the side of the sink or simply by placing the dryer on the table.
Choosing a built-in device for drying dishes
In the process of selecting this device for the kitchen, you need to decide in which cabinet it will be fixed. According to this criterion, dryers are divided into three subtypes:
The dryers for them are structurally similar, they differ in geometric shape, the first and third are straight, while the second is made at an angle. Once a decision has been made on the type of cabinet, you will need to make a choice regarding the material of manufacture.
The advantage of a built-in dryer is that dust will not settle on the dishes.
Plastic, of course, is more stable and hygienic, but metal always wins in aesthetic terms. The price aspect is also important when choosing a device; the chrome-plated version is the most expensive, but also reliable; as the cost decreases, it loses in resistance to corrosion damage.
The dishes will be neatly folded and will not take up much space.
And finally, you will have to think about the capacity of the dryer, whether it should be one or several rows, it all depends on the number of dishes being processed.
What materials are used to make dish dryers?
The first material from which dish drying systems are made is metal. Such systems are made of steel and then covered with a layer of anti-corrosion coating . It is this coating that protects drying from rust, rot and scratches.
The next material is stainless steel, popularly known as simply stainless steel. Such systems will be an order of magnitude more expensive than metal ones. But they will differ from the latter in their durability and strength. In addition, such dryers do not require painting or additional coating. Well, as the name of the material suggests, the systems are completely protected from corrosion.
Another type of material is plastic. Plastic dryers are characterized by the lowest price . However, when choosing such a system, carefully check the plastic for its quality, because... Poor quality plastic can have a detrimental effect on your health.
Tip: ask for a quality certificate for the products sold in the store.
The disadvantage of such systems is that they quickly lose their original and beautiful appearance, because... Plastic has very low resistance to various mechanical influences on it, for example, it can be easily scratched.
And finally, a tree. Dryers made of wood have been considered an item of luxury and wealth in the home since ancient times. In addition, a wooden drying rack will easily fit into any kitchen interior. During production, the dryer is covered with a layer of moisture-proof material. This is what protects the dryer from moisture penetration . But it is best, of course, to use wooden systems only for storage. Or after purchase, coat the dryer again with moisture-proof material. But you probably won't want to do this.
What materials are dryers made from?
Dish drying systems can be made from various materials.
Metal constructions
The most common are metal structures. In this case, the material must undergo processing - galvanization or enamel coating. This is important when operating in conditions of high humidity.
Metal dish dryer
Prices for metal dish dryers
Most often, stainless steel is used, which has a coating that protects it from corrosion (it is important that there are no chips or other defects). These dryers last for a long time, they are durable and functional. Most steel models look very stylish. But stainless steel systems are not cheap. Used in the production of dryers and aluminum. A big plus is that metal products require virtually no maintenance.
Plastic products
Plastic products are cheaper than metal ones (especially stainless steel). Stylish, bright interior items are made from this material. It is important that polymer models are completely unaffected by water, corrosion and rotting. But their other characteristics often leave much to be desired.
Prices for plastic dish dryers
The mechanical strength of plastics is low. Over time, plastic loses its appearance. Dirt collects in the scratches and chips that form on the surface.
Wooden crafts
In some interiors (for example, country or Provence), stainless steel or plastic dryers will look ridiculous. In this case, you cannot do without wooden structures.
Built-in wooden dish drainer with two shelves
Despite the fact that wood is largely susceptible to the effects of water, steam and temperature fluctuations, with proper pre-treatment of products they acquire the necessary resistance to impact and decent durability. Of course, it is desirable to minimize direct contact with water from such dryers.
Wooden dish drainer
Combinations of materials are also used in the manufacture of dryers.
The choice of type of dryer is purely individual. The main thing is that the design is easy to use and its appearance does not cause dissonance with the design of the kitchen space. The cost of a model is influenced by the material from which it is made, its size, and design.
Important! Products produced under well-known brands cost the consumer significantly more than those whose brand is not very well promoted.
Types of drying racks
There are two main types of dish drainers that are built into dish cabinets:
Polymer-coated dryers, usually white
These are inexpensive dryers, which is called an economy option. This dryer is equipped with one tray for water draining from the dishes.
Dryers larger than 600 mm sag, and they are not durable; over time, rust begins to appear, and the tray breaks easily. Installation of the white dryer is simple; 8 holes with a diameter of 8 mm are drilled into which plastic bushings are installed.
Dryers with galvanic coating, usually chrome color
More expensive, the difference in price is 5-10 times, but also a more durable option for drying dishes.
Dish rack width
Drying widths are available in 400, 450, 500, 600, 800, 900 mm. The size is given for the size of the cabinet into which the dryer will be built. That is, a 400mm dryer means that it will be installed in a 400mm wide cabinet.
There is such a nuance here, there are dryers that are installed either in a case made of chipboard with a thickness of 16 mm or 18 mm, and there are universal ones that are suitable for both 16 and 18 mm chipboards due to the use of special gaskets, pay attention to this when purchasing a dryer .
The optimal size is 600 mm, 400-500 mm is small, and 800-900 mm begin to sag under the weight of the dishes, and the dish drying cabinet itself turns out to be heavy when loaded with such a width.
Types of drying racks for dishes:
- installed in a cabinet with drawers
- dryer that hangs on the railing
- tabletop drying drying in a corner closet.
Dryers built into wall cabinets
This type of dryer is the most common. As a rule, they are placed in cabinets that are located above the dishwashing area. This little trick from furniture designers makes it possible to reduce the number of movements that housewives make when washing dishes. By placing such a dryer under dishes in the sink area, the housewife can simplify the care of her furniture and reduce the frequency of washing it. This way, drops of water from the plates will flow into the sink and not onto the work surface.
Classification:
- Drying with or without a frame.
- Single- and multi-level structures that extend for drying tableware, including corner drainers.
With or without frame
In order for cutlery to dry evenly, it is necessary to create favorable conditions in the bedside table in which the dryer is built in:
- As a rule, they are produced without a bottom edge, thereby ensuring good ventilation of the cabinet.
- To make the structure more stable, dryers are equipped with a special frame that functions as the bottom of a cabinet.
- Occasionally they are made with a bottom, where two holes are made, from which a lattice is formed.
Important! Both types of dryers are suitable, both with and without frames.
Single-level frame
Frame drying, which ensures the strength and stability of the structure, is made for a specific model of bedside table from high-strength material. When choosing this type of dish dryer, you must know the parameters of your product and the thickness of the material used for manufacturing. It is not possible to regulate here, so it is simply necessary to know all the parameters. Often, do-it-yourself dish dryers for cabinets are made from 18 and 16 mm chipboard.
Important! The main environment for using single-level dryers is horizontal hanging cabinets. Their main difference is in the equipment with gratings. You can place both plates and glasses on them.
Multi-level
Multi-level dish dryers consist of two parts:
- Top rack for glasses and cups.
- Bottom grid for plates.
Important! The placement of the gratings may vary depending on the customer’s wishes.
Corner dryers can be identified as a separate subsection adapted for drying dishes. Thanks to the L-shaped design, the interior space of the corner bedside table can be used more efficiently.
Important! A characteristic feature of corner dryers is their design. They are made only with two doors, and they are intended only for installation in bedside tables of a standard size of 60 by 60 cm.
Cabinet design for drying installation
In general, the design of the drying cabinet corresponds to an ordinary cabinet, with the exception of the bottom of the cabinet. The fact is that there is high humidity in the dish drying cabinet and additional ventilation is necessary. To solve this problem, the bottom of such a cabinet is not made or is made in the form of two strips 100 mm wide.
The design of a drying cabinet with a two-slat bottom is made for cheap white drying racks and for drying racks that do not have a groove in the back for installing a fiberboard back wall.
In the design option without a bottom, the bottom is the lower part of the dryer, or rather its frame. That is, the drying itself provides the required rigidity of the structure. Although, in my opinion, this should be done when the drying cabinet is located between other kitchen cabinets. This should be done because the drying fasteners cannot withstand the weight of the dishes, and the drying body in the lower part begins to move apart.
https://shkafkupeprosto. ru/states2/Kak-sdelat%60-shkaf-sushku-dlya-posudy. htm The article discusses a reliable and aesthetic way to install a standard dish dryer in a cabinet of non-standard sizes. Installing a dish drainer in a closet
Types of designs
When choosing a design, you have to take into account the design features of the room, the number of residents, the preferences of the hostess and financial capabilities. In the kitchen you can install an open structure or tucked away in a cabinet. To save space, corner structures are used.
Depending on the method of placement, several types of dryers can be distinguished.
Troflexes
The simplest type of product is a grate or board with small perforations that is installed on the sink.
Dish drying rack on the sink
When using such devices, water from the dishes flows directly into the sink. Models are also available that can be folded into a roll, which makes them easier to store when not needed. They can be made of plastic or metal.
On such a dryer you can install a few dishes to dry, but for one or two people living in the house this is enough. In addition to serving items, you can also place freshly washed food here. Troflexes look quite simple, you can choose them without being particularly tied to the style of kitchen design.
READ How to install addons for morphvox pro
Tabletop
There are many models available that are installed on horizontal surfaces. They can be separate modules for drying cutlery, cups or plates. More functional are combined systems that have compartments to accommodate the entire range of utensils used. Both stationary and folding products are produced. The structures can be easily moved if necessary, they are easy to use - utensils are always at hand. But storage systems installed on the countertop or next to the sink clutter the space. In addition, airborne dirt particles settle on washed dishes.
In order to save free space and create comfortable conditions for the housewife, a stationary structure for drying dishes can be built behind the sink.
Wall mounted
You can hang the dryer in any free space on the wall (usually on the apron) or inside the unit, not far from the sink. This method of organizing space for storing wet dishes allows you to free up the work surface. However, it does not provide tableware with the necessary protection from dust and dirt.
Built-in
Most often, in modern kitchen sets, special drying cabinets are supposed to be installed to place washed dishes. These modules can be located both on the lower tier and above the sink. The most functional location for storing wet dishes is in a drawer. Usually it is at the bottom. Typically next to the dishwasher.
The great advantage of closed structures is the protection of the dishes in them from dust and grease generated during the cooking process. It is also important that this method allows you to free up space in the kitchen and hide cutlery behind the facade, which is more aesthetically pleasing. But when storing wet dishes in a cabinet or drawer, special attention must be paid to its ventilation. This is important both for plates with mugs and for the durability of the kitchen set, since dampness has a detrimental effect on it.
Dish drying cabinet
The standard depth of kitchen unit elements is 600 mm. This should be taken into account when choosing a built-in dryer model so that there are no problems with its installation.
Important! When purchasing a built-in structure, special attention should be paid to the quality of the fasteners. The weight of the dryer with the dishes placed in it is decent. It is necessary to eliminate the risk of it falling along with serving items.
Drying racks can be single-tiered or have several levels, which allows you to place plates, cups, and cutlery in them. Such systems are more functional - they do not take up extra space, and you can dry a large number of dishes in a small area. But the disadvantage of most multi-tiered models is that water from objects placed on top gets to those on the lower levels, which is not very hygienic.
Option to install a standard dish dryer in a cabinet of non-standard sizes
Furniture standards for a dish dryer provide for its installation in a cabinet with a facade width of 400, 500, 600 mm, etc. In this case, the length of the dryer will be 32 mm less than the specified width of the facade. It’s clear that installing a dryer in a correctly designed cabinet is not a problem: you put marks, drilled holes, inserted clamps and installed the dryer.
What can you do if the kitchen requires installing a dish dryer in a cabinet with non-standard dimensions (old or homemade furniture, etc.).
Let's consider an original idea for beautiful and high-quality installation of a dryer in a non-standard cabinet.
Required set of materials and tools:
- awl;
- drill;
- roulette;
- Dryer;
- pencil;
- hacksaw for metal;
- metal drill with a diameter of 12 mm;
- copper tube for air conditioner, diameter 12.7 mm;
- caliper with bore gauge (for taking exact dimensions).
Dish dryer in the closet
Most often, when installing a dryer, the module located above the sink is selected. This greatly simplifies the life of the owner.
READ How to install an eta modem on Windows
Designs in the closet can:
Single-level models, as a rule, are fixed in wall shelves with a door that opens upward or without doors.
Single level kitchen cabinet dryer
To ensure good ventilation inside the cabinet, they often do not include a bottom edge. In addition, when placing the drying module above the sink, you can ensure that drops of water drain directly into the sink, which simplifies the care of the set. If the cabinet has a bottom, for ventilation it is necessary to make holes in two side walls.
Ventilation holes in the top wall of the cabinet
Standard dryers are produced in lengths of 400, 500, 600, 700 and 800 mm. Between two levels it is necessary to provide a distance of at least 300 mm for storing different types of dishes. Before purchasing a product, you need to find out the exact dimensions of the headset module where it will be installed, and you need to pay attention not to the external dimensions, but to the internal ones.
Installing a dish dryer
To begin with, you need to choose a dryer with a size smaller than the width of the box itself. For example, the internal width of the drawer is 500 mm, which means you need to choose a dryer with a length of 500 mm. But, since the length of the drying set is indicated by the width of the facade, its actual size will be 468 mm. If you take a dryer larger than the required size of the box, then such an important part of the set as a tray for catching water cannot be installed under it.
Marking the mounting holes
The dryer should be placed at a height of 100–140 mm from the bottom of the drawer and 300–400 mm from the top shelf.
Installation diagram for a shelf for dishes in a kitchen cabinet.
Taking this into account, four holes are marked for fastenings. A dryer with attached fasteners is leaned against one wall of the cabinet and the locations for drilling mounting holes are marked. The distance from the second fastening to the free rack is measured.
Drilling holes and installing inserts
Holes with a diameter of 12 mm and a depth of 13 mm are drilled in the designated places. The parameters of the holes are controlled by a caliper. The size is measured from the copper tube: the distance from the dryer mount to the free wall divided by two and 14 mm is added to this size (13 mm hole depth and plus 1 mm for installation error).
Which option should I choose?
Before purchasing a dryer for the kitchen, the first thing we do is decide on the location of the future fittings. It is important to consider the size of the room and the available space that can be allocated for the item. Often, dryers are 60 cm; to determine whether they will fit or not, measurements are taken inside the cabinet.
READ How to install a touchpad on a Lenovo laptop
If space allows, you can purchase a drying device of 80 centimeters, but if the cabinets are small, 40 centimeters will be enough. If you plan to purchase a system with a pallet, pay attention to the distance between the tiers; it should be at least 7 centimeters.
To save space and increase comfort of use, you can purchase a retractable design. Such a system is as functional as possible, because everything you need will be in a visible place.
How to install a dish drainer in a closet
Hello friends! Today, while installing a dryer in a cabinet, I remembered how 5 years ago I could not remember the distance to the upper level of the dish dryer. Understanding that this is one of the important factors of a comfortable kitchen, I tried to install the fittings as accurately as possible.
To free you from this “headache”, I decided to describe this topic in detail in this article. And without any distracting reviews, I’ll go straight to the instructions. The result of reading the article will be confident actions of your hands and grateful eyes of the owner of the headset.
Easy installation of a conventional dish drainer in a box
Hello, friends.
Let's look at installing a dryer in a wall cabinet.
During the installation process, there are two points that need to be taken into account. This:
- Correct marking of the sides for this fittings
- Correct marking of the position of hinges of swing facades
Now let's look at these points in more detail.
The dryer must be installed in the cabinet in such a way that:
- A tray was placed freely at the bottom of the box, designed to collect water that could drain from already washed dishes.
- Plates and cups should fit freely in it (according to dimensions)
- It should be at such a height that it is convenient to use (this point especially applies to those options when the owner of the kitchen is short). Sometimes, for convenience, it is even necessary to design similar fittings that are built into the lower modules of the kitchen unit.
In order for the fittings we are considering to meet the requirements given above, its lower holders must be installed at a height of 60-70 mm from the lower horizon of the module into which it is attached.
The upper holders should be installed at a height of 350-400mm from the lower ones (to ensure the appropriate height for the same plates).
In most cases, in modules whose side height is 800-900 mm, there is still enough free space above the installed dryer, which can also be used effectively.
In such cases, you can still design a shelf above the dryer (the height from the shelf to the upper horizon should be at least 200-250mm, otherwise there is no point in installing it).
The holes for the holders are drilled with a drill whose diameter is 10 mm. When drilling, you need to be careful (especially when drilling into an external side piece) so as not to drill through it (a similar example is shown in the photographs where the dryer is installed in a module whose right side is visible).
The lower internal joints of the module (between the lower horizon and the sides with the rear wall) must be treated with silicone.
Also, if the module has hinged facades, then the lower holes for hinges cannot be drilled in them at a distance of 100 mm from the edges, since there is a high probability that the installed hinge will fall on the lower fittings holder.
The best option in this case would be to drill holes at a distance of 150mm from the bottom edge of the facade.
You can see about the installation of the fittings we are considering (another type) here.
Here are some simple tips to remember.
Standard drying depth
Let's look at the instructions for installing a standard dryer. Let's start with the required depth of the wall cabinet. Since an ordinary dish dryer has a depth of 280 mm, this means the cabinet should not be smaller than this size. Accordingly, it may well be more.
The drying design consists of two parts - for plates and glasses. This is the main problem. At what height from the plates should the section for glasses be installed? Let's think together and get an answer to our question.
Within walking distance of you, there is a service for calculating cabinet furniture.
Second level height
First of all, the height must be sufficient to accommodate the plates. To do this, you need to measure the diameter of the largest cup. And based on this size, taking into account the gap of about 20 mm, determine the level of the upper tier. Minimum 360 mm.
The second most important criterion is the height of the owner of the kitchen set. Here, in my opinion, everything is clear; for a woman of short stature, the upper part should be set to the minimum permissible height. And for tall ladies, a comfortable height for raising your hand.
The third factor, which is not inferior in importance to the first two. Of course, this is the height of the dish drying cabinet itself. I would not install a two-level dryer in a cabinet with a height of less than 480 mm. With the largest cup diameter being 230 mm.
Let's sum it up
If you are making a kitchen set with your own hands, then my installation recommendations will be very helpful. And if you take into account the main factors I have listed, then the hostess will never comment on the correct growth of your hands.
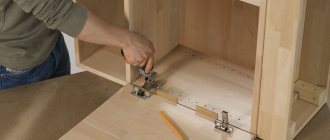
Instructions for installing a dryer in a closet
As a rule, manufacturers provide fasteners and installation instructions complete with products. In the event that neither one nor the other is available, you can install the dish dryer yourself, armed with a tape measure, a pencil and a screwdriver.
Instructions are provided for installing 25 cm wide dryers in a 30 cm deep cabinet.
Table. Materials and equipment required for work.
| Name | Illustration |
| Two dryers (upper and lower level) | |
| Self-tapping screws with a wide head, 25 mm long (4 pcs.) | |
| Screwdriver | |
| Roulette | |
| Pencil |
Important! Self-tapping screws must be chosen of such a length that they do not go through the walls of the cabinet. In our case, the wall thickness is 19 mm, but to attach the shelves it is necessary that the screw head protrudes above the surface. Therefore, fasteners 25 mm long will do.
Table. Installing a dryer in a closet.
| Using a screwdriver, self-tapping screws are attached to the two side walls. Their caps should protrude by about 7-8 mm. |
The result is a strong and durable design Video - Installing and assembling a dish dryer with your own hands |