Final part
Most Russian residents cannot imagine life without a bathhouse.
However, public steam rooms cannot be compared with a small bathhouse in the private sector. That is why in villages and villages it is difficult to find a farmstead where there is no steam room. But how convenient and functional it will be depends entirely on the owner. Of course, it is easier to purchase shelves for a steam room, but not everyone has the financial opportunity for such a purchase. Taking into account the fact that making shelves for a bathhouse with your own hands is not too difficult, and it will come out much cheaper, this option would be optimal
PHOTO: zoon.ru Bathhouse is, perhaps, the best thing that humanity has come up with
We really hope that the information presented will be useful to novice home craftsmen in arranging a much-needed building. You may have some questions while reading. In this case, feel free to ask them in the discussions below. Homius will be happy to answer them as quickly as possible. There you can leave your comment on the article, express your personal opinion about what you read, or share your experience in arranging shelves, if any.
Watch this video on YouTube
Previous BathhouseExcerpt from SNiP standards: at what distance from the fence can you build a bathhouse Next BathhouseBathhouse in black style: the new is the well-forgotten old
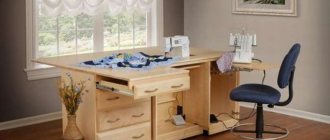
Choosing furniture for baths and saunas
The standard set of furniture for baths and saunas consists of the following items:
- shelves and sunbeds;
- benches and benches;
- wardrobe and hangers;
- hanging shelves;
- chairs, stools, armchairs and tables.
To create a special atmosphere of comfort and relaxation, it is not recommended to use old and unnecessary furniture for the bath. The exception is brushed furniture, stylized as antique.
The main selection criteria are functionality, safety and durability. Functional areas in the bathhouse should not be cluttered with unnecessary interior items, so the optimal set of furniture for each room must be thought out in advance.
Steam room furniture
The key element of the steam room is the canopy. Standard size: width – 65 cm, length – 185 cm. For tall visitors, it is better to arrange products up to 220 cm in length. Its height is determined as follows: in a standing position, the arm is lowered, the knuckles of the hands should reach the shelf. The optimal height is up to 80 cm.
When choosing, the design features and dimensions of the room are taken into account - products can be single- or multi-tiered, L- or U-shaped, folding and stationary.
For convenient placement on the upper tier of the shelf, special benches of varying heights are used, taking into account the height of visitors. The width of the benches is up to 45 cm. Structurally, they are represented by wide longitudinal strips up to 3 cm thick, installed on thick supports.
No less important attributes of the interior are headrests and footrests. Headrests allow you to sit comfortably on a shelf in a lying position and reduce pressure on the spine, and footrests are used for high-quality warming up of limbs that are in a suspended state.
Furniture for washing
A bench of various configurations and dimensions is often installed in the washing department. Other functional pieces of furniture are compact stools and shelves - on them you can store a basin, bucket, tub and other bath utensils necessary for water procedures.
A compact hanger for clothes and bath accessories – towels, hats and washcloths – can also be installed here. To install it, you should choose a secluded place, protected from splashes.
Furniture for the rest room
Furniture in the rest room should be comfortable and practical. It is selected taking into account the total number of visitors who will simultaneously use the steam room. The recreation area allows you to implement any design project - from strict classics to bold art deco.
The standard set of furniture for a rest room is represented by a table, benches, wooden trestle beds, shelves, chairs or stools.
Dressing room furniture
A small functional area, which does not exceed 1.2 sq.m., should not be filled with unnecessary interior items. Furniture in the dressing room should be compact and comfortable.
It is not recommended to install massive and heavy products here; it is better to choose simple and lightweight designs - a couch, stools, a bench, hangers and a closet.
Important! Upholstered furniture for a bath in the rest room and dressing room should not have fabric covering. It is prone to contamination and prolonged drying, which leads to a rapid loss of aesthetics and attractiveness. It is better to choose products covered with artificial materials.
Wood species
When choosing materials for construction, it is worth considering the following criteria:
- strength;
- durability;
- resistance to negative factors;
- wear resistance;
- ease of processing; naturalness and environmental friendliness.
If you choose wood, it could be pine, larch or oak. These materials have a special aroma and unique texture.
When choosing material for construction, pay attention to:
- quality. The parts must be free of defects and flaws. Check if the tree is damaged by insects or rot;
- Conifers are softer. They are pleasant and easy to work with;
- hardwoods are considered the most profitable. Products made from them are durable and reliable.
Reference. Most often, furniture is made from pear, cherry, ash, and birch.
Choosing a tree for a bath
There are many types of wood, but not all of them are suitable for saunas and baths. There are certain requirements that the material must meet:
- low thermal conductivity;
- ease of processing;
- absence of cracks, knots and resin pockets;
- high density.
Conifers containing resins can only be used in the wash room, dressing room and recreation room, where there are no high temperatures. The exception is Canadian cedar, which has a low resin content and a very attractive texture. In all other cases, steam room furniture is made exclusively from hardwood - ash, linden, oak, aspen, poplar, alder and others.
Characteristics of wood
| Name | Color | Advantages | Flaws |
Pine | White, light yellow | The material is durable, good density, easy to process, affordable price | Releases resin when heated |
Spruce | Spruce White to reddish | Easy to process, has a beautiful texture, affordable | Highly susceptible to rotting, contains a lot of resin, a large number of knots |
| Larch | Yellow | Beautiful texture, high density and strength, resistant to negative influences | Heavy, may crack during processing |
Oak | From light gray to brown | Beautiful texture, high strength, resistance to any aggressive influences | Heavy weight, requires effort when handling |
Ash | White to olive | Wear-resistant, not subject to cracking, bendable, has a beautiful texture | Sensitive to changes in humidity and temperature |
| Poplar | Sandy, off-white | Easy to process and light weight | Prone to rotting |
Aspen | Light yellow | Easy to process and highly resistant to moisture | Wears out quickly and gets dark |
Alder | Pink to red-brown | Soft, light, easy to handle, moisture-resistant, does not deform or dry out, has a healing effect on the body | None |
Linden | Light beige | It has a pleasant aroma, has a healing effect, is easy to process, does not heat up, does not rot | None |
| Canadian cedar | Reddish brown | Beautiful texture, high strength, very pleasant aroma, beneficial effect on the human body, does not rot | High price |
The wood must be dry, dense, without cracks or other defects, with a smooth surface. The higher quality the lumber, the longer the furniture will last. Raw boards are more difficult to process, and finished products become deformed when drying.
Texture of different types of wood
How to make a bench with your own hands for a bathhouse
To make a regular portable bench for a bathhouse, there is no need to assemble a special frame. This design option is distinguished by its simplicity and ease of use.
Material selection
Only a certain type of wood is used to make bath benches. Due to the high resin content in pine, which begins to actively release under the influence of high temperatures, this type of material loses its relevance. Iron hornbeam is also not used, although it has a high level of resistance to water and moisture. Its significant disadvantage is the strong heating, which leads to burns on the skin.
Among all types of wood, it is better to give preference to:
- Linden. It practically does not heat up even in a sauna and is resistant to steam. The material has a pleasant smell, but after a while it begins to darken.
- Aspen. Its resistance to steam and water is an order of magnitude higher than that of linden, but it is inferior in smell. This variety is the most mediocre in terms of attractive appearance. Aspen is valued for its resistance to mold.
- Larch. It is noteworthy that wood under the influence of steam and water only becomes stronger and can last for ten years without changing color or texture. The disadvantage of the material is its high cost.
- Cedar. This representative of coniferous species releases resin in minimal quantities when heated. It is chosen for finishing steam rooms and making benches due to its positive effect on the lungs and the entire human respiratory system. Cedar is especially useful for people suffering from asthma, bronchitis, and lung diseases.
- Oak. This type of wood has proven itself well when used as a material for making bathhouse benches. Oak has increased resistance to water and steam, and has high decorative qualities, but products made from it are best used for dressing room equipment. Given its density, it gets very hot in the steam room.
- Birch. It is used to make benches for bathhouses because of the medicinal tar released when heated. Thanks to its healing properties, it is possible to treat even the most contagious skin diseases.
To make a bench you will need:
- wooden beam with a section of 6×7 cm;
- slats 2-2.5 cm thick and 6 cm wide (for the seat structure) in the amount of 9 pieces;
- fasteners made of wood or metal.
When decorating a bathhouse, it is not necessary to use the same material for finishing the walls and making the bench. But the option in one style looks more impressive, although playing in contrast also has its own originality.
Required Tools
To carry out the work you need to prepare the following set of tools:
- saw;
- hammer, mallet;
- pliers;
- screwdriver;
- sander;
- roulette;
- level.
Advice! It is important to prepare all the tools in advance so that you don’t get distracted when making a bath bench.
Bench manufacturing technology
Step-by-step instructions for a do-it-yourself wooden bench for a bath include the following steps:
- Cutting the timber into 4 fragments, each 40 cm long.
- Assembling U-shaped racks. Two pieces of timber 60 cm long need to be knocked down to form transverse jumpers.
- Cutting according to the specific length of slats for making a seat. It is optimal to use slats with a length of 160-170 cm.
- Assembling the bench. The prepared slats need to be stuffed onto the jumpers, avoiding a gap of less than 1 cm between them. This is necessary to remove excess moisture and to expand/contract the natural material when exposed to temperature changes and high humidity. In addition, it is recommended to retreat 20 cm from the edge in order to achieve increased stability of the structure.
- Bench strapping. To create a strong bench, the legs and stands need to be connected using the remaining slats, 10-15 cm away from the floor. Special corners are also suitable for these purposes, but it is advisable to attach them from the inside of the product, otherwise a burn will appear on the skin at the point of contact. That is why it is advisable to recess the fittings used in the manufacture of the bench by 2-3 mm.
Finishing and decor
The finished bath bench must be treated with a natural-based antiseptic composition. If you want to make it in country style, then you need to adhere to the following algorithm of actions:
- Sand the surface along the grain with a brush.
- Clean with a grinder until a relief pattern is formed.
- Apply translucent glaze in two batches.
- Wipe the surface with a dry sponge; when it dries, remove the glaze.
- Cover the bench with varnish.
Making and giving the bench the desired appearance is quite simple if you follow all the recommendations regarding assembly and finishing.
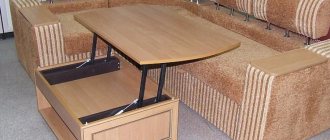
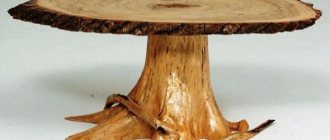
Log table
The second option is an antique wooden table that will fit perfectly into the interior of the bathhouse. The legs are made from solid logs.
A massive wooden table with simple shapes will look especially natural and harmonious in a log bathhouse.
For greater convenience, you can use a rounded log. It has already been processed - the bark has been removed, the wood has been cleaned, the surface has been milled. All sides of the log are smooth and equal.
For the tabletop, logs are used, sawn in half lengthwise. You can also assemble it from cross cuts of a log. In our example, we will look at making a tabletop from boards.
Manufacturing stages
Step 1. Determine the dimensions of the future table, taking into account the size of the room in which it will be installed.
Step 2. We will need three logs for the legs. It is necessary to make 4 pieces of log 915 mm long; four more - 850 mm each and two - 500 mm each. We cut 500 mm logs straight, all the rest must be cut at an angle.
Step 3. We saw off one log 1800 mm long - it will serve as a supporting bar.
Step 4. In the second and third logs we make a cut for the lock. First, draw out the required half with a marker. Then we cut off the pieces of wood into squares and level the cut with an ax and saw.
Step 5. To attach the legs, we will need 4 reinforcements slightly longer than the full length of the leg. We assemble the legs and drill two holes in them for the reinforcement. The diameter of the holes must correspond to the thickness of the reinforcement. Next, insert it into the holes and mark the cut location. It should be 5 mm higher than the beginning of the hole in the fifth log.
Step 6. Pour a little glue into the holes of the first logs and insert the reinforcement. Leave until the glue dries completely. We bait the second log, then place the crossbar log on it and cover it with the third log. We do the same with the second leg. Under the weight of the table, the transverse log will be firmly held between the legs. The lock area can be coated with wood glue.
Step 7. We string the remaining logs onto the reinforcement. Fill the holes of the fifth logs with glue to the very edges and leave until completely dry.
Step 8. We will make the tabletop from an edged board with a section of 50 x 150 mm.
Step 9. We saw off the boards to the length we need and process them using a plane, sanding machine, and medium- and fine-grained sandpaper.
The first option for installing a tabletop is to nail each board individually to the table legs. Small holes (3–5 mm) should be left between the boards. The dimensions of our table allow us to nail six 50 x 150 mm boards and leave 3 mm holes (150 mm x 6 pieces = 900 mm; 3 mm x 5 holes = 15 mm).
Another option is to connect the boards with slats at a distance slightly less than the location of the legs, making sure to leave a 3 mm gap between them. This will help hold all the boards together so that they can be nailed to the legs faster and more evenly.
Country style table
This table is called by different names - country style table, retro style table, bar table - and presented in different ways. Furniture researchers usually describe it as a simple, low, oblong table on a massive base with turned legs and legs. This characterizes it quite accurately: a table with a drawstring belt and legs. Legs, especially those as strong as in the picture, significantly increase the durability and rigidity of the structure. With intensive daily use, the legs can increase the service life of the table by years. The terms "country" and "bar" are definitely associated with the 17th and 18th centuries, when such tables were widely used in hotels, taverns and bars in rural areas and towns. Surviving examples of such tables actually have massive legs - although they are heavily worn out by many feet. The table shown here is equipped with one middle leg instead of two longitudinal ones, to make it more comfortable to sit at the table. However, many early tables had pro-legs around the perimeter. The design is simple. The drawbars and legs are cut into the legs with spikes and reinforced with wedges, dowels, etc. The table cover is a wide panel “at the tip”.
Design options
The easiest way to change the design of a table is to change the legs. Our “original” table has round legs - turned - and the shape of the turning can be changed endlessly. Just remember that you will need a flat, rectangular surface for the frame-to-leg joints. On a country-style table, you can also change the legs - both in appearance and in their configuration, as shown in the figure below.
Types of folding table
Before installation, you need to decide what shape the wall-mounted table will be. For example: oval, square, rectangular or round. In addition to the form, there are many installation options. More details on what types of tables there are:
We have listed common table models and offer to learn about the advantages of such furniture.
Do-it-yourself carpentry workbench: assembling the base
Before making a workbench from wood, it is better to estimate the amount of work in advance and outline the procedure. Most of the table parts are fixed using screw connections. To facilitate the assembly process, it is advisable to make holes for them in the plywood in advance in the appropriate places. For these purposes, you need to use a drill whose diameter is approximately 1/2 or 1/3 smaller than the diameter of the fastener itself.
Having prepared all the necessary tools and materials, as well as carefully studying the drawings of the carpentry workbench, you need to make all the structural parts. A circular saw is suitable for cutting wood and plywood. After this, the end part must be sanded so that the edges of all elements are smooth. This will not only simplify the assembly process, but will also avoid problems with joining parts.
To assemble the workbench base, you need to secure the frame and base plate.
First of all, the base is assembled. It consists of a base plate where a cabinet with drawers will be installed, an open area for equipment and stiffening ribs to strengthen the structure. To do this, you need to assemble the frame and fix the plate on it. For fixation, M50 fasteners should be used.
Note! Only dry lumber can be used for work. The optimal wood moisture content is 12%.
Peculiarities
By unfolding the table, you can easily create a surface for eating or working. Depending on the model, its size may be quite large and will replace a full-fledged dining table. When the table is not needed, the space occupied by it is just as easy to free up. There are models that rest on 1-2 legs at the free end of the tabletop. Some models are attached to the wall without the use of such supports.
The peculiarity of the product is its stationary position in the room. A wall-mounted table cannot be moved to another room or moved to a more convenient location. It is advisable to immediately choose a suitable location for it, where it will be appropriate in folded or unfolded form.
Advantages and disadvantages
The wall table has a number of advantages:
The design also has disadvantages, but owners of small apartments believe that compared to the advantages they are insignificant. The main drawback of any design is its relative fragility. Compared to a full-fledged piece of furniture, the folding table mechanism allows you to place only light objects on it.
A folding table can be made in many ways. There are simply structures mounted on the wall that resemble a shelf. There are also more complex models with runners that allow you to move the tabletop along the wall. The most common types also have design features.
Table transformer
This type includes products that, when folded, become part of other furniture. For example, a cabinet hanging on the wall can easily be turned into a table by folding its door forward and down. A classic example of a transformer is a secretary. The body of a foot-operated sewing machine is often equipped with similar tables. When folded, the transforming table looks like a small cabinet, and when the lid is folded back, the seamstress gets an additional work surface. A built-in table with a retractable tabletop is also classified as this type.
Traditional folding table
In the traditional version, the folding tabletop is attached to the wall using a narrow strip. When folded, the support legs are hidden behind a wooden plane lowered along the wall. When unfolding the table, the lid is raised to a horizontal position. The supports can be attached to the underside of the tabletop or additional parts on the wall. The folded product looks like a narrow console or shelf with a screen. You can put small decorative items on it.
Wall table
If the brackets for a folding table are attached to the wall, and the tabletop is not supported by legs, then the product is called wall-mounted. A do-it-yourself hanging table is made with a fixed tabletop of small width. A retractable part can be located under it, increasing the area.
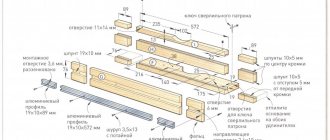
Drawing of a wooden workbench with your own hands and materials for work
Based on the design drawing, you need to make all the parts necessary for its assembly. The overall dimensions of the workbench in this case are 175 cm (length) and 76 cm (width). A distinctive feature of this table is its three-layer lid, which has an increased margin of rigidity and strength. The upper and lower levels are made of plywood sheet with a smooth surface. The middle layer of the table top is stacked, it is formed from boards.
Note! It is imperative to leave a gap between the boards in the middle layer of the tabletop. This space is necessary so that the threaded rod can rotate freely. Table containing a list of materials needed to create a wooden carpentry workbench:
A table containing a list of materials needed to create a wooden carpentry workbench:
| Material type | Quantity, pcs. | Dimensions, mm |
| plywood sheet | 1 | 1.2x1.2 (8 mm) |
| 2 | 0.2x2.5 (8 mm) | |
| 3 | 1.2x2.5 (18-20 mm) | |
| 4 | 0.9x2.5 (25 mm) | |
| 3 | 1.2x2.5 (25 mm) | |
| Perforated plywood | 1 | 1.2x1.2 (8 mm) |
| Threaded rod (stud) | 1 | M20 (180-200 mm) |
| Lock-nut | 2 | M20 |
| Washer | 4 | 20 mm |
| Latch with mate | 4 | — |
| Handle for drawers and folding tabletop | 8 | — |
| Furniture wheel with flat support for fixation | 4 | — |
| Self-tapping screws or wood screws | 0.5 kg | M8-M24 |
| Self-tapping screws or wood screws | 0.5 kg | M50 |
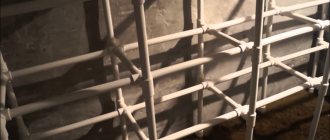
Making a built-in bench for a sauna with your own hands: detailed instructions
Before starting work, it is useful to familiarize yourself with the presented photo and video materials. As a rule, they show approximate diagrams and drawings of do-it-yourself bathhouse benches. This will help you better understand the principle of arrangement of components when assembling bath furniture.
When deciding to make a bench for a bathhouse with your own hands, you don’t have to make the drawings yourself. The scheme of actions is quite simple, and you can limit yourself to the detailed instructions given below.
In order to assemble a regular portable wooden bench for a bathhouse, you will need:
- wooden beam with a section of 6×7 cm;
- slats for the seat in the amount of 9 pieces, 6 cm wide and 2–2.5 cm thick;
- fittings for fastening (wooden or metal);
- necessary tools (saw, hammer and mallet, screwdriver, pliers, angle grinder with circular saw and attachments for it, tape measure, level).
When all materials are prepared, you can begin assembly:
- Cut the timber so that you get 4 pieces, about 40 cm each, for future bench legs;
- Take 2 pieces of timber, 60 cm each, and use these parts to knock down U-shaped racks for cross lintels;
- Make the slats for the seat approximately 160–170 cm in length, this is the optimal size that will allow you to steam while lying down on the bench;
- Start assembling the bench by stepping back 20 cm from the edge of the lintels and stuffing slats on them, maintaining a gap of 1 cm. This will not only ensure the strength of the structure, but will also not interfere with the drainage of moisture and the process of contraction-expansion of wood under the influence of water and high temperatures .
- Connect the legs and uprights with the remaining slats, making a kind of strapping for the bench 10–15 cm from the floor, which will give the structure additional stability. You can also use special corners for fastening. Then they should be stuffed from the inside, since in the steam room the metal parts become very hot, and there is a risk of getting burned. For the same reason, the fittings are recessed into the wood by several millimeters.
Pre-compiled approximate do-it-yourself sauna bench drawings will help you decide on the desired shape of the product and the location of the parts. It should be noted that, just like portable bath furniture, built-in benches for a bath with your own hands should be made with lattice.
For this you will need:
- timber with a section of 5×6 cm;
- strips 10 cm long and 5 cm wide;
- flooring boards;
- fastening fittings;
- necessary tools (saw, angle grinder with circular saw and attachments for it, hammer and mallet, screwdriver, pliers, tape measure, level).
The instructions below will make assembly much easier. So:
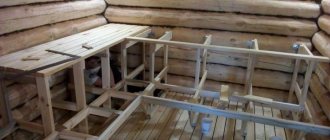
- To install a multi-tiered bench, the most suitable place would be a blank wall, to which you need to attach the bench frames themselves. In a small room, a steam bench can be placed along the wall, along its entire length, which will significantly simplify further work.
- Attach 30 cm long planks to the walls, in 1 m increments, with anchors in order to secure the frame to them, and begin assembling it.
- For the lower bench, fasten the beams together with anchors or fastening angles, and recess the fittings into the wood. The width of the resulting structure should be 1 m 20 cm. For greater reliability, it must be mounted at a height of 50 cm from the floor on the base of the retaining strips. Nail the decking boards onto the frame, leaving a 1 cm gap between them.
- Make the upper tier in a similar way, only the frame for it needs to be made twice as big. As a result, the distance between the upper and lower tiers should be at least 70 cm. You can put planks on the wall above the second tier of the bench with a sheathing of polished boards. This will allow you to rely on a kind of backrest during bath procedures and create additional comfort.
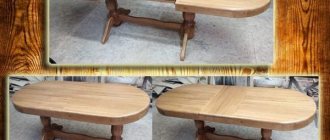
Bath table
Before starting construction of a table for a bath, draw a detailed drawing. The size of the table depends on the number of family members and the available space in the room. A table drawing will help you calculate how much material you need to purchase. Choose the shape of the bath table. A round table is impractical furniture; it takes up a lot of space, and a limited number of people can fit at it. An oval table, on the contrary, is inappropriate in a small bathhouse. The best option is a classic square or rectangular table. Sand the wooden slats and bars so that there are no snags left on the wood. Lay out the beams from which the tabletop will be created on the floor, fasten them together using two slats at opposite ends.
Attach the table legs to the slats. Unlike a bench, using struts to build a table is not reliable. It is more effective to place another rectangular beam in the middle of the legs, connecting the legs to each other. This design will make the table strong and prevent swaying and breakage. Treat the finished table with an oil solution, use drying oil, it will protect the wood from moisture and temperature.
To maintain a unified style in the design of the bathhouse, create other attributes of the bathhouse from wood. Hangers for clothes, shelves for dishes and washing utensils, a font for dousing - they will decorate and complement the cozy wooden interior.
Making a table with your own hands: option 1
This diagram shows the design of a table that will fit quite harmoniously into any bathhouse, and especially with a limited area of the rest room. If necessary, its dimensions can be increased or decreased. The presented sample is designed to comfortably accommodate six people - two on the sides and one on each of the two ends. Manufacturing process:
- On the blanks for the table legs, 10 cm are measured and a straight line is drawn from this mark to the corner.
- An incision is made along the marked line. The result is a leg that will stand well at an angle. A total of 4 such legs are needed.
- The surfaces of the legs should be smooth. To do this, sand them with sandpaper.
- The legs are combined in pairs so that they form the letter “X”, and the cut ends are located in the same plane.
- The legs are fixed with clamps. Markings are made on them for the location of fasteners.
- Holes for bolts and screws are drilled in the designated locations.
- The entire structure is assembled into a single whole. Only after making sure that the cut angle is correct and located in the desired plane can you finally fix the position of the legs with spacers.
- Next, the tabletop is assembled: three boards are fastened together with crossbars.
- The table top is attached to the legs.
- All surfaces are once again sanded, cleaned of sawdust and coated with antiseptics, as well as protective compounds or drying oil (provided that the table will not be located in a room with high temperatures).
Features of the bath
Differs in characteristics:
- Occasional use. It is heated at regular intervals and is not used every day. The rest of the time the temperature inside is not regulated. It is not a residential building.
- High humidity. When used, it is exposed to large amounts of water and water vapor. Due to the large temperature difference, condensation may collect on the ceiling of the waiting room.
- Hot air. High temperature inside is one of the main characteristics of the bath structure. Hot air with excess humidity prevails inside the washing room and steam room. It makes it difficult to breathe freely and puts a strain on the body.
- Solid fuel. As a rule, it is heated with wood, the combustion products of which, along with the smoke, partially enter the building.
- Minimum windows. The building is always built with a minimum number of windows to avoid heat loss. The steam room has no window openings at all. The largest number of windows are located inside the antechamber.
- Carbon monoxide. If the air exchange inside the bathhouse is not properly organized during its use, there may be a risk of carbon monoxide poisoning.
Classification
Tables for a bath can be divided into separate groups depending on various factors: material, type of general design, shape of furniture.
By material
For high-tech bathhouses, plastic or metal tables are suitable, but most steam rooms are lined with clapboard. For such rooms it is better to choose wooden furniture. Suitable wood species:
- Poplar. Its performance characteristics are similar to aspen. The advantages include low price and availability. Disadvantages include low strength.
- Alder. Easy to process, resistant to temperature changes and physical impact.
- Linden. Pliable wood for processing. When heated, it emits a pleasant odor and has a uniform texture. Retains its properties even under the influence of external factors.
- Oak. Strong, wear-resistant and durable material.
- Aspen. Natural defects can be found in the array.
To avoid damaging the wood when tightening screws, it is recommended to initially drill a hole with a smaller drill bit.
By design
Depending on this criterion, 3 types of tables can be distinguished:
- Classic rectangular. The legs are located parallel to each other.
- V-shaped. The legs rest on a horizontal beam that lies on the floor. They connect at one point, from where they diverge to different corners of the tabletop.
- X-shaped. The legs cross each other. They are connected by inserting into cut-out recesses.
Classic tables with parallel legs can be divided by the number of supports - from 1 to 4.
By shape
Varieties:
- With a round tabletop. Several bath attendants can gather around them at the same time, depending on the size. Due to the lack of corners, useful space disappears; such a shape is more difficult to make yourself.
- With an oval tabletop. They are similar to round ones in terms of operation and the difficulties of self-assembly, but they take up even more usable space.
- Rectangular, square. Especially popular among bath attendants. They are easy to make yourself.
A separate group of tables are polygons. They have low popularity because they are only suitable for large rooms.
Technical specifications
Requirements:
- absence of corners that can cause serious injury if touched;
- environmental friendliness of the material;
- resistance to moisture;
- stability during movements, impacts, collisions.
To select sizes, you need to consider several options for ready-made tables:
- For a two-seater design - a square tabletop. Each side should be 60 cm long.
- Triple - round tabletop with a diameter of 80 cm.
- Quadruple - people can sit behind it crosswise or parallel to each other. If the tabletop is square, the length of each side should be 80 cm. If it is a circle, you need to choose designs with a diameter of 90 cm.
The optimal distance for one seat is from 40 to 60 cm.
Manufacturing
Making a table for a bathhouse is simple. You need to draw up a drawing, prepare consumables, tools, and perform step-by-step assembly.
Drawing up a drawing
To understand how the work will be performed and to calculate the amount of consumables, you need to draw up a diagram. In the drawing it is necessary to indicate all dimensions and indicate the joints of the parts of the structure.
Preparation of tools and materials
To assemble the table for the bathhouse, you need to prepare:
- screwdriver, self-tapping screws;
- grinding machine;
- miter saw;
- wood hacksaw, rubber mallet;
- set of chisels;
- wood glue;
- paint and varnish compositions for wood, brushes;
- boards, bars;
- manual electric router with a set of equipment.
Making a classic design
Manufacturing process:
- Cut boards to required sizes.
- Assemble a rectangular frame on the floor, connect the boards together with metal corners.
- Attach the legs to metal corners or screws on the inside of each corner.
- Make a lower frame that will tie the legs into a single strong, stable structure.
- Assembling the tabletop begins with laying out the prepared boards. They need to be placed so that you get a wooden shield.
- If you want to get a homogeneous sheet, you need to cut out tenons with grooves on each of the boards, coat them with glue, and tighten them into a single board using clamps.
- To make tables in which each board is spaced apart, the elements need to be screwed to two guides.
Step-by-step production of the table
After assembly, all parts need to be connected with self-tapping screws.
Making an X-shaped structure
Build process:
- Lay out the boards for the tabletop on the work surface. Set a distance of 5 mm between them. You can use special spacers with the same pitch.
- Step back 80 mm from the ends of the legs, draw a straight line from the notch to the opposite corner. Cut along the drawn line. This creates supporting surfaces on the legs.
- Mark where the two legs connect to each other. Drill holes for mounting bolts. Trim half the thickness from each leg at the marked points to join them together.
All that remains is to fasten the legs with bolts and attach the tabletop to the metal corners through self-tapping screws.
Treatment
To prevent wood from rotting under the influence of moisture, you need to cover it with a special antiseptic.
It is important to choose an impregnating composition that does not emit harmful substances. It is easier to coat the wood before assembling the furniture
How to make: instructions
So, the model is quite simple. You don't even need an expensive tool for it.
Classic table
It is a tabletop with a straight two-meter long side and radius rounded ends, which is mounted on four legs 75 cm high. This design will allow you to accommodate at least 6 participants in the feast in fairly comfortable conditions. To make it you will need:
- Board with a cross-section of 250×40 mm, length 2000 mm, 4 pcs. for making countertops;
- Board with a section of 100×20 mm and a length of 1600 mm. - 2 pcs. 800 mm long. - 2 pcs. 750 mm long. - 2 pcs. for structural piping;
- Beam with a section of 100×100 mm. 750 mm long, 4 pieces for legs. The timber can be successfully replaced with turned balusters, which will somewhat enliven the surroundings of the structure.
Making a countertop
- A set of tabletop boards is laid on a flat and rigid base, tightly fitted to each other, and the radius of the ends is outlined using any available object, as a template: a bucket, basin, hoop, etc.
- The ends are formed using a jigsaw according to the outlined template.
- Using transverse supports placed at a distance of 400 - 450 mm from the edge of the end, a set of tabletops is secured.
- The formed tabletop can be edged with a milling cutter or simply processed with sandpaper with sequential alternation of grain from 60 to 240.
Making table top lining and installing legs
- A structural set is strengthened from the bottom of the tabletop, which will hold the legs and border the tabletop from the inside.
- The legs are installed and secured in the seats formed by the structural set.
- This design allows for free space in the leg area, without weakening the structure in terms of rigidity.
X-shaped table
This option is relatively budget and inexpensive. To make it you will need:
- Board with a section of 250×25 mm. 1750 mm long - 3 pieces, to form a tabletop;
- Board with a section of 150×25 mm. 900 mm long - 4 pieces for making legs;
- Board with a section of 100×25 mm. 1100 mm long - 2 pieces for fastening at the bottom of the legs, as spacers;
- Beam with a section of 20×40 mm. 900 mm long. — 3 pieces for making crossbars from the bottom of the tabletop.
Making a countertop
The tabletop boards are laid on a flat, hard surface with a spacing of 5 mm and secured with cross bars.
The edge is processed by milling or sanded with sanding paper.
Making legs and tying them
- On the board for making legs, 80 mm is set aside from the edge and a line is drawn from the notch to the corner. According to the resulting projection, the edge is cut off to form the supporting surface of the leg. In the same way, using the finished leg as a template, the rest are prepared.
- The legs are combined in pairs, in an oblique cross, so that the cut edges are located in the same plane.
- At the junction of the two legs, holes for the mounting bolts are marked and drilled, one above the other, in a vertical plane.
- In the lower part of the legs, notches are made “in the back” in which the boards of the longitudinal fastening of the table are strengthened.
- At the last stage, the tabletop is fused with the legs, the straightness and correctness of installation is controlled using a bubble level.
- When installing the table in place, the legs can be cut in place, adjusting the correctness of its installation relative to the floor.
DIY folding sofa
To make a folding sofa with your own hands, you should learn in more detail what transformation mechanisms are available. This will allow you to choose an option for the bedroom, taking into account its dimensions and the location of other interior items.
Let's look at the main types of folding sofas.
The book is the most common and popular model. The product turns into a wide berth by raising the seat to a vertical position. In this case, the backrest moves to the lying position, the device lock is activated (accompanied by a click). After this, the seat returns to its original position.
Click-klyak (book) is an excellent model for relaxation and sleep. A unique mechanism allows you to bring the sofa into a “half-sitting” position. This is very convenient for those who like to sit for a long time reading or watching TV. When you need the bed, you need to apply a little force and bring both parts into a horizontal position.
Eurobook is a modern, improved interpretation of the book sofa. The seat is raised above the floor by 1-2 cm and moved forward. The back rests on the base of the sofa.
The accordion is lightweight and easy to use. To transform into a sleeping place, you just need to pull the loop at the bottom of the seat. When it starts to move forward, both parts of the backrest follow.
The retractable (roll-out) mechanism is similar in principle to an “accordion”. Using a special hinge, the seat, equipped with wheels, rolls forward, setting in motion a kind of platform hidden under it. Then the folding part of the seat cushion is placed on it.
Sofa bed. In order to convert such a sofa into a bed, you need to remove the seat. Then remove it from the box and unfold the hidden structure. Such models are not suitable for daily sleep.
Having chosen the transformation option, you can begin to create a sofa according to your own measurements. The principle of manufacturing any frame model is taken as a basis.
Bath hanger
Option 1
Bath hanger
To create a hanger you will need:
- flat board 400x20 mm and 50 cm long;
- 4 wooden knots with a Y-shaped branching with a diameter of 30 mm;
- plane;
- sandpaper;
- drill;
- stain;
- screws, nails or wooden dowels for fastening.
Branches should be chosen that are strong, with a dense texture, and without traces of rot. It is not necessary to look for knots of the same shape, the main thing is that they match in thickness. The length of the workpieces should not exceed 30 cm, and the length of the branches should not exceed 3-4 cm. The bark from the branches must be removed, and the workpieces are thoroughly dried in the shade.
Branches
Step 1. Each workpiece is planed on one side with a plane along the entire length to approximately ¼ of the thickness of the branch. This side of the branches will be attached to the base.
Sanding a branch
Attaching branches
Step 2. The ends of the branches on the workpieces are treated with sandpaper, rounding off the cuts.
Branch arrangement option
Step 3. The board is sanded, then covered with stain along with the branches and dried.
Step 4. Lay out the knots on the board and mark the attachment points with a pencil. If wooden dowels are used as fasteners, 2 holes are drilled on the smooth side of the workpieces - bottom and top at a distance of 5 cm from the ends of the branches.
Step 5. Holes for dowels 2 cm deep are also drilled in the board according to the markings, after which the branches are fastened to the base. When using nails or self-tapping screws, the caps are recessed into the wood by 1-2 mm, and then covered with heat-resistant putty to match the color of the wood.
Option 2
Bath hanger diagram
To work you will need:
- 3 boards 1120x100x20 mm;
- 6 boards 1500x120x20 mm;
- 1 board with a section of 200x20 mm for the shelf and sides;
- self-tapping screws 35 mm;
- wooden dowels 10x30 mm;
- wood plugs;
- stain;
- sandpaper;
- hacksaw;
- jigsaw;
- drill;
- hammer;
- tape measure and square;
- pencil;
- hooks
The manufacture of such a hanger is carried out in three stages: first, the frame is assembled, then a holder for hooks is made, and the shelf is attached last in the upper part of the frame.
Step 1. The wood is thoroughly sanded with sandpaper or a sanding attachment. Boards 1500 mm long are laid out on a flat surface parallel to each other, leaving a distance of 8 cm between them. The edges are aligned.
Sanding wooden boards with sandpaper
Step 2. Fasten the future frame of the hanger with three horizontal crossbars made of boards 1120 mm long. The upper cross member is located flush with the ends of the boards, the other two - in increments of 50 cm. All frame elements must be perpendicular. The screws are screwed in from the side of the crossbars, recessing them slightly into the wood.
Step 3. Start making a holder for hooks: cut a piece 1070 mm long from a 200x20 mm board, sand the ends. Now you need to secure the holder to the frame, but the hooks can be screwed in after installing the hanger.
Step 4. The holder is placed under the frame, laid parallel to the top crossbar at a distance of 10 cm from the top of the structure. Fasten with self-tapping screws, screwing 2 into each vertical board. This fixation of the holder gives the frame additional rigidity.
Step 5. From the remaining board, cut out a shelf 1070 mm long and cut out two side panels with a jigsaw, as in the diagram. All cuts must be sanded. Next, markings are made for the dowels: with a pencil, they mark the lines where the shelf fits to the sidewalls and the sidewalls to the frame boards, and points are placed on the lines for drilling holes.
Fastening the shelf and sides
Step 6. Drill holes according to the markings, insert dowels into the shelf, attach the shelf to the sides, and then to the frame itself. Additionally, the shelf is secured on the sides with self-tapping screws, the heads of which are covered with plugs.
Step 7. Determine where the hanger is attached to the wall, drill holes for fasteners in the wall and cross boards, install and fix the hanger.
Attaching the hanger to the wall
Unusual hooks made from forks
Coat hook made from a key
Classic coat hooks
Forged hooks
This is how you can furnish your bathhouse or sauna with homemade furniture. All the examples are quite simple, so even a novice master can cope with them. And even if everything doesn’t work out perfectly, hand-made furniture will make your stay in the bathhouse much more enjoyable!
Similar hanger design, assembled in the same way
Style
Let's start with style. This time we would like to limit theorizing on this topic as much as possible. Therefore, we will limit ourselves to introducing two poles - simplicity and ornateness, and between them let there be many intermediate options, including various attempts to imitate different eras or countries.
So, the more traditional your bathhouse is, the wider the possibilities - hangers of any degree of ornateness will suit you, and of the simplest ones, only those that combine exaggerated rigor of geometry with metal or glass elements are not suitable.
Original homemade hangers in the bathhouse shown in the previous photo
The more modern your bathhouse is, the better it is to opt for relatively simple interior elements. Of course, we are not talking about high-tech now, but simply about a comfortable bathhouse in which modern materials are used, everything is functional and there are not many references to tradition.
What do we mean by comparative simplicity? The presence of some decorative elements, but subordinate to functionality and not very attractive. Let us explain: the more original your hanger is, the more demanding it will become of its surroundings.
You need to understand the principles of stylistic unity - if you put Khokhloma on the table, then several other interior items should play with similar patterns, and the entire interior as a whole should be designed in the Russian ethno-style. A single out-of-the-ordinary object is more likely to irritate than please the eye
Let us explain: the more original your hanger is, the more demanding it will become of its surroundings. You need to understand the principles of stylistic unity - if you put Khokhloma on the table, then several other interior items should play with similar patterns, and the entire interior as a whole should be designed in the Russian ethno-style. A single out-of-the-ordinary object will irritate rather than please the eye.
Blueprints
In principle, the diagrams that we have given above can already be a source of inspiration when creating a table.
Below we present several drawings that we found on the vastness of the worldwide computer network. We do not claim authorship and do not know their authors, therefore we cannot provide links to primary sources (see appeal to copyright holders).
Let's go through the options already mentioned above. Let's start with a one-legged table made in the shape of a polyhedron. It rests on a crosspiece, and for greater strength (and, partly, greater decorativeness), the connections of the legs with the crosspiece and the tabletop are reinforced with jibs. The parts are fastened using glue and self-tapping screws.
A table with two legs also looks very attractive in a recreation room. In addition, it is not difficult to manufacture. As can be seen from the drawing, the transverse beam is inserted into the holes made for it in the legs and fixed with pins.
Three-legged tables are not used for feasts. Therefore, let’s immediately move on to the “classic” - a table with four legs.
As you can see, the table is very simple, without frills, but correct in design and suitable for making even for beginners.
This is what we will use as the basis for our instructions.
Self-production: from a set of tools to the finished product
Before you make a table for a bathhouse with your own hands from wood, you should definitely take care of the availability of high-quality raw materials and a minimum sufficient set of tools.
The choice of raw materials consists of selecting boards, timber and slats. Lumber must meet a number of requirements:
- Have acceptable geometric parameters regarding straightness and absence of signs of warping and torsion;
- A sign of good quality material should be the absence of through knots, the so-called “nails”;
The list of tools needed to make a wooden sauna table with your own hands is also not particularly sophisticated. The minimum set includes:
- Tape measure or carpenter's ruler. Provides preliminary and assembly marking of workpieces;
- Bubble building level. Allows you to control the straightness of the structure, both at the cutting stage and during assembly;
- A wood hacksaw or circular saw, the so-called parquet type. Will help in cutting blanks into the necessary individual structural elements. When making a table with a large number of radius curves, it is worth taking care of the presence of an electric jigsaw equipped with a blade for figured cutting;
- A screwdriver, corded or cordless, or a screwdriver with a Phillips-shaped working part;
- Sanding paper on a wooden block or belt sander. Necessary for finishing the external surfaces of the structure;
- Hand router with collet chuck and set of wood cutters. It is not a mandatory tool, like a jigsaw, but it will significantly improve and decorate the product by milling edges and applying decorations of a different nature;
- Fastening elements. These include self-tapping screws, wooden nails - spikes, bolts, studs, nuts. In the case of merging parts using a classic tenon joint, high-quality wood glue will be required;
- To eliminate defects, wood putty is a good help. Often such material is tinted to match the color of solid wood of a certain species.
Making a wooden bench
Bath bench assembly diagram
This part is necessary for use as a replacement for the lower part of the shelf, footrests, basins and buckets.
To make a bench with your own hands you need:
- cut the block into several 40 cm pieces (future supports);
- transverse posts 60 cm long are cut out from another block;
- nail the supports from below, and attach the base for the seat on top, formed from boards 1 m long;
- cover the base of the bench with wooden boards, leaving 1 cm gaps;
- coat the finished furniture with an antiseptic containing vegetable oils.
Drawing of a simple bathhouse bench to make yourself