Very often at home or in the country you can find an old, but very comfortable chair, which you would be sorry to throw away and cannot put in a visible place. In this article we will show you how you can easily repair a Viennese chair.
The old furniture is very good quality. With a little effort, the old chair will get a second life and will last for many more decades.
We will look at the restoration using the example of a Viennese chair with a back and soft seat, made of natural hardwood.
Let's briefly look at the main elements of the chair.
Product history
The technology for creating such chairs was invented by master Michael Thonet, who lived in Vienna in the 19th century. The products were created from beech wood, bent under the influence of steam. The furniture instantly gained popularity. The famous chair, which has survived to this day practically unchanged, bore the number 14.
Today this furniture is as popular as at the time of its creation.
Recovery stages
Any chair can be made new. However, for this it is necessary to know at least in general terms the sequence of work. If you do not have experience in doing this, then it is recommended to study at least a short master class, which will be discussed below.
Preparatory stage
With the proper approach, even if the chair's upholstery is torn, the legs are wobbly, or the old varnish or paint is partially or completely cracked, it can be completely transformed by doing the restoration yourself. First of all, you will need the minimum required set of tools and materials:
- Tools for restoring a chair: a screwdriver, a hammer, 2 different screwdrivers, scissors, a brush, a clamp, a stapler, sandpaper, a small mallet and scissors.
- Materials: screws (self-tapping screws), staples for a stapler, glue for wooden furniture, foam rubber, paint and varnish, upholstery fabric.
After preparing the materials, try to clean the chair from dirt and dust by washing it thoroughly. To do this, you can wipe the chair with a slightly dampened sponge.
Disassembly
Before restoring the chair, it must be disassembled. After waiting for the chair to dry after wiping it with a damp sponge, you can proceed to disassembling it. The seats and backrest, as a rule, can be removed quite simply, after which the frame is disassembled. To avoid damaging the components when knocking them out, use a rubber mallet rather than a metal hammer. In any case, you should work very carefully.
If the table is assembled with screws or screws, then disassembling it is not difficult, since you just need to unscrew them. In any case, it is advisable to dismantle all parts, since they may interfere with repairs. In this case, if possible, you should mark the fastener parts or simply fold them in such a way that you cannot confuse them later.
As for how best to remove the remnants of old glue, especially epoxy. Those places where there are glue residues must be covered with pre-moistened rags or sponges. Any old and unnecessary rag will do. Keep it on the chair parts until the glue is completely wet, after which it can be quickly scraped off with a knife.
Either way, after you've finished getting rid of the old glue, you'll need to leave some time for the wood pieces to dry. In cases where epoxy resin gets into a hard-to-reach place, it can be removed in much the same way, with the only difference being that you will need to use steam instead of water. If you don’t have any special devices that create hot steam under pressure, you can use the old-fashioned “method”, which involves using a hose with a tip that fits onto the spout of the kettle.
Chair design
The design consists of two arches that are connected to the rear legs, and complemented by a round seat. The elements are connected with screws. The beauty of furniture is that it is very simple, but looks impressive.
Although the Viennese chair is already about 200 years old, it does not lose its charm and fits well into many interiors.
The advantage of the furniture is that it is incredibly durable, which means that after restoration it will last for many years.
Viennese style chairs are made only from natural wood.
Assembling a Viennese chair
Now it's time to attach the seat to the frame. For this process, you can use metal corners and screws.
The updated chair is ready. So we looked at the main methods of restoring Viennese chairs. We hope that this article will help you restore old chairs and they will not only be useful for a long time, but also delight you with their appearance!
Good luck to all masters!
Design options
Manufacturers offer classic Viennese chairs made from bent wood, as well as modern metal models. They are made in the same configuration, but from more durable material. Such chairs are less likely to need repair and restoration.
The streamlined and smoothed design of these chairs with different color tones fits perfectly into the interior of the dining room, living room, nursery or kitchen.
Classic chairs are:
- without armrests with hard seats;
- without armrests with soft seats;
- with shortened armrests that are connected to the back;
- half-chairs with a wide back and long armrests.
Disassembly of the structure
The connection diagram of the chair is well known; disassembling the structure yourself is not difficult. First, the back and rear legs are unscrewed. Assembling the chair occurs in the reverse order, then all the grooves will fall into place. If the chair is attached to glued tenons, you need to melt the joints with hot water - to do this, apply a hot wet cloth several times or use a steam generator.
Detected cracks are filled with a mixture of sawdust and glue or sealed and pulled together to fix them until dry. If tenon joints are damaged, new plugs are made to replace the old ones, and tongue-and-groove fastening and gluing are used to strengthen the drawbar joints. You need to drill a thin hole to the thorn and pour glue into it with a syringe, fix it until it dries. If the legs are inserted into special grooves in the bottom of the chair and the chair wobbles, then the legs are removed and the upper part is wedged out, it becomes larger and fits more tightly into the groove.
If a highchair is being updated, in addition to the above, it may be necessary to replace the hinges or the turning mechanism for transformation. Most wooden children's chairs consist of a large number of parts to ensure the safety of the child. It’s a good idea to glue them again with wood glue for strength.
When disassembling a folding chair, it is enough to remove the axial pins connecting the backrest and the seat and unscrew the seat. Chairs with a metal frame simply unscrew; for models with cast frames, only the seat and the soft part of the backrest are unscrewed for reupholstery.
The chair seat can be equipped with a spring block. The block itself does not need to be dismantled and torn from the base; if necessary, individual springs are replaced.
How to restore a Viennese chair with your own hands
To put an old, high-quality chair in order, you don’t have to call a professional. All work can be done with your own hands. The restoration of the Viennese chair will consist of strengthening the structure, repairing cracks and decorative finishing. If the seat has upholstery and it is worn out, you will have to replace the fabric and padding.
First of all, before you begin restoration, inspect the product itself to understand all the weak points.
Inspection and search for defects
As always, at the beginning of the repair we need to carefully inspect the chair and identify any defects. They can be varied. It depends on where and under what conditions our chair was stored. We will look at the main and most common defects.
- The chair is shaking. This means that its tenon joints have become loose. In such cases, the chair requires more labor-intensive repairs, because it is necessary:
- increase the size of the spike;
- install seals on the drawers;
- The power bars may need to be replaced.
- Replacement of paintwork. This process is the simplest and easiest.
- Seat restoration.
Next, we will look in more detail at methods for correcting defects.
Selection of tools
To disassemble and reassemble the chair you will need a screwdriver and a screwdriver. You can leave the old fasteners if their threads are not damaged, or you can replace them with new ones.
Tools and materials that you may need when carrying out restoration work on chairs.
To correct the configuration and finishing you will need:
- hammer;
- clamps;
- wooden mallet;
- sandpaper;
- solvent.
To change the upholstery, you will need a furniture stapler and staples.
Method 1: Painting a chair
Even the most old-fashioned or simply ordinary chair, say, a “Viennese” wooden, plastic, folding or office chair, can be transformed by painting. The main thing here is to choose the right color. Here are some inspiring examples where color alone saved furniture from ending up in a landfill.
Viennese chair before and after coloring
Folding chair before and after painting
Chair before and after staining
Chair before and after painting
Old Viennese chair before and after renovation
A few more examples of remaking the most common Viennese chairs made of bent beech, which can be found in almost every home or cottage.
Here are some cool ideas for painting stools.
Inspired? Then let's get to practice!
To paint the chair you will need:
- Acrylic paint, or preferably chalk paint, in one or more colors;
- Synthetic flat brushes (separately for primer, paint and varnish);
- Protective gloves (better to buy at a pharmacy);
- Primer for wood/metal (depending on the frame material);
- Wax or matte varnish (polyurethane or acrylic);
- Medium to fine grit sandpaper.
How to paint a chair with your own hands:
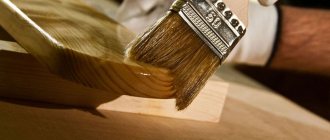
- Prepare the chair for painting: wash it to remove any rough dirt and dust, then sand it with medium-grit sandpaper to remove the top layer of old varnish or paint. The surface should be slightly rough.
- If you want to update a metal chair, then it is not necessary to sand it (although it is safer to sand off the top gloss), but before priming/painting, the frame must be degreased with white spirit.
- Also, you can avoid the tedious sanding step if you use chalk paint, but you won’t be able to do without a primer.
- If your chair is varnished, it can be removed with a special varnish remover.
- If the chair has any damage, such as scratches, chips or cracks, fill them with furniture putty.
- Wipe the chair from dust, wait for it to dry and apply two layers of primer to the entire frame, allowing each layer to dry for about a day. Between layers, it is advisable to sand the primer with fine-grained sandpaper (no. 220 is suitable).
- Take a new brush and paint the chair in 2-3 layers, allowing each layer to dry completely. Make sure that the paint does not smudge.
If you want to paint a chair with a distressed effect, then first apply a dark paint, say dark gray or dark blue, to some places (for example, the edges of the seat, back and armrests), and then cover them with wax. Next, you should paint the chair with the main paint in 2-3 layers. And finally, lightly work with fine-grained sandpaper to expose the dark “substrate”.
- Do you want to achieve the effect of a perfect factory paint job? Then be patient: each layer of primer and paint (except for the finishing layers) will have to be sanded with fine-grained sandpaper. This way the coating will be as smooth and reliable as possible.
- To paint only certain parts or parts of the chair, use masking tape.
- Treat the chair with wax or matte varnish. Voila, your “four-legged friend” has found a new life!
Helpful Tips:
- Don't know what color to paint your chair? You can't go wrong if you paint it white, because this color is the most versatile and goes well with any bright upholstery;
- Before painting, you can glue the stucco decor to the back of the chair using wood glue;
- You can achieve the effect of a very old and dirty Provence style chair using dark brown wax;
- Chalk paints are a relatively new type of paint that are not yet widely available. However, we recommend using it, because due to its thickness, increased adhesive properties and super-fast drying (in 30 minutes), it saves a lot of time and effort. In Russia, you can purchase chalk paints from designer Daria Geiler, and in Kazakhstan – from Vernenskaya Manufactory. You can also always order paints from foreign manufacturers - Annie Sloan and Rustoleum.
This video master class will help you better figure out how to paint an old chair with your own hands.
Completing of the work
During the inspection process, possible defects are identified.
The first stage of restoring a Viennese chair with your own hands is preparation. The product must be thoroughly cleaned of dust and dirt. You can briefly immerse the chair in water and wash it with soapy water. But it’s better not to overdo it: wood absorbs moisture and swells. After this, the furniture is dried naturally. You can place the chair on the balcony, but not in direct sunlight.
It is better not to disassemble connections in which the parts are held tightly.
Already at this stage the varnish will begin to partially peel off.
The chair must then be inspected to assess the scale of the work.
Important: before washing a chair with upholstery, it must be removed so that moisture does not linger in the fabric and fillings and harm the wood.
It is better to mark all disassembled parts so that there are no problems during assembly later.
Disassembly of the structure
The simplest thing is to unscrew the bolts and remove all possible elements from the base. This is necessary to simplify the process of grinding and repairing damaged parts.
First, remove the seat and backrest. In old chairs they are mostly attached with screws.
Fasteners should be placed in a separate bag or organizer. Deformed or rusty elements should be replaced with identical ones.
Options for fastening parts and methods of disassembly:
- the legs are attached according to the tongue-and-groove principle - they must be carefully loosened in order to be removed from the base, the back and seat are separated in the same way;
- if the chair is assembled with screws, they must be removed using lubricating oil so that they slide out of the grooves faster;
- glued furniture can be preheated with a hair dryer at the seams or the joints can be treated with a rag dipped in hot water, so the glue will become soft and the parts can be separated without much effort.
It may happen that the leg wobbles a lot in the socket, then you need to cut a slot at the end and drive a small wedge into it.
Sanding parts
The main part of the varnish and paint can be removed with a solvent. Or go straight to mechanical grinding. You will need a jigsaw or sandpaper of varying degrees of grit. First use with the coarsest grain, and the final cleaning is done with fine-grained paper.
When the parts are completely free of paint and smooth, sanding is complete.
Sanding is needed to remove as much old varnish as possible.
Repair of chair mounts
An important stage in repairing a Viennese chair with your own hands is the restoration of the fastenings.
How to do it:
- The ends of parts that have worn out need to be sawed a few cm deep.
- Drive wedges between them so that the seating part sits tightly in its original place.
If there is a need to strengthen the drawer, you need to cut out several blocks in the shape of a trapezoid.
One side is attached to the leg, the other to the drawer. If antique fragile furniture is being restored, a thin hole is cut out in the connecting seam. Wood glue is injected into it. Severe tenon wear can be corrected by a wedge made from wood chips. It is lubricated with glue and inserted into the hole along with the part.
If necessary, for better fixation of the parts to be glued, they can be pressed together with clamps or rubber bands. Rubber bands from expanders are ideally suited for these purposes.
Assembly
The prepared and cleaned parts are connected to each other in the same way (with glue, screws or tongue-and-groove technology). If the fastening points are worn out, you can additionally apply wood glue.
Decoration features
There are several ways to refresh the appearance of your chair:
- treat with stain and varnish;
- treat with wood putty, prime and paint.
As decoration, you can use both the upholstery itself, choosing a fabric of interesting colors like a tapestry, and other parts of the furniture, making them carved and figured.
For finishing, transparent or tinted varnish or acrylic paint of any shade are suitable. To give the chair a classic look, you need to leave the wood texture visible and simply varnish it. Bright chairs are suitable for kitsch or modern interiors.
The seat or back can be decorated using decoupage technique:
- Take decoupage napkins or newspaper clippings.
- Dilute PVA with water (1:1).
- Immerse the image in the solution and soak it slightly.
- Transfer the design with a brush to the surface.
- Allow to dry and seal with 2-3 layers of varnish.
The wooden surface of the supporting structure and the back are laminated, that is, covered with durable varnish in several layers.
The painting will look beautiful and unusual.
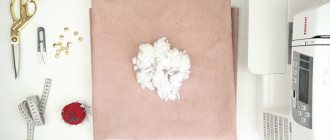
Soft seat on the chair
To repair the soft upholstery on the seat, you need to remove the old one in such a way that the pattern can be removed from it. It is transferred to new fabric, allowances of several cm (5-10) are made.
A leaky seat is updated by replacing the base with slats or the upholstery is completely restored.
It is very important to choose a comfortable filler. You can make the layer a little thicker to make sitting on the chair more comfortable. Regular foam rubber is suitable for this. From it you need to cut a part in the shape of the seat, a couple of cm smaller than the part itself.
The filler is attached to the seat with glue so that it does not move out.
Important! The upholstery is placed in the center, the edges should be free so that the upholstery can be folded under them.
Complete replacement and restoration of upholstery.
For greater convenience, you can put a layer of synthetic padding on top of the foam rubber or use polystyrene foam. This is a more modern material that holds its shape well and does not sag over time.
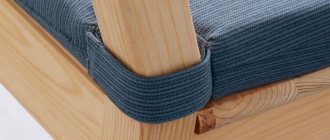
The last stage is to stretch the upholstery over the seat and fasten it with a furniture stapler.
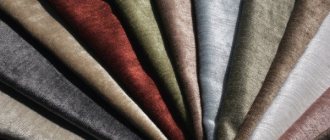
It is important that the color of the material is in harmony with the legs of the chair. You can see successful options in the color correlation table. Elastic and durable furniture fabrics are chosen for upholstery: chenille, matting, tapestry.
You don't have to place the fabric on the outer sides of the seat. Then the upholstery is folded inward around the perimeter. The seat frame will be visible.
Repair of chair mounts
The ends of the worn parts that are connected to each other are sawn several centimeters deep. Then a wedge is driven between them. Thus, the expanded part fits tightly into the seat.
When working with antiques, a thin hole is made in the seam of the joint. Then wood glue is injected there. In case of severe wear of the tenon, a wedge is made. The wedge is made from wood chips coated with glue. It must be inserted into the hole along with the part during the assembly process.
Photo gallery: Viennese chairs after restoration
Upholstering a chair
If desired, you can reupholster Viennese chairs. It is recommended to do this as follows:
- First of all, you need to remove the old fabric and foam.
- Foam rubber for Viennese chairs with a soft seat must be taken no more than 5 cm thick and placed on a flat surface. Then the seat should be laid on it, and then the workpiece should be cut out. This must be done exactly along the edges of the part.
- In the same way, it is necessary to cut the workpiece from any other suitable material. In this case, bends must be taken into account. Next, you should increase the part on all sides by about 7 cm.
- The next step is to lubricate the future seat with a small amount of glue. After this, you need to attach the foam rubber to the glue.
- All that remains is to fix the upholstery on the seat. This should be done on the wrong side of the fabric, with the filler facing down. Then staple around the entire perimeter.
Using the same principles, in the process of furniture restoration, it is possible to eliminate existing deficiencies in the elements of the back of a Viennese chair. But there is one main difference: when replacing the upholstery, the back wall needs to be draped with fabric or ribbon. This must be done in such a way that the staples can be hidden.
Preparatory work
First you will need to stock up on equipment and all the necessary materials. To restore chairs with your own hands, the following will be useful:
- beautiful upholstery;
- hammer;
- wooden mallet;
- screwdriver;
- screws and screwdriver;
- clamps;
- paint, brushes, solvent;
- clamps (metal);
- padding polyester (foam rubber, latex is possible);
- stapler with staples;
- scissors, glue;
First of all, the chair needs to be washed and cleaned. This can be done with a brush and dishwashing detergent. We dilute a soap solution in a large amount of water and apply it to the chair with a brush. Use gentle movements to remove dirt. After which the wooden frame should be blotted with a dry cloth. You should not carry out the “washing” procedure for a particularly long time, as excessive contact with water can damage the stool. After drying, we disassemble it into individual components.
Why Viennese chairs?
Many people wonder how to update Viennese chairs. To begin with, we should note their phenomenal strength, which is why it is easier to update them than to purchase a new one. Also, do not forget about convenience, because you can sit on such furniture for several hours and a person will not feel tired. Another advantage of this furniture is its original appearance. These chairs are perfect for the living room, kitchen and even bedrooms. Now it is possible to install them on the balcony near a light table.
Restored chair
Restored chair 2
Restored chair 3
Restored chair 4
Restored chair 5
Restored chair 6
Judging by the large number of advantages, making them will be much more convenient than buying them. Moreover, now it will not be easy to get such a durable and high-quality model at a fairly reasonable price. Therefore, you shouldn’t rush to send them to the landfill; by changing their appearance you can complement the interior of your apartment in an original way. Moreover, on the Internet there is a large amount of photo and video materials with step-by-step instructions that describe each action in detail.
Gluing mates
We wrap the damaged parts of the legs with a bandage, carefully applying glue to each layer of wrapping. At the end of the leg, we cut out a depression a couple of centimeters and drive a wooden wedge into it (any small piece of wood will do). After this treatment, the leg will “sit” tightly in the socket and will not wobble.
Restoring old chairs with your own hands will be complicated by the fact that in such models there are drawers and crossbars under the seat. In this case, all parts are connected to each other with spikes and glue. If the seam is weakened, it is enough to drill a hole and pour glue into it, and if the tenon fails, then during assembly, a sliver of wood soaked in glue must be hammered into the nest. A completely loose leg must be disassembled and completely glued.
Disassembling the chair
Before you begin restoring the chair with your own hands, you need to remove the backrest and the seat itself. This can easily be done manually, without using any tools. After which the chair needs to be thoroughly loosened and the bad connecting points separated. If necessary, you can gently tap the sockets with a mallet. But if, nevertheless, the joint cannot be disassembled, leave it, it means that it is still able to serve you well.
Chair reupholstery
We continue our master class on restoring an old chair with our own hands. First, all wooden parts should be painted with paint, then a layer of varnish should be applied. Next, we leave our precious chair to dry again. Meanwhile, let's move on to the finishing work: we'll start replacing the upholstery.
List of subsequent steps for reupholstering a chair:
- We remove the battered old upholstery. It is important to try to maintain the integrity of the tissue. She will act as a kind of pattern. All the little things and shortcomings of the wooden seat need to be eliminated first.
- We take the foam rubber, lean the seat against it and draw the contours as accurately as possible with a marker.
- Using regular scissors, cut out the desired area on the foam along the contours
- On the fabric of the future upholstery, using the old version of the fabric as a template, we draw a seat in the same way with a marker, but taking into account the allowances on the sides, three to four centimeters is enough.
- Next, we put together some kind of “sandwich”. To do this, we place the new fabric “face down” on the table as the first layer, followed by foam rubber, and the seat itself as the third layer. Thoroughly straighten, align and stretch the fabric, tuck the hanging edges under the wooden base. We secure it with a stapler or small nails with wide heads.
If the back of the chair is as soft as the seat, then the above steps will need to be repeated with it. The upholstery fabric can be chosen in any color, the main thing is that the new chairs match the overall interior design.
At the very end, we attach the seat to the chair frame itself. It is best to “plant” it on self-tapping screws using metal corners.
Restoration of parts
At the initial stage, all small defects should be removed immediately. Cracks, as well as places bitten by pets, need to be tightened with clamps; all other chips can be easily removed with paper tape or putty made from a mixture of sawdust and wood glue. If glue gets on unnecessary parts of the chair, there is nothing to worry about. In the future, all flaws can be easily eliminated. For round elements you need to use metal clamps.
The glue must dry thoroughly. This will take at least 48 hours, perhaps even more. The next step is to sand all the elements of the chair. To do this you need to use sandpaper. You need to start with paper with a coarser grain, gradually moving to the smallest. It is necessary to achieve an absolutely flat surface of all parts. Otherwise, there will be jagged edges on the chair, on which clothes will subsequently cling.
Updating an old chair
Updating an old chair
Restoration of the Viennese chair is carried out at home and does not require much attention. The first step is to thoroughly polish all the details of the old product, eliminating all irregularities and old elements. Then it is advisable to coat it with varnish and leave it until completely dry.
Repairing a chair requires checking all nails and bolts. If something doesn't hold well, it's worth replacing that part. After the varnish has dried, we begin to restore the seat. It can be with a foam seat, or simple, wooden. The foam version can simply be covered with new fabric or leather. You can choose a large pattern that will harmoniously combine with the graceful lines of the back.
Knowing how to restore an old product, you can avoid spending money on buying new furniture. Moreover, a piece of antiquity in an apartment has now become very fashionable, and many people try not to throw away interior items handed down to them from their ancestors. Such models are suitable for almost all apartments, and decorating with fabrics will allow them to fit harmoniously.
1. Materials for restoration 2. Remove the connection, which is attached with small nails. Then we use a sander to go over the wooden frame 3. Sand all the parts 4. First sand the edges of the crack. We pour wood glue into it and secure the desired place with two small clamps 5. Having removed the old covering and removing the layer of almost decayed cotton wool, we leave clean plywood 6. Using a stapler, we attach the foam rubber and upholstery fabric 7. We start painting. If desired, the chair can be painted twice 8. Attach the seat and the chair is ready
It is worth noting that Viennese chairs are very durable and models made back in the fifties serve their owners well.
That's why we restore antiques, and do not get rid of such durable models of chairs. Their endurance was tested by throwing them from the Eiffel Tower. This chair was the only one that withstood a blow from such a height and was practically undamaged. The remaining models did not pass this test, as they mostly fell apart or became unusable.