Distinctive design features and main advantages of heel loops
With a wide variety of fittings, choosing the right solution for your home can be difficult. If installing mortise models is difficult, pay attention to the heel loops. Such products allow you to beautifully decorate the door, thanks to its special design. They do not degrade the appearance of the door leaf, creating the illusion of a door floating in the air.
Heel loop
Design features
Conventional hinges require fastening to the door leaf and then screwing it to the side post of the frame. The design has advantages and disadvantages. When replacing old fittings with new ones, difficulties arise. You have to select a similar product, as marks will remain on the surface of the door leaf. Especially if the hinges are mortise.
The heel products rest against the floor and the upper lintel of the door leaf. Due to their location, they are able to hold a heavy door, unlike hinged hinges of the same size. The presence of a support bearing makes the door movement smooth and uniform. The canvas is easy to open and close.
Such hinges are chosen for almost all swing structures. The exception is folded canvases with a rebate. For such doors, a different type of fittings is chosen.
Products are mounted in different ways. If you want to hide the fittings by installing hidden hinges, it is worth preparing a special groove in which the fittings will be placed. Such hinges do not protrude above the surface of the door leaf and remain invisible to prying eyes.
If preparing the groove causes difficulties, the hinge is attached to the end of the sash. In this case, an additional gap appears between the canvas and the box, the size of which depends on the thickness of the attached fittings.
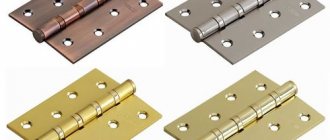
Made from various materials. Manufacturers offer steel and brass products. The former, due to the mechanical characteristics of the alloy used in their manufacture, are able to withstand heavy operating loads. They are chosen for heavy fabrics and high traffic areas.
Brass hinges are characterized by low cost and worse performance characteristics. They are suitable for lightweight door leaves that do not experience significant load during operation.
Attention! Before giving preference to a specific product, carefully read the conditions of its operation and the characteristics of the door leaf for which it is purchased.
Adjustment
After installation, adjustments must be made. It can be in three directions. If you tighten or loosen the special adjustment screws inside the parts, the doors are aligned as accurately as possible and do not make sounds when opening and closing. You can adjust it with a screwdriver or a wrench, which is included in the kit, it all depends on the type of pin loop.
Adjustment technology:
- top screw for horizontal alignment;
- the bottom screw adjusts the clamp and sets the exact gap between the doors and the door block;
- The doors are adjusted vertically with a middle screw (the exact position is achieved by rotating in different directions).
It is worth noting that, following the recommendations, you can install screw-in hinges yourself, but, as in any other matter, experience and special knowledge may be required. It is important to choose the right hinges and carefully read the instructions before starting work.
A detailed master class on installing screw-in door hinges is in the video below.
Advantages
Heel overhangs are preferred for a number of reasons. Such accessories:
So, if you want to add elegance and uniqueness to your installed door system, look no further than heel overhangs. The special design of the hinges makes them suitable for most door panels. Before choosing a specific model, compare its characteristics with the characteristics of a particular door, as well as the operating conditions of the door system.
Source
Do-it-yourself heel loop – Heel loops – the originality of the design solution
With a wide variety of fittings, choosing the right solution for your home can be difficult. If installing mortise models is difficult, pay attention to the heel loops. Such products allow you to beautifully decorate the door, thanks to its special design. They do not degrade the appearance of the door leaf, creating the illusion of a door floating in the air.
Heel loop
Design features
Conventional hinges require fastening to the door leaf and then screwing it to the side post of the frame. The design has advantages and disadvantages. When replacing old fittings with new ones, difficulties arise. You have to select a similar product, as marks will remain on the surface of the door leaf. Especially if the hinges are mortise.
The heel products rest against the floor and the upper lintel of the door leaf. Due to their location, they are able to hold a heavy door, unlike hinged hinges of the same size. The presence of a support bearing makes the door movement smooth and uniform. The canvas is easy to open and close.
Such hinges are chosen for almost all swing structures. The exception is folded canvases with a rebate. For such doors, a different type of fittings is chosen.
Products are mounted in different ways. If you want to hide the fittings by installing hidden hinges, it is worth preparing a special groove in which the fittings will be placed. Such hinges do not protrude above the surface of the door leaf and remain invisible to prying eyes.
If preparing the groove causes difficulties, the hinge is attached to the end of the sash. In this case, an additional gap appears between the canvas and the box, the size of which depends on the thickness of the attached fittings.
Made from various materials. Manufacturers offer steel and brass products. The former, due to the mechanical characteristics of the alloy used in their manufacture, are able to withstand heavy operating loads. They are chosen for heavy fabrics and high traffic areas.
Brass hinges are characterized by low cost and worse performance characteristics. They are suitable for lightweight door leaves that do not experience significant load during operation.
Attention! Before giving preference to a specific product, carefully read the conditions of its operation and the characteristics of the door leaf for which it is purchased.
Advantages
Heel overhangs are preferred for a number of reasons. Such accessories:
So, if you want to add elegance and uniqueness to your installed door system, look no further than heel overhangs. The special design of the hinges makes them suitable for most door panels. Before choosing a specific model, compare its characteristics with the characteristics of a particular door, as well as the operating conditions of the door system.
Voted more than 0 times, average rating
How to adjust an interior door?
After installation, interior products should be easy to close and open with the same ease. The door should not hang on its hinges, creak or touch the floor. Therefore, it must be adjusted after installation. The door does not close or is difficult to close. Causes and correction of malfunctions.
- The door frame is warped. To correct it, you need to check whether the beams are well secured to each other. If not, it is recommended to remove the door frame and secure each beam with two or three screws on each side.
- Weak hinge depth. To eliminate this error, you just need to tighten the loops. If this does not save the situation, you need to remove the hinges and deepen the grooves or, on the contrary, put something under the hinges.
- The hinges are mounted too deeply into the door frame or into the leaf itself. In this case, it is necessary to move the hinges to the proper place and attach them with self-tapping screws.
An uneven gap between the door leaf and the door frame, which makes it difficult to open, but at the same time the door is very easy to close. Causes and solutions to problems.
- Poorly tightened door frame. To eliminate such a defect, you need to pull the box towards the beam. You can determine which screws need to be tightened visually or using a level.
- The loops are set deep. To correct the error, you need to loosen the screws on the hinges. If loosening does not help, you need to remove the hinges and put cardboard under them.
- The hinges are too far out - tighten the entire door frame using self-tapping screws.
An open door closes or opens on its own. How to adjust the door in this case? The point is the verticality of the box. If its top is tilted, the door will open. If the bottom of the door frame is inclined, then the door will close accordingly. To eliminate the defect, you need to use a level to align the box strictly vertically; most often, it is enough to level only the hinge beam. Next, you need to securely secure it in this form.
The door leaf touches the top of the door frame. This means that the door is uneven in size. It happens that the new canvas has an irregular rectangular shape. To do this, you can put a carbon copy and close the door. After this, the place where the canvas touches part of the door frame should be imprinted. Level the unevenness found with a plane, then paint and varnish.
In order to eliminate the creaking of the door, you need to remove the door leaf from the hinges and lubricate them with a lubricant that contains grease. The adjustment of the interior doors is complete. If you still have questions, you can watch the videos on installing and adjusting doors located here.
DIY heel loop installation
It is quite possible to sew a Glisson loop with your own hands at home. Traction loop (Gleason loop) is a hardware simulator that is designed to stretch the spine. You can buy it or make it yourself.
READ How to install two WhatsApp on iPhone
Have you been trying to heal your JOINTS for many years?
Head of the Institute for Joint Treatment: “You will be amazed at how easy it is to heal your joints by taking it every day.
The device can be used in a lying, sitting and standing position. It is used to treat pathologies such as:
OUR READERS RECOMMEND!
Our readers successfully use Artreid to treat joints. Seeing how popular this product is, we decided to bring it to your attention. Read more here...
Sewing a simple Glisson loop
To make a traction loop yourself, you will need a drawing of the device, which is easy to find on the Internet.
The design of the loop can be as simple as possible. There is no need to create a pattern in this case. Such a device consists of dense belt tapes (slings) or other dense, but elastic and elastic fabric. To make the simplest Glisson loop, you will need 2 strips 7–10 cm wide and up to 50 cm long, tapes up to 2 cm wide and a rope.
The design is a bandage bandage. On each of the ribbons at the ends it is necessary to form loops; for this, 7–10 cm are folded on both sides and secured with tailor’s pins. For stitching, use the “X-box” seam (“window” with a cross of diagonals). To do this, step back 0.6 mm from the edges of the folded tape and draw a square or rectangle depending on the width of the tape, the sides of which should not be shorter than 5 cm.
To facilitate the stitching process, both the window and the intersection of the diagonals can be drawn with a pen or pencil. The ribbons must be connected to each other with laces or narrow slings about 75-80 cm long. The ends of the laces (ribbons) must be sewn together, forming rings. Before sewing, the laces can be pulled through metal rings to attach the hanging rope, or they can be fastened with one ring of narrow sling.
One of the strips must be sewn to the lace (ribbon) and remain in a stationary position. It serves as a support for the back of the head. The second strip will hold the chin, it must be left movable. You can attach pieces of wide elastic or adjustable straps between the strips to make the design comfortable and not slip.
Making a pattern
There is another option for how to make a Glisson loop yourself. In this case, you cannot do without a pattern. Its scheme is quite simple, but construction will require some skills. To make a traction loop, an elastic dense fabric is taken, the width of which is equal to the width from the chin to the condyle of the occipital bone. The length of the cut is measured from crown to crown through the chin. The design narrows towards the ends, and in the center there is a figured cutout for the head and ears.
The occipital part may have semicircular protrusions reaching the chin, to which adjustable straps or strips of wide elastic are attached for more comfortable and reliable fixation of the device on the head. This is especially important for full hangs. For fixation, you can also use textile Velcro fasteners.
For convenience, the design should be lined with soft fabric. Thin pads can be placed in the area of the chin and back of the head. The edges of the product must be covered with hard fabric, bag tape or a strip of thin leather to avoid stretching the traction loop during use. To assemble such a product, you will need a special walking foot or Teflon foot, with a roller for stitching leather and its analogues.
At the narrow ends of the product, loops are made using an “X-box” seam, after having previously inserted large metal rings into them. For this type of device, you can additionally use a straight clothes hanger made of stainless steel, to the ends of which hooks or laces are attached for hanging a Glisson loop.
You can make a similar design yourself from available materials: steel rod, wood.
Assembly of the structure
To use the traction loop in a lying position, it is enough to install 2 hooks yourself on the floor or other flat hard surface, to which the device is attached. Ideally, the surface should be inclined so that the spine extends under its own weight.
If you plan to use a Glisson loop for vertical stretching of the spinal column, you need to figure out how to make a suspension for it. You need to calculate its length yourself. To do this, you will need a diagram taking into account the selected support point. Usually the support is a door leaf, a wall bars or a horizontal bar.
You can make a hanging hook yourself; for this you need to select a suitable metal that can withstand the weight of a person and not deform.
Typically, the Gleason design drawing provides for 2 methods of spinal retraction: under the influence of a load and with the help of the patient’s own hand. To do this, attach to the upper ring:
It is important to securely fasten the parts of the product.
The rope and rubber cord must be strong enough to support the patient's body weight. Instead of a rope, you can use a thin cable or strong rope.
Alexandra Pavlovna Miklina
If this piece of the torso is not pumped up, the muscle corset ceases to hold, the belly falls forward, and the vertebrae fall into the panties, the spine begins to shout “SOS” with all its strength.
And then my godfather told me about such a magical thing as the “TRX loop,” which allows you to work out almost all muscle groups, at the same time do stretching and Thai massage, and many other useful things. You-tube will be happy to tell you how and what to do. But the cost of this miracle element starts at $200. But! If your arms grow from pumped up shoulders, then you can significantly reduce the expenditure. Up to about 20 dollars. That is 10 times.
Approximately, the result should be something like this:
When assembled it looks like this:
We make two third elements (.), but they are identical.
To do this, we will need more than three meters of cable and a 20-centimeter piece of pipe for each.
READ How to install a metering pump on a T 25 tractor
We push one tail into the pipe, leave a loop so that the foot can fit freely there, and place the tail in the same “entrance” as before:
We sew the structure at the top:
We move the pipe to the side and fix it and sew a loop inside the pipe (the cross in Figure 3-1).
Ready! Your back, abs, legs, shoulders and everything else are eager to try what it is you have created.
how to sew at home
It is quite possible to sew a Glisson loop with your own hands at home. Traction loop (Gleason loop) is a hardware simulator that is designed to stretch the spine. You can buy it or make it yourself.
The device can be used in a lying, sitting and standing position. It is used to treat pathologies such as:
Sewing a simple Glisson loop
To make a traction loop yourself, you will need a drawing of the device, which is easy to find on the Internet.
The design of the loop can be as simple as possible. There is no need to create a pattern in this case. Such a device consists of dense belt tapes (slings) or other dense, but elastic and elastic fabric. To make the simplest Glisson loop, you will need 2 strips 7–10 cm wide and up to 50 cm long, tapes up to 2 cm wide and a rope.
The design is a bandage bandage. On each of the ribbons at the ends it is necessary to form loops; for this, 7–10 cm are folded on both sides and secured with tailor’s pins. For stitching, use the “X-box” seam (“window” with a cross of diagonals). To do this, step back 0.6 mm from the edges of the folded tape and draw a square or rectangle depending on the width of the tape, the sides of which should not be shorter than 5 cm.
To facilitate the stitching process, both the window and the intersection of the diagonals can be drawn with a pen or pencil. The ribbons must be connected to each other with laces or narrow slings about 75-80 cm long. The ends of the laces (ribbons) must be sewn together, forming rings. Before sewing, the laces can be pulled through metal rings to attach the hanging rope, or they can be fastened with one ring of narrow sling.
One of the strips must be sewn to the lace (ribbon) and remain in a stationary position. It serves as a support for the back of the head. The second strip will hold the chin, it must be left movable. You can attach pieces of wide elastic or adjustable straps between the strips to make the design comfortable and not slip.
Making a pattern
There is another option for how to make a Glisson loop yourself. In this case, you cannot do without a pattern. Its scheme is quite simple, but construction will require some skills. To make a traction loop, an elastic dense fabric is taken, the width of which is equal to the width from the chin to the condyle of the occipital bone. The length of the cut is measured from crown to crown through the chin. The design narrows towards the ends, and in the center there is a figured cutout for the head and ears.
The occipital part may have semicircular protrusions reaching the chin, to which adjustable straps or strips of wide elastic are attached for more comfortable and reliable fixation of the device on the head. This is especially important for full hangs. For fixation, you can also use textile Velcro fasteners.
For convenience, the design should be lined with soft fabric. Thin pads can be placed in the area of the chin and back of the head. The edges of the product must be covered with hard fabric, bag tape or a strip of thin leather to avoid stretching the traction loop during use. To assemble such a product, you will need a special walking foot or Teflon foot, with a roller for stitching leather and its analogues.
At the narrow ends of the product, loops are made using an “X-box” seam, after having previously inserted large metal rings into them. For this type of device, you can additionally use a straight clothes hanger made of stainless steel, to the ends of which hooks or laces are attached for hanging a Glisson loop.
You can make a similar design yourself from available materials: steel rod, wood.
Assembly of the structure
To use the traction loop in a lying position, it is enough to install 2 hooks yourself on the floor or other flat hard surface, to which the device is attached. Ideally, the surface should be inclined so that the spine extends under its own weight.
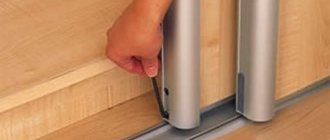
If you plan to use a Glisson loop for vertical stretching of the spinal column, you need to figure out how to make a suspension for it. You need to calculate its length yourself. To do this, you will need a diagram taking into account the selected support point. Usually the support is a door leaf, a wall bars or a horizontal bar.
You can make a hanging hook yourself; for this you need to select a suitable metal that can withstand the weight of a person and not deform.
Typically, the Gleason design drawing provides for 2 methods of spinal retraction: under the influence of a load and with the help of the patient’s own hand. To do this, attach to the upper ring:
It is important to securely fasten the parts of the product.
The rope and rubber cord must be strong enough to support the patient's body weight. Instead of a rope, you can use a thin cable or strong rope.
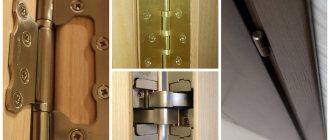
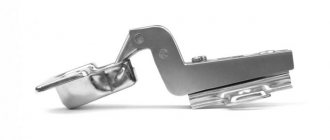
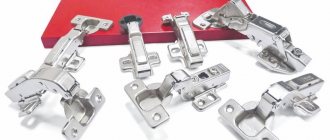
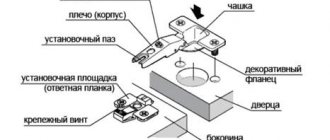
Furniture hinges: features and types
A furniture hinge is a semi-mechanical design that makes it possible to open and close part of the furniture body (usually a door), retracting it to a certain angle. It is completely invisible from the outside, but at the same time it is capable of not only holding it in the desired position and helping to open the facade (door), but also preventing it from opening without permission. Typically, hinges are used for the so-called hanging of doors made of various materials - wood, glass, aluminum profile. Also, most hinges are capable of closing on their own. The most common type of hinges is four-hinged . They are highly functional and very reliable, durable and can serve for many years without breaking.
Four-joint furniture hinge
On a note! For the first time, a design that can close on its own appeared only in the twentieth century; it was patented in Italy.
The design of a furniture hinge is represented by the following elements.
- The base or base is the element that is attached to the mounting plate. It has a special screw that makes it possible to adjust its position.
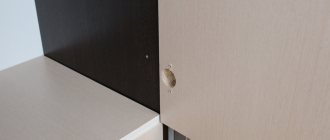
- The cup is a part that, during the installation of hinges, is installed in a hole specially drilled in the facade. It has a round shape.
- Hinges are movable elements equipped with spring mechanisms.
How furniture is assembled - furniture fittings | With your own hands
Method of knitting socks with knitting needles with a “Boomerang” heel
Having knitted the shin in a circle on four knitting needles, you can proceed to the “Boomerang” type heel. It is a little shorter than the traditional one. For the heel you will need another additional spoke. Double loops are not knitted.
Method of knitting a stepped heel at the toe
The stepped heel is knitted in the same way as in previous cases, using the first and fourth knitting needles, leaving the second and third ones temporarily aside.
Double knit heel knitting
You can increase the wear resistance of knitted socks not only by adding an additional thread, but by putting into practice a special method of knitting a double heel, increasing its thickness.
READ How to install a car seat in a car video on the front seat
In order to start knitting socks with straight heels, you will need yarn of the desired color and five double needles. In the process of work, you can make various patterns, as well as use yarn of different colors, knit additional threads to obtain a more durable heel.
Cast on the required number of loops.
Cast on stitches on two needles
Distribute them evenly across four knitting needles. This means: if the total number of loops is 60, then there will be 15 loops on each knitting needle.
Distribute stitches evenly across four needles
Next, continue knitting in the round, completing as many rows as corresponds to the given description or your own calculations. The beginning of a new row is easy to determine by the hanging “tail” of the thread of the first row. All rows of the upper part of the sock can be done with an elastic band or a pattern.
Finished knitting the top of the sock
Having finished knitting the upper part of the sock, let's move on to knitting the heel.
Straight heel knitting consists of two main parts:
Part 1: Performing the heel wall.
The straight heel is knitted on two needles in forward and reverse directions, so set aside the 2nd and 3rd needles and knit so many rows on the loops of the 1st and 4th needles in stockinette stitch so that their number is 2 less than the number of loops on these knitting needles. For example, the number of loops on two knitting needles is 30, so you need to knit 28 rows.
Or use the size charts.
Finished knitting the heel wall (right side)
Finished knitting the heel wall (wrong side)
Part 2: Knitting the bottom of the heel.
Divide the heel loops into three parts; if this number is not a multiple of three, then leave a larger number of loops on the middle part.
Distribute the heel wall stitches onto three needles
Stages of performing the lower part of the heel in rows:
1st row (right side): knit the last stitch of the middle part with the first loop on the next needle together. Next, without finishing the row, turn the work over.
Knit two stitches together. After that, turn the work over.
2nd row (wrong side): slip the 1st loop without knitting, purl the middle part, and purl the last loop of the middle part with the next loop (the first loop on the next needle). Again, without finishing the row, turn the work.
Knit subsequent rows in the same way until all the loops on the side knitting needles are completed, and only loops on the middle knitting needle remain. On uh
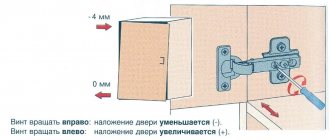
How to adjust furniture hinges
To properly set up the operation of the canopy, you first need to check the position of the cabinet itself. Doors on the facade will help sag under their own weight or due to skew of the body. To do this, we check the position of the box with a level and level it either by altering the suspension on the wall, or by trying to adjust the height of the legs.
Any mortise hinge has at least three position adjustment screws. In general, the system allows you to adjust the position of the door, its displacement by 2-4 mm vertically, horizontally and in depth. Since there are usually two loops, the angular deviation can also be corrected. A more detailed description of the screws for adjusting furniture hinges is given in the video:
But you can also use the diagram below.
How to adjust furniture hinges vertically
In all training manuals and manuals, it is usually recommended to begin adjusting the door position by eliminating the most obvious problems with the hinges. If the screws are not screwed deep enough or are loosened at both fastening points, then one half of the facade will simply drop a few millimeters lower relative to the other.
Advice! First of all, you need to check the condition of the screws themselves. If the cabinet is assembled from chipboard of low quality, then it happens that the fasteners are pulled out of the particle board.
In this case, you will need to unscrew the screws, place a piece of a match or toothpick in the hole and tighten the fasteners.
If the fastening is in order, you can adjust the height of the sash by unscrewing the screw 1-2 turns. Next, we will raise the cabinet door level with the other half, fix it and at the same time raise the “butterfly” hinge to the same height. All that remains is to tighten the fasteners with a screwdriver, use a ruler and a level to check the accuracy of the installation.
How to adjust furniture hinges horizontally
Since when opening a cabinet a person usually grabs the corner of the door with his hand, the main part of the load falls on the nearest hinge. As a result, the door may warp, the upper parts of the two doors will collide head-on, and a huge wedge-shaped gap will form between the doors below.
In this case, you have to adjust the horizontal displacement along the front on one of the hinges, usually the top one. To level the position, you will need to unscrew the adjusting screw, which is located first from the end, as in the diagram.
Before adjusting, you need to loosen the screw, align the door and only then tighten the fastening point
If a cabinet with a skewed door has been in use for a long period of time, then you will probably have to adjust the lower canopy. Using a school wooden ruler, it is convenient to control the size of the gap between the edges of the sashes, so as not to adjust, as they say, “by eye.”
You can configure cabinet doors with four hinges in the same way. Initially, you need to adjust the gap on the top and bottom hinges, then use the screws to level the gap in the middle of the sash. One of the options for adjusting the horizontal reach is shown in the video:
How to properly adjust furniture hinges in depth
Front or depth adjustment makes it possible to adjust the size of the gap between the ends of the side walls of the cabinet and the ends of the door in the open position.
Frontal adjustment is the most important; the durability of the hinge depends on the accuracy of the gap setting.
If the doors do not open completely to an angle of 90°, then most likely there is no working gap at all. To fix the problem, you need to adjust the specified distance at 0.6-3.4 mm. Again, it is very convenient to use a ruler as a gauge.
Adjusting the gap is easy:
- We turn out the screw farthest from the facade;
- Place a ruler on the end of the wall and fix it with your hand;
- Next, you need to adjust the protrusion of the screw with a screwdriver so that the cabinet door leaf opens fully.
It is also not recommended to make the gap too large; in this case, you will have to additionally adjust the position of the horizontal movement with a nearby screw.
Screw-in door hinge: fittings for hidden fastening
Any interior or solid entrance door performs protective functions. But besides this, it decorates the room and matches the interior.
It is important to choose the right door hinges. If the awnings are chosen poorly, the doorway will look unsightly, and the panel may warp or cause an unpleasant creaking sound. To minimize possible shortcomings, screw-in door hinges are often installed.
Application area
A pin or screw-in hinge, similar to corner structures, is intended for installation on doors equipped with a hinged quarter. In this case, the slats replace two small rods. Each pin is screwed into the door block and leaf.
Hidden hinge mechanism
Screw-in fittings designed for installing doors have a number of positive qualities. The pin loop is easily adjusted with a hex key in different directions:
Caps for screw-in hinges provide a beautiful appearance to pin structures. They cover the rods and play the role of decorative elements. The industry produces such caps in different colors and shades. They are easy to match to the existing interior.
The choice of a pin model depends on the weight of the door leaf and its dimensions. Lightweight folding doors or swing structures are often equipped with screw-in canopies that have several rods (2-3).
When it comes to heavy door structures, products with four rods are reliable and durable. They are made from special steel and can withstand heavy loads.
Screw-in hinge design
Such interior door parts consist of two cylindrical parts located symmetrically to each other. Holes are made in each half to secure them with mounting screws.
Each individual part was called a “barrel”. One cylindrical wing is attached to the door block, the other part is tightly fixed to the door leaf.
Hidden loop model drawing diagram
How are pin loops constructed?
This type of door hardware consists of several parts:
The industry also produces pin loop mechanisms, which include a ball and a special nylon insert. These parts provide:
Each part is equipped with a decorative cap. It is designed to give the fittings a beautiful look and hide the internal mechanism. Hinges with such caps fit into the design of the room, and their color scheme matches the existing interior.
What does the installed loop look like?
Types of loops
The design of such fittings differs according to two important criteria.
There are two types of loops in stores:
After installing the first type, you can align the position of the canvas relative to three planes. In this way, the exact location of the door is achieved. Her movement becomes silent and easy.
Where are screw-in hinges installed?
Such systems are designed for installation of all types of doors and wooden windows. Pin structures have several positive qualities compared to their counterparts:
Installing a Pin Loop
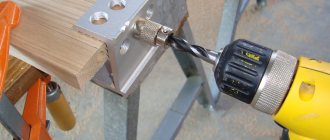
To install the pin loop, a certain technological sequence is followed.
Preparatory work on the door block is carried out in exactly the same sequence: