Quite often, our favorite items, which we use for a relatively long time, lose their original appearance or simply become boring. Sometimes it happens that you want to make repairs and update the interior of a room, but at the same time not part with your favorite piece of furniture, which in its style or color does not fit into the new design. And if we are talking about such items as soft poufs, it is enough to change their covering, and they will be able to please you for many years, making your life more comfortable and cozy. By upholstering the pouf with new fabric and soft lining, you will receive a completely new piece of furniture that will fully correspond to its style and your taste. If you don’t yet know how to cover a pouf yourself, then this article is for you.
Our story will also be useful for those home craftsmen who are going to sew an ottoman from burlap, leather, old jeans with their own hands, or make it from plywood and cover it with upholstery fabric. After reading the article, you will be convinced that performing these processes does not require special knowledge and experience in reupholstering furniture. Having basic cutting skills and knowing how to sew fabric parts together, you can easily cope with the task.
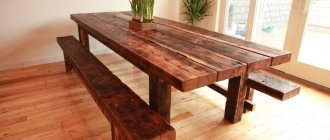
Chipboard ottoman cover
To perform finishing work you will need the following tools and materials:
- decorative fabric for upholstery;
- a piece of padding polyester or foam rubber;
- furniture stapler;
- glue gun;
- sewing machine.
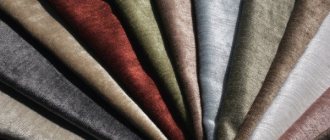
Choice of upholstery fabric
First, you need to choose what stylistic solution your new upholstered chair will have. Depending on the style, I cover the ottomans with various dense texture fabrics - tapestry, suede, velor, velvet, eco leather, eco fur and other materials.
For example, a pouf covered with satin or brocade-like fabric is perfect for a classic design.
If you are planning to decorate a room in an ethno style, then a matting pouf will look very good in it.
Modern interior styles will perfectly complement original pieces of furniture made in patchwork style.
To make such a cover, you will need several scraps of dense fabric of contrasting colors, from which you should cut out identical wedges and sew them together. You will get a very bright and stylish seat for the ottoman. The sides of the chair cover can be cut from a plain fabric that matches the color tone of one of the patches.
Stages of work
Take your old ottoman or make a frame for the ottoman from sheets of chipboard or plywood. In accordance with its dimensions, make patterns from the prepared fabric.
We cut out a piece of foam rubber according to the size of the seat.
Next, you need to measure and sum the width of all sides of the pouf. Based on the measurements obtained, taking into account the height of the product, we cut out a piece of padding polyester and cover the side parts with it. We secure the padding polyester using a furniture stapler.
To make this work easier, you can first apply special glue to the walls of the pouf frame. In the same way, secure the foam rubber blank to the seat of the chair. Attach the patterns cut from upholstery fabric with a stapler to a soft base, tucking the edges.
At the junctions of the parts, glue a suitable decorative cord or apply a decorative pattern to the sides.
Another way to update an ottoman with your own hands is to sew a cover from the selected material. This option will be more practical, since if necessary, it can be removed, washed and put back on the pouf.
To do this, fabric patterns must be basted together and stitched on a sewing machine.
After we sew all the parts together, we need to cut off the excess fabric and smooth the seams with an iron.
The bottom edge must be hemmed by machine or by hand and also ironed. We turn the cover inside out and put it on the pouf, straightening out the folds.
At this point, the work on the updated pouf is not completely finished - if desired, it can be decorated. For example, you can sew a large button into the middle of a seat made of scraps, having previously covered it with decorative material in the color of the sides.
An ottoman trimmed with ruffles or lace is perfect for a girl’s bedroom or children’s room.
A fringe sewn on the bottom will look good on a product intended for an interior in a baroque or classic style.
Replacing upholstery for a pear chair
If your favorite beanbag chair has lost its former beauty due to wear and tear of the fabric on the outer shell, then you will have to restore the ottoman. You, of course, can throw it away and buy a new one, but believe me, repairing it will be a more pleasant and less expensive task than buying a new bag.
If the inner burlap is in good condition, and the filling has not shrunk and still holds the shape of the chair, then you can quickly update the product.
The simplest option is to remove the old cover from the bag and, in accordance with the shapes and sizes of its wedges, cut out new pieces of fabric. To do this, we select a dense and strong material for the new outer shell of the bag, make a pattern and sew all the parts together from the wrong side. Then we cut off all excess fabric, steam the seams with an iron and turn the product inside out. We sew in a zipper and update our old pear ottoman by putting a new and beautiful outer cover on it.
Using the same principle, you can sew a stylish and fashionable ottoman from old jeans. It will look pretty good in a children's room or youth apartment. To do this, you will need several pairs of unnecessary jeans and a great desire to sew an ottoman out of them.
If you already have burlap with filling, all you have to do is make a pattern on paper, examples of which can be easily found on the Internet, and transfer it to pieces of jeans that have been previously ripped at the seams.
When choosing a pattern, keep in mind that the width of the bean bag chair wedges should be no larger than the width of the pant legs.
Next, according to the scheme familiar to us - you sew together all the wedges of the bag, sew on the base, steam the seams, turn the fabric inside out, sew on a zipper and put the denim cover on the bag with the filling.
Create a soft ottoman-bag
To work, you need to prepare the following materials:
- Fabric for outer cover.
- Fabric base for the inner bag.
- Filler.
- Decorative elements (ribbons, guipure).
- Pattern.
If the master has a sufficient level of cutting and sewing skills, you can make the template yourself. In another case, patterns of finished models are available on the Internet for studying and downloading.
Step-by-step instructions for the master:
- Using the prepared patterns, we cut out a fabric blank for the inner cover: the outer bag should be larger in volume than the inner cover.
- The inner cover is stuffed with soft filling.
- The outer bag is sewn according to a different principle. Eight parts are made using the templates: two rounded parts for the base and top, six wedge-shaped parts for the sides. This principle of creating elements will allow you to give the pouf a certain shape.
- The wedges are sewn together and with the lower part.
- An inner cover filled with filler is placed inside the formed frame-bag.
- Lastly, the upper rounded element of the pouf is sewn on.
- Be sure to sew in a zipper so that you can remove the outer cover for washing in the future.
The original ottoman is ready for practical use.
Materials, tools and patterns
The easiest way to show how to sew an ottoman is with its cubic shape. The pattern of such a seat consists of only 6 squares, of which 4 are the side edges of the soft chair, and 2 are its top and bottom. The size of the squares depends on the size of the ottoman. To work you will need a pencil, ruler, paper. You will also need to prepare scissors, needles, pins, threads, and a sewing machine. And, of course, you need fabric for the ottoman cover, filling and, if desired, finishing material.
You can sew an ottoman not only from new fabric. An old bedspread, curtains, dress, etc. are quite suitable for this purpose.
Thin silk or knitted fabrics stretch, the machine stitching on them turns out to be tight, so thin fabric is duplicated with a denser one.
Scheme for collecting cut out parts for an ottoman.
You can use an old linen sheet for this purpose. The backing fabric prevents the cover from deforming; all seams are clear, which gives the product a beautiful shape.
Work begins with a pattern. In this case, the pattern is the most elementary - a square, the side of which is equal to the height of the ottoman. 6 squares are marked along it on the main fabric, not forgetting to make allowances for the seams, adding 1 cm on each side. The backing fabric is also cut out. A total of 12 squares are cut out. Now they need to be folded in pairs - a square from the base + a square from the backup fabric (base + backup).
Calculation of ottoman size
First, you need to decide on the location of the ottoman. Using a tape measure, we measure the free space and determine what size the pouf should be. Next, we estimate the length and width of the individual parts.
Poufs can be of different sizes.
In the classic version, the ottoman should not be large. Standard dimensions are 350mm by 300mm, where the first number means the height, and the second the diameter of the circle or the side of the square. If a child will use the pouf, the seat can be left the same size, or reduced to 220-250mm.
There are special ottomans for children.
Be sure to reduce the height so that the baby can sit comfortably. Optimal numbers are 180-250mm. As a result, the height of the pouf should be approximately 1/5 of the height of a person, and 1/4 - 1/3.5 for a child.
Assembling parts of soft poufs
We wrap the base for the ottoman with linoleum and fasten it with self-tapping screws.
Next, the pairs begin to sew together. First, sew the side squares. The two pairs are stacked on top of each other in the following order: understudy - base (face up) - base (face down) - understudy. To the sewn 2nd pairs, the 3rd and 4th pairs are sewn in turn. The result is a rectangle, the long side of which is equal to the sum of all sides of the square. Pairs of top and bottom squares are attached to it. All seams are carefully smoothed with an iron.
Through the remaining side hole, filler is placed into the case - padding polyester, foam rubber, etc. Ottomans filled only with synthetic padding are very dented. Therefore, it is better to add any unnecessary fabric products to the padding polyester - dresses, T-shirts, towels, etc. The filler should be evenly distributed throughout the entire volume, especially in the corners. When the cover is sufficiently filled, the hole is sewn up by hand. For the side surface of the cube, you could take one rectangle instead of 4 squares. But in this case, it would not be possible to make an ottoman with your own hands in the form of a cube with clear outlines of the edges.
We wrap it in foam rubber and attach wheels to make the ottoman mobile.
For a round soft chair, a different pattern will be required. A circle is drawn on a piece of paper, the diameter of which corresponds to the size of the future pouf. The circle is divided into 8 (or more) segments. In each segment, the arc is replaced by a straight line. This makes 8 triangles. You need to draw rectangles to the base of the triangles. One side of the rectangle is the base of the triangle. The height of the ball depends on the size of the other side - the larger it is, the higher the pouf will be.
Next, proceed according to the above scheme: cut out the parts on the fabrics, put all the parts in pairs, sew the pairs along the side seams, which are steamed with an iron. The result is two hemispheres that need to be sewn together. Do not sew along the entire circumference, leaving a small hole for stuffing.
The hole for stuffing can be left in the center of one of the hemispheres. To do this, when sewing, the stitching should not reach the top of the triangles by 3 cm. You will also have to cut out an octagonal part - a lid, which, after stuffing, is sewn on by hand. On a plain fabric, a zigzag hand stitch looks good, which can be used to cover the ottoman along all the seams. You can decorate such a chair with decorative ribbon, fringe, etc. The needlewoman herself will figure out how to cover the ottoman.
Fabric selection
The choice of fabric for upholstering an ottoman is a purely individual matter. However, it is worth noting the fact that the fabric should be natural and dense. It is not advisable to use synthetic fabrics and knitted fibers for upholstery of ottomans.
The best option for making ottomans are considered to be materials that do not absorb moisture and eco-leather.
Examples of ottomans made from improvised means
To make beautiful and original ottomans, improvised means may well come in handy. Below are examples of making ottomans from a plastic bucket and an old stool.
Paint bucket ottoman
A bucket ottoman is another option for creating an original masterpiece. In order to make such a pouf, the following accessories are needed: a plastic paint bucket without a handle, rope, two types of fabric, padding polyester, buttons, a glue gun, cans of paint and lace.
The technology for making an ottoman from a bucket is as follows:
- The rope must be divided into two parts, one of which must be twisted into a spiral and painted white.
- Starting from the very top, the bucket needs to be wrapped with unpainted rope almost to the middle. When wrapping a bucket, it is important not to forget that the base needs to be glued. Having reached the middle of the bucket, the unpainted rope needs to be cut and continued wrapping with the painted rope. The bottom of the bucket should be wrapped with unpainted rope.
- Next you should decorate the inside of the ottoman. To do this, you need to cut out a circle corresponding to the diameter of the bottom of the bucket, and a rectangle 10-20 centimeters higher than the height of the bucket itself. The circle and the rectangle need to be connected to each other, and then the resulting bag needs to be lowered into a bucket, the excess fabric needs to be processed with lace.
- Using the plastic cover, you need to cut out a cardboard base to make a seat. It is necessary to lay out the padding polyester and distribute it evenly on the cardboard. On the padding polyester you need to put fabric 10-15 cm larger than the diameter of the base. The edges of the fabric need to be tucked in and secured with a glue gun. In the central part of the seat you need to sew a large decorative button. The resulting soft seat for the pouf needs to be glued to the plastic lid of the bucket. The edging part of the lid is decorated with the remains of the rope.
The ottoman from the plastic paint bucket is ready.
Ottoman from a stool
It is not at all necessary to throw away an old stool that no longer fits into the interior. You can give it a new life and this can be done literally in a matter of hours. If the stool is high, then in order to make a pouf out of it, the legs will need to be filed a little. Then you need to prepare a piece of fabric for the seat, stuff it with synthetic padding and attach it to the seat itself.
As a material for the workpiece, you can use ordinary fabric, leather or fur. Fastening the finished workpiece to the seat is done using a construction stapler or decorative nails.
As you can see from the article, making an ottoman with your own hands is quite simple. You need to choose the model you like and realize your idea, and the fantasy and imagination shown during work will help make the product original and unlike any other.
Chairs with a rigid base
A very simple and affordable way to make a soft chair is to use plastic bottles as a base. This pouf is very light but stable. In addition to several identical plastic cylinders, you need to prepare tape, hard cardboard, foam rubber, and scissors. In order to sew a cover, you will need the same materials and tools as given above.
We cut out a circle of foam rubber with a diameter of 390 mm and attach it to the top of the ottoman.
You can make your own ottoman from plastic bottles square or round. Let it be a square. The bottles, placed in a square shape, are firmly connected with tape. The plastic structure is placed bottom down on cardboard and its base is traced with a pencil, then it is cut out. You need to cut out two of these cardboard squares - for the top and bottom of the chair.
The connected bottles are placed on a cardboard base, with a second square placed on top. Attach the top and bottom to the bottles, wrapping it all with tape. One square is cut out of foam rubber to fit the top of the ottoman and 4 rectangles for the side walls. One side of the rectangles will be equal to the side of the cardboard square, the second - the height of the bottles. Foam rubber is laid around and swept over the edge. It is better to use a double layer of foam for the seat.
Next, you can start cutting and sewing the cover. To cover the bottle frame, you will need to cut 6 parts - 4 for the side walls and 2 for the bottom and top (as for a cube). The dimensions of the fabric parts are larger than the dimensions of the foam parts. To their dimensions it is necessary to add allowances for seams and for the thickness of the foam rubber. Using the method described above, all parts of the cover are sewn together, except for the lower base. The sewn cover is placed on a plastic base, the bottom is sewn on by hand. All that remains is to cover the ottoman with your own hands with a beautiful braid or decorate it with applique.
The shape of a homemade chair can be very different, not just round or square. You can also use an oval shape, it's a matter of taste. The main thing is that the streamlined shapes and soft designs of ottomans bring warmth and comfort to the interior of the apartment, taking up very little space.
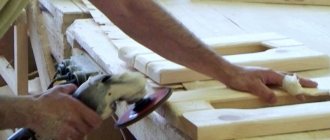
Hard frame pouf
For work you will need the following materials and a set of tools:
- Sheets of plywood or chipboard, several wooden blocks.
- Soft fabric for upholstery.
- Filler.
- Threads, needles, scissors.
- Screws.
To make a hard ottoman, you can use the following step-by-step instructions:
- First of all, prepare the frame. Two parts are cut out of chipboard for the base and top, as well as a long sheet to form the side.
- Wooden blocks are screwed onto the lower workpiece, and the frame cover is attached to the top.
- A flexible sheet of thinner chipboard is attached to the outer surface of the base, sequentially screwing the material to the bars with screws.
- Now you need to make soft upholstery.
- Blanks of the appropriate size are cut from the fabric base.
- A bag for the frame with a zipper running along the bottom of the pouf is sewn from some of the blanks.
- But the pouf cannot be left without a soft seat. Therefore, we separately prepare two fabric circles according to patterns: one should be larger in diameter.
- The circles are sewn together to form a kind of bag that needs to be filled with filler. To decorate, the circle is stitched with strong threads, making mesh-shaped seams.
- By slightly pulling the seam threads, we will give the pillow an interesting hilly look.
All that remains is to hem the pillow onto the top edge of the fabric cover.
With and without backrest
This furniture comes with or without a frame. Each individual option is unique in its own way. The frame of the products is made of wood or metal .
The top of the pouf is upholstered with foam rubber and textiles. Frame models are most often installed in hallways, corridors or kitchens. They look harmonious in classic styles.
Frameless poufs are softer and more comfortable to use. They are soft bags filled with foam rubber, holofiber or other filler. They are placed in bedrooms, living rooms and children's rooms. It is pleasant to relax on such a product after a hard day at work. Their peculiarity is that if you have free time and the necessary materials, you can make a piece of furniture with your own hands in a short time. The shape of the products can be round, triangular, or pear-shaped.
According to the classification, poufs are also divided into soft and hard . Soft ones, in turn, come with:
- With open frame. They resemble a small chair with a soft seat. Such models are budget-friendly and easy to make on your own. Their frame can be wooden or metal.
- With a closed frame. Outwardly they look like large pillows. Their frame is upholstered on all sides with textiles. They can be equipped with legs or furniture wheels. The shape of the products is most often round or square.
Rigid models are made of wood and decorated with decorative trim . They are used not only as a seat, but also as a coffee table.
By type, ottomans are divided into:
Banquettes. They are found in hallways and are used as additional seating. Their height does not exceed 40 cm .
As for the appearance, shape and decorative finish of the bench pouf, there are no restrictions.
- Bedside products. They are installed in bedrooms and are made in the same style as the bedroom set.
- Pouf-box, chest of drawers. Such models are equipped with additional storage space. They have drawers or shelves in the interior space.
- Transformers. Their characteristic feature is their ease of transformation into a chair, bed or other piece of furniture.
- Poufs with back. They look like armchairs, but they do not have armrests.
Options
Ottomans are made in various shapes and materials for external decoration. For a small hallway, you can make an ottoman with a built-in cabinet for storing shoes; for a child’s room, a soft ottoman.
The pouf looks very respectable as part of a furniture set made of leather. Photos of various ottomans, including handmade ones, are presented on this page.
Round or square?
The shapes of poufs differ depending on their purpose . They are:
rectangular;
But round and square products are considered the most in demand and popular:
- A square pouf will harmoniously fit into any interior of a hallway, living room, or bedroom . This furniture is divided into frame and frameless. They will not only decorate the room, but also make it as cozy and easy to use as possible. Such furniture items are used as additional seating or as a footrest. If you make a product with a hinged lid, you will get additional storage space for personal items.
- The round pouf looks beautiful in bedrooms, living rooms and children's rooms . They are distinguished by a soft base and interesting designs. Rounded shapes smooth out the angularity of the interior and visually increase the space.
Design features
According to their design features, poufs are transformable . That is, with the help of special mechanisms, they turn into:
A folding bed. Such models can be put forward according to different principles. A folding pouf is suitable for both small and spacious apartments. It will not be possible to completely replace the sleeping place with it .
But it will be useful if you suddenly have overnight guests. During the day, such a piece of furniture is used as a seat; at night, it can replace a bed for one person.
Of what?
You can make a beautiful and practical ottoman with your own hands from different materials.:
Plastic bottles. The products are characterized by wear resistance, the ability to withstand heavy loads, environmental friendliness, fast production times, and minimal costs.
Plastic bottles act as the frame of the furniture item, and the cover is sewn from textiles.
To make the pouf as comfortable and soft as possible, a foam rubber lining is placed between the bottles and the fabric cover..
The shape of such a pouf is most often made round. Its cover is made from fabric of any color. You can decorate furniture with buttons, fringe, and lace.
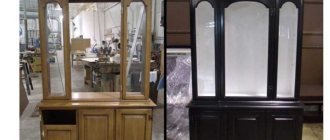
Chipboard. This material is easy and simple to work with. The pouf can be made entirely from chipboard, or it can be covered with textiles on top.
The positive aspects of such furniture include: durability, reliability, affordable cost, wide selection of textures and colors. The pouf can be upholstered with: leather, leatherette, chenille, jacquard, velor.
As for upholstery materials, they are selected according to the overall interior of the premises. Velor and velvet are considered the most popular fabrics . They are pleasant to the touch and can add a special charm and warm atmosphere to the room. But this fabric is quite difficult to care for.
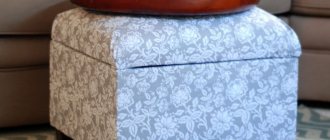
How to make a stylish ottoman cover with your own hands
There is absolutely nothing complicated in making a stylish and high-quality cover for an ottoman. Anyone can make it, even a novice needlewoman. The main thing in this painstaking work is to clearly measure the dimensions.
To make a case you will need:
- Matter (type depends on preference);
- Needle and thread;
- Adhesive tape (you can use a zipper if desired);
- Decoration elements.
Using the measurements, cut out the blank for the lid, not forgetting to leave a few centimeters in reserve. Cut out the side blank. Its width should be equal to the height of the accessory, and its length should be equal to the width of all four sides in total. In this case, it is necessary to leave an allowance of 5 cm. You need to sew a ribbon or zipper to the narrow part of the workpiece. Sew the blanks, stitch all edges so that no threads stick out from the material. Decorate the resulting seam lines with decorative elements.
This is a simple way to decorate an ottoman with an original handmade cover! The advantage of such a case is a wide selection of materials, decorations and colors that you can choose according to your own taste.
An ottoman made with your own hands will become a luxurious addition to the interior, playing the role of not only original, but also useful decor! The creative work itself will not cause much trouble, but on the contrary, the author of a stylish ottoman will have a lot of fun while making it. Without spending a lot of effort and time, you can enjoy a luxurious accessory for many years that will fill your home with comfort and beauty!
Style and design
To give the room an original and exclusive appearance, the pouf should be made bright and colorful.
For children's rooms, rich colors of blue, pink, and turquoise are chosen. Of course, it must be in harmony with the overall interior. You can also decorate a piece of furniture with beads, rhinestones or embroidery.
For classical motifs such as baroque or rococo, it is recommended to attach curved or carved legs to the product . Their upholstery is made of velvet, velor or leather in subdued neutral tones.
For the high-tech style, a metal frame is taken as the basis, the seat is made of artificial leather. Their legs are shaped like arcs and painted chrome.
The minimalism direction requires a minimum of decor and ornaments.
How to quickly make it yourself at home?
A large soft pouf easily takes the shape of a person resting on it. It is quite easy to sew it yourself. To do this you need:
Decide on the design of the product.- Prepare supplies.
- Make a pattern.
- Assemble the frame.
- Perform decoration.
As a result of your efforts, you will get a stylish piece of furniture on which you can spend your leisure time.
You can make a large soft pouf with your own hands in the form:
- Pillows. This product does not hinder movement, takes on various shapes and is quite comfortable to use.
- Ball. It has a round shape, with a diameter from 35 to 100 cm. It will fit perfectly into the interior of a child’s room or living room.
- Pears. This is the most convenient and common model. The product easily takes the shape of a resting person. The pouf is sewn from velor, artificial leather, leather.
Large soft pillow consists of two elements:
- Internal container with filler. For these purposes, fine-grained balls made of foam polystyrene, foam rubber, and padding polyester are used.
- External cover. It is made of wear-resistant and durable fabric. If necessary, the cover can be easily removed from the product for washing.
Material selection
What fabric to sew from?
Having decided to make a soft pouf with your own hands, you need to carefully consider the choice of consumables. Durable, wear-resistant and practical materials are used to sew covers :
Velours. It is characterized by a silky texture, soft texture and a wide color palette. But this fabric is difficult to care for .
Stains are difficult to remove from its surface, which is why it is not recommended for use in kitchens and children's rooms.
What to stuff it with to make it soft?
As for the filler, the following are used:
- fine-grained foam beads made of polystyrene foam;
- foam;
- rubber sawdust;
- padding polyester
Scheme, drawing, pattern
Before sewing a soft pouf, you need to make a drawing and pattern in advance. The drawing indicates the dimensions of each individual part, sewing materials and filler . The pattern is drawn on wide paper. It consists of:
- four side parts;
- two circles.
All paper details are cut out along the contour and transferred to the fabric.
Crafting tools
To make a pouf you will need the following supplies and tools:
- sewing machine;
- fabric for cover and lining;
- filler (sintepon);
- threads;
- scissors;
- pattern paper;
- decorative elements.
Assembling large upholstered furniture step by step
The pouf is assembled in the following sequence:
The two side parts are connected and stitched on one side.- The same is done with the remaining side parts.
- The side parts are sewn together. Don't forget to leave a small hole for the filling.
- The workpiece is turned right side out.
- Through the side hole, the product is filled with padding polyester and the hole is sewn up.
- Using the existing pattern, but with a small margin, we sew a removable cover. A zipper is sewn into the side or bottom so that the cover can be easily and quickly removed.
That's the whole process of making a large pouf yourself. Making it yourself is quite simple. This will require two to four meters of fabric, filler, a sewing machine and some free time. As a result, you will get a stylish and original piece of furniture that will be comfortable to spend your evenings with.
To give the product a decorative appearance, it can be trimmed with ruffles and lace . Beads or seed beads and other decorative elements.
Drawing with dimensions
Before you start making an ottoman with a chipboard lid, you need to calculate its dimensions in advance, select manufacturing materials, and think through the design. After this, it is recommended to make a drawing with all dimensions on a piece of paper.
Tip : Having a drawing will simplify the work process and will prevent you from mixing up parts or spoiling consumables.
Master class on carriage screed step by step
When making a pouf from leather, it is recommended to use the carriage tie technique:
First, the ornament is selected.- Next, a sketch is drawn up with a diagram of the location of the buttons.
- After making the base of the pouf, foam rubber is glued to the plywood using glue.
- The carriage screed is marked on the foam rubber. The holes according to the markings are made with a drill .
- After the preparatory process, the padding polyester is stretched over the foam rubber and holes are made again.
- The entire structure is covered with upholstery material and fixed on the reverse side with a stapler.
- The material should be pulled neatly and evenly . There should be no folds or irregularities on it.
- In the places where the buttons are attached to the fabric, neat holes are made using a drill with a thin drill bit.
- Now we move on to the stage of sewing on the buttons. A thin wire is attached to them, which is pulled out from the reverse side and fixed with a stapler.
A pouf in the house is beautiful, comfortable and practical: