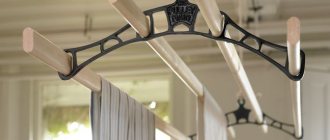
How to make a wooden hanger with your own hands? It's very simple, we'll tell you how. It would seem, what is a hanger in the house? Almost no one notices it, even though it is quite a significant and functional item. You will be surprised how you can improve it, and even do it yourself. There are no special skills required, so anyone can do it.
Materials for work: what kind of wood to make a hanger from
Depending on the type of hanger, we may need different materials for work. There is a general handy list that will be quite useful for any of the jobs in this category. The arsenal of tools looks something like this:
- The material from which the hanger is made.
- Self-tapping screws.
- Screwdriver.
- A grinder saw that can be used to cut the required parts of a hanger.
- Dowels, if the structure is wall-mounted.
- Screwdriver or drill (preferably electric).
- Level, tape measure, pencil.
- Sandpaper for cleaning the surface.
- Hooks.
Stone staircase
It is stationary and is usually laid on the outside of the pool bowl; the stone staircase looks very beautiful and will decorate any pool. But if you build a stone staircase inside the bowl, then over time the steps of the pool will become covered with plaque, will slide and pose a danger to vacationers.
ADVICE!
To ensure safety, handrails made of stainless steel or aluminum must be installed on the sides, and the steps themselves are finished with slabs with anti-slip notches.
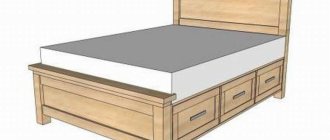
DIY floor wooden hanger
Wooden things have always been of high quality and durable, as well as useful in everyday life. This also applies to hangers, so we will now try to build a wooden floor hanger with our own hands. This work will not take us much time. You will need approximately 20 free minutes, as well as all the necessary materials.
To create a wooden floor hanger we will need:
- Six tribes (copper).
- Four tees (copper).
- Four plugs (must be the same inlet diameter).
- A wooden round stick of the same diameter. The total length should be 5.3 meters, cut into parts: 2 pieces of 125 cm, two more of 70 cm, 4 pieces of 20 cm, and the last 6 of 10 centimeters each.
The process is very simple. Following the drawing plan, we must assemble all the structural elements. To make the task easier, they are marked with letters in the figure.
- "A" - 125cm.
- "B" - 70cm.
- "C" - 20cm.
- "D" - 10 cm.
To further secure our floor hanger, use wood glue. Copper inserts will look interesting; on the one hand, they will attract attention, and on the other, they will be quite durable in use.
Related article: Horizontal plastic blinds: design, advantages, care
Website about the dacha
01/11/2019 admin Comments No comments
Homemade products from PVC pipes
It is unlikely that PVC pipes, which are used mainly for drainage and sewerage, are somehow connected in your mind with creativity and creative ideas. But it’s time to start thinking differently, because with their help you can improve your storage system, organize your workspace, decorate your home before the holidays, decorate a wine bar, make a frame for a bed, and even make a table lamp.
Homemade products from plastic pipes are easy and simple to make. But all sorts of useful little things last for a very long time, because plastic is not subject to corrosion and is resistant to various types of influences.
Shelves and racks are quite easy to assemble:
Country tables and chairs for outdoor use
Many people have a question: “is it possible to replace PVC pipes with polypropylene pipes?” You can use polypropylene pipes, only in this case we will also need a soldering iron.
Advantages of PVC pipes: - snow-white color; — pipes can be connected to fittings using glue, or without it at all; - if you do not use glue, the structure will be collapsible, and like a LEGO constructor, you can use fittings and pipes to assemble other structures. Of course, polypropylene pipes are deprived of these advantages
Camping folding chair
The author of the idea, who is very respectful of music, as well as art in general, proposed creating original furniture from scraps of plastic pipes and other building materials. So, using pipes in the form of legs and fixing glass on top, he got a magnificent coffee table. The basis for the chair was also parts of pipes folded in the shape of an organ, combined with a soft top made of dense bags with foam-paste crumbs inside. And how exclusive the bed turned out to be.
What about a crib? In my opinion, this is simply brilliant!
Children's 2-tier bed
The playpen can be filled with balls and the baby will have no limit to his joy. And the material for making this playpen is ideal - because the polypropylene pipes are soft and the child will not hit himself if he accidentally falls on them.
Basket for trash and dirty laundry
Clothes dryer made of PVC pipes.
Tell me, where do you dry your laundry and clothes at your dacha? And if you also have a swimming pool, then this design is absolutely necessary for drying towels. Tight ropes are somehow a thing of the past. A little work and here you have a clothes dryer made from scrap materials
holder for small items
Embroiderers are also not forgotten: an embroidery frame and a machine.
Please have a minibar at your service
Lovers of creative lamps outdid everyone:
Our smaller brothers are not forgotten either:
And here the sewer pipes came into use. And the cat can mouse at any time.
DIY bird aviary made of plastic pipes
Hanging swing for a summer house
Fences and enclosures made of plastic pipes
A trellis for grapes made of plastic pipes that will always have a pleasant appearance.
You can make hydroponics from plastic pipes; you can use any pipes (including sewer pipes)
Collapsible outdoor tents and tents made of plastic pipes
A greenhouse made of PVC pipes will serve you for many years, it does not need to be painted, and it will not rot or rust, as usually happens with greenhouses made of wood and metal.
It is most advisable to make a greenhouse from PVC pipes, giving them an arched shape, since this design eliminates sagging of the film and increases its service life. A homemade greenhouse made from PVC pipes can be covered with either polyethylene film or polycarbonate. Such greenhouses are not suitable for all-season use, but they are quite suitable for early spring and late autumn growing of berries, vegetables and herbs
Or make a pen for chickens
By attaching the wheels, we get very convenient carts.
Children's car made of plastic pipes
Carports made of plastic pipes
As you can see, plastic pipes can be used in any industry (and not just for their intended purpose), and where exactly to use them depends on your imagination.
DIY wooden wall hanger
An integral part of any corridor, as well as an item that is simply necessary in every apartment.
You can build a wall hanger yourself using all the necessary tools. The material options can be different, the best of course is wood. For the “cheaper” option, you can use chipboard.
The tools that we will definitely need are:
- Screwdriver or screwdriver.
- Drill.
- The set was drilled.
- Roulette with a pencil.
- Hooks.
It is very simple to do - just measure the required distance and drill hooks to the board, and then hang the finished hanger on the wall. But there are more interesting options for such crafts.
New life for PVC pipe scraps
It is necessary to connect pipe fragments using the same components as when installing a water supply system. In this way, you can make not only a hanger, but also any useful item that requires a frame (the finished frame of the structure can be sheathed with other materials to get a more functional product) - for example, a children's play tent or a clothes dryer.
Making structures from PVC pipes is especially suitable for those craftsmen who do not have woodworking equipment - for such an interesting activity you only need a knife and glue. In this case, it is not at all necessary to use leftover materials - the required length and diameter of PVC pipes and components for them (elbows for connections, plugs) can be purchased at a hardware store at a very budget price.
Do not dispose of pipe scraps after repairs
Hammer wall hanger
In this craft, we will need everything the same as in the previous version, only instead of hooks we will use old hammers, from which we will need to cut off the handle, leaving a short end, which we will attach to the board.
Progress:
- We are preparing a board that will serve as a wall hanger. Depending on its condition, we bring it into ideal shape. If necessary, we sand and varnish.
- Then we lay out the hooks and mark with a pencil on the board exactly where they will be attached. They don't have to be in a row. You can arrange them in a zigzag or checkerboard pattern.
- After this, we need to mark with a pencil the points where there will be places for self-tapping screws. Therefore, we put the hooks on the side and directly drill the required holes.
It is important to note that the drill should be approximately 1-2 millimeters smaller than the diameter of the self-tapping screw. Of course, you don’t have to make preliminary holes, but this threatens us with cracking the surface when screwing in, and then the work would take much longer and more difficult
- We attach our hammer hooks in place.
- Additionally, there is an option to make a shelf so that you can place a scarf, hat, and other small things there. This is done as follows:
- Measure the same distance on both sides, attach the bracket and mark the required holes for fastening.
- Drill and install the bracket.
- The final part will be attaching the structure to the wall. Here the technique will be similar - mark the place and drill a hole. The drill must be the same size as the dowel.
The approximate time it takes to actually make a wall hanger is about 2-3 hours (this includes the shelf).
Assembly steps
First, we determine the dimensions of our future rack. Here are some recommendations:
- for storage rooms, the height of the shelf should be at the ceiling, the depth should be at arm’s length (to make it convenient to reach the item);
- if the rack can be approached from both sides, then its depth can be increased;
- for storing tools: height – 2 m, depth – 50 cm, number of shelves – 4, distance between them – 45 cm;
- for storing canned food, the step between the shelves can be reduced (up to 30 cm), and their number can be increased.
Typically the dimensions of the shelf are:
- 180x50 cm – with 4 shelves;
- 200x60 cm – with 3 shelves;
- 180x50 cm - with a high bottom shelf, the rest - in increments of 35 cm.
Of course, these dimensions are not absolute; they can be changed when making them yourself.
When this stage is completed, prepare the drawing. As a last resort, a diagram. But be sure to indicate the dimensions that need to be maintained during assembly.
When this documentation is ready, production can begin.
- Cut the profile into equal sections. If this does not work, bring it to the desired length by grinding the end of the workpiece.
- Clean off burrs and chamfer.
- If the pipes will be connected with fittings, the protective varnish must be removed from the ends of the workpieces. To do this, use sandpaper again. In addition, a rough surface adheres better than a perfectly smooth surface.
- Start assembly with the vertical posts. Then connect them with cross beams. Fasten the parts together in the desired sequence. The method of fastening depends on the material of the workpieces and the type of connections.
- Be sure to use a level - the product must be level. The more often the checks, the fewer errors.
- Using this method, assemble the entire frame.
- Install shelves. If the fastening is through, then the frame is assembled to the height of the lower shelf, which is then placed on the pipes. After this, grow the frame to the desired height.
- If the bookcase is high, secure the top crossbar to the wall with anchors.
- Once the shelving is assembled, paint it. Preferably in several layers.
The structure is ready. Both plastic and metal shelves are assembled using this system. A homemade rack does not have to be rectangular; it can also be made angular. The general assembly technology does not change.
And finally, an important tip. Load both factory and homemade shelves correctly. Place heavy things on the lower shelves, light ones on the upper ones. Periodically inspect the fastening points, because this is where destruction begins.
To learn how to make a shelving unit from pipes in a loft style with your own hands, see the following video.
Extraordinary ideas for a wooden hanger
Floor and wall hangers are considered classics, but when you want something unusual or creative, you can consider the following design options.
- A collection of things that is similar to an exhibition from the world famous TV series with Carrie Bradshaw. The idea is that when you get into the corridor, you don’t spend a long time rummaging about which hat or scarf to wear today, but simply choose from the things hanging out.
In order to turn your idea into reality, you will need a free wall in the corridor and ordinary hooks. This will become not only a kind of interior design for the corridor, but also an extraordinary approach to solving the issue of hangers.
- With the help of different types of hooks, you can emphasize a particular interior style, be it classic or modern.
- Believe it or not, the most seemingly inappropriate items can be hangers. A very unusual approach would be to use old pitchforks or rakes in this matter, playing with them to suit the desired theme. You just need to cover the sharp ends with it first, so that neither you nor your guests get hurt.
- Fans of hiking and traveling can use old skis or oars as hangers.
- Old chess pieces will serve as an original substitute for ordinary hooks.
- In a vintage style, you can use old doors to create a coat rack, perhaps even with nails instead of hooks. Of course, you will first need to treat the surface, but imagine the idea itself already in execution. Quite shocking, especially if you work on the small details.
In this idea, you can also use an old fence instead of doors.
- The motif of a tree on which hooks for things are located has become popular today. It can be cut out of a piece of wood, or simply painted on the wall, placing hooks on the branches.
Pipe connection methods
To make any structure from pipes, you need to know how to fasten parts. Sometimes polypropylene pipes are fixed to each other using a welding machine (if you don’t have one in your arsenal, you can try renting one). But not everyone can handle such a device, so you have to look for other ways to connect PVC pipes.
Table 2. Options for connecting plastic pipes
| Variant, illustration | A comment |
| This method involves connecting one end of the pipe to the other through an extension and a rubber seal. Despite the fact that formally the structure remains collapsible, it is undesirable to move the pipes after assembly because the connection is too rigid. Sometimes rubber seals are additionally coated with sealant to make the joint monolithic. |
| This is the most popular way of connecting parts of a product to each other. For such purposes, only strong glue is used. It is best to use silicone sealants, as they give the structure some flexibility, and the pipes will not crack at the joints if moved awkwardly or dropped. |
Master class “Hanger made of real wood”
The word “wood” does not mean just wooden material (board), but pieces of real natural wood. Oak chocks are best suited for this work, perhaps even with knots, which will serve perfectly instead of banal hooks.
Progress:
- The first step is to get the decks and cut them in half to the required sizes. It is best to do this outside the apartment, because sweeping out all the garbage will be quite difficult.
- To find out the optimal sizes of the required logs, make blanks approximately 15*15 centimeters, the diameter of the branches no more than 3-4 cm.
- One side of the chip will need to be leveled with an electric plane.
- The next stage of the process will be preparing the surface for use. It would be a good idea to treat the tree with special agents against fungi and insects. It is best to coat the top with a clear varnish to preserve the natural color. Of course, you can also apply paint, which will look much more interesting.
- Self-tapping screws will help you mount our hanger to the wall. First you need to drill a chamfer, then prepare a hole. The diameter should match the screw. This precaution will help prevent damage to our product.
The hanger will undoubtedly attract attention and also brighten up the boring atmosphere of the room. Most often, this option is placed in a country house or in a country house, less often in apartments or mansions.
Primary requirements
In modern realities, no one considers a swimming pool as an attribute of luxury. If a capital stationary “reservoir” was not built in advance, then with the onset of heat, many install inflatable structures.
A ladder is a mandatory addition to the pool, ensuring safe immersion in the water and comfortable exit from it. However, many residents strive to purchase or create with their own hands not just a reliable staircase, but a surprisingly attractive design. An elegant original staircase will become the best decorative element.
Specialized retail establishments offer a wide range of pool accessories. In them, you can select acceptable models of stairs, but this option for solving the problem cannot be called rational.
The process of constructing a ladder for a frame pool with your own hands allows you to save money and get not a standard “product”, but an original ladder that will fit perfectly into the landscape design.
To carry out all subsequent work, you need to prepare high-quality material that will allow you to create a product that meets safety requirements:
- all individual parts and the entire assembled structure must be durable, capable of supporting even the heavy weight of swimmers;
- the place of descent must be equipped with lighting fixtures, or the staircase must be installed so that the level of illumination is maximum;
- the surface of the structure must have anti-slip characteristics to prevent slipping, which often causes injuries;
- ease of use (the process of descending or exiting the water should not be accompanied by problems);
- long service life (with this characteristic, the product can be used for many years without the need for repair or replacement).
Photo of wooden hangers in the interior
As you can see, you can make a wooden wall or floor hanger - for clothes or jewelry, for children and adults, for a dressing room or for a hallway. This could be either a classic or some unusual hanger made of wood - from skis, hammers, old things, a fence or doors, from pallets and so on. The main thing is to use your imagination, and for inspiration I suggest looking at photos of various wooden hangers that you can make with your own hands.
We can conclude that there are quite a lot of options for hangers, as well as ideas for their implementation, and each of them is unique in its own way. Therefore, choose which of the ideas will best suit your home and start making your own masterpiece. Drawings and available materials will help you with this. The main thing is to have an original idea and the mood to implement it.
Decoration
Unusual design can transform anything, even an ordinary one at first. To ensure that the furniture has a classic design, it is enough to cover it with artificial, natural leather or a substitute. In the case of wooden structures, you can preserve the original design of the material, making it more expressive with the help of stain or clear varnish. It is permissible to tint coat hooks with silver, gold or bronze paint, and cover the hangers with satin or velvet.
To decorate in a country style, it is permissible to use additional decorative components, for example, carving horns from wood. In order for the product to be made in a retro style, its color can be aged. When they want to decorate a hanger in a Provence style, they use decoupage techniques. Images of birds, flowers and landscapes are glued to the product. The final design depends only on your imagination. It’s not difficult to come up with something original yourself using glue, sequins, beads, ribbons, cords, etc.
Metal staircase
It is an excellent inexpensive option for both large and small pools. Installation of a ladder into a pool can be attached to the bowl, or it can be mounted. They are made of alloy and black steel and have anti-corrosion properties. This staircase is easy to maintain and affordable.
IMPORTANT!
During operation, low-quality metal will begin to rust. Before purchasing, you need to familiarize yourself with its composition. The more nickel it contains, the more reliable and durable the metal.
Useful tips for making crafts from plastic pipes
When making a structure, you must follow the advice of experienced specialists:
- The special glue used to join pipes is quite expensive. When you have to build a three-dimensional structure, you have to spend a lot of money. Therefore, it can be replaced with a conventional composition for attaching plastic - such glue is not inferior in strength, but at the same time has a budget cost.
- Despite the fact that most designs are quite primitive, it is recommended to first draw a drawing of the hanger. This will allow you to follow the instructions and not get confused in the details.
Simple drawing of a hanger
- Although PVC pipes are not toxic, this is difficult to say about some types of glue, so protective gloves and masks must be used when assembling any structure. Experts recommend installing plastic pipes outdoors.
- There are a large number of pipes on sale with different characteristics that should be studied before purchasing material. For example, pipes with a metal base are more durable, so this hanger will be more stable. But, they are susceptible to corrosion and are not suitable for outdoor structures.
- To obtain different bends, certain sections of the pipes can be heated and then shaped. An electric stove, hair dryer, and even boiling water are suitable for such purposes.
- As we said earlier, to obtain greater stability, you can pour sand into the pipes, but this option is only suitable for small products. Sometimes, to make them heavier, craftsmen place pieces of reinforcement inside. This may be necessary in cases where the design involves installation in the ground.
You can bend pipes using heat
Important! Before cutting a solid pipe into parts, it is necessary to double-check the correctness of the marks several times. Otherwise, you can only ruin the product.