Communities › Do It Yourself › Blog › The simplest DIY furniture door.
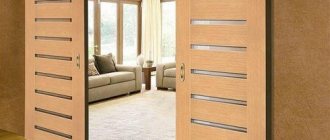
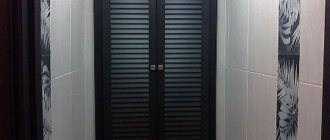
Hello friends. Many people like to frequently change the interior of their home. I offer you a relatively inexpensive way to change the facade of any furniture. This method of producing doors will also be useful to you in the production of any cabinets, mezzanines, etc. and so on. For example, almost all the furniture in my house is made by hand. The only thing you need to do is take the dimensions and order the material from an organization that produces custom-made furniture. Transportation and assembly, I think, is not the same and difficult task, for which you sometimes have to overpay two or even three times. I hope it will be useful to someone. Moreover, it looks no worse than factory furniture. Colors and sizes, you choose everything YOURSELF. For me this is a very big plus. Enjoy watching.
How to choose glass hinges
Important factors to consider when purchasing a glass door pivot kit:
- maximum door opening angle:
- sash thickness and dimensions;
- weight of the glass sheet (and decorative decorations);
- appearance of the front part of the loop;
- complexity of installation (with and without drilling).
Don't skimp on accessories. Buy models from well-known manufacturers with built-in door closers.
MDM-Komplekt is an Italian company that has been supplying high-quality furniture fittings to Russia for many years.
Tags: DIY furniture door
Comments 27
My friend, 99% of those sitting here have such furniture. What are you talking about?
What is this argument about 99%? As our teachers said at school - “if everyone is bent off the roof, you too will jump”? I am for changing Soviet thinking and striving for better. And it’s not necessarily more expensive; Ikea also has quite affordable wooden furniture. And you can do it yourself without any problems. I made a cabinet like this from furniture panels, and the paneled doors are for sale... Four years ago it cost me, I think 8 thousand, and this is a normal product, not shitty furniture made from toxic glue and sawdust!
Normal wooden furniture cannot be afforded by the common man. And it’s not so easy to do it yourself for a person who doesn’t care about it. And I didn’t understand at all about Soviet thinking. What, in the Soviet Union they made such furniture as they do now? Look at some grandma’s house, there’s a hundred pounds worth of some kind of heavy-duty wooden chest of drawers. And the varnished walls were already closer to the collapse of the USSR and there was no choice. What does the scoop have to do with it? Should I write something against it? I don't understand.
and at first I thought: you sawed, trimmed and glued yourself...
A good option to update the facade
The door weighed 2 kg, became 3 kg))
There is no way to upload the video, unfortunately, so I apologize if my question was answered there, what did you use to cover the casing?
What do you mean?
Normal topic. I think that regular trim made from sawdust in film can also be used, you just need to cut it carefully. If I can’t think of anything else, I’ll decorate the mezzanine like this.
Well, assembling such a façade at home is also problematic. A frame profile made of MDF is produced by AGT; it can be assembled in two ways or using plastic butterflies, but this requires a special router, and it is not cheap. Or using a pneumatic stapler on pins is also a rather specific thing and not everyone uses it on their farm. I’m telling you as a former furniture maker. So the only option left is to order a ready-made facade. And as far as I know, the cost is also not cheap. Although now most furniture makers work for the sake of work. Almost no gain. I did it a little differently. I bought all the materials myself and went to familiar furniture makers, sawed, cut, assembled myself. In this case, you can save money, but not too much.
I also thought it was a framer) but no) it’s an imitation of a framer, you can clearly see it in the photo. the profile is simply glued to an ordinary chipboard part
Then yes. Cheap and cheerful. At least change the frame every year when you get tired.
I also thought it was a framer) but no) it’s an imitation of a framer, you can clearly see it in the photo. the profile is simply glued to an ordinary chipboard part
This photo just didn't load for me. Fucking Chinese phone industry.))))
Well, assembling such a façade at home is also problematic. A frame profile made of MDF is produced by AGT; it can be assembled in two ways or using plastic butterflies, but this requires a special router, and it is not cheap. Or using a pneumatic stapler on pins is also a rather specific thing and not everyone uses it on their farm. I’m telling you as a former furniture maker. So the only option left is to order a ready-made facade. And as far as I know, the cost is also not cheap. Although now most furniture makers work for the sake of work. Almost no gain. I did it a little differently. I bought all the materials myself and went to familiar furniture makers, sawed, cut, assembled myself. In this case, you can save money, but not too much.
What determines the choice of hinges for glass facades?
Essentially there are two options:
- Install regular glass or mirror as doors. First, you need to grind the edge around the perimeter of the glass. In order to avoid injury from the edge during installation and further operation. Sanding gives a matte finish but costs less. Polishing the end of the glass is more expensive, but it also looks more beautiful and presentable. For hinged facades, glass/mirrors with a thickness of 4-6mm are used.
- Frame the glass. A frame facade with glass looks better and is more practical to use. The frame can be solid (for example, made of MDF) or prefabricated. If the frame facade under glass is assembled from laminated chipboard, MDF or solid wood, then ordinary furniture hinges are installed on it - overhead, semi-overlay, internal, corner, etc. A frame façade with glazing can be assembled from an aluminum profile. Your own specific furniture hinges are installed on the aluminum frame, with fastener adapters for wide and narrow profiles. Hinges are also divided into types (overhead, inset, semi-overhead, etc.), depending on the design of the box.
Preparation
In order to make cabinet doors, you will need:
The first step is to decide on the door design, which depends on the existing interior.
What can it be made from?
The choice of material depends primarily on the availability of tools and the style of the room. Cabinet doors can be made from:
Dimensions
The size of the door depends on the existing frame (this is also true for built-in furniture).
If the height of the cabinet is about two meters, it is better to make two high doors and two small ones for the mezzanine.
A monolithic high door can be made only if the material is sufficiently dense and rigid . In this case, an additional hinge is attached to one door for reliable fastening and smooth opening and closing of the door.
Calculating the exact size of the door is quite simple. To do this, you need to take the external parameters of the base and add 1.3 cm to them.
Loops
The choice of fasteners depends entirely on the selected material.
Semi-concealed hinges are suitable for plywood sashes, which do not require special groove cutting. For denser materials, conventional hinges for swing structures are suitable:
The simplest in terms of fastening are overhead hinges using self-tapping screws, which are already included when sold. If you have the appropriate tools, you can install European cup hinges with closers, i.e. soft closing system.
How to correctly determine door dimensions
Now you know what size my doors are, but I would like to give you some tips so that you can decide on your sizes. The calculation is quite simple. Take the width of the cabinet door opening and divide by 4. Then subtract 1.25 centimeters from the width of each panel and 2 centimeters from the bottom.
How to sharpen scissors: unexpected uses for ordinary aluminum foil
Create a wow effect: stylish trendy textiles in the interior 2021
Celebrities who post strange things on their Instagram account
Each panel consists of 4 parts, called a top layer and a bottom layer. They are joined together to create one panel. The reason for the two layers is so you can secure the panels together with screws on top.
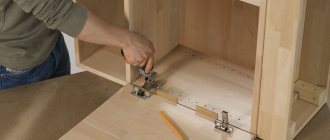
Making at home
Accuracy is the key to obtaining a high-quality and beautiful product, so each stage of production must be as prepared as possible. The selected material for the door is installed on a flat surface of a workbench or regular table and secured.
Marking
After carefully measuring the cabinet, it is necessary to apply markings to the material sheet. To do this, you need to draw several dots or dotted lines along which the cut will follow. If you are not sure that the cut will be smooth, you should connect the dots to obtain a smooth, uniform line.
Cutting parts and processing
A circular saw with a well-sharpened blade is used to cut out the part or parts of the required size.
The nicks and irregularities formed at the cut site are eliminated using a grinding machine or ordinary construction sandpaper.
Using the grainy surface of the sandpaper, you can create a beautiful 45 degree cut to make the doors look more elegant.
If the work is carried out efficiently, you can begin decorative design; for this, the wooden surface is covered with stain or paint , preferably in two layers. The door is left to dry in a dry, well-ventilated area for one to two days. After this, it is better to varnish the door in order to preserve the coating as much as possible for a long time. The more layers of varnish are applied, the more glossy the effect appears.
Showcase cabinet: preparation of grooves
Set the circular saw fence and blade height to cut a 5mm wide and 15mm deep groove in two passes on the back of the face and door lintels.
Then you need to do the same in the racks, without changing the installation of the tabletop circular. Finish the grooves approximately 25mm from the door posts and 37mm from the ends of the face posts. Later, when the frame is assembled, you can trim the back side of the profiled edge with a rebate bit.
Select four face frame studs and label them as the side of the wall.
Take four more face frame posts and label them as the side of the door. Mark the remaining posts as the back corner. Process the ends of the racks in accordance with the drawing.
Installation
The final stage of door manufacturing is connecting the leaves directly to the frame itself.
To do this, you need to screw the hinges onto the door using self-tapping screws. The loops should be evenly . So, if the height of the door is one meter, then the hinges are screwed at a distance of 5-7 cm from the bottom and top, and one - exactly in the middle.
The greater the height of the cabinet, the more hinges will be needed for the mechanism to function flawlessly.
At the next stage, you need to attach the door to the pre-applied markings and screw the second part of the hinge. You should not immediately tighten the hinges too much, because after installing the door or doors, you need to adjust the doors.
The structure is aligned along the bottom and sides. Using a screwdriver, you can tighten the hinges so that the door “sits” evenly, without distortion.
The final touch is to remove marker and marking residues using a solvent. The hinge mechanism will take some time to develop, so the opening and closing process may be a little tight.
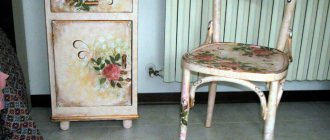
If you have already mastered making doors and want new feats, we suggest looking at other options:
Make a base
1. Process the material for the manufacture of the front and side boards of the base O, P . Saw off the front board to the specified length, and leave an allowance of about 25 mm on the side boards.
of 25 mm into the collet of the router fixed in the table, make roundings on both ends of the front board O and one end of each of the side boards R. Then mark and file the bevels on all three pieces (Photo I).
Mill the roundings at the ends of the base boards O, P, then mark and make bevels. The side boards will be sawn to final length later.
Place the front base board O on the bottom panel at a distance of 16 mm from the edge, aligned to the center, and glue, securing with clamps.
3. Mark the cutout on the front board O in accordance with the template (Fig. 2) and cut it out, leaving a small allowance. Sand the edges smooth and make 3mm fillets on the bottom edges of the legs and the bottom edges of the side boards P. Finish the base parts with 220 sandpaper.
4. Place the bottom panel L/M/N on the stands, upside down (photo J ). Glue the front base board O to the underside of the panel (Fig. 2c).
5. When the glue has dried, attach the side boards of the base P board O and place marks on them flush with the ends of the side plates N. Saw the side boards to the final length, glue them in place and secure with clamps.
6. Cut out the rear gussets Q and the front bosses R of the specified sizes and shapes. Make 10mm chamfers on the front bosses for installation of clamps. When the glued base has dried, glue the gussets and bosses into place, securing them with clamps (Fig. 2).
How to make a glass cabinet door
You need to buy glass of the required thickness , but it’s better not thinner than three millimeters, and mark the doors to the required size using a metal ruler or strip (here you will need the skill of using a glass cutter). Next, the ends will have to be sanded for a long time with sandpaper of different numbers, starting with coarse grain and ending with zero grain. It’s easier, of course, to order glass with already processed edges from a glass workshop. Now you need to glue the handles onto super glue . The door is assembled in the kitchen cabinet using special fittings with clamps , which are included in the kit, or which can be purchased. The clamps are usually sealed with rubber or plastic gaskets and crimp the glass using hex key screws.
Here is an example similar to doors, but the principle is the same:
Glazed facades are one of the ways to decorate furniture, because stained glass, glass with a matte pattern and relief can be used as glazing. Also, glazing furniture adds practicality: transparent doors allow you to see everything that is on the shelves. At the same time, souvenirs, books, and other items displayed in glazed sections are protected from dust and easy access. Which furniture hinges for glass doors are best to use? It all depends on the functions and features of the cabinet, cabinet or display case itself - that piece of furniture in which glass facades are installed.
Adjustment and Leveling
At this stage, you need to work at the construction level - determine the correspondence of the frame parts to the door leaf. To do this, the level is applied to 3 planes - to the two sides and to the front. They should be as even as possible. That is, there should be no gaps or deviations between the frame and the door leaf.
Alignment begins with adjusting the vertical gap. To do this, pressing the facade against the frame, tighten the fixing screws on the strip. Then close the door and check the possible angles of inclination with a building level.
By adjusting the screws, all gaps between the facade and the frame are eliminated. For example, if the upper corner is tilted to the right, tighten the screws on the upper hinge and loosen the screws on the lower one.
Then they begin to adjust the doors according to their height. Two self-tapping screws located on the “ears” of the strike plate are responsible for this. To begin with, loosen the screws on all hinges, raise or lower the canvas (depending on the situation). Then tighten the screws until they stop, holding the facade in the desired position.
Furniture hinges for glass doors without drilling
The easiest way to install glazed sashes on a cabinet with your own hands, at home, is using overhead U-loops. They do not require drilling of the facade.
The name of furniture hinges is explained by their shape. U-loops wrap around the end of the glass. They are installed only inside a niche - this is the only possible installation method. Therefore, all internal shelves of the niche must be recessed relative to the sidewalls by at least a centimeter. The gaps for installing furniture hinges of this type require subtracting about a centimeter from the internal dimensions of the niche for free movement. Installation is extremely simple, “expanded” from the inner edge of the niches.
Furniture U-hinges are sold as a set for single and double glass doors. They are quite cheap. There are black, chrome, nickel and gold plated. Inside each hinge there is a sealing gasket and an adjusting screw to allow you to adjust the thickness of the glass. Canvas can be used with a thickness of 4-6mm. From practice, I can say that optimally the sash should be no more than 1000x500 mm in size for U-hinges of normal quality, made of steel.
U-loops often come with an overhead handle and a single or double ejector magnet. However, both the overhead handle and the magnet can be purchased separately.
A “more solid” variety of furniture hinges without drilling of the same overhead type are hinge hinges for glass doors. They are also “overlaid” on the edge of the glass sash and installed inside the niche.
There are a lot of modifications for hinged furniture hinges for glass doors without drilling. There are even remote ones that allow you to implement not an internal installation of a glass facade, but an invoice. But the installation principle is approximately the same: drilling holes for the hinge is not required, the fasteners come from the corner.
Another group of furniture canopies for glass facades without drilling are hinges with UV bonding. They can have the same opening mechanism as U-hinges, with internal installation.
Other types of furniture hinges
Card, piano, and hinge hinges are rarely used for installing cabinet doors. They do not have three-level adjustment and do not lock the door in the open and closed position. An additional fastener is needed. Today they are more often used as an additional decorative element. For example, antique.
Mezzanine
For installation of horizontal overhead panels that open upwards.
Mezzanine
Secretaries
Used for hanging downward opening facades.
Secretary room
We have learned in our practice how proper installation and adjustment of hinges affects the operation of the cabinet as a whole. Some time after assembly, the door of the wardrobe or kitchen cabinet stopped closing - the upper part of the door rested on the frame.
To correct the misalignment and use the cabinet normally, I had to readjust all the hinges. Therefore, during installation, it is advisable to prevent any deviations; any gap can lead to deformation of the entire cabinet structure.
Source: bezkovrov.com
Furniture hinges for glass doors with drilling
The mechanism for opening overhead hinges itself implies installation with fixation only at the top and bottom. This gives certain restrictions on the size of the facade - after all, glass, as you know, has much more weight than, for example, chipboard. And also very fragile. For glass doors with a large area, it is better to use furniture hinges with drilling. Their installation allows the fasteners to be distributed evenly along the entire length of the facade.
The most practical, allowing for adjustment and various installation methods are four-hinge furniture hinges for glass doors with drilling. They have the following design.
The gaps for calculating the size of the facade are absolutely similar to the usual ones, description here.
To be able to install four-hinged hinges for glass in facades, in addition to processing the edges, you need to make holes. You can cut the holes yourself if you have the skill and the appropriate tool, but it’s better to order it directly from a glass cutter. On a sash up to 800-1000 mm in length, it is enough to make holes for two hinges (at a distance of approximately 100 mm from the edge on both sides). If the sash is longer, then another loop should be added in the center and, accordingly, another hole.
Four-hinged furniture comes in a mini version, with a bowl with a diameter of 26 mm, and in a standard version, with a bowl 35 mm in diameter. For small, lightweight sashes, a mini-hinge is sufficient.
When ordering holes for hinges, you need to think about handles. In some cases, it is quite appropriate to use an overhead handle. But if you want to install the same handles as on the rest of the furniture, you will need to immediately order holes for them. Measure the base (the distance between the handle screws) and determine where you want to install them.
In addition to four-hinged glass hinges, there are other options.
They are rarely used due to their high cost. If you decide to install them, be sure to study the installation instructions - for what diameter of the loop and at what distance from the edge you need to make the holes.
glass cutting, sale and repair of glass products and mirrors
You can do the calculation yourself: Online calculator
or send a request for calculation to our manager: Request for calculation
Glass products are indispensable in creating a beautiful and cozy interior. Glass doors for furniture will exquisitely emphasize its lightness and grace. Glass doors are appropriate in the kitchen and living room, library and bathroom. It is difficult to imagine that glass could not organically fit into the interior of any room. Our glass workshop makes custom glass doors for furniture, fireplaces and bathrooms , and we can also repair and install broken glass doors made of glass or mirrors. Glass, as a design material, is very versatile; it can be painted in any color, given any shape, bent, drilled, milled, made into mosaics and much more. In our workshop we can make beautiful glass furniture to order, including decorative glass doors for niches, glass doors for cabinets, fireplaces and other furniture.
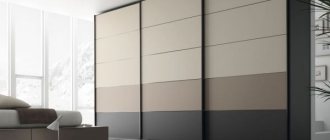
Sliding wardrobe panels
The sliding wardrobe is the most popular furniture today. This is facilitated by the ability to rationally use living space. Often the closet occupies the entire space from floor to ceiling, has a large capacity and, when using a sliding door, does not at all interfere with the movement next to it.
In order for such storage furniture to serve for a long time and without failure, it is important to correctly assemble the entire structure. The main role belongs to the flawless installation of sliding facades. By precisely fulfilling the requirements and recommendations of specialists, a person with the skills to use special tools can install the cabinet door system with his own hands.
What do you need for work?
Before you start installing the door yourself, check that you have the necessary components for the sliding system in the closet. In addition to the facades themselves, the following must be prepared:
- Bottom and top rails or guide profiles. These are the main parts that ensure the movement of the door leaf.
- Motion limiters and stoppers. Parts that help the door move smoothly along the guide rail and stop the movement at a certain point.
- Closers are mechanisms that ensure the sliding of the door panel.
- Accessories for façade systems. For example, seals, screws, rollers, etc.
Prepare your tools:
- electric drill;
- metal drill with a diameter of 4 mm;
- a set of straight and Phillips screwdrivers;
- spirit building level;
- imbus key;
- plumb line;
- sandpaper;
- pliers;
- hammer;
- stationery knife;
- roulette.
Carefully familiarize yourself with the main structural elements of the sliding wardrobe door and their location.
Step-by-step instruction
You can begin installing sliding facades with your own hands only after the installation of the wardrobe itself has already been completely completed. The doors of the structure must be set according to the level. When performing work, be extremely careful and careful, as components can be easily damaged.
- Measure the width of the cabinet opening at the top as accurately as possible. The top guide rail will be mounted there. You need to subtract 1-2 mm from the obtained value.
- Use a ruler (square) to accurately mark the cutting line perpendicularly according to the obtained size. Cut the profile using a grinder or a hacksaw.
- We prepare mounting holes for self-tapping screws. Along the entire length of the guide profile, at regular intervals of about 40-60 cm, mark the holes for the screws; they should be located on the same line.
- To avoid damaging the profile while drilling, use a chair, table, etc. as a support. Drill the holes, then sand the edges with sandpaper.
- Install the finished guide profile in the upper opening of the wardrobe. Use screws or self-tapping screws for this.
- Trim the lower profile in the same way as the top one. Mark the mounting holes, then drill and sand the edges of the cuts.
- Install a stopper at both ends of the profile guide. The device is designed to fix the state of the cabinet door leaf in the closed position. For the latch to function correctly, it must be inserted: in the right panel - in the recess on the right, in the left panel - in the recess on the left.
- We use a plumb line to check the correct position of the profile.
- Installing a door on profiles in a wardrobe. Alignment of the position of the facade canvas.
The sliding system used involves the use of special rollers, which are placed on both sides of the facade (top and bottom). The upper elements are stationary; they fix the door leaf. The lower rollers perform the function of workers - the door moves along them.
- Carefully insert the upper rollers with your own hands into a special place in the upper profile, and the lower wheels into the groove of the lower profile rail. The diagram clearly illustrates installation locations and methods.
- The sliding wardrobe doors are installed, it's time to adjust their position. For this, there are special wheels that are located on both sides of each door leaf. To properly adjust the balance, the cabinet doors must be in the closed position.
Glass doors have a number of advantages:
Glass is a unique construction and finishing material, without which it is difficult to imagine a modern interior, including glass doors.
This is one of the few modern materials that remains 100% natural and environmentally friendly. One of the main advantages of glass doors is their ease of use. Glass is very easy to clean and wash, it does not wear out and retains its aesthetic appearance even after many years of use of glass doors.
Special tools are used to process glass, and special fittings are used for glass door opening mechanisms. Working with glass requires special care and precision, because glass has a significant drawback - it is very fragile, and its fragments are very sharp and dangerous. Therefore, if you need to repair glass doors, it is better to contact a glass workshop.
Choosing hinges for glass furniture
Like any other fittings, fittings for glass furniture can be made of aluminum, stainless steel, hard alloy brass, zamak or bronze.
The choice of hinges from one material or another should be determined not so much by the appearance of the hinges, but by the method of their installation and the type of construction of the canopy itself. However, you shouldn’t forget about the appearance either, because the fittings for glass cabinets are visible not only from the inside, but also from the front, determining the aesthetics of the product.
It is also worth recalling that glass doors usually have an impressive weight, significantly exceeding that of wooden products, therefore, when choosing suitable canopies, you should know whether they can withstand it.
Depending on the weight and type of door, the number of awnings used may vary. So, double-leaf doors are usually attached to two hinges, while single-leaf doors will require at least 3 hinges.
By installation method
Depending on the installation method, furniture hinges for glass doors can be overhead or threaded. Each type has its own characteristics:
- Overhead loops:
- No drilling required for installation.
- They look very aesthetically pleasing, are easy to install and do not require the use of special tools, however, the weight of the door hung with their help should not exceed 20-25 kg.
- Attachment is carried out using special clamping bolts, the quality of which should be given close attention. The gasket used to seal the canopy with glass also deserves attention. It can be adhesive, plastic or rubber. Adhesive gaskets are used for doors made of thin glass up to 5 mm thick, plastic - for glass up to 8 mm, rubber - for glass up to 10 mm.
Installation of overhead hinges does not require glass drilling
- Mortise hinges:
- Requires door drilling during installation. They have a cup design.
- The strike plate is installed on the wall of the base (cabinet). A decorative plug is installed on the front side of the door in place of the hinge.
- Hinges of this type provide reliable fastening of even heavy glass doors with a thickness of more than 10 mm. When installing these hinges at home, the greatest difficulty is the need to drill holes in the glass.
The mortise-type canopy consists of a strike plate, a cup, an inlay and a cover.
By opening method
Depending on the location of the doors relative to each other, as well as depending on the method of opening the door, the hinges can be pendulum, hinged, closing, or overlapping. Let's look at them:
- Pendulum loops. Allow the door to swing freely when opening and closing. Due to the fact that there is no certain limit of movement in hinge designs of this type, it is possible to avoid the door hitting the base when closing. Pendulum hinges for glass cabinet doors are not popular, as they require free space and a unique cabinet design.
Pendulum hinges have an attractive design, but are rarely used in furniture making
- Hinges. They have many design varieties, but are similar in their ability to withstand fairly large loads (up to 20-25 kg per loop). The most reliable in this series are four-hinged hinges, which allow the door to open 165 degrees.
Hinges have 2 leaves connected by a common hinge (axis)
- Leading loops. They combine the function of fasteners with the function of a closer, which ensures gentle and safe closing of the door. They are also able to withstand heavy door weight (up to 20 kg per hinge).
Hinges with closers facilitate gentle closing of glass sashes
- Overlapping hinges. Very suitable for shower stalls, linen closets and cabinets made entirely of glass. Provide a large opening angle (180 degrees). At the end of the hinge movement, the adjustment is activated, which ensures gentle handling of the door. Very convenient for installing curved doors.
Overlapping hinges are convenient for hanging glass doors on a glass base
- Sliding hinges. They are most often used for interior doors and office partitions, much less often in the manufacture of glass furniture.
The use of sliding hinges is important when hanging wardrobe doors and partitions
Thus, when choosing suitable canopies for glass furniture, you should pay attention to the way they are attached to the door, the loads they can withstand, and the type of canopy construction.
Glass door safety
For greater safety, we recommend our customers to use tempered glass.
It is much stronger, and as a result of destruction, its fragments are safe for human health. When we manufacture glass doors for fireplaces and stoves, we use specialized heat-resistant and fire-resistant glass, which in turn best meets all safety criteria. We can quickly and efficiently repair broken glass doors, replace broken glass in a glass door for a cabinet or fireplace. The extensive experience of our glass cutting workshop specialists allows them to complete work of any complexity. We will make custom glass doors.
Source
List of materials and tools
I won't lie, this is a time consuming project. It may take you some time. I advise you to be patient and move towards your goal in small steps. Once you've already planned something, there's no turning back.
The cutting and assembly of the panels was completed within a few hours. Not long at all. Then adding and dyeing the fabric was about another 3-4 hours. I spread this project over several days. I recommend that you do the same.
Auto experts tell us how to properly warm up your car after a cold night
Goat and other 5 signs of the Chinese horoscope who will have good luck in 2021
Computer threat, or Why a child needs to be prepared for the digital world
Consumables:
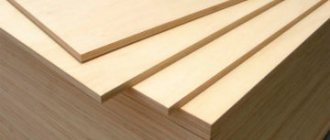
- lumber;
- stain (optional);
- burlap (I used five meters of fabric);
- stapler for furniture;
- screws (drill);
- acrylic paint for painting burlap (also optional);
- hinges for cabinet doors;
- double-leaf door fittings;
In the photo above you can see the top and bottom layers of the panel.
Installing hinges on glass doors
Four-hinged hinges for glass doors are distinguished by the presence of a special tab for attaching the cup and a cover for masking the device from the outside.
If you have no experience working with glass, it is better to turn to specialists to drill holes. Before this, you need to establish preliminary markings of the locations of the loop cups. At the same time, they also take into account the hole where the handle will be hung.
Overhead hinges are also used for glass doors, which can be hung without drilling glass.
You need to place and secure the cup in the drilled holes using a tab, and attach the counter plate to the box with self-tapping screws. Afterwards the door is aligned along three planes.
For glass doors, overhead hinges are also used, which can be hung and fastened without drilling the glass. They are mounted inside the box; accordingly, all shelves in the closet must be recessed inward. Suitable for light sashes only. For example, for the bookcase department.
Four-hinged hinges come in different modifications, which can be selected depending on the location of the panel relative to the box and the cabinet itself in the room.
Invoice
The canvas attached to this loop is completely perpendicular to the body and covers the stand. Used when the door overlaps the side rail of the cabinet.
Invoice
Half waybill
It is used when two doors need to be hung on one rack. Each facade overlaps the end of the rack by half.
Insert
The door leaf is perpendicular to the post, but does not overlap its end.
The overhead hinges also differ in the angle of inclination. This is necessary for installing corner cabinet doors. Depending on the difference between the angle of the facade and the perpendicular to the stand, you can select hinges with an opening angle: -25 °, 30 °, 45 °, -45 °, 90 °.
Insert
Transformer
Used to create composite facades from several doors or in cabinets with drawers that are hidden
Eight-joint
It has all the characteristics of a four-hinged hinge, only without inserting the cup into the facade body. It is attached with self-tapping screws, so it is only suitable for fabrics with a dense texture.
Eight-joint
Features of installing hinges for glass doors
The installation method depends on the type of hinges.
Invoices are placed on the surfaces of the walls; the latter are used if you need to install two hinges on a door that opens in both directions. Insets are installed in furniture provided the doors are recessed. Corner ones are made at a certain angle and are used for this type of furniture. Fittings with a closer are designed for smooth, gentle closing of the glass facade and can be used as an additional device. The gas shock absorber makes closing the doors silent. To install hinged ones, you need to make holes in the lower and upper walls of the frame, into which these fittings are installed, and the glass is fixed into the grooves and pressed with screws. To ensure comfort when using glass doors, they are often equipped with a handle.
The service life of glass doors depends on how correctly the installation is performed.
The duration of their operation without repair, as well as their performance, is affected by:
- hole accuracy;
- correct installation of holders;
- compliance with installation rules taking into account the characteristics of the glass texture.
Properly installed hinges for glass doors, which can be found in our online store, can be used without repair for up to 50 years.
Preparing parts
Before the actual process of creating a structure, the following preparatory steps are performed:
- a specific model is selected that will be created with your own hands;
- the entire cabinet is visually divided into individual component elements, after which a drawing is generated for each part;
- to simplify the process of creating a drawing and diagram, you can use modern and easy-to-use computer programs;
- it is decided what dimensions the cabinet will have, the main parameters being: width, height and distance between the shelves;
- according to the drawings, the parts that act as the main elements are cut to obtain a complete and high-quality cabinet;
- if chipboards are used, then it is advisable to order cutting from specialists, since if you do not use specialized equipment, you will end up with uneven cuts, chips and other defects;
- If you need to make rectangular ends of the panels, then they can be easily and quickly covered with veneer.
When preparing parts, you must constantly check the existing drawings and diagrams, since there is a high probability of creating low-quality elements that cannot be used in the future.
Cutting out curly parts
All parts need to be sanded
Bookcase parts
Installation of stop hinges without drilling
Use end loops here. The procedure is as follows:
- Drill holes for pins in the bottom and top of the cabinet frame. They must be exactly above each other and at the same distance from the wall!
- Install hinges in the corners of the opening.
- Place protective pads in the grooves.
- Insert the corners of the glass into the grooves of the hinges and clamp them with the clamping bar and screws until they stop.
- Make sure everything is level and secure.
- Install decorative elements if they are provided by the manufacturer.
Making cabinet parts in a workshop
The next step is to make the cabinet parts in the workshop. So that in the workshop you don’t have to explain “on your fingers” what you need, just print out the specifications of all the elements and their drawings in advance and give them to the craftsmen. In addition, Basis can also make a cutting map, for which the workshop requires a separate fee.
To do this, you just need to use the Basis-Cutting module, specifying the dimensions of the original chipboard sheets. This card is a pattern according to which structural elements will be cut from a sheet of a certain size, taking into account indentations, thickness of cutting materials and other subtleties. True, some nuances still need to be coordinated with furniture makers, so it is better to entrust the cutting map to them - they have a better understanding of these issues, and when cutting they will take into account the tools they have.
As an example, let's consider the manufacture of a wardrobe with a height of 2.5 m, a width of 1.2 m, a depth of 0.4 m. According to calculations, it turns out that for its manufacture you will need two sheets of chipboard with an area of 4.08 m2 and a sheet of fiberboard with an area of 4. 67 m2.
What should you pay attention to when making a wardrobe?
When choosing a color, you should not rely on names like “Milanese walnut”, etc. Each manufacturer has its own understanding of what this very nut looks like, and there are no uniform standards. So it’s best to go and choose the color of the material yourself, based on its type, and not on its name.
After all the elements of the cabinet are cut out in the furniture shop, you may be offered to take with you the scraps of the sheets from which they were cut, because you bought a whole sheet, which means the scraps are yours.
If you don’t need them, furniture makers will keep them and give you a small discount. This solution seems more attractive to many. It seems like we got rid of garbage and also saved money. But it is not so. During the assembly process, some elements may become damaged, and you can use the scraps to replace them.
If you order a separate part from a workshop that is not made from your own material, you can overpay up to 25% of the cost.
One more nuance. You need to pay not for the manufacture of each individual part, but for cutting the sheet. At first glance it seems that these are one and the same thing, but in fact this is not entirely true. Therefore, when calculating the amount of starting material, you need to clearly determine the number of sheets and send them for cutting.
Programs like Basis will help you decide on the issue of material consumption quickly and accurately. Manual calculations often give inaccurate results, especially if there are a lot of parts.
A separate expense item is the production of shaped elements, for example, side shelves with a rounded corner or baseboards. The cost of such cuts is higher than cuts of a simple rectangular shape, which must be taken into account and agreed upon in advance, so that later there are no misunderstandings when paying.
Let's summarize. The costs of making parts in a workshop consist of:
- drawing up a cutting map (it’s still better to entrust this to the craftsmen);
- cutting laminated chipboard and LDVP sheets;
- making plinths;
- production of rounded elements.
We make a wardrobe ourselves from design to assembly with our own hands
If you make a wardrobe with your own hands, then it can rightfully be considered the most functional piece of furniture.
It fits easily even in a limited area and at the same time you can put almost all things in it.
Such a cabinet is a real find for small apartments and small hallways.
But even in spacious houses there is a place for it, where it can become a real decoration of the room.
In a word, a wardrobe is a universal piece of furniture, which nowadays is difficult to do without.
Looking at the finished wardrobes, it seems that making them is quite difficult. In fact, there is nothing complicated about this, you just need to correctly calculate all its parameters.