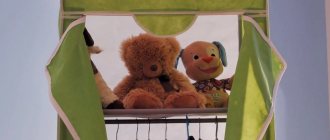
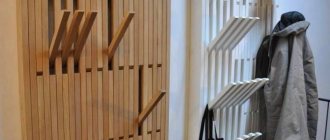
Most girls have a passion for playing with dolls. For many, it does not go away in adulthood. As a rule, they have more than one or two favorite toys, and each has a decent wardrobe. Over time, all these dresses, skirts and blouses accumulate in such quantities that they need to find a place to store them. It could be a homemade hanger, on which each doll outfit hangs on its own hanger.
How to make a doll hanger
There are many options for such toy hangers - from hooks screwed to wall shelves to full-fledged cabinets. In general, everything is the same as in humans, only the sizes are smaller and the material may not be as durable.
doll hanger
If you or your child also have this problem brewing, we will help you solve it by telling us how to make and arrange a doll’s wardrobe with your own hands.
Read on our website: DIY plywood products.
Making hangers
You don’t have to make hangers for doll clothes, but use ready-made ones, for example, from sock packaging.
The hook can be removed from the packaging
If desired, they can be wrapped in thin foam rubber and covered with fabric.
Decorating hangers
If there are not enough of them or the right size, you will have to take their production into your own hands.
Hangers made of paper clips or wire
The easiest way is to make hangers from paper clips. They come in different sizes, metal, colored, with plastic braiding - there are plenty to choose from. The manufacturing process is simple, you can do it with just your hands, but it is more convenient to use pliers.
It is enough to bend the paper clip slightly on both sides, and then lift the long part and bend it with a hook. For rigidity, the tip of the short part can be wrapped around the neck of the hook.
Clothes clip hanger
Video - How to make hangers for dolls
If dolls need hangers larger than those made from paper clips, use wire. It is quite difficult to make neat and even products out of it; a simple device made from a piece of plywood or a plank and several small nails will help with this.
| Image | Description |
Step 1 | On the board, draw the outline of a hanger of a suitable size and drive several nails into it, without recessing the caps. |
Step 2 | Cut a piece of wire and wrap it sequentially around the nails, forming hangers. |
Step 3 | Remove the workpiece from the template, cut off the excess wire and make several turns with its tip around the neck of the hook. |
Progress
Using a pencil, draw hangers on a checkered sheet of paper. At the sketch stage, you can modify, increase the edges or, conversely, reduce them.
Cut out according to the sketch. Place it on cardboard and trace it with a pencil.
Cut it out.
Apply a drop of glue to the cardboard and apply a satin ribbon. This way we fixed the tape.
We begin to wrap the hanger. Periodically fix the satin ribbon with glue.
We continue to wrap the hangers. First, we take one side and move the edge to the other.
Then we wrap the other side.
We fix the edge of the tape with glue. Then we start decorating. Cut one star from the star lace and glue it in the center. We change the decor, the color of the ribbon and hangers look different.
Hangers can also serve as decoration if you are knitting clothes for toys to sell.
We change the size and the hangers become larger, for example, for a baby doll.
← How to decorate a postcard? How to sew a cat bed from an old jacket? →
comments powered by HyperComments
Other materials in the section
Mom's book
How to make a bracelet from a plastic bottle?
Paper elephant
Making a hanger (hanger) for doll clothes in shabby chic style
Over the past year, I have not come across information anywhere on the Internet about how to make hangers (hangers) for clothes of dolls or toys. I’m sure that this method was not invented by me and was invented a long time ago, but since, if I haven’t come across anything like this before, then perhaps my little master class will be useful to at least someone.
Every craftsman who creates handmade dolls or handmade toys in the Teddy style or others, sooner or later faces the question of where to get hangers for the removable clothes of his little charges.
Also, this method of making a hanger for doll clothes can be useful for mothers of little princesses for their dolls or toys, for arranging doll houses.
This method is so simple that even a child over 7 years old can use it for their dolls (with a little help from an adult when working with pliers).
The dimensions of the hanger will depend on your wishes; mine turned out to be 10 cm and 15 cm wide.
So, for work we will need:
- wire (I have thin florist wire);
- 3mm satin ribbon about a meter long;
-glue (this time I used instant gel, last time I used a gun. Both methods are good, this is not for everyone;
- half beads, buttons, etc. - to your taste - for decoration
We connect the two ends of the wire, begin to wrap it in a spiral with pliers about 3-3.5 cm.
Next, we give an approximate shape to our future hangers:
Next we make our shape to your taste:
How to make a doll hanger
Most girls have a passion for playing with dolls. For many, it does not go away in adulthood. As a rule, they have more than one or two favorite toys, and each has a decent wardrobe. Over time, all these dresses, skirts and blouses accumulate in such quantities that they need to find a place to store them. It could be a homemade hanger, on which each doll outfit hangs on its own hanger.
How to make a doll hanger
There are many options for such toy hangers - from hooks screwed to wall shelves to full-fledged cabinets. In general, everything is the same as in humans, only the sizes are smaller and the material may not be as durable.
If you or your child also have this problem brewing, we will help you solve it by telling us how to make and arrange a doll’s wardrobe with your own hands.
Matchboxes
Empty matchboxes can make a nice chest of drawers.
Materials for work:
- 3 matchboxes;
- Double-sided tape;
- glue;
- colored double-sided half-cardboard;
- beads;
- white acrylic;
- brush;
- a simple pencil with a ruler;
- scissors .
First, connect the boxes with double-sided tape.
Then cut out four rectangles from colored paper. The size of the first two is 50x35 mm, the rest - 50x40 mm. Glue strips of double-sided tape along the edges.
Next, glue all the parts to the sides, bottom and surface of the future chest of drawers.
Paint the boxes with acrylic paints.
Decorate the drawer doors with colored half-cardboard. To begin, cut out rectangles measuring 3x1 cm. Then take smaller strips of rich pink color. The size of the strips is 2×0.5 cm.
Glue them to the doors one by one.
White beads will replace the handles.
From the remains of hot pink paper, make two rectangles (40x35 mm and 40x25 mm). One - to decorate the surface of the chest of drawers, the other - the side.
The chest of drawers is ready.
Making a doll closet with your own hands is not difficult. Having chosen one of the feasible methods, you can safely begin construction.
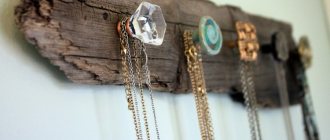
"Hanger" with a heart
Sometimes just one tiny detail is enough to create the “right” mood. There is no need for global projects, expensive alterations, or large-scale ideas. To start smiling, sometimes all it takes is a tiny heart that peeks out from behind a blouse, hides behind a dress, or winks behind a jacket. Touching, barely noticeable, almost elusive, but so sincere!
How to decorate “hangers” with a heart - an idea from Сraftaholicsanonymous
What materials and tools are useful for the job?
To make a hanger for doll clothes with your own hands together with your child, it is important to choose the right material for such a craft, as well as the right tool.
Of course, a lot depends on the age of the child, however, the tool must be safe. If we talk about materials for crafts, then it should be quite soft and easy to process. You can choose multi-colored metal clips in PVC insulation. Not only are they soft enough, but they also have a beautiful color. They are also not afraid of dampness and will not rust.
With tools everything is much simpler. It is necessary to have small pliers and side cutters in order to shorten the paper clip if necessary. To bend the wire beautifully, it is good to have round duckbills.
Beach robe
To make a robe with a hood for swimming, you will need to cut out a rectangle with sides 16 x 29 cm. On this rectangle you need to make cuts for the armholes. To do this, put a length of 18 cm up. Divide this line into three parts - 5 cm (right shelf), 6 cm (back), 5 cm (left shelf). On a segment of the back line at the beginning and end, set aside 3 cm upward and make cuts.
Bend the edges of the shelves by 0.5 -0.7 cm and iron them.
Fold the robe blank in half.
Make the top seam. This is the formation of the hood.
The bathrobe with a hood is ready.
The belt for the robe can be cut from the edging of the T-shirt neck.
We try on a robe with a hood and tie the belt.
Small bonus
If you have already bought a box of beautiful paper clips, then why not use them for something else? For example, for doll lollipops.
If your paper clips are striped, especially red stripes, you will make wonderful Christmas candy canes.
If they’re just colored, just multi-colored candies.
If you want to make toy candies shiny, coat them with varnish: transparent to preserve the original color, or colored, in the case of ordinary metal paper clips.
Source: pictures from the Internet, copied once for personal use, and therefore I don’t remember where exactly and who the author is; if this is you, write
How to assemble a craft
This work is quite simple. First you need to take a paper clip and straighten it. Then straighten it to make a straight line.
After this, depending on the size of the doll dress, bend the bottom shelf of the hanger. After this, twist the ends of the wire together and make a hook at the end. Cut off the remaining wire with side cutters. Then you can invite the children to repeat all these operations.
Of course, hangers can't just lie around. They need a closet or wardrobe where you can hang dresses. This could be the theme of the next craft.
Thus, by making hangers for doll dresses, you not only had a good time with the children, but also taught them a lot of useful things.
We make it ourselves
To create a closet for a toy house you will need:
- Cardboard box or shoe box;
- Scissors;
- Glue;
- Sandpaper;
- Acrylic paints or gouache;
- Sheets of colored paper;
- Glue "Moment";
- Pliers;
- Stickers and cut-outs for decoupage, scrapbooking;
- Wire.
Making furniture blanks will only take a few minutes. As a rule, cardboard boxes are closed with 4 wings.
- You need to cut off 2 shorter wings, leaving 2 long ones. Thus, you make a blank for the wardrobe.
- Roll up a thick roll of paper up to 5 millimeters in diameter. Cut 4 pieces from it, each up to 5 millimeters high. Using glue, attach the blanks to the edges of the bottom of the cabinet - these are the legs.
- A short wing can be mounted inside a future wardrobe, creating a small upper compartment for hats and bags or a lower one for shoes.
- Cut points and other irregularities must be thoroughly sanded with sandpaper.
- Make door handles. Cut 2 identical pieces of short length wire and bend them 2 times each. On the middle side, bordered by the fold, wind bright threads or roll paper.
- Carefully make a hole in the cabinet doors with the protruding points of the wire blanks, thread them through and bend them using pliers on the inside of the door so that there is a small distance between the handle and the door at the front.
- Cover the workpiece with paint of the color you like or with colored paper.
- Now use your imagination and decorate your newly made cabinet at your discretion using stickers, cutouts and drawings.