Wood is a favorite material among furniture makers.
After all, each piece of furniture made from natural solid wood is unique and inimitable in its own way. You don’t have to be a professional furniture maker to make a beautiful and practical chair for your home. The main thing is to choose the right materials and tools, show your imagination and stock up on free time and patience. By deciding to make chairs for your home from wood, you will fill the interior with a special atmosphere of warmth and comfort. This material combines harmoniously with glass, stone, textiles and even metal .
Popular and beautiful models
The most common models of chairs among home furniture makers are:
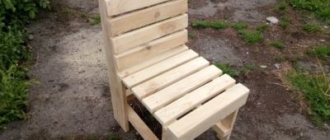
Massive products. Such designs are the easiest to manufacture .
There are no curly lines here. Therefore, the item is suitable for beginners to craft. The massive chair is practical and easy to use. It is stable and fits well into different designs.Its only drawback is its large size, which does not allow furniture to be installed in cramped and small spaces.
When choosing such a model for a dining room or kitchen, you should choose original designs that differ from the standard options. It is better to make the frame of the chair from solid wood.
In this case, carved legs and an elegant back made of slats will look good. The seat can be made of plywood and covered with textiles.
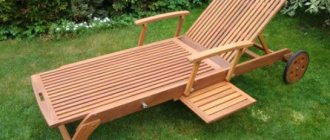
Folding beds. This option is more appropriate for street use .
A chair made of natural wood, which is lightweight and quickly folds and unfolds, is useful for an outdoor picnic. It is compact in size and light in weight. Also, such a piece of furniture can be installed in the garden, on the terrace, or on the balcony.As for the dimensions of a folding chair, you should choose models with a height of 75 cm, a width of 39 cm, and a height from the floor to the seat of 30-35 cm.
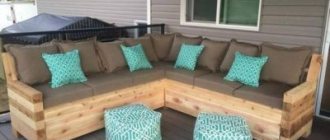
- Armchair chair. It is a little more complicated to make and requires the experience of a carpenter. But such a piece of furniture will fit harmoniously into the recreation area. Its dimensions can be similar to those of massive models, or larger or smaller.
Advice : novice craftsmen should opt for classic massive products.
How to make a carved chair
After the necessary tools and wood have been prepared, the pieces of plywood need to be placed on a flat surface for cutting.
- Apply markings according to the drawings used.
- Using an electric jigsaw or a special circular saw, cut out the parts for the future chair.
- The cut parts should be cleaned. Experienced woodworkers do not recommend sanding the wood with sandpaper at this stage. It is better to use one scraper.
- Secure the workpiece that will be decorated with carvings on the workbench.
- Transfer the drawing to the wood with a simple pencil, tracing the contours of the stencil. Show precision and accuracy when doing this.
Video:
If you have no experience and have never made carved wooden chairs with your own hands, start with simple options. Gradually, skills and abilities will improve. Indeed, to apply complex patterns, special modern machines are often used for processing three-dimensional parts.
- Proceed with cutting according to your choice. Beginner carvers can use a jigsaw to cut out the pattern in the form of through holes. The part for such work can be made from plywood.
- Assemble a chair from finished processed parts. Use glue, screws or wooden tenons. After assembly, you need to secure the connections with clamps or a special press until the glue dries completely.
Diagram and drawing with dimensions
Before making any piece of furniture, you need to think about its design, the materials from which it will be made, and its dimensions. After this, a drawing is created in a variety of ways convenient for you:
- drawn by hand on a piece of paper;
- is on the Internet;
- created using a special program on a computer.
This drawing must indicate the exact dimensions of all individual parts and options for connecting them to each other.
The standard dimensions of a simple chair with a backrest are:
- height - 88 cm;
- width - 43 cm;
- height from floor to seat - 45 cm.
What you need for work
Before starting work, it is necessary to prepare tools and devices, depending on what model you plan to make and what material is used for this.
- Ruler
- Square
- Hacksaw
- A circular saw
- Wooden hammer
- Slotting machine
- Band-saw
- Reimus
- Miter saw
- Sander
- Putty
- Varnish
- glue
Tools
Tools you will need:
electric jigsaw or wood saw;- sanding machine or sandpaper of varying degrees of grain;
- drill with a set of drills;
- self-tapping screws;
- screwdrivers or screwdriver;
- furniture stapler;
- hammer.
Prepare from materials:
- lumber (in our case, boards and plywood for seating);
- stain;
- paints and varnishes;
- brush;
- upholstery fabric;
- wood glue;
- foam rubber
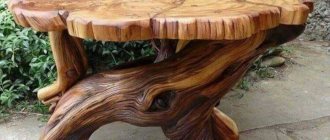
Solid wood chair
A classic wooden chair with voluminous carvings will decorate any apartment. But it is made from a single tree trunk. Of course, finding such material for furniture is not easy, but it is possible.
Please note that it is better to harvest wood in autumn or winter. Then there is less chance that it will crack during drying.
What do you need for work?
- Dried tree trunk.
- Chainsaw.
- Electric jigsaw.
- Grinder with attachments of different grain sizes.
- Chisels and cutters for wood carving.
- A simple pencil.
- Ruler.
- Stain.
- Varnish.
To make a soft seat and backrest decor, take thin plywood, foam rubber, decorative and technical textiles, and use a furniture stapler.
Progress
Preparation of wooden elements
So, when starting the work process, place the drawing near you to avoid mistakes in the manufacture of parts. For our model of a chair with a back, you will need to cut out the following individual elements:
2 rear legs measuring 38 by 75 by 1075 mm;- 2 front legs - 38 by 38 by 445 mm;
- upper backrest lintel 20 by 90 by 475 mm;
- lower backrest jumper with dimensions 20 by 50 by 475 mm;
- central backrest bar 12 by 100 by 475 mm;
- 4 external backrest strips measuring 12 by 50 by 475 mm;
- 2 side arched lintels 20 by 75 by 475 mm;
- 2 side lower jumpers 20 by 50 by 475 mm;
- 2 side central strips 12 by 100 by 255 mm;
- 2 side external strips 12 by 50 by 255 mm;
- 8 side external strips with dimensions 12 by 50 by 255 mm;
- 2 front and two rear arched lintels measuring 20 by 75 by 475 mm;
- 2 front and rear drawer elements - 20 by 38 by 475 mm;
- 2 side elements of the drawer - 20 by 38 by 475 mm;
- 4 seat support bars 20 by 20 by 395 mm;
- one seat made of plywood with dimensions 20 by 435 by 435 mm;
- 1 lower backrest jumper 20 by 50 by 475 mm.
How to do it?
So, after all the materials and tools are prepared, you can start making your own chair with a back made of natural wood. The workflow will look like this :
We cut out the legs. To do this, we make two parts, the thickness of which will be 3.8 cm, width - 7.5 cm, height 107.5 cm.- We measure on the legs the place where the horizontal jumpers are attached.
- We make two front legs, which will be much shorter than the back ones. Their height will be 42 cm.
- We process all cut parts with a grinding machine or sandpaper.
- We make markings and, using a cutter or chisel, select grooves for attaching the legs and jumpers.
- We make 2 horizontal and 5 vertical jumpers, the length of which will be 47.5 cm.
- We make grooves in the horizontal elements.
- Assembling the back. At the same time, we coat all fastening points with wood glue to improve the strength of the product.
- Now let's start making the side inserts. Namely, the upper arched parts and the lower crossbars. Since these elements will be identical, it is better to make a template from MDF . Now we grind all the parts and make grooves on the arched elements.
- We insert the strips into the tenons and coat the joints with glue. After the glue has completely dried, you can attach the attachment points with screws.
- Next, we put decorative plugs on the screw holes.
- Now let's start installing the seat supports. We screw them to the crossbars with screws, making holes for them in advance.
- Now we assemble all the finished elements together: glue the jumpers to the rear legs, fix the parts with clamps and screw in the screws.
- Next, we glue the side elements of the drawer and inserts to the finished back.
- Now we glue the arched lintel with the front drawer and legs.
- We carefully place the resulting structure onto the sidewall spikes.
- We fix the parts with clamps and screw in the screws.
That's the whole process of assembling a chair with a wooden back with your own hands. For those who have never encountered making such a piece of furniture, the work process may seem quite complicated at first. Therefore, it is better for beginners to start by assembling a simple stool.
After making a chair with your own hands, you need to carefully sand all surfaces, cover them with stain and paint materials.
The varnish is applied to the chair in two layers. The second layer is applied only after the first has completely dried .
The seat of the chair must be covered with textiles. Various fabrics are suitable for these purposes (leather, substitute, chenille, jacquard, tapestry). Before you start covering the seat with fabric, a small layer of foam rubber is glued to the plywood and then the fabric is fastened to the underside of the seat using a furniture stapler.
If you don't have a furniture stapler, you can nail the upholstery with small furniture nails.
Tip : To prevent the chair from scratching the flooring, you can attach rubber or felt pads to its legs.
Necessary materials for work
Parts for assembling a carved wooden chair with your own hands
Before you start, you will have to prepare certain materials. Their choice should be approached with special attention, since the quality of furniture manufacturing depends on this.
Materials for work:
- solid wood boards;
- MDF or chipboard;
- screeds;
- dowels;
- wood glue.
Drawing of solid ash and oak
Making carved furniture with your own hands will not bring large expenses in terms of purchasing materials. In this case, the choice of wood type is very important. The most impressive decorative pattern will look on oak or ash. Structural elements made from hardwood will last longer than those made from inexpensive wood.
Despite the wide variety of wood glues, it is advisable to choose PVA for the job. The adhesive composition of this brand reliably holds the structural elements together.
Professional wood glue PVA from Tex
What paint to paint homemade furniture?
Thanks to the finishing, the aesthetics of the furniture item not only increases, but also its service life is extended. To preserve the beautiful natural texture of wood, you should choose transparent varnishes . If the chair will be used outdoors in bad weather conditions, you should choose a reliable varnish, for example, yacht or alkyd PF 170. To use furniture in the house, ordinary furniture varnish will work. If you have chosen a nitro varnish that dries quickly, but at the same time emits a pungent odor during operation, try to paint the chairs either in the fresh air or in a well-ventilated area.
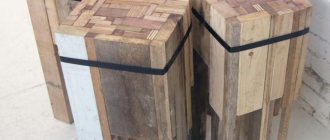
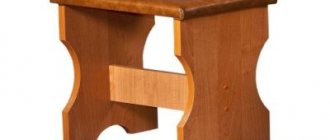
Advice : if the chair seems too complicated to you, try assembling a stool from wood, plywood or chipboard. And for connoisseurs of comfort, we recommend taking a closer look at chairs made from pallets and tires.
Materials for making a chair
To make a chair, materials can be combined using boards, plywood, timber and upholstery. Or buy ready-made bars and assemble the model you like only from them. Using a similar pattern, you can make a bench or a bench.
But no matter which option you choose to obtain a high-quality and durable product, there are a number of recommendations that you should heed:
- Use only dry wood, free from cracks and rot.
- There must be a minimum number of knots.
- The material should be purchased with a reserve, since there is a possibility of the part breaking during operation.
- It is preferable to use such types of wood as oak, pine, linden, and beech. They are durable, beautiful, and easy to work with.
Important! The type of product and the duration of its operation depend on the correct preparation of materials.
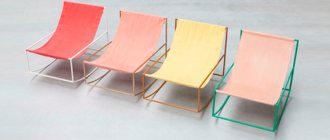
Photo
Ideas for decorating the resulting result can be seen in the following photos:
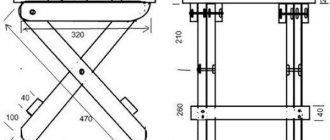
Work progress in making a folding chair
The simplest model of this type of chair is a stool. It is compact when assembled, easy to transport and convenient to use. There are options for folding chairs that look very aesthetically pleasing and can be used as a permanent attribute, for example, in kitchen furniture.
What do you need for work?
To make this model you will need the following tools:
- Screwdriver
- Jigsaw
- Fraser
- Sander
- Miter box
- Wooden shield, size 24*400*1120
- Threaded rod (8*250mm) with nuts
- Furniture hinges 4 pcs.
- Self-tapping screws
- Dowels
- Tinting varnish
- PVA or wood glue
Preparing folding parts
According to the dimensions of the presented drawing, markings of the future structure are made.
All parts of the product are cut out one by one and carefully polished.
The handle on the chair seat is prepared. To do this you will need a 22mm drill. Having made the markings, 2 holes are drilled along the edges and connected to each other with cuts.
Next, a long groove is cut out on the inner legs using a straight cutter (8.5 mm). If this is not possible, holes are drilled, after which, using a chisel, the jumpers between these holes are removed.
The upper ends of the legs are filed at an angle of 30°, and the lower ends are simply rounded.
Important! The angle of the supports must correspond exactly to 30° degrees, otherwise the stool will not work.
Assembling a folding chair and finishing it
Jumpers are installed on the supports using dowels, having previously lubricated the holes with glue. The structure is fixed with clamps until it dries completely.
A threaded rod is attached to the outer legs.
Hinges are screwed to the ends of the supports and to the seat using self-tapping screws.
For aesthetics, the hairpin can be disguised with a tube by cutting it out using a lathe; if you don’t have one, you can use a plane, making the tube multifaceted.
The resulting chair is sanded well again with sandpaper until a smooth surface is obtained. After this, a double layer of tinting varnish is applied, giving a special texture to the wood.
Important! Each layer of varnish should be applied only after the previous one has completely dried.