26379 0 2
SlavagodM August 2, 2016Specialization: master of interior and exterior finishing (plaster, putty, tiles, drywall, lining, laminate, etc.). In addition, plumbing, heating, electrical, conventional cladding and balcony extensions. That is, the renovation of an apartment or house was done on a turnkey basis with all the necessary types of work.
Closet doors in the toilet in the form of blinds
In most cases, when renovating, you will need bathroom cabinet doors to hide the pipes and water meter. Here you can go in two ways, the first method is to buy such doors from glass, plastic or wood, and the second is to make them from tiles. But I want to talk about all this in more detail and offer a video in this article.
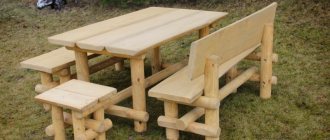
Tree
We come up with a design for the future structure, buy bars, and install the frame. To increase service life, we treat the surface with protective impregnation.
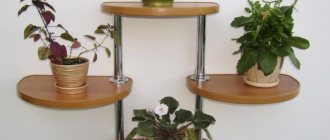
We use a niche to create an open closet. We paint the shelves in the required tone. In this case, the acid green color repeats the shade of the ceramics on the walls.
We measure the dimensions of the recess, calculate and create a wooden structure, and install drawers.
We decide on the dimensions of the wall-mounted model and assemble the cabinet for the toilet.
Such a door can be purchased at a kitchen showroom. We first close the communications using sheets of plasterboard, cover the surface with ceramics, leaving an inspection hatch, and finally install a wooden facade.
Material selection
When choosing a material for making a cabinet, its operational properties are taken into account. The material must be:
- Resistant to mechanical stress.
- Light.
- Moisture resistant.
- Aesthetically attractive.
- Easy to care for.
- Eco-friendly.
"Book" doors
Note! If wood is used to make a cabinet, then at the preparatory stage it is treated with impregnations that increase its moisture resistance.
Table 1. Suitable materials for making a toilet cabinet.
| Name | Description |
Drywall (GKLV) | A moisture-resistant type of drywall is used. This material is easy to process and install. Fastening occurs on a wooden or metal frame. You can install built-in lighting. Drywall is not afraid of moisture, condensation, is not subject to rotting, and is an environmentally friendly and safe material. After treating the joints and priming the surface, drywall can be painted, wallpapered, plastered and covered with any materials. |
Plywood | For premises, choose plywood that is resistant to moisture and deformation. The thickness of the sheets must be at least 14 mm. The material is lightweight and easy to process. |
Natural wood | Wood is used to make the frame of the structure. It is important that it is properly dried and treated with protective moisture-resistant compounds. Wood can be used to make cabinet facades or doors. |
laminated chipboard | Laminated chipboards have a dense monolithic front layer that reliably protects the material from moisture. The advantage of the material is a wide range of shades, textures, patterns and the ability to apply photo printing, which allows you to create a unique toilet interior. The design turns out to be massive and heavy, so it is important to pay special attention to the method of fixing it on the wall. |
Aluminum | It is used to make a frame when attaching plasterboard sheets. It is important to ensure high-quality protection of the material from corrosion. Some interior styles can use a metal hanging drawer. |
Plastic | The material is light and moisture resistant. Has a wide range of colors. |
The thickness of the material should ensure sufficient reliability of the structure, but at the same time not make it massive.
Plastic
We create the frame and internal shelves. We purchase plastic facades with glass ready-made or to order, and install them to the base ourselves.
Material: chipboard, top layer – plastic. Taking into account the exact dimensions, we order cabinet doors, create shelves, and then hang the fronts.
Wall cabinets
Above the toilet you can hang a regular wall cabinet of suitable width and height. This could be part of a kitchen unit or part of a hallway. You can find a suitable example in any modular collection. You will only have to cut holes in the back wall for sewer and water risers, but this modification is not difficult.
Wall cabinet above the toilet: heights and fronts are different...
If you are concerned that the exposed cut may be damaged by moisture, you can take self-adhesive melamine furniture edge and apply it to the cut. A simpler option is painting or coating with a water-repellent sealant.
The height of the cabinet above the toilet may vary. As you can see in the photo above, the models can be hung on two or three shelves (total height is about 70 cm) or on five to seven shelves (total height is a meter or more). The most important condition is that the cabinet should not block the ventilation hole . The second point: it should not interfere. That is, there must be access to the flush button, and while sitting on the toilet you should not hit your head on the door. Based on these considerations, the dimensions of the wall cabinet in the toilet are selected. Since the parameters of the toilet bowl, cistern and installation of the entire structure are different, the depth of the cabinet can be from 35 to 60 cm.
Ceramics
We install the hatch simultaneously with the structure covering the bathroom communications, after which we cover the surface with ceramic tiles. This option looks neat and is easy to use (the hatch opens when pressed).
Using metal profiles and sheets of plasterboard, we close the correctly selected installation, then we mount an open niche for decoration. We lay tiles on top of the gypsum board.
Invisible
There is also an invisible hatch. It is mounted with a cabinet and does not look different from the general design. For a better understanding, you can view photos with such hatches. A plumbing cabinet with such a hatch creates the appearance of a complete structure. Installation of such a hatch requires knowledge and experience.
Manufacturing scheme
What materials will be needed to build a DIY plumbing cabinet?
- Drywall. Mandatory presence of a water-repellent effect;
- Doors;
- Plastic end tape;
- Door fasteners;
- Self-tapping screws.
The optimal depth for the cabinet is up to the toilet barrel, the height should be at least 20-25 cm from the barrel to the shelf.
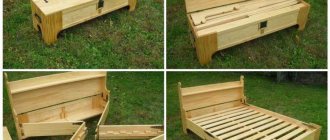
We take foam block slabs and attach them to the walls. Where gaps have formed, fill in foam. We begin to fasten the prepared shelves with screws and corners. All shelves are sealed with end tape. The doors are attached and the hatch is formed. This article describes in detail how to make a cabinet in the toilet with your own hands. There is nothing complicated about this; all the necessary materials are available in any hardware store. The toilet is a room with a special function, but with some modifications it can also be turned into a good storage room. Additional storage space for all kinds of household cleaning products will never be superfluous. Treating communication pipes with soundproofing material will improve the sound insulation of the room as a whole.
Doors with lathing
First we create the base of the cabinet, cover the walls with tiles, and fix the finished doors last.
PVC or wood is used for the facade. Installation is quite simple; the day before you only need to prepare the block frames, special fastenings for the lock and hinges. For protection, it is recommended to coat the material with stain or varnish.
Guides and drywall are at the base; we lay ceramics on top, leaving a niche for inspection. We close the opening with doors.
We cover the wall with the installation with plasterboard, install an inspection hatch, and close the niche with contrasting roller shutters.
Preparation stage
Obviously, purchasing a ready-made cabinet for a toilet is not difficult, just like installing it.
Therefore, we will consider the option of independently designing and assembling this piece of furniture for the plumbing unit. You will be satisfied with the work done, you will have something to be proud of, plus you will be able to create exactly the furniture that is ideal for your particular case. After all, not every ready-made toilet cabinet corresponds to the availability of free space, wishes or requirements of the client.
Preparing to create a toilet cabinet with your own hands begins with design. That is, you determine what the dimensions will be, where the furniture will be located, how many shelves, doors there will be, and so on. Calculate the dimensions accurately so that obvious problems do not appear during installation.
- Create an image of your ideal cabinet, compare your desires with the possibilities and available space.
- Transfer the project to the drawing, include literally every little detail, fasteners, and hinges on it.
- Consider the option of covering all sewer pipes and communications with a cabinet. At the same time, fittings and meters must remain accessible. To do this, consider the location of plumbing hatches.
Frame installation
- The frame is made of bars measuring 30 by 30 millimeters. Try to make all markings evenly, using a level and tape measure.
- Mark the wall where you plan to install the cabinet.
- Assemble a frame from the cut bars, connecting the elements together with corners and self-tapping screws.
- Now the frame needs to be fixed to the wall, guided by the pre-applied markings.
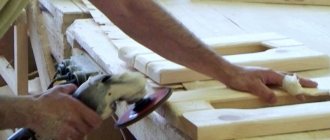
- Do not forget about pre-processing the bars, sanding them, covering them with stain, varnish, and paints.
Shelves
- Once the frame is secured to the wall, measure the boards that will serve as shelves. Make preparations.
- Install metal corners on the vertical bars of the frame, which will hold your shelves.
- Be sure to cut out the pipe as it often ends up sitting right in the middle of the cabinets.
- Now all that remains is to place the shelves in their places. It is not at all necessary to fasten them firmly. It is enough that they are simply held at the corners. This way you can remove them if necessary to free up space.
Doors and fittings
Of course, a closet in a toilet cannot be called complete if it does not have doors and fittings.
- Take measurements for the doors, cut blanks for them. Decide in advance whether your closet will be equipped with one door, or whether it will have two hinged doors.
- Mark the hinges on the frame. The easiest way to make a toilet cabinet is with piano hinges, since they are easy to install, quick, and they serve quite well.
- Armed with a screwdriver, secure the hinges to the frame.
- Install furniture magnets at the marked places. It is not recommended to purchase Chinese-made products, since their service life is extremely short. It's better to pay more but get a decent product.
- Treat the doors with special compounds to protect them from moisture. For wood, varnish is the best option.
- Of course, doors can be made not only from wood or chipboard. An alternative is roller shutters, characterized by practicality and modern design. Plus, if there are tiles in the toilet, you can use simple sheets of plywood, which are then covered with the same tiles that are mounted on the walls of the bathroom.
Glass
We fill the recess in the wall with shelves and hang a glass facade.
We close the niche above the installation using mirrors.
The inside of the glass has a matte finish.
Plumbing door latch
If there are deris, then they must close. For swing doors, plumbing latches are used, which, depending on the design, are divided into several types:
- sliding models can act as a latch and a locking bolt;
- magnetic latches prevent doors from opening without permission, but do not lock them;
- electronic and electromechanical models are controlled remotely using programmed keys;
- roller latches hold doors using rotating spring-loaded rollers;
- In halyard models, the locking mechanism is a spring tongue.
Most of the complex latches from the listed variety are installed on the entrance doors to the bathroom. The doors of the sanitary cabinet are equipped with a simple mechanism.
The latch control element is a plumbing screw on the door that locks the lock. The technical device is placed on the leaves of interior door blocks. However, the wrap is sometimes used on cabinet doors.
Procedure
Removing the old door
In principle, nothing special, but there is a small nuance. The box should not be broken out; if it does not give in, then cuts are made in several places, and it is removed from the opening in parts. Passages to bathrooms are in internal walls or partitions. Unlike load-bearing structures, they are not as strong. Excessive efforts and carelessness will only increase the amount of work - you will have to level and strengthen the ends of the walls.
Preparing the opening
- Complete stripping down to the base. This will allow, firstly, to determine the condition of the wall and draw up a list of necessary measures. Secondly, select the necessary materials and preparations.
- Formation of the opening. The door blocks have the correct geometry, and therefore significant curvatures and bevels are not allowed at the ends of the walls. In addition, the dimensions of the passage must correspond to the dimensions of the door frame, with only a small difference providing a technological gap around the perimeter (recommended within 10 mm).
- Processing the base. The fire protection agent and the method of its application are determined by the wall material. One of the effective methods is impregnation; Such preparation for door installation is more appropriate, since we are talking about damp rooms.
Fabric preparation
- Marking the frame for installing canopies. Considering the light weight of the doors, two hinges are enough.
- Drilling holes.
- Attaching hinges to the sash.
It is advisable to equip the canvas with fittings after installing the box; There will be plenty of time while the sealant dries.
After finishing work with the sash, it is recommended to prepare the jamb in the same way. After placing it in the opening, holding the door in a canopy, it is difficult to accurately mark it.
Box installation
- Markings are made to determine the locations of fasteners. This is necessary to ensure that the fixation of the jamb is as reliable as possible. The walls are not uniform everywhere, there may be individual defects, and therefore the anchors must sit “rigidly”.
- In the jamb, according to the diagram, holes are drilled for fasteners.
- After placing the box in the opening, it is leveled and fixed in the desired position with spacer wedges.
- Through the holes in the timber at the end parts of the wall, the fastener locations are marked.
- The jamb is removed and drilling is done in the opening.
- After installing the dowels, it is returned to its place, it is given the proper position, and the box is fastened. It is recommended to tighten the anchors through one, from different sides. At the same time, the spatial orientation of the jamb is controlled in order to prevent distortions in the structure. Otherwise, it will not be possible to install the door correctly - the door will not close tightly, difficulties will arise with attaching the canopies, installing the latch, and a number of other problems.
- Sealing the opening. The gap (around the perimeter) between the box and the wall is filled with polyurethane foam.
Hanging the sash
This stage can be started only after the sealant has completely dried. As a rule, at average temperatures and humidity in the room, a day is enough.
The work is not difficult, but you can’t do it without an assistant. The canvas is raised, the second half of the hinges are aligned with the cutouts in the box, and they are screwed to it with self-tapping screws.
All that remains is to check the correct operation of the door and eliminate any identified shortcomings. Everything else - platbands, finishing of the opening - is at the discretion of the master, based on the general design style of the corridor. In principle, there cannot be a single recommendation for the final stage of installation.
Installation features
- Mandatory presence of a threshold. The minimum height is 100 mm from the floor covering. This is necessary to protect the remaining rooms from flooding in the event of communication breakdowns or plumbing problems. A door with a threshold will temporarily keep water from spreading into adjacent rooms.
- As a rule, with separate bathrooms, they are located through the wall (partition). Therefore, the doors are nearby. Their installation is carried out in such a way that in extreme positions the blades do not block each other. There are several options. For example, in one opening there is a hinged model, in the next door there is a compartment. If both doors open, then certainly in different directions.
- The gap between the canvas and the threshold is at least 10 mm. Otherwise, even forced ventilation, not to mention natural exhaust, will not save you from dampness. Violation of the free movement of air masses contributes to the appearance and intensive development of mold and mildew. Installing bathroom doors without taking this fact into account leads to high costs and time in the long term; It is extremely difficult to rid walls, ceilings, and the contents of a room from such an “illness.”
Advice. It is advisable to purchase doors whose leaves have ventilation grooves (holes, slits). Then you won’t have to lift the sash above the threshold.
Installation of sanitary doors for bathrooms and toilets
The method of installing doors depends on the design of the cabinet. Most often, a box is assembled from drywall, inside which all communications are hidden. The front element of the sanitary cabinet is a false wall. It is installed on a frame made of metal profile. You can use wooden slats, but in damp conditions the wood quickly disappears and becomes deformed, which will negatively affect the appearance of the structure.
Drywall used is moisture resistant. The sheets should lie flush with the main wall of the room. If the cabinet does not cover the entire wall, then it is first plastered. Only the untouched area is left where the drywall will lie. The sheet should lie flush with the plaster.
If communications are located in the corner of the room, a profile frame is placed here. The drywall does not have to be adjusted flush with the plaster or wall. The sheets of the false wall will adjoin the adjacent walls of the room.
The size of the niche and doors depends on personal preference. Plastic doors are hung on a small hatch measuring 50x50 cm with hinges. Hidden hatches are made the size of a tile, for example, 20x30 cm. The door is the tile itself, which is fixed with magnets. The mechanism for plumbing hatches is sold in stores. It is easier to buy, install and equip with a door.
If you plan to install a large sanitary cabinet with storage shelves, the size of the door depends on its design. Roller shutters, curtains, and blinds allow you to create an opening niche from the floor. The toilet will interfere with swinging doors from opening. The plumbing cabinet is placed so that its lower part is higher than the cistern.