We make furniture for the apartment with our own hands. Built-in wardrobe - compartment.
Today, a built-in wardrobe with sliding doors can easily be called the most relevant and practical solution for storing clothes and other things in any modern apartment. Such a built-in wardrobe can be installed in almost any room of the house, because thanks to its design it can make the most optimal use of all available usable space, from the floor to the ceiling.
Content:
Today, many companies offer to purchase ready-made wardrobes from them or order them individually. Of course, this is much more convenient, but the cost of such cabinets, it should be noted, is not at all small. That is why it will be much more practical and economical to make a built-in wardrobe yourself, as they say, with your own hands, assembly is just as simple, and below is a diagram and drawings for clarity. Moreover, carrying out such a process is not so difficult if you act , naturally, according to some strictly predetermined algorithm.
All you need to create a high-quality wardrobe is the correct instructions, recommendations with drawings and visual diagrams and a little inspiration, because designing something with your own hands is always an art. The website for renovating your apartment with your own hands, tried to bring all this to life. So, there is a desire to make a simple built-in wardrobe - now you need to choose a place to install an element of built-in furniture. As a rule, in modern apartments all kinds of niches and other recesses are allocated for the installation of a wardrobe, the area of which cannot be effectively used for arranging other structures.
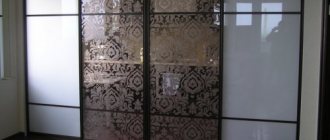
In the event that the existing depth of the structure is not satisfactory for some reason, then you can additionally, using tools, cut a niche. Once the niche where the wardrobe will be installed in the future is ready, and all the necessary precise measurements have been taken, you can begin planning blueprints. In fact, the appearance, as well as the configuration of the wardrobe, depends only on the personal wishes of its owners, but there is a certain standard, “classic” variation of such a piece of furniture. Drawings of just such a wardrobe are shown in the photo below.
It should be noted that when drawing up drawings of a sliding wardrobe, special attention should be paid to such steps as determining the distance between shelves, as well as calculating their number. It is necessary to mention the fact that since this model of wardrobe has doors that do not go all the way to the ceiling, the upper shelves had to be made a little smaller in depth in order to provide more convenient access to things.
Natural materials
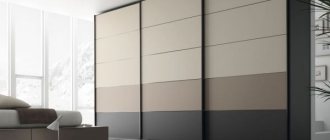
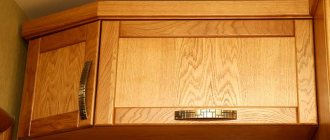
A sliding wardrobe made of wood looks very expensive and is used both in respectable classics and in rustic styles. Artistic veneer looks like elite wood species. The raw material goes well with decorative inserts from:
- glass;
- mirrors;
- acrylic
Natural raw materials with original texture are suitable for eco-design. The fronts of sliding wardrobes made of bamboo and rattan will bring a feeling of closeness to nature to the space. The materials are often combined with lacquer parts. A door made of leather (natural, artificial) with metal looks very solid.
Wooden sliding wardrobe Source menduk.org
Arrangement and assembly of a wardrobe: start of work
Once the drawings (or even just sketches) are ready, you can safely begin to complete the task at hand - embodying what was drawn on paper. It’s best to start by arranging the “insides” of the cabinet, namely by installing various shelves. For shelves, it is best to use the most common laminated chipboard in a light color (or dark, depending on the wishes of the household and the general style of the room).
It is recommended to use metal corners and self-tapping screws as fasteners to secure shelves to the wall. Thanks to the fact that all the necessary measurements were taken in advance, all dimensions for the shelves are already available. The depth of the lower shelves, in our case, was 60 cm, and the depth of the upper ones (as previously agreed) was 30 cm.
The material and its sawing can be done independently, but it would be best to order both from the most common construction base - in this way, you will be able to save significantly, because there is no need to purchase expensive tools. Assembling the internal frame of a sliding wardrobe begins with a shelf that is mounted on the floor (it acts as a floor), after which the walls of the built-in closet (side boards) are fixed to the bottom board and wall using dowels. Next, a structure is assembled consisting of two horizontal, one vertical crossbars and three more crossbars installed vertically. The main fastening element on which the entire structure of the built-in wardrobe is supported are metal corners and self-tapping screws, purchased in advance from a hardware store.
The frame is assembled, all that remains is to immerse it inside the niche and secure the upper shelves to the walls. As a result, you get two compartments specially adapted for storing outerwear (sweaters, dresses, shirts, etc.). In addition, you can store underwear on one of the shelves, and the other three shelves can be adapted for a wide variety of clothes (for example, they can be give as wife's things).
The wide shelf, which is located in the back of the cabinet, is specially divided into three parts, which have a slightly shallower depth. At the very top of the wardrobe made and assembled by yourself, there is a long and narrow shelf, where you can very conveniently place all kinds of boxes with shoes, Christmas tree decorations, blankets and other small and little-used things. After the frame of the built-in wardrobe is completely assembled and installed in the previously prepared niche, it’s time to start assembling the sliding doors. It should be noted that the fittings for such doors differ both in cost and in quality, and therefore the most optimal option is a strong “average” one, that is, fittings that have an average cost.
Door fittings will require sets of lower and upper rollers, as well as special guides, handles and other elements. You can use some decorative mirror to fill the doorway of the wardrobe. The door itself is assembled, and therefore it is necessary to install guides. The first thing you need to pay special attention to is the diagonals, which can cause a lot of trouble. It is best, as they say, to measure 7 times and cut only once - carefully double-check the location of the guides and only then install them.
It should be noted that in addition to the appearance of hated diagonals during the installation of the lower and upper guides, it is also very important not to disturb the installation level of all structural elements. In order to facilitate the process of installing a sliding door, you can initially install the upper profile in the guides, and then simply remove it and install it together with the door - this will be much easier to do than if the door leaf and guide were installed in the stasis. Further, it will not be superfluous re-disassemble and reassemble the structure. In this way, it will be possible to determine which systems need improvements, as well as identify problems and deformations.
In addition, a thorough double-check of the assembly process will make it possible to eliminate possible distortion of the door, which is also important for the normal functioning of the cabinet. If, after installing the door and fully assembling the cabinet, an unsightly gap has formed between the door and the wall, then it needs to be corrected. This is quite simple to do - the cause of this problem may be improper fastening of the bolt securing the lower rollers to the door leaf. Such a bolt not only performs a fastening function, but it can also be used to adjust such gaps.
In order to eliminate the defect, it is enough to simply use a regular hexagon, which is used for screwing conformats, to adjust this very bolt so that the gap completely disappears. You can purchase such a tool at any construction market or store.
Now the installation is complete. Making a built-in wardrobe with your own hands, as you can see, is a fairly simple process, for the implementation of which you do not need to have any very special skills and talents. It is enough just to have ingenuity, “straight hands” and a set of simple tools that every owner has, as well as drawings and diagrams of the planned product. Also, one should not forget inspiration, because it is the engine of new ideas and all kinds of processes. We hope that it will not be difficult to manufacture and build, and the assembly will be successful! Similar articles If we are talking about making a cabinet with your own hands, then let’s talk directly about the sliding wardrobe.
Today, its popularity knows no bounds, and it is due to several reasons. Firstly, the absence of swing doors, secondly, compactness and, thirdly, the possibility of hidden installation. In fact, it differs from an ordinary wardrobe solely by the sliding door mechanism. This path to solving the issue of making a sliding wardrobe with your own hands can be called the simplest - it can be conditionally divided into three stages.
Conquering the heights of furniture craftsmanship, you will have to learn the art of design and construction, perhaps carpentry and become a good furniture assembler. But first things first, let’s start by learning the basics of design and construction skills. I think you’ll figure it out yourself with the design of the cabinet and the position of the shelves and partitions – there are no subtleties here. The main thing is that it is convenient to operate this design, but we will touch on the technical aspects of making a sliding wardrobe with your own hands in more detail. So, for convenience, we transfer the design of a sliding wardrobe you have come up with from mental images onto a piece of paper and, in accordance with the installation location of the future cabinet, we put down all the necessary dimensions .
You need to start with the width and height of the entire product - it is on the basis of these that the dimensions of all other partitions and shelves are calculated. Now you need to concentrate and be as consistent as possible. When the general dimensions are ready, making a sliding wardrobe with your own hands will require detailing all its parts - on another sheet of paper (can be to scale) we draw out each individual element of the wardrobe. Start with the sides, top and bottom - mark the full dimensions of the part on each of the drawings.
Do not forget that the shelves and partitions inserted inside the cabinet must be smaller than the overall size of the cabinet by exactly the thickness of two sheets of chipboard used. This issue must be decided in advance; as a standard, such furniture is made from laminated chipboard 16mm thick. These are the ones that need to be taken into account. Let’s move on and, taking into account these 16mm, we put down the dimensions of each individual part of the sliding wardrobe.
When this painstaking work is completed and everything has been checked several times, we move on to the next stage of design. I hope everyone has seen how the front ends of furniture chipboard are made? This operation is called trimming - when calculating a sliding wardrobe with your own hands, on each of the detailed drawings you need to mark the edges that will be covered with a special tape. It costs a lot of money to paste over the ends at the factory, so there is no need to mark everything - your task at this stage of work is to determine exactly those edges that remain visible from the front side of the wardrobe. So, have you figured it out?
Now you can take a deep breath and experience a deep sense of satisfaction, after which you can go to a specialized warehouse that sells furniture chipboard and, at the same time, saws it, and order all the necessary parts. I completely forgot. But what about sliding doors? Everything is simple here - having the general dimensions of the interior of the cabinet, height and width, we report them all in the same warehouse and the local craftsmen independently determine the dimensions of all the structural elements of the sliding system. You just have to choose the door material - as a rule, you are given a choice between all kinds of mirrors, chipboard and plastic pseudo-mirrors.
Decide on this yourself. After all this fuss, it’s time to relax and get ready for assembly work. While the parts of your wardrobe are being manufactured, it is a good idea to take care of the necessary tools. The minimum you will need is a screwdriver, a jigsaw just in case (suddenly you miscalculated some dimensions), a drill bit for confirmations, a set of different wood drills, a stapler with twelve staples and a lot of furniture fittings, ranging from fastening corners and confirmations to small screws and wooden chips. Assembling a sliding wardrobe with your own hands is not at all difficult.
During its development, you should have drawn a complete picture of this process - we can say with confidence that even half asleep you will clearly and clearly imagine not only the general assembly sequence, but also the installation of each individual part. You need to start with the main parts, that is from the sides, top and bottom, at this stage you need to twist the main box. Considering the dimensions of even the smallest sliding wardrobe, this will not be easy to do - first of all, it is necessary to mark and drill holes for confirmations. Once they are drilled, you can install a special hex bit on the screwdriver and connect the parts of the box into a single product.
Then it’s easier - all the internal boards can be fixed, as they say, in place - installed, drilled two boards at once and screwed in the confirmation. When the box with the partitions is assembled, you need to take care of the back of the cabinet - as a rule, it is covered with laminated fiberboard. This part is fastened with a stapler every 5-10 cm. With the shelves, things are even easier - they are held not by confirmations, but by special steel pins. You only need to drill four holes for each shelf and drive pins into them, then the shelf is simply placed on top of them. Depending on the dimensions of the finished structure, from 4 to 6 such legs will need to be installed - in each of the corners and possibly in the middle. Here we are and got to the installation of the sliding system.
Now our task is to install sliding wardrobe doors with our own hands. Despite their dimensions, this is done simply. We unpack them and find the upper and lower guides. How to distinguish them? The lower guide is flat with narrow grooves, and the upper one is voluminous and has wide grooves.
We screw them into place - the top rail is up, and the bottom rail is down, respectively. All that remains is to insert the doors and adjust them. The doors are installed as follows - first insert the upper rollers into the guides, then lift the door and, pressing the lower rollers, install it on the lower guide. Adjusting wardrobe doors is no more difficult than installing them.
At both ends of each door at the bottom (hidden under the boot) there are two screws - one fixing, the other adjusting. With their help, you need to ensure that the doors are level. Installing a sliding wardrobe with your own hands will require you to adjust the stops - they are needed so that the doors do not hit the cabinet body. The stops are located in the grooves of the lower guide, and in order to protect the doors from impact damage, you just need to move them to the desired position. That seems to be all.
Now we can say with complete confidence that the built-in wardrobe with our own hands is ready. Is it difficult? Agree! But it's very interesting. And most importantly, you can be proud of the specialty you have mastered on your own. Built-in wardrobes have long been guests in most apartments.
They save space. They can accommodate a wide variety of items. It doesn't have to be clothes or shoes. Household items or dishes can be stored here. Drawing of a built-in wardrobe. The modern market offers many different models of built-in wardrobes.
However, not all of them are of high build quality. In most cases, really good furniture costs a lot of money. However, you can make a built-in wardrobe with your own hands. Today you can buy almost any material for these purposes.
Construction and furniture stores often distribute everything you need, so you can find them even in the smallest city. Making such a cabinet is quite easy. This is worth talking about in more detail.
Making a comfortable wardrobe with your own hands
Regardless of the size of the apartment, you always need a place to compactly store a huge amount of things - clothes, shoes, linen, books and many other necessary (and not so necessary) things. And such a place is a closet.
The ideal option is a coupe - it saves space in the absence of swinging doors, it is spacious, and the design can decorate any room. Mirrors will visually enlarge the space, MDF inserts will make the interior unique, and soft triplex with a pattern of your choice will turn your furniture into a work of art.
DIY sliding wardrobe for the hallway
Which wardrobe should you choose? The answer is simple. If you have settled in your home seriously and for a long time, if you do not like rearrangements, if there is a free niche that you definitely want to use, then you need a built-in one. But if moving is still possible and you, due to your character, have a hard time parting with your favorite and comfortable things, then your choice is an ordinary cabinet made according to your individual project.
Furniture, in the construction and design of which everything is thought out by you and for you, is more than a piece of furniture: it is your creation, your pride, a way to express your individuality.
You can, of course, just go to the store and buy an option that more or less suits you in color, filling, size and price. One of tens of thousands produced on the conveyors of furniture factories. You can order production according to an individual project in one of the many showrooms. Or you can do it yourself, putting a piece of your soul into a thing that will be before your eyes every day. In one piece of furniture, realize yourself as a designer, constructor, sawmaker, assembler. And let some of your friends not like your creation. This is YOUR work and no one has the right to criticize it.
Plywood
Plywood is quite strong and durable, so furniture made from it lasts for many years.
It has been used by humans for quite a long time in the production of furniture. It is also suitable for a built-in wardrobe with your own hands.
A distinctive feature of plywood is its high strength and durability. Many pieces of furniture made on its basis last for decades. However, this material also has its drawbacks, which will have to be put up with during the work and further operation.
The most important negative point is the difficulty of processing this material. It is not so easy to saw off even pieces.
It is often not recommended to work with such material on your own. If you have chosen plywood to organize a built-in closet, then you should make sure that it is pre-cut to size in the store. This is the only way to eliminate all misunderstandings.
Plywood tends to delaminate under the influence of water or other liquid, so if you plan to install the cabinet in the kitchen, then you should not use this fancy material for its manufacture. In other cases, you can take it as a basis.
Required tools and materials
To install individual sections of furniture and attach them to the wall, you will need the following tools:
- drill or hammer drill;
- building level;
- roulette;
- hammer;
- screwdriver or screwdriver;
- dowels with self-tapping screws;
- fastening elements.
Let's look at the latter in more detail.
Types of fastening elements
Popular:
- furniture corners;
- mounting strips;
- special functional fittings.
They are purchased additionally if there are no suitable elements in the house or they were not included in the kit. Each part has unique features, advantages and disadvantages.
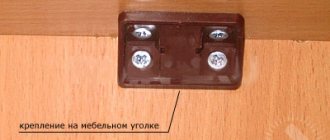
Furniture corners
Help
Corners are the simplest fastening element in their structure. Consists of one bent plate. The bend point is the edge, and the edges are the shelves. An angle is formed between the shelves: obtuse, straight or acute. The plate itself is made of metal.
Characteristics of corners:
- Versatility . The element can be mounted in any corner and does not require the use of professional tools. It is secured with self-tapping screws, other screw fasteners with washers and nuts.
- Reliable fixation . Suitable for installation of light and massive structures. If you choose a reinforced furniture corner, you can screw in heavy cabinets with additional load.
- Variety of sizes and shapes . Depending on the size and design features of the furniture, the type of fastening is selected.
There are some disadvantages. During installation work, the technician needs the help of a second person. It will support the cabinet at an angle so that the fixation is successful.
It is unacceptable to purchase plastic fasteners . They have a minimum service life. They cope worse with heavy loads.
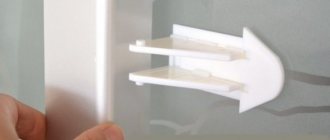
Mounting strips
Attention
The design is a metal strip with a hook. The latter is attached from the inside to the side wall of the cabinet. From the outside, such elements are practically invisible.
Design advantages:
- Easy installation. Both people with basic construction skills and beginners can handle the installation of planks.
- There is no need to measure and drill holes for each cabinet separately. It is enough to note a single level.
- The position of the furniture is adjusted using anchor bolts. The presence of defects on the wall will not interfere with fixation.
- The planks show good endurance and reliability. If a few screws become loose, the rest will be able to handle high loads.
There are no disadvantages to mounting strips . It is important to evaluate their material: a low-quality element will bend greatly and eventually break during installation.
Special adjustable fittings
There are various types of it. For screwing use:
- Press-fit canopies for hanging furniture Traser-6 . Mounted on the side wall of the cabinet. Adjustable vertically (18 mm), horizontally (16 mm), front (25 mm). One suspension can withstand a load of up to 65 kg. Additionally requires a strike plate. Fixed with dowels.
- Canopies with protection . Performs the function of hidden installation behind the rear wall. Withstands loads up to 130 kg. They require an additional rail and a through hole in the wall for access to adjustment.
- Scarpi-4 canopies made of metal . Adjustable vertically (13 mm), horizontally (8 mm), frontally (17 mm). Access to adjustment screws from inside the cabinet.
- Canopies adjustable with screws . Popular reliable designs. They have three-dimensional adjustment: down 7 mm, up 11 mm, back 3.5 mm, forward 12.5 mm.
The proposed fastenings are not universal. For proper hanging you need right and left hangers.
laminated chipboard
Laminated chipboard is quite easy to process and therefore is in great demand, but it also has a drawback - it is not the most environmentally friendly material.
A material that has earned respect among many people. This is what people use in most cases to arrange built-in wardrobes. It is distinguished by high levels of strength, reliability and durability.
In addition, it is quite easy to process using any tool. This is an undoubted advantage and is fundamental when designing cabinets. There are also some disadvantages here.
Laminated chipboard is produced in the form of huge sheets. It is not always convenient to work with them.
To cut it you have to use every possible skill. However, in this case, you can leave the sawing to specialists in the store. The main thing is to prepare all the sizes in advance and write them down on a piece of paper.
Step. 3. Choice of material.
- The most common is laminated chipboard (LDSP). This is a very practical material. It is easy to process and affordable. The variety of colors provides ample opportunities for design solutions. Laminated chipboard is manufactured industrially. The sheets have different sizes and thicknesses. For production, slabs with a thickness of 16 mm are used, and for inserts in doors - 10 mm thick.
- 3.2mm thick fibreboard (fibreboard) is suitable for the back wall;
- MDF is beautiful, durable, more environmentally friendly, used for making furniture in rooms with high humidity, but a much more expensive material;
- Wood is the most environmentally friendly of materials, but, unfortunately, it is poorly suited for the manufacture of wardrobes.
- Due to its fragility, drywall is generally not recommended for furniture making.
Sliding door system. Currently there is a fairly large selection of different systems on the market:
- aluminum;
- steel;
- hanging;
- frameless, etc.
Each of them has its own advantages and disadvantages. For example, in aluminum systems, convenient vertical handle profiles are ideal for hallways and children's rooms. Steel systems are distinguished by their elegance, which is especially important in the bedroom. Hanging systems will fit perfectly into the interior, where they should be invisible.
Plastic
The advantages of plastic are: long service life, resistance to mechanical stress, moisture resistance, heat resistance and immunity to fats, chemicals and oils.
This kind of material has been part of our lives for quite some time now.
It is not always used for furniture production, but sometimes even built-in wardrobes are made from it. Plastic has a number of undoubted advantages that make it one of the leaders in the modern construction market. It is quite easy to process with almost any tool.
There are no specific skills required here.
During operation, the cabinet will be easy to clean. To do this, you can use a very ordinary cloth soaked in water. This material is not afraid of any liquids, even aggressive ones. Chemical components can also be used for washing.
These advantages affect purchasing activity. The disadvantages are also noticeable. Plastic does not look as organic as natural building and finishing materials.
Furniture panels
Scheme of formation of packages of furniture panels with chip filling: a, b - order of operations; 1 — metal spacers, 2 — finishing lining, 3 — rough lining, 4 — shield frame, 5 — forming frame, 6 — chip filling.
They are the best option for making a built-in wardrobe with your own hands. They are produced in a thickness of 18 mm.
At the same time, they are quite easy to saw into pieces, since they are not as bulky as laminated chipboards.
An ideal option for almost any occasion.
Of course, they are not suitable when it comes to constructing a large cabinet.
Here you will have to look for alternative materials.
The choice of material remains up to the individual. Our goal is to show their advantages.
Cabinet design
Before assembling the wardrobe, you need to finally decide on its drawing and location. Everything is individual here, and there can be no specific advice, just find a good place for the closet. This could be a closet, a niche in the wall, or just a corner in the room.
If free space is not limited, then choose the size of the cabinet according to the golden ratio rule, according to which the ratio of height and length should be 1.62.
Thus, if your ceiling is 2.5 m high, then it would be optimal to choose a cabinet length of 154 cm (250/1.62=154.3). The depth of standard furniture parts is usually 60 cm; there is no need to make it more, otherwise it will be inconvenient to get distant things from the upper shelves. Also note that all internal parts must be at least 10 cm narrower due to the width of the doors.
When you decide on the installation location, you need to draw up drawings. Make a detailed diagram of the cabinet and all shelves with dimensions on paper or on the computer (choose the Basic Cabinet or Excel program). Specialized programs will be able to give you with one button the number and dimensions of the required parts for cutting, which is very convenient.
When modeling interior shelves, you can’t do without your significant other, otherwise you’ll have to redo everything later. Modeling is one of the most important stages, which should be devoted to a separate topic, so now we will only briefly present our sliding wardrobe project with dimensions.
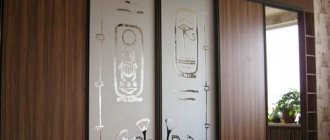
Drawing of a built-in wardrobe in a niche
This wardrobe diagram is designed to be created in a closet with a beam at the top. Therefore, mirrored doors will not go all the way to the ceiling.
Selection of fittings and fasteners
In order for working with a cabinet to bring only pleasure, it is necessary to select only high-quality accessories for it. Here we are talking about wheels, guides and handles.
All these elements can be purchased today in specialized stores without any problems. Roller guides are selected. It is worth ensuring that the videos themselves are made of high-quality materials.
Detailed wardrobe assembly diagram.
It can be plastic or metal.
The main thing is that the assembly is of good quality. As for handles and hinges, you can choose any standard option. The most important thing is that their colors and external design exactly match the interior where the cabinet will be placed.
A wide variety of fasteners will be used.
Its choice directly depends on what material the built-in wardrobe will be made from. You can also use self-tapping screws, but you will definitely need to take care of purchasing special plastic or wooden overlays. They will ideally hide all design defects.
Such overlays can also be purchased at furniture stores. Wooden dowels will look good if the construction is done using furniture panels or plywood. It all depends on the material that was chosen as the basis during the manufacture of the cabinet.
Some features
If we talk about drawers, then it is best to make them from chipboard. This material is easy to process. To arrange them you will need guides. In this case, roller options are suitable. They are mounted strictly in a horizontal position.
It is best to use a level for leveling. A liquid instrument should always be available at home. The retractable cabinets themselves are extremely easy to assemble. For ease of use, special handles can be attached to them.
You can make a built-in wardrobe, which will have both pull-out cabinets and ordinary shelves. In this case it will be universal. You can store almost any clothes here. Doors are sometimes made with glass windows. This allows you to see everything that is inside. The result of the work is a wardrobe, which is currently very popular among residents of our country.
Assembling a built-in wardrobe
Regardless of what material is used to make a built-in wardrobe, the principle of its construction will be the same in all cases. To begin with, you need to make all the necessary markings on the material in accordance with the drawing. This is done using measuring and drawing tools.
Before work, you should clean the area where the cabinet will be installed. Then start applying markings. The most important thing is to position the guides correctly so that they make it easy to slide the drawers in and out.
It is necessary to screw aluminum profiles to the door panels using self-tapping screws, which must be cut in advance.
Wardrobe door assembly diagram.
Before installing the rollers, you must remove the special installation screws required by their design. Large wheels are installed at the bottom, and small ones at the top.
This way the load will be distributed evenly. After this, the screws must be tightened. Thanks to this, the profile and door leaf will be connected.
After the profiles are attached to the canvases, you need to make holes for the rollers. You should not do this right away, as this may interfere with further assembly work.
Now you can move on to the next stage of work, which is the installation of sliding doors.
Installing door tracks requires little effort from one person. You will have to invite an assistant who will work with you to adjust them. Otherwise, there is a high probability that the doors will warp.
To level the height, special adjustable supports are installed.
The guides are attached to the ceiling, and then ready-made door panels are inserted into them. Only after this is the lower guide installed. Now it can be safely secured with screws.
This stage was not final, since during the previous work only a bare box was obtained. It must be filled with internal content.
The interior decoration of a built-in wardrobe can be varied. Some people prefer to install modest, fixed shelves in it. Some friends make pull-out cabinets.
It all depends on the desire of the person and his capabilities. Simple shelves are much easier to make than creating drawers. The main thing here is to make the correct calculations of all components.
For arranging ordinary shelves, the same shield that was used to install the main structure is suitable. You must first make markings inside the cabinet for these same shelves. They can be attached in various ways.
It is best to use wooden dowels in this situation. The number of shelves can also be very diverse. It all depends on the functional purpose of the built-in cabinet.
Installation of guides
The dimensions of the guides must be equal to the width of the cabinet, in our case it is 1318 mm (according to the drawing). But in fact, the width of the cabinet is slightly different. Of course, we won’t cut anything; the difference of +- 3 mm is not so significant.
The first thing you need to do is install the top guide.
Top rail installation
The guides can be secured using self-tapping screws with a 4.2*16 press washer or universal screws with a countersunk head 3.5*16. To do this, we make holes in the upper guide with a 4 mm drill, approximately in increments of 300 mm.
If you are screwing in a universal screw with a countersunk head, in order for the self-tapping screw to “seat” completely, in these holes you need to make a countersink for the screw head, you can use a 6-8 mm drill (NOT through).
Installation of the top guide of the sliding system is quite simple: insert the guide, align it “flush” and fix it with self-tapping screws.
Installation of the bottom guide
We make similar holes for self-tapping screws, but do not rush to fix the guide in the cabinet right away. There is one nuance here.
The bottom guide should be offset inside the cabinet by 20 mm (+- 2 mm). In order to accurately determine its distance from the edge, do the following:
- Just put the guide in the cabinet
- Install one door (two people are needed - one moves the door into the upper track, and the second lifts the wheels and places them into the lower track)
- Take a level and achieve a strictly vertical position of the door (by moving the lower guide)
Naturally, the cabinet itself should already be leveled before this.
When screwing the guide, do not forget to first install the clamps in it.