Decor and creativity
on December 6, 2021 832 views add comment
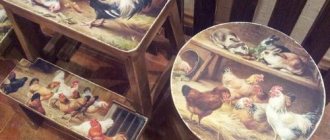
How nice it is to create something with your own hands! And it’s doubly pleasant when, with the help of creativity, you can bring old things back to life, again use them to the fullest, without being embarrassed by their outdated appearance. Craftswomen all over the world know a lot of techniques that allow them to beautifully design different types of products that we use in everyday life. DIY decoupage of furniture with napkins is not a new way to update cabinets, chairs and much more, but now it is at the peak of popularity. How to turn old furniture into an exquisite piece?
DIY furniture decoupage with napkins
- 1 Why do this?
- 2 What do you need to know about decoupage?
- 3 What tools and materials will be required?
- 4 Secrets of technology
- 5 Master class on decoupage of a chest of drawers with napkins
- 6 Decoupage stool 6.1 Video - Decoupage. Glue on a large napkin
What is decoupage and its varieties
Before you start decoupaging a cabinet with your own hands and delve into the nuances of this or that technique, let’s understand the terminology and implementation possibilities.
Decoupage refers to types of applied decoration of furniture and any interior items - boxes, wall clocks, plates, mirrors, etc. According to its stylistic meaning, literal translation, the word decoupage means “clippings”. Literally, the decoration technology involves gluing various cut-outs onto previously prepared surfaces and finishing them in some artistic way. As “clippings” you can use special decoupage napkins, cards, rice paper, newspapers, wallpaper and the most common prints of your favorite pictures on a thin base.
But the most interesting thing is that you can do decoupage of a cabinet with your own hands by combining other techniques, which will give the author’s handmade work individuality and special chic:
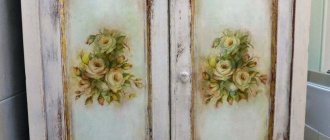
- Applying cracks using craquelure composition.
- Artificial aging of the surface in vintage and Provence style.
- Stencil painting and hand drawing.
- Gilding, patination, staining and tinting.
- Decoration with glitters and other “powders”.
- The use of natural materials (leaves, shells, textiles) to imitate relief.
- Creating a three-dimensional effect with a convex contour made of acrylic paint, putty and texture paste.
Of course, you always need to start from simple to more complex and time-consuming, developing your hand and sense of proportion. But, as a rule, the result always exceeds expectations.
Features of decoupage for polished furniture
Most owners of old, dull furniture want to transform it. But in order to decoupage a polished product, you will need to prepare its surface, otherwise after a while the entire decor will simply flake off and peel off. Working with such surfaces looks like this:
- The coating is sanded using coarse sandpaper. It is not possible to completely remove the polish; just remove all the shine.
- To eliminate defects and level the surface, it must be covered with a layer of putty.
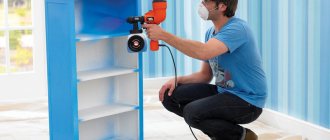
- Since a polished product lacks a natural texture, it must be completely primed using acrylic paint.
- Having completed these steps, you can begin decoupling.
Polished furniture differs from its wooden counterparts in its composition, namely the absence of wood. Under a millimeter layer of varnish you can see paper or a sheet of chipboard.
Decoupage on the surface of solid wood, plywood, MDF and laminated chipboard
Typically, decoupage is used to decorate the front part of cabinets, open shelves and decorative elements (arches, columns, pilasters, etc.). For the manufacture of these furniture parts, solid wood, chipboard, MDF, plywood and other sheet materials are used.
Before you start decoupaging furniture with your own hands, you need to prepare the surfaces chosen for decoration. For example, cabinet doors.
Surface preparation
To prevent the work from “peeling off” over time, the application surface must at least be washed and degreased. But most often this is not enough and more time will have to be spent preparing the basis for future “decoration”. Preliminary work includes four main stages:
- Sanding the surface.
- Padding.
- Leveling the primer using fine sandpaper.
- Degreasing the surface.
If you plan to use decoupage to hide some furniture defect (cracks, scratches, chips), then you may also need to putty the uneven surfaces. The order of work in this case is as follows:
- Sanding and filling of cracks and chips.
- After drying, sanding and priming again.
- Leveling the surface.
- Coloring or tinting (as needed).
- Degreasing the surface.
If you plan to do decoupage of the cabinet yourself:
- On a wooden surface. We clean it, level it by sanding if necessary, degrease it, prime it, paint it with acrylic paint if the wood has been painted (if you plan to leave the natural color, then no).
- On a polished surface. Using coarse sandpaper, remove the polish from the cabinet door, degrease, prime, paint (or tint).
- On a laminated surface (chipboard, MDF). If there are no defects, then you can simply degrease and paint if desired.
You can read about the nuances of painting depending on the material from which the cabinet is made here.
What you need to decoupage furniture with your own hands
In addition to the hand tools, primer, brushes and paint that are required to prepare the surface, you also need materials for the decoupage itself. The list depends on the technique in which it will be performed.
Minimum set:
- PVA glue. Diluted 1 to 1 with water. But it is better to purchase special decoupage glue.
- Brushes for glue and varnish, sponges (pieces of dense foam rubber) . Different sizes and hardnesses - as you work, you will understand which ones you are more comfortable with. With brushes and sponges you will need to “paint” the surface, “impregnate” the workpieces with glue and carefully, without wrinkles, “straighten” them when gluing. And also, after drying, varnish.
- Clippings. You can use special decoupage cards with the desired motifs. Or napkins, newspapers, pieces of wallpaper, printouts, fabrics, etc.
- Furniture varnish (usually water-based acrylic). Claquelure varnish can also be used as a finishing coating if you want to add an antique effect. And also shellac varnish for fixing the effects of staining and toning.
Preparation
Preparing a cabinet for decoupage is the most labor-intensive process, accompanied by dust.
Moving from the center of the napkin, use a brush to carefully straighten the paper, pressing lightly, avoiding soaking and wrinkling.
To work you will need
- Abrasive meshes: significant surface irregularities are processed with coarse-grain, then medium-grain, fine-grained and polished for finishing.
- Grater for attaching the mesh.
- Dry rag, sponge or brush.
- Wood putty.
- A rubber spatula is soft and will seal all the holes and cracks.
- Roller.
- Primer – acrylic can be used for all types of finishes.
- Respirator.
- Acrylic paint.
- Roller.
- Narrow brush.
Periodically it is necessary to moisten the pattern with diluted PVA glue.
DIY cabinet decoupage using napkins, newspapers, cards and printer printouts
The simplest decoupage technique is as follows: glue is applied to the base, and the decoupage motif (for example, a napkin) is impregnated with it. Then the napkin is carefully transferred to the place of gluing and “sealed” with a brush, without wrinkles or air bubbles. After the glue has dried, the decoupage is coated with furniture varnish.
The thinner the glued motif, the more accurate the decoupage turns out - it seems to merge with the surface without any additional techniques. For example, decoupage a cabinet with your own hands or special decoupage cards. Here the technology is slightly different - before application, the picture is placed on the film with the front side and wetted with the back. Then, layer by layer, a thick layer of paper is removed with a hard brush until it thins until the top layer with the picture itself is translucent. And only then, without applying glue, the film is brought to the place of gluing and the film is carefully separated.
The thicker the paper, the more it will have to be impregnated with glue so that it becomes more elastic for gluing to the base - the surface of the cabinet. To hide the protruding “volume” of the edges of the glued motif when decoupaging cabinet doors with your own hands:
- Wait for the glue to dry completely.
- Gently sand the edges of the pasted decoupage with sandpaper and lightly prime if necessary.
- After the primer has dried, coat with varnish.
But many craftswomen, on the contrary, emphasize the protruding relief of pasted applications.
For example, you can outline flower petals with an acrylic outline. Or emphasize the volume of straight lines and the texture of the drawing itself with structural paste.
You can also “sprinkle” the edges of the cutout with glitter, cover it with shells, and then paint it one color with the base.
Often the motif is hand-painted with brushes, as if continuing the pattern onto the rest of the cabinet surface, and emphasized with glaze.
Painting through a stencil also looks impressive, complementing the theme and plot of the decoupage. For example, stencils of letters and numbers in a suitable font when decoupaging a cabinet with newspapers with your own hands.
Decoupage stool
Using decoupage, you can update not only a closet or chest of drawers, but also an old chair or stool, as in this master class.
Step 1. For ease of work, the seat of the stool is removed from the legs.
Stool seat removed from legs
Step 2. The process of sanding the surface with sandpaper begins. If you don’t have a grinding machine at hand, then screw a piece of coarse sandpaper onto a block. Sanding is done very carefully over the entire surface. There should be no irregularities left.
Sanding the stool seat
The block is wrapped with sandpaper
Sitting the stool after sanding
Step 3. The surface is wiped well with a cloth soaked in acetone. This will degrease the surface and remove dust resulting from sanding.
Wiping with a cloth soaked in acetone
Step 4. The surface is primed with acrylic construction paint using a brush. The layers are applied evenly. You can apply up to 3-4 layers of paint. You need to use white color.
Applying acrylic paint
Paint is applied in several layers
Step 5. The painted surface is sanded again with sandpaper.
Repeated sanding with sandpaper
Step 6. Select a suitable napkin and place it on the seat of the stool as it will be glued.
The napkin is placed on the surface
Step 7. The napkin is covered with a layer of varnish. It is necessary to carefully coat the edges and corners. During the process of applying varnish, all irregularities on the napkin are smoothed out. The varnish is applied with a brush. The napkin is visually divided into 4 parts, each of which is coated separately. First, the varnish is applied along the inner edges of the visual square, then diagonally to the corner of the stool, then the remaining areas are coated. Other visual squares of the napkin are also processed.
Now you need to apply the varnish on a napkin (in this example, yacht)
Processing the first visual square
The varnish is applied to the second visual square
The entire napkin is coated with yacht varnish
Step 8. Using a piece of clean sandpaper, carefully remove any excess napkin hanging from the edges of the stool.
Removing overhanging excess napkin
Step 9. The varnish layer is well dried.
The varnish must dry well
Step 10. After the varnish has dried, the surface is sanded again with sandpaper. At this stage it is important to perform the procedure very carefully.
The surface is sanded with sandpaper
Step 11. To decorate the sides you will need brown gouache and a little varnish. They mix with each other in small quantities. The resulting composition is, as it were, driven into the sides with a brush. The actions are carried out with an almost dry brush.
Gouache mixed with varnish
The resulting mixture is beaten into the sides with a brush.
Step 12. The stool is coated with another layer of varnish and dried. That's it, the work is finished.
Another coat of varnish is applied
Video - Decoupage. Glue on a large napkin
This is how you can give new life to old furniture. And it will last for many more decades. And most importantly, no one can boast of exactly the same design; decoupage products are truly exclusive!
5/5 (4)
DIY cabinet decoupage with wallpaper and fabrics
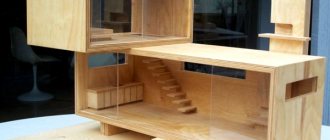
Sometimes decoupage means completely covering an old cabinet with wallpaper or fabric. Or some part of it. For example, the back walls of open shelving cabinets - this technique looks very fresh and original, allowing the furniture to fit more organically into the interior and make it more elegant.
Facades and sidewalls are also pasted over – at will and according to the author’s idea.
DIY cabinet decoupage with wallpaper, photo from curbalertblog.com
The process of covering a closet with wallpaper, newspapers or fabrics is not much different from decoupage with cut out “appliqués”. The only thing is that the material used is not a cutting of some motif, but a piece of fabric or wallpaper of the required size to completely cover the selected surface.
Step 1. Priming, photo girlinthegarage.net
Step 2. Painting, photo girlinthegarage.net
Step 3. Decoupage of cabinet doors and drawers, photo photo girlinthegarage.net
DIY cabinet decoupage step by step master class for beginners
When decoupaging a closet or chest of drawers with fabric, wallpaper, newspapers, or cards, you can use the so-called “decopatch” patchwork technique. In this case, the material is cut into pieces and glued overlapping each other, imitating brickwork or mosaic. After drying, the boundaries of the overlap are sanded off a little, preserving the resulting “relief” of thickenings. Then coated with finishing varnish.
Master class on decoupage of a chest of drawers with napkins
Let's look at an example of how to update an old chest of drawers that has lost its appearance using decoupage techniques.
Step 1. To do this, you will need to prepare all the necessary materials - a ruler, scissors, varnish, napkins, sandpaper, primer. Anything that could interfere with work is removed from the surface of the chest of drawers. Cracks are sealed with foam filler. You can use putty to fill deep flaws. After this treatment, the surface should dry for 3-5 hours.
First you need to prepare the chest of drawers
Step 2. A small block (such that it is comfortable to hold in your hand) is covered with sandpaper. Next, the surface of the chest of drawers is sanded in a circular motion - all the bumps and irregularities are ground down. The resulting dust is swept away.
Wooden block covered with sandpaper
Step 3. The surface is cleaned with acetone and covered with a primer layer of white paint. Then it is sanded again with sandpaper to increase adhesion.
Surface painted with white paint
Step 4: Use an iron to smooth out wrinkles on the napkins. The napkins are ironed until smooth. If the material is multi-layered, then it will have to be divided into separate layers.
Wrinkles on a napkin need to be smoothed out
Step 5. The napkins are laid out on the surface of the chest of drawers the way they will be glued. If necessary, they can be trimmed, the main thing is to do this so that the pattern matches both the trim and the whole napkin.
Napkins are laid out on the surface of the chest of drawers
It is important that the pictures match
Step 6. Napkins are glued to the surface one at a time. Then they are varnished in stages - it is important not to leave uncoated areas. Sometimes, if the paper is very thin (as in this case), you don’t have to use glue - just cover the laid out napkins with varnish, which will keep them on the surface.
No glue is used in this example
Coating napkins with varnish
Step 7. Edging is done. To do this, napkins are cut into small strips, which are also coated with varnish and fixed on the edge. Due to the small working surface, varnish is first applied to the edge itself, then a napkin is applied to it, and the top is again coated with varnish applied with a thin brush.
How to decoupage an old cabinet with the effect of staining, aging with craquelure and bitumen
If you want to decoupage a kitchen cabinet in Provence, shabby chic, country or vintage style, then you will need special tools to create the antique effect. Craftswomen have a truly huge selection of them.
- Lucky . The most popular varnish in decoupage for creating artificial cracks is craquelure. Apply in two stages.
- Stains . Wooden surfaces can be additionally stained with stain to highlight the texture of the wood.
- Bitumen. Using bitumen and wax on the surface of a cabinet door with decoupage, you can create an aging effect.
- Waxes . They are used to patina facades and give an interesting shade to surfaces.
Additional materials at hand:
- Gloves and respirator . Most formulations are quite aggressive to the skin of the hands and have a strong odor. You will also need to use white spirit to clean your brushes.
- Sponges and rags . Disposable sponges are an excellent replacement for brushes - and you can throw them away immediately after use, without wasting time on washing. A soft rag is useful for wiping surfaces, oiling, etc.
Watch a master class on how to decoupage a cabinet with your own hands using one of the listed techniques.
The “patina of antiquity” looks impressive on wardrobes with decoupage and craquelure. The area of surface preparation followed by treatment with craquelure varnish is much larger. Therefore, try to implement your plan first on a small area of material to understand how best to work with it.
Material options
Decoupage can be performed on various surfaces: natural wood, glass, metal, plastic, cardboard, chipboard and MDF products. Each technique has its own operating features. If the furniture is made of materials other than wood, then first it must be thoroughly cleaned of dust and dirt, then the paint and varnish will apply evenly and neatly. Plastic, metal, glass are “difficult” surfaces with weak adhesion, so they must first be thoroughly washed and degreased. It is better to take glue with good adhesion.
Materials for decoupage techniques can be different: images on paper, fabric, decorative ornaments, products made from natural raw materials - in general, everything that can be glued and varnished. When using them, you need to be guided by a sense of taste and proportion. For the first work, it is better to collect a minimum set:
- base blank;
- image;
- priming;
- paints;
- tools (palette knife, palette, brushes, sponges);
- sanding paper;
- varnish
It is better for a novice master to make simple applications, for example, made up of several pictures. Various napkins, pieces of wallpaper, ready-made drawings from magazines, newspapers, images from posters, posters will do. If there is no suitable plot, then you can select pictures from online resources and print them.
Napkins
Napkins are an ideal and cheap material for simple jobs. There are several methods of gluing, for example, with PVA glue, which is pre-diluted with water (1:1). In this case, you need to straighten all the folds and remove any bubbles that form, do not press hard so as not to damage the napkin. The described material has one drawback - the limited size of the finished work.
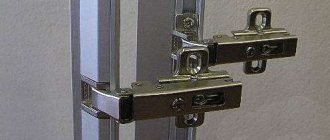
Purpose, features of basic types of furniture hinges, installation nuances
Analogues are decoupage cards and rice paper. They are much easier to use, the images are glued without defects. And also, you should not ignore the primer, it increases adhesion, hides small cracks, and brightens the surface of the base. Using a special file will allow you to easily place and capture the picture.
Decoupage cards
Rice paper
Napkins
Colored pictures from magazines
This is a simple and economical material. They can decorate both small and large surfaces. Pre-prepared pictures are glued to the base and covered with varnish. If there are inconsistencies in the drawings, they need to be corrected. When working with multiple scenes, you can photograph the composition and focus on it. The disadvantage of pictures from magazines is the same as that of napkins.
Wallpaper
When making cabinet decor with wallpaper yourself, you need to know some nuances. An unusual effect is obtained when using vinyl options with a three-dimensional pattern. In addition to basic materials, you can use paint with a metallic effect in cans.
Large surfaces are suitable for this method, for example, tables, chests of drawers, shoe racks. As for polished cabinets and wardrobes, they are first treated with sandpaper, that is, the shiny layer is removed. Then they carry out all the cleaning and priming work. Pre-prepared pieces of wallpaper are glued to the surface and covered with varnish. If you want to give the effect of an aged item, the base is painted in a dark color, allowed to dry and then treated with a candle made of natural wax. Then they paint the product with white acrylic paint and reuse sandpaper. This produces a brushing effect.
The advantage of wallpaper is its availability and wide variety of options. They also have disadvantages. Wallpaper should not be used if there are large chips or dents on the surface. They decorate not all furniture, but only some parts.
Textile
The fabric is used here as a decorative element to add volume and create realistic effects. For example, when making a still life, you can decorate the tablecloth on the table and curtains. This way you can create the structure of old wood, seascapes, and various draperies.
Work algorithm:
- the fabric is thoroughly impregnated with glue;
- laid out on the base;
- it is given the desired shape and volume;
- the work is dried;
- elements of the picture are painted over;
- effects are added (patina, sparkles, rhinestones);
- The work is varnished in several layers and dried.
When decoupaging an old cabinet, for example, you can create curtains on the doors by gluing scraps of fabric to their back side.
Reverse decoupage on glass
To decorate kitchen cabinet displays in Provence and country styles, you can use the reverse decoupage technique on glass. It is similar to the direct method, but is done on the back side of the glass, leaving it smooth. Sometimes craftswomen create some kind of 3D effect using manual drawing on the outer surface of the glass, duplicating some elements of the internal picture.
Cabinet decoupage is an excellent opportunity to make your furniture design exclusive. Don’t forget that the furniture should fit into the interior of the room and not look alien.
Methods
Creative ideas in this area are always being improved. Over time, new techniques appear that craftswomen want to master. There are no restrictions for creativity and imagination. The main thing is to study the issue in detail and practice a little. There are currently 5 types of decoupage known.
Types of furniture pipes, nuances and tips for their use
Each method has a different level of difficulty. For example, classic, original and volumetric decoupage are considered simpler methods, while artistic and reverse are considered to require skill. In addition, the latter create the impression of professional work of high quality.
Execution options will depend on the complexity of the work, the selected materials and surface. Three-dimensional techniques with elaboration of details, using different methods and careful selection of materials are effective. The features lie in the principle of creating decoration. For example, when decorating a cabinet in the Provence style, where there are many noble notes and grace, surfaces with an aging effect are used. Light shades, an abundance of pastel colors, floral motifs and floral patterns are relevant here.
Classical
This type of technique is the simplest, it can be considered a base for others. This is an application on some basis. Decorating in the classic version is possible on various prepared surfaces. The wood is sanded, primed, glass, plastic, leather are degreased with alcohol, the fabric is washed and ironed.
When decorating the bases with multi-layer napkins, you need to be as careful as possible. Such materials are very thin and can tear easily. If you are decoupaging a cabinet with wallpaper, you must first soak it for 30 seconds in plain water. Products glued on the inside look interesting. For this work, it is better to purchase a special decoupage glue; if this is not available, then PVA will do.
Napkins are selected taking into account the style of furniture design
Reverse technique
This technique is applicable to glass surfaces (transparent). The main difference from the classical method is a clear sequence of actions and extreme accuracy. Here the design appears on the back of the glass, then the dishes are used not only as decoration. The downside of this method is that it requires at least minimal skills to work.
First, the image is fixed to the base on the outer part (with the front side facing away from you), additional work is performed, for example, contours are painted, the desired effects are created. Then the surface is primed, if necessary, the outer side is decorated with direct decoupage and varnished.
Art
This decoupage is a combination of artistic techniques to create unique decorations on furniture or other substrates. This allows you to achieve the effect of a completed work with smooth transitions and gradients from the main plot to the main background. The key principle here is the imitation of painting in an artistic style and graceful execution.
Using this technique, you can restore a cabinet or other large furniture, making it original and exclusive. Despite the apparent complexity, you should not refuse such work. Sometimes the plot requires color additions with shading transitions and shading. It is better to learn this technique first, and then move on to more complex things. To begin with, you can use a special drying retardant, which makes it possible to gradually develop the background, create gradients, and halftones. Artistic decoupage is recommended for experienced craftsmen.
Volume
This modern method involves the use of natural materials, fabric flaps, and modeling paste. This decor is suitable for creating three-dimensional three-dimensional (3D) images. Materials used:
- modeling paste;
- wood putty;
- textile;
- special art gel;
- 3D decoupage cards.
Purpose of furniture wax, advice on the correct use of the composition
Using modeling paste, animal figures, flowers, cartoon characters, and various subjects are sculpted. Putty is needed for finishing work, correction, and creating specific effects, for example, brickwork, wood or other natural structures. This method requires more expensive materials than the previous ones.
Original decopatch/depatch
This term refers to a technique using special paper. You can also choose napkins with interesting prints. Decopatch creates the illusion of a complete pattern, but it is assembled from individual flaps, resulting in a kind of paper patchwork.
Here we use rice paper, decoupage cards, napkins, old cards, sheet music, newspapers, magazines, and decopatch paper. The size of the materials will depend on the size of the object. They can be glued overlapping, forming an interesting combination.
This technique is applicable to create a background, as well as as an independent decorative element. Any objects, for example, papier-mâché figures, are suitable for the base.
Mirror is a special element of the interior
It's no secret that mirrors can make a room visually more spacious and bright. It is precisely this that allows the designer’s rich imagination to run wild – there are many ideas for its design and decoration! Let's look at the simplest ones.
Mirror corridor
You will need 5 mirrors, of different shapes and sizes. Hang them in increasing order of diameter on the wall. This composition will look great above the stairs.
A mirror in shells will be an excellent decoration for the bathroom
You will need:
- Glue.
- Brush.
- Mirror without frame.
- Seashells.
- Varnish or spray paint.
On the wall, place a frame of shells around the mirror. Glue the shells to the mirror, first applying glue with a brush.
Do this carefully - the glue should not get on the mirror surface. Before covering the shells with varnish or spray paint, cover the surface of the mirror with newspaper so as not to stain it.
True, it is not recommended to decorate all mirrors this way - they can make the room somewhat cold and uninviting.
Mirror in rhinestones
You will need a small round or oval mirror without a frame. Cut out a ball of thick cardboard, a circle in the shape of a mirror, but a few centimeters wider, as well as many thin strips that need to be glued into circles of the same size - make 3-4 rows of them, which will create your frame.
Glue these circles to the edges of the cardboard ball and secure with glue. Then glue the mirror to the cardboard and start decorating the circles with rhinestones. This way you will have a stunningly beautiful frame.
Mirror frame made of beads
You will need multi-colored or plain beads. You can purchase models of different diameters and shades. Apply glue to the edges of the mirror and glue beads (or rhinestones).
Do not apply glue along the entire perimeter of the mirror at once, so that it does not dry out and ruin the neatness of the composition.
DIY home decor using a mirror is one of the win-win options. Feel free to experiment with different options for decorating mirrors.
Modern style
Do-it-yourself wardrobe decoupage in a modern style will make your bedroom more comfortable and harmonious. To complete this decorative work you will need the following materials:
- wallpaper in neutral colors and discreet pastel colors;
- voluminous flowers, butterflies;
- rhinestones, beads.
Instructions for performing the work:
- If you decide to extend the life of an old polished cabinet, its top layer must be removed using sandpaper, otherwise it will be very difficult to glue the paper.
- Glue the paper using the traditional decoupage method, cover with varnish and let dry.
- When the material has dried well, glue three-dimensional elements in random order - flowers and butterflies, and decorate the wardrobe doors with rhinestones and beads.
Cabinet Decor Ideas
Decoupage creates unique and original things that will be in a single copy for its owner. Most often, such designs are used for certain styles: shabby chic, Victorian, simple city Provence and loft. It is better not to mix styles, since each has its own motives.
It is advisable to make decoration in one style.
Decoration methods
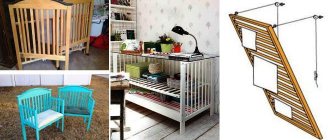
Don't be afraid to radically change the appearance of your furniture. Nothing is impossible for creative people. Restoration techniques have long been developed. Follow the instructions and you will succeed. To update furniture use:
“We are still friends”: Derevianko commented on the breakup with his wife
It’s good to wash often: myths about shampoo and hair care that only harm
Smooth and fresh skin: dermaplaning, or why a woman needs to shave her face
- decoupage;
- painting;
- templates;
- mosaic;
- artificial aging.
Below we will look at each of these techniques in more detail. Before using any of them, you should definitely repair your furniture (if necessary). It is also advisable to remove the fittings so that they do not interfere with creating beauty.