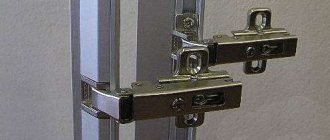
Functionality, practicality and ergonomics are the qualities that are most valued when it comes to the necessary attributes of any home - furniture. Sliding structures—sliding wardrobes—that occupy a minimum of space have become one of the most popular items for quite some time now. Such products are almost unique: they can be built into niches and corners, and due to the doors moving on rollers, they do not steal space when open. Very often, owners make such furniture themselves. They are driven to this “feat” by high prices and the inability to find an item that will fit perfectly into the free space and interior. And in this case, the majority of questions are raised by wardrobe doors. It's no secret that they are the most difficult part of these structures. In fact, the work is not as scary as it is made out to be. Many owners will be able to assemble wardrobe doors with their own hands.
Types of sliding systems
To decide on the design of the door block, you need to know the main differences between sliding systems. There are four groups of them:
- Coupe. The simplest type of mechanism. Easy to do yourself without complicated tools.
- Radius. It is impossible to assemble such a structure without experience and specialized tools.
- Cascade. The complexity of the system is not inferior to the radius.
- Harmonic. The simplest hinged door, sliding on top rollers. The disadvantage is poor vapor and sound insulation.
All sliding systems are based on rollers and a guide profile, but differ in the way the sash moves :
- Along the wall. The best option is to make compartment doors yourself. Disadvantage: free space is required on the wall adjacent to the opening.
- Driving inside the partition. It is more difficult to make such a design. The advantage is saving space along the wall.
- Retractable. The principle of operation is similar to a system where the sash moves along the wall, but special fittings allow it to change its position. Disadvantage: it’s difficult to make and expensive.
Any sliding system consists of a set of rollers, guides, and rails. The mechanism differs in the material of manufacture :
- Steel. For an interior door, a system made of this durable material is chosen. The mechanism is designed for heavy loads. Disadvantage: loud noise.
- Aluminum. Guides from this material are chosen if you need to make a lightweight sliding partition from polycarbonate, plastic, or glass. Advantage: quiet operation.
- There is even a plastic mechanism . It is usually used on accordion folding doors. The frameless device is attached to the frame of the doorway. The sash moves on the upper rollers.
An aluminum guide and steel rollers are often used. This mechanism is inexpensive, but long-lasting.
Required materials and tools
To make a sliding door yourself, you will need carpentry and plumbing tools :
- electric drill, screwdriver;
- a milling machine, but if you don’t have one, you can use a chisel;
- wood hacksaw;
- level;
- screwdriver, open-end wrenches for adjusting the rollers of the sliding system;
- pencil, ruler, tape measure.
If you decide not to buy a kit, but to make a compartment door yourself, the materials you will need are guides, rollers, and fittings . To fix the top rail, prepare a beam with a section of 50x50 mm .
The length of the workpiece is equal to twice the width of the sash. You will need a door frame, trim, anchors, and screws.
Features and installation procedure
To properly make a compartment door between rooms, you need to know when to install a sliding system :
- When choosing the “in the wall” , the mechanism is installed during the rough finishing work of the room. For the niche, a false wall is made of plasterboard. It is important to provide for fastening the embedded beam in the opening in advance. The guide rail is fixed to it.
- If the sash goes behind the wall , the mechanism is installed after finishing. Before starting work, check the condition of the walls adjacent to the opening. They must be strictly vertical without bends, slopes and parallel to each other. Identified deficiencies are corrected, otherwise the coupe will not work correctly.
The leaf must match the size of the doorway. It is important to pay attention to the height of the canvas . The parameter also depends on the chosen method of mounting the mechanism. The roller rail is fixed to a beam or a special profile, but this element can be fixed above the opening or to the ceiling . The height of the canvas also depends on how to make the guide from below . This implies the location of the rails, as well as the presence of a knife or lower rollers.
What to consider when designing a shoe rack
The width of each façade is slightly larger than that of half, a third or a quarter of the doorway (depending on the number of sliding panels). This is explained by the design features of the wardrobe. The vertical profile handles of adjacent facades overlap each other, so the overall width of the panels is increased.
When a wardrobe is made to order, the compartments in which the sliding systems are planned to be installed are made a little narrower. Thanks to this slight shift, drawers, baskets, and shoe racks do not rest against the door leaf when pulled out. The stand, slightly moved from the center, moves the retractable systems a couple of centimeters away from the facade, thanks to which the systems function without problems.
In factory and some custom models, internal vertical partitions symmetrically separate the body opening. So that the retractable structures of such models do not cling to the facades. They need to be moved a little to the side. This can be done using spacer strips that need to be screwed to the internal vertical post. Such components are purchased ready-made or cut from laminated chipboard. Most often the second option is used.
Self-installation of sliding interior doors
Recommendations on how to make a sliding door with your own hands, if the mechanism was purchased separately from the door, consist of the following points:
- The sash is leaned against the opening, where a mark must be made with a pencil on top of the wall. A horizontal line is drawn 7 cm above it. The beam will be located here. The horizontality is checked with a level so that the canvas does not move spontaneously.
- A guide rail is attached to the bottom side of the beam with self-tapping screws. The fixation step is 15 cm. The beam is fixed to the wall with anchors where the mark was made. Rollers are inserted into the rail, and the ends are covered with shock absorbers.
- For smooth opening and better operation of the mechanism, a second guide rail is installed from below. It is cut into the end of the sash or the lower lintel of the frame. The second option is worse due to the formation of a threshold.
- The brackets (the main fastening of the rollers) are fixed to the upper part of the canvas with self-tapping screws. With their help, the sash is secured to the roller carriage, moved completely to the open position, and the location of the lower guide element is measured.
- The canvas is temporarily removed. Depending on the choice of system, a roller or guide knife is fixed to the lower jumper of the box.
- When hanging a sash, a guide knife or roller is first inserted into the rail from below. The brackets are connected to the carriages. Next, use a wrench to adjust the bolts, ensuring the door is horizontal.
- After checking the functionality of the system, side racks are made to serve as a stop for the open and closed door. Then they hide the entire mechanism with extensions and platbands.
How to make compartment doors with your own hands?
Complete installation of compartment doors from scratch involves not only the installation of the working mechanism, but also the manufacture of the leaf. To make a sliding door with your own hands, step-by-step instructions look like this:
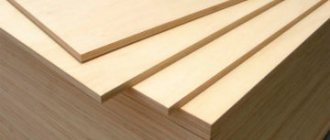
- The door leaf is made 2–3 cm larger than the opening in height and width. It is better to make the sash frame from timber. The elements are connected using a tongue-and-groove locking method. For cladding, it is advisable to use lightweight materials: MDF, plywood, fiberboard, plastic. You can insert glass, laminate and even a mirror.
- When the sash is ready, the installation of the sliding system begins. The beam is attached to the upper guide rail. Measure and install the lower guides. Hang the canvas and adjust the mechanism. A homemade compartment door is made at will, opening behind the wall or going into a pencil case.
The installation principle of sliding systems is the same. The only difference is the way the sash moves. For a novice craftsman, it is easier to make a compartment with an opening behind the wall.
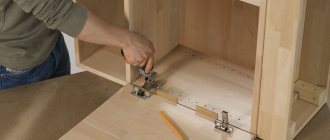
Assembly
When the details of the future structure are prepared, assembly can begin. How to assemble a cabinet without mistakes? To do this, a detailed diagram of the assembly and installation of the doors on the sliding wardrobe is created. Then, using a drill, you need to create holes in the sides, roof and base. Its individual parts are connected into a single frame using special fasteners. To increase the maximum level of permissible load on the cabinet, the junction of the base and top cover with the sides of the structure is reinforced with special metal corners. The back of the furniture is covered with a thin sheet of chipboard, and supports are attached to the base.
You will also need holes for pins in the side walls of the furniture. This will be required for subsequent installation of shelves inside the product. If necessary, storage systems for certain types of things are installed inside the structure: vertical crossbars with hangers, trouser racks, and the like. If the assembly stage is completed, we proceed to the most difficult part. It is the installation of doors that will be the most critical process in the entire work.
Assembly diagram
Types of cabinet doors - opening systems, materials, facades
It’s hard to imagine an apartment or house in which there is no closet for storing clothes and other things. When selecting a piece of furniture, it is important to take into account not only the contents inside the storage system, but also the specifics of the part of the façade of the product. One of the main facade elements are doors. The furniture industry offers consumers different systems for opening cabinet doors; before choosing a specific model, it would be nice to get acquainted with the positive and negative properties of each type.
Today's storage systems can have the following types of cabinet doors:
- swinging open;
- sliding:
- folding;
- lifting
Wardrobe with double doors
The opening system with swinging leaves is a traditional design. Despite the long presence of the model on the furniture market, hinged cabinets do not lose their great popularity.
The design of double doors is incredibly simple and consists specifically of the panels themselves, door handles and parts that are used for fastening. The doors are installed on the walls on the sides of the cabinet. Iron furniture hinges serve as fastening elements. To access the space inside the cabinet, you need to grab the door handles and move the doors to the side.
Basically, in swing-type models, the number of door leaves corresponds to the number of sections; a wide section with a bar is equipped with 2 doors.
The width of one door leaf that swings open should not be more than 65 cm; wider leaves will place a dangerous load on the door hinges, which usually leads to distortion or complete failure of the fittings.
On the furniture market you can now find models of double doors equipped with improved fittings - automated built-in closers, hinges.
The advantages of swinging systems are as follows:
- variety of models;
- good visibility when the canvases are open, the opening angle can reach 130;
- no noise when opening the doors;
- good value;
- long service life (up to fifty years).
The main disadvantage is that free space is required to open the door leaves.
Swing-type door opening designs are very often used in the designs of wardrobes for dresses, in kitchen units, and in built-in storage modules.
Wardrobe with compartment doors
By request, the next post will be on the topic - a children's closet for two. We believe you will like it.
Sliding door opening systems include door leaves, guides, roller mechanisms, and opening limiters. This device ensures the opening and closing of doors by moving the door leaf along the upper and lower guides, while one of the leaves slides behind the other.
The main positive qualities of sliding systems:
- preservation of free space - no additional space is required to open the doors;
- beautiful appearance.
Disadvantages of sliding mechanisms:
In the next article we will talk about the topic of a built-in oven for the kitchen. Let's try to describe this topic in more detail.
- The service life of the door system depends on the material of the rail. Thus, the average service life of a sliding mechanism with steel guides will be approximately 7 years, aluminum rails will usually last up to twenty-five years;
- very high price of the system;
- presence of noise when moving doors;
- incomplete view of the shelves (one part of the cabinet is covered with door panels);
- reducing the useful volume of shelves due to the installation of guide rails. The difference between the internal and external depths of the cabinet can reach about 7cm.
Sliding opening systems are used in the designs of wardrobes and closets.
Folding Wardrobe Door System
Accordion doors are considered a unique alternative to sliding opening systems. The action of the folding mechanism is as follows - the front facade part is fully folded according to the accordion principle. Unlike sliding systems, accordion door designs use only a guide located on top. The door leaf in folding opening systems is not considered solid; it has several leaves that are connected to each other by fastening elements, with each part having a separate fastening to the upper guide.
Choosing a rail structure
It is easier to assemble a rail system with your own hands, although it is more capricious in operation. When deciding on a design, pay attention to its quality. It will be impossible to fix it, to do anything worthwhile, if, having decided to save money, you purchase dubious parts.
Door systems of the “Commander” type have proven themselves in operation. However, do not rely only on the model name: some unfortunate manufacturers manage to replace aluminum guides with tin ones or in some other way ruin a good idea.
The main advantages of using a high-quality rail system:
- Light weight of sashes, even mirror glass ones.
- Simplicity of design and adjustment.
- Variety of facades (8 mm chipboard, mirrors with sandblasted patterns, etc.);
- Quiet, easy to lock in extreme positions.
Rice. 6. Possible options for making your own wardrobe facades with rail doors
When installing this system, no screw connections are used; the door frames are fastened with latches. For DIY assembly, this is the most acceptable option.
An example of calculating the overall dimensions of sliding doors
Let's calculate the dimensions of sliding doors:
- door width;
- canvas height;
- quantity of materials.
Rice. 7. Wardrobe layout
Calculating the width of the doors will give a size of 1556 mm: from the total span of the opening (1572 mm) covered by the doors, it is necessary to subtract the thickness of the right wall (16 mm). Any sliding structures overlap each other, so we add 50 mm to the calculated figure (25 mm for each panel), we get 1606 mm. The extra 50 mm is guaranteed to ensure the absence of gaps when opening, but you can make a tolerance of 25 mm, at a minimum. We divide the resulting width (1606 mm) by the number of planes (2) and derive the width of one sash - 803 mm.
Rice. 8. Sliding wardrobe: location of doors, top view
Let's start determining the length of the canvas by fixing the total overall height from floor to ceiling. In this case it is 2481 mm. It is necessary to subtract 16 mm from it for the pads under the guides at the top and bottom and for the gaps between the guide and the door by 15 mm. We get a canvas with a height of 2419 mm, therefore for the wardrobe it is necessary to make 2 sliding doors with dimensions of 2419x803 mm.
Rice. 9. Door profile of a built-in or cabinet wardrobe
When calculating the amount of materials needed to make sliding cabinet doors with your own hands, you should take into account that the profile is sold in sections of 2700 mm. For 2 doors you will need 4 whips (left and right ends of both leaves).
Rice. 10. Sliding wardrobe: upper (1) and lower (2) horizontal door profiles
The framing profile for the top and bottom of the sashes is made in sections with a step length of 1 meter. Therefore, you will need to purchase 2 meters of the upper profile and 2 meters of the lower one.
Manufacturing of door frames
Let's start assembling the frame; the kit for 1 leaf includes:
- 2 support rollers for the lower guide profile;
- 2 bolts for attaching support wheels;
- 4 self-tapping screws for coupling horizontal and vertical profiles;
- 2 supports for fixing the sash in the upper guide profile.
Rice. 11. Cutting the vertical profile to the required length
- Having made the markings, cut off 4 pieces of the vertical profile of the required length. In the example presented above, it is 2419 mm. Remember that to protect against damage during transportation, the whips are covered with plastic film. There is no need to remove it before cutting; it will protect against accidental scratches.
- The length of the upper and lower profiles is calculated as follows: from the sash width of 803 mm obtained in the example above, subtract 25 mm on the right and left verticals, and then add 1 mm to fit the elements into the grooves. The resulting length of the horizontal profile is 755 mm.
Rice. 12. Scheme of the horizontal profile fitting into the vertical groove
- We determine the drilling location in the vertical profile for the self-tapping screw, which will fasten it to the lower horizontal one. To do this, using a caliper, measure the distance from the end of the profile to the middle of the hole for the self-tapping screw (7.5 mm) and transfer it to a vertical rod. We repeat this procedure with the upper horizontal profile. We do the same with the second vertical whip.
- On the vertical profile on the bottom side we mark holes for installing support wheels. To do this, you need to measure the gap between the end and the middle of the mounting hole of the block with the support wheel and transfer the resulting measurement to the vertical rod.
Rice. 13. Drilling a vertical profile
- Wherever the markings are made, we drill through (through the outer and inner planks) 5 mm mounting holes for self-tapping screws. There should be a total of 3 holes in each vertical rod, the first for fastening the upper profile, the second for fixing the lower, and the third at the very bottom for installing support rollers.
- We increase the diameter of the hole in the outer strip to 8 mm, this will allow you to hide the screw head in it, and the lower strip will be pressed.
Installation of door frames and calculation of filling
After aligning the drilled holes, a self-tapping screw is inserted and the structural elements are pulled together. Before fully tightening the top guide profile, the positioning support must be inserted.
There is no need to screw the bolt in deeper, let it come out from the profile by 1-2 mm. In the future, it will be possible to adjust the position of the sash on the lower support.
You can make the filling for the sashes, created by yourself, as well as the cabinet itself, from a variety of materials. But before selecting them, let’s take the dimensions between the upper and lower horizontal strips (in our example it will be 2360 mm), and between the left and right vertical ones (767 mm).
It is necessary to make a gap of 1 mm on each side, this will allow you to assemble the frame without any difficulties. The filling size will decrease to 2358 and 765 mm, respectively. If you want to make a cabinet with mirror or glass doors with your own hands, then you should remove another 1 mm from each side. This is explained by the laying of a rubber sealing tape, so the size of the filler will be reduced to 2356x763 mm.
Materials for making cabinet doors
Cabinet doors differ from each other not only in the opening system used, but also in the materials used. What types of cabinet doors are there by type of material? Wood, mirror, glass.
Door leaves are used in the manufacture of models of swing-type cabinets. Wood is more durable and has a longer service life. In addition to real wood, in the manufacture of cabinet doors, materials based on wooden boards are often used - chipboard and MDF, which have become popular with consumers due to their affordable cost and variety of finishes.
Mirror and glass facades visually make the space larger than the room. Cloths made of stalinite and mirrors are most often used in cabinets with a sliding opening mechanism.
In the next article we will talk about the topic - custom-made doors for closets. Let's try to describe this topic in more detail.
Depending on the design, there are several options for door leaves:
- solid;
- with cutouts;
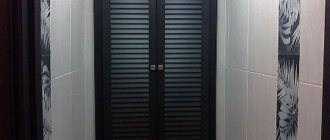
- louvered;
- with glass inserts.
Wood finishing
I decided to use wood stain. First of all, let me say that the reason I applied the finishing material to the wood surface is because I wanted a smooth, neat piece that would show a little bit under the burlap.
I was afraid that since this part of the wood looked darker than the others, it might be visible under the burlap. Now that I think about it, I truly regret using this material. I used thinned acrylic paint.
It's been 2 weeks now, but my workshop still has this unpleasant smell from the finishing. I really hope he disappears.
I should note that I did not apply a clear coat over the stain at all. I'm not sure that this can change anything. At this stage of work, it seemed to me that this idea was a failure, but still I continued to work on my project.
Dangerous fence: an ice wall made of icicles has appeared in the UK
In the 1960s, everyone was called that: in a Ukrainian village, almost all men have the same name
Model Pogadaeva became the first participant in the eighth season of the show “The Bachelor”
Here's what the panels looked like after painting (photo above).
Types of decor for cabinet door facades
To decorate part of the cabinet facade, different designer techniques are used. Furniture manufacturers use textiles, leather, and carved parts as decoration.
In swing type models, unusual door handles act as a decorative element. The mirror and glass facade of the cabinet are decorated with designs applied by sandblasting or by partially removing the mirror layer, photographic printing, and colored stained glass. The highlight of the translucent glass facade is the lighting located in the middle of the cabinet.
Doors for a built-in wardrobe: which ones to choose, what to use and how to make them
What could be simpler than furniture built into a niche? By and large, the niche itself is already a ready-made cabinet that just needs to be equipped with shelves and doors. It is for this reason that a common approach to the manufacture of built-in wardrobes is to form a deep niche from plasterboard and then install chipboard shelves and doors into it. We have already talked about how to make a niche from gypsum board, so in this article we will focus on doors. Together with the site, we will deal with the questions: what kind of doors for a built-in wardrobe is better to make, what to make them from and how to do it correctly?
Content
Periodic attempts to get rid of the clutter in the lower compartments of cabinets consistently fail. A permanent mess does not give you a chance in this unequal struggle. It seems like just yesterday the shelves were put in perfect order, but a week later it takes an inadmissibly long time to find the right thing. It seems that the wardrobe lives its own life, which is not subject to the will of its owners. The situation can quickly be changed in your favor if you integrate retractable storage systems into the furniture. Some of them can be done with your own hands.
Doors for built-in wardrobes: two available options and an alternative to them
It is considered standard to install compartment doors in a built-in closet, but besides them, there are other options, and some of them are not much inferior in their advantages to this common method of closing the closet. Let's get acquainted with the possibilities of all door manufacturing options available to furniture makers in more detail.
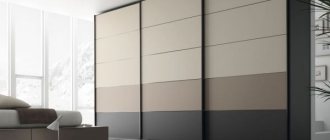
- Sliding doors for built-in wardrobes. This closet closing system has become widespread due to one advantage - when opening, the doors move to the side and do not create any problems when moving around. Simply, the door does not interfere with either the person or the furniture standing nearby. But besides this advantage, sliding doors for a built-in wardrobe also have some disadvantages - for example, no matter how hard you try, you will not be able to open the wardrobe completely. Maximum half. Although this point completely depends on the width of the cabinet - the larger it is, the wider it will be possible to free up space in the cabinet by moving all its doors as far as possible to the sides.
- Hinged doors for built-in wardrobes. This is a classic option that is not in fashion now - it’s no secret that the main disadvantage of such doors is the rather large space required to open them. Let's just say that if the closet is sandwiched between two walls, then problems will definitely arise with opening the hinged doors. Of course, you can put up with them, but why do this if there are better options?
- Furniture roller shutters. Despite the fact that this option can hardly be called a door, you shouldn’t keep silent about it - it combines all the advantages of swing and sliding doors. Essentially, roller shutters are installed in such a way that when opened they do not take up any useful space in the room and allow you to open the closet completely. Among other things, they are quite easy to install with your own hands. If we talk about the disadvantages of such an alternative for cabinet doors, then we can highlight only one disadvantage - the appearance, which not every person likes. If desired, you can diversify it by applying a self-adhesive film with a pattern to the roller shutters.
How to make doors for a built-in wardrobe: sequence of work
When approaching the issue of making doors for a built-in wardrobe yourself, the first thing to note is that you can make almost any type of door with your own hands. Hinged doors, compartment doors and even roller shutters are no exception - the latter, however, cannot be made at home, but installing them yourself is quite possible. Let us consider in more detail the principles of manufacturing and installation of all the options described above.
- Coupe doors. Here, in fact, you only need to resolve the issue with the door leaves - the guides can be bought on the market or in a hardware store to choose from. There are quite a lot of them, and they all differ in both their appearance and purpose. Naturally, those designed for installing sliding interior doors are not suitable for a closet. It is better to give preference to a more compact system of rollers with guides. With door leaves, things are also not too complicated - with equal success, you can choose the profiles that are used for standard compartment doors and fill them with anything, as well as install any sheet material on the rollers. Even chipboard or OSB is no exception (but with the latter you will additionally have to resolve the issue of decoration). The simplest of the options described above is to use furniture chipboard - to install it on casters you only need to select special grooves in it. Well, you will also need to correctly calculate the width and height of the doors.
- Swing doors. Everything is much simpler here - the situation is made easier by the fact that in most cases furniture chipboard is used to make similar doors for a built-in wardrobe - cutting the same furniture hinges into it is not difficult at all. In fact, you only need to drill non-through holes in the doors with a diameter of 35 mm - this can be done using a special cutter (feather drill) mounted on a drill. Everything else (connecting the doors to the cabinet itself and installing handles in them) will not be difficult to figure out - you just need to look at how they are installed on the kitchen furniture and do everything exactly the same.
- How to install roller shutters? As mentioned above, it will not be possible to make furniture roller shutters at home - it is much easier to make mirrored cabinet doors with your own hands. You can simply order them by first measuring the size of the cabinet - these are quite affordable products in the price category. By the way, most companies involved in the production of furniture roller shutters also include installation in the price of their products. Installation of such systems for a cabinet is carried out in three approaches - first, the side guides are installed, then the roller shutter itself is attached under the top, after installation of which the simplest adjustment is made. Such roller shutters open and close without auxiliary devices - the counterweight system allows you to open and close them with your hands, without much effort.
In general, that's all. There is not much left to add - in particular, to say a few words about installing a compartment door for a built-in wardrobe with your own hands. The technology is simple and is carried out in four stages. On the first of them the upper guide is mounted, on the second the lower guide is attached, and at the third stage of work the doors are inserted into the guides (first into the upper one, and then with a slight lift they are lowered onto the lower guide). And at the fourth stage, a simple adjustment of the compartment doors to the horizon level is made. There are screws at the bottom of the doors (two pieces near each roller) - one of them is a wheel position lock, and the second is a regulator. By rotating it, you can quite simply achieve the position of the sash relative to the horizon.
Labor costs
| № | Work stage | Number of hours |
| 1 | Assembling the vertical frame | 4 |
| 2 | Making a bed frame | 4 |
| 3 | Installation of lifting mechanisms | 3 |
| 4 | Total | 11 |
The assembly of the transformer bed cabinet was completed in 2 days.
This do-it-yourself scheme for assembling a bed cabinet will cost much less than ordering such furniture. To build such a simple but responsible structure yourself, you must have experience working with the above tool.
Source: svoimirukamimebel.ru