In apartments and private houses, designers often use zoning. The living room and kitchen combine well. Two rooms connected to each other look spacious, and this layout will make the space cozy. You can update the design, implement interesting ideas, or repeat a design seen in a magazine, TV show, or photo on the Internet. The style in the living room-kitchen can be different, and choosing it can turn into an exciting experience. Before combining rooms, designers advise taking into account the basic rules, creating a project, choosing colors.
Zoning
Designers do not advise giving in to fashion trends and copying design ideas without taking into account dimensions, location and other nuances. Before planning and arranging furniture, every detail is thought through. There are several simple rules that experts advise you to follow:
- Let the room have natural light. To do this, remove excess walls (except for load-bearing ones).
- If the rooms in the apartment are small (12 sq. m or 16 sq. m), the layout of the kitchen combined with the dining room will be the right solution.
- If the ventilation system is not designed correctly, the smell of food will spread throughout the apartment.
Wooden product
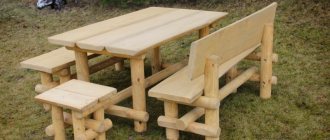
The design looks like this: two benches, or four, which are located along the edges of the table. If your table has the shape of a table, then the option with four benches will suit you. It is important to consider the following features:
- width ranges from 600-900 mm;
- most often the height fluctuates around 750 mm;
- 300-400 mm is the most optimal width for a bench seat.
Depending on your individual preferences and wishes, the appropriate length of the product is selected.
- DIY cornice: a detailed description of how to design and decorate a stylish interior element (80 photos)
DIY folding chair: 110 photos, drawings, diagrams and sketches of convenient and easy options for creating portable chairs
- Do-it-yourself pouf: step-by-step instructions on how to build a stylish and original interior element with your own hands (105 photos)
Partitions
The interior of the kitchen and living room begins to be thought out from the junction of two zones. Here are some of the methods and objects that delimit the space: installing a bar counter; a kitchen island; a large table; installing a low partition. Designers advise installing a wide counter, since you can sit at it like at a regular table, and high chairs are quite suitable for the whole family. However, in small rooms (16 sq m), narrow counters are installed. Kitchen islands are convenient to use, but are only suitable for large kitchen-dining rooms (25 sq m or 30 sq m). Capital low partitions are installed only if it has been decided in advance what they will be used for (for example, as a TV stand).
Benches with elements made of corrugated pipe
Options for making a chair with your own hands, diagrams and drawings
Benches with a supporting structure made of metal look more elegant, sophisticated and more expensive. At the same time, it is not necessary to have your own forge, because it is quite possible to make a frame from profile pipes, which come in different sizes and various cross-sectional shapes.
Regular
Such benches are most often installed in parks and garden plots. They are relatively light in weight, easy to move from place to place and are quite simple to create.
List of necessary things
Everything you need to make such a bench:
- Boards.
- Profile pipe.
- Drill and drill bits for metal.
- Saw.
- Sander.
- Electric or gas welding machine.
- Bolts with rounded heads.
Drawing
The design of this bench is so elementary that it can be easily repeated without any diagrams. However, a ready-made drawing will significantly speed things up.
Product creation
The work is performed sequentially, step by step:
- First, cut the pipe into pieces of the required length.
- After this, they begin welding the seat frame, connecting two longitudinal blanks and one long transverse one.
- Two sections of the profile are bent by 30 degrees and the resulting elements are welded to the finished frame.
- The front legs are attached to the workpiece with scarves.
- Weld the rear legs.
- Using welding, “nickels” are attached to the legs to increase stability.
- Sand the entire metal structure and paint if necessary.
- They begin to manufacture wooden elements, cutting boards of the required size.
- All parts are polished.
- Drill holes for bolts in the metal frame and boards.
- Assemble the back and seat, attaching the boards with bolts and nuts.
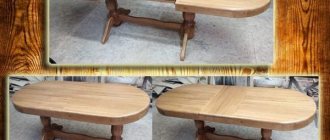
Transformer
This bench will really appeal to those who like to have breakfast in the fresh air. It can even be placed on the balcony of a city apartment, because thanks to its design it does not take up much space. The backrest rises up, turning into a tabletop, and the seat reclines back, leaving room for the legs. If you make a bench according to the dimensions indicated in the drawing, three people of average build will comfortably fit on it.
Tools and Supplies
During work you will need:
- Square profile pipe.
- Wooden slats.
- Board.
- Drill with drill bits for metal.
- Bulgarian.
- Welding machine.
- Sander.
- Metal rod.
- Bolts with nuts.
- Screwdriver and screws.
- Jigsaw.
- Knife saw.
Blueprints
In order for the bench to fulfill its main function - to easily fold and unfold, it is necessary to strictly adhere to the indicated dimensions. All numerical values are in millimeters.
Structure of the tabletop backrest and its lock:
Seat with lock:
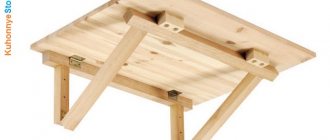
Preparation and assembly
It seems that making such a bench is difficult, but it is not. Using pipes greatly simplifies and facilitates the process:
First, the pipes are cut with a grinder into pieces of the required length and assembled using a welding machine according to the drawings. Start making wooden parts: Cut out a tabletop from a board, rounding its corners. If you don’t have a jigsaw, you can make a rectangle and cut the corners with a router. Cut the slats that will make up the seat. All wooden surfaces are treated with a sanding machine. Assemble the seat into a single structure
It is worth noting that when unfolding the bench it turns over, so all its sides must be done equally carefully.
Fasteners are made. Perform complete assembly of the product using clamps.
In order for a lovingly made bench to serve for many years, you should regularly care for it: paint, varnish and coat the metal parts with special anti-corrosion compounds.
- 5
- 4
- 3
- 2
- 1
Furniture items
A few examples of furnishing a kitchen combined with a living room:
- 1. Sofa. It becomes an object that zones space. The sofa is placed with its back facing the place where food is prepared. In small rooms (less than 20 sq m) a corner is placed, which is placed against a wall installed perpendicular or parallel to the kitchen.
- 2. Set. According to designers, minimalist models without elaborate details look modern. The service, vases or glasses are placed on an open shelf. You can buy a fashionable display case for them. Furniture is placed near the wall. If the space is large (20 sq. m, 25 sq. m or 30 sq. m), then in the central part you can install an island, which also has sections for kitchen appliances.
- 3. Furniture set. The style should be combined with the design of both rooms. In small rooms, a compact table and chairs made of transparent material or painted in light colors look good. You can add a table with a round top to your living room interior. In spacious rooms, the kit is installed near the wall or in the central part. An elongated rectangular dining table would look good here.
Read here: DIY folding table - optimal design ideas, interesting projects and effective solutions for small rooms (125 photos)
Materials for making a country table
You can make your own garden table from various lumber. This could be: boards, construction pallets, logs, plywood, LSDP. Each individual option has its own advantages and disadvantages. When choosing building materials, you should take into account their technical characteristics, cost, and aesthetics.
Which wood is best for outdoors?
Wood of different species is suitable for outdoor furniture. These can be either soft species (pine, fir, spruce, cedar) or hard (oak, birch, ash, maple, acacia).
Attention : too soft tree species, such as poplar, alder, willow, are not recommended for use in the construction of garden furniture.
When choosing wood for the manufacture of outdoor furniture, it is worth considering its resistance to rotting, high moisture and sudden temperature changes.
Important : for beginners in carpentry, it will be easiest to start working with pine and birch. Since this wood is quite easy to process in various ways, and at the same time has high technical qualities.
In the manufacture of individual elements of furniture (table tops, legs, frames), it is allowed to use different types of wood. All individual elements of a piece of furniture are assembled using dowels made of acacia or boxwood.
Multi-level floor
To zone the space, craftsmen install floors at different levels. They advise installing a podium to separate the kitchen and dining room. This option is considered one of the most practical because, among other things, the owners have additional free space where they can hide something. It is convenient to use boxes or drawers for this. Wicker baskets will look good. But such space can remain free.
For podiums, reliable materials are selected that can withstand heavy loads. Usually builders make wooden or metal podiums.
However, such a design should not be made if there are small children in the family, since the podium can become an obstacle for him. In addition, various floor coverings can be used. They will zone the space between the living room and the kitchen and protect the podium from damage. For example, tiles are laid in the kitchen area, and laminate flooring in the dining room. The main thing is to choose colors and textures and combine the finishes correctly.
Varieties of mechanisms and designs
The first thing you should think about before you start designing a bench table is how many people should fit on it. Depending on the number, you need to choose one of the design options.
- Table + benches. The most popular model. One bench, when disassembled, turns into two with a table in the center. Up to 6 people can comfortably sit here. The only downside that can be noted is that the appearance when folded is not very aesthetic.
- Constructor. This bench is also designed for a company of up to 6 people, and if you don’t take it apart, for two. The project includes a tabletop. Slightly inferior in capacity to the first option.
- Flower. It looks a bit like a construction set, but if assembled it will look like a bud—hence the name. An important advantage is the ability to adjust the backrest of the seats, but the downside is that there are recesses on the seats, which makes them less comfortable compared to other models.
- Additional design options. In fact, there are many varieties and designs of such benches. You can make a corner structure if you have empty space in the corner. The design with a coffee table is ideal for those who like to work outdoors, and the polygon table is suitable for a large group of 8 people.
Instagram @daria.lozhnikova
Instagram @daria.lozhnikova
Instagram @daria.lozhnikova
Loft
This year the style remains in demand. It is often used to equip kitchens combined with a living room. This combination gives more free space, which will only emphasize all the details of the loft.
Today, such a definition as “classic style” is used less and less by designers. Loft - any interior design in which various technical elements are not hidden, but emphasized.
For example, stylists play with brickwork, wires or concrete walls. The photographs clearly show how successful it can look like a living room that is combined with a kitchen. For loft, rough and heterogeneous surfaces and rough materials are selected. In apartments decorated in this style, wall lamps are installed. In this case, the light is directed along the walls. Due to this, shadows fall so that uneven surfaces look three-dimensional. At first, loft was viewed with caution, but it quickly became popular. Designers do not hide finishing materials and even fake them. To imitate a concrete surface and smudges, decorative plaster is used.
How to make an outdoor table with your own hands
A bench with a table with your own hands is considered an ideal option when arranging a recreation area in or near a gazebo. For this you will need:
- boards of standard sizes;
- metal studs with washers and nuts for connecting individual parts of the table;
- timber
The process of making a table and benches for a summer house with your own hands is as follows in detail:
- Seats are made according to the existing drawing. The boards are cut into the required lengths (necessarily in double quantities, since there should be two benches). The wood is then sanded, paying special attention to the ends. Short sections (used to hold the seat boards together) are cut at a 45 degree angle.
- Next, the structure is assembled and attached to the bottom of the seat.
- Then we add legs to the obtained result, which are fixed with nails or self-tapping screws, and all parts are tightened with studs and bolts.
- Next we attach the seating boards. They should not be nailed close to each other, but gaps of at least 5 mm should be left. This will prevent rotting and damage to the wood under the influence of heavy rainfall. The seating boards are nailed to the supports.
- The finished seats are secured with four boards.
- Next, the legs are attached using pins.
- Now you can start assembling the table. To do this, the transverse boards for making the tabletop are cut at an angle of 52 degrees. They are attached at such a distance that the table legs fit.
- Then we move on to assembling the legs - crosses. To do this, take two boards and cross them. The intersection of the boards is marked with a simple pencil. At this point you will then need to remove the wood to half the thickness of the board.
- We do the same with the second board. To check how correctly the work was carried out, you need to fold the legs together and they should be in the same plane. Now you only need to connect them with nails, and you can begin installation on the previously prepared structure.
- The final step is installing the countertop. It is attached to the product using metal pins.
Provence
The name of this destination comes from a region in the south of France. Even a small kitchen-living room, the decor of which was inspired by French aesthetics, will be filled with warmth and comfort.
The main thing is that it has a lot of daylight, textiles with romantic prints, and floral patterns. The dining room in the Provence style is designed in pastel shades. Furniture items can be vintage or artificially aged. Plain walls will contrast with large checkered curtains. The door in the kitchen area set is sometimes replaced with curtains made from the same material as the tablecloth. A good addition would be vases and figurines, clay pots, forged metal parts and ribbons.
Design options
Despite the fact that almost all models of transformers use the same scheme, almost all home-made workers try to design a folding bench in their own way, to make its design more individual and attractive.
Color combinations
Stylists advise taking into account the following nuances:
- direction in the interior;
- combination of shades;
- illumination
It is much easier to choose a palette if the style for the kitchen and living room has already been selected. For example, neoclassicism and Provence have their own combinations. In a classic interior, designers combine pastel colors, pale colors, which are slightly diluted with dark shades. In French country houses you can often see soft blue, pink, and pistachio colors. Art Deco designers make up objects and finishing materials in black and white, sometimes beige and brown or silver and black. The main thing is to choose a shade for the walls. White will become universal, it will expand the space, and later you can paint them with any paint. However, in the cooking area, white ceases to look fresh. Beige or gray shades would be more practical. This background will highlight the other colors. In a monochrome interior, designers recommend gluing wallpaper in an unusual color or with a photo print.
Waterproof surfaces are easy to clean, so washable wallpaper is recommended. The colors of the furniture echo the details and accessories, be it cushions for the sofa, curtains or other items.
conclusions
Manufacturers offer a wide range. But the DIY option undoubtedly has more advantages. Among them are an interesting appearance, taking into account individual wishes, preferences and a relatively low price.
This type of design allows you to have a good time, invite friends and be proud of the product you made yourself.