Furniture with a luminescent effect looks unusual and especially interesting. Anyone who wants to make the interior of an apartment original or add a “zest” to the equipment of their summer cottage, this option is suitable – a table with “backlight”. The product is created using epoxy resin and two types of durable paints. All work - from sanding to cladding - is quite accessible to a beginner in carpentry.
All work - from sanding to cladding - is quite accessible to a beginner in carpentry.
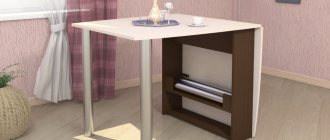
If contrast is desired, the supports are coated with paint that differs in color from the main palette.
When decorating a table, you can come up with your own design based on the quality and texture of the material.
Furniture with a luminescent effect looks unusual and especially interesting.
The benefits of making it yourself
Making a glowing table with your own hands does not require any special material or labor costs. Anyone who knows how to hold a tool in their hands can treat a wooden tabletop using a special resin.
When decorating a table, you can come up with your own design based on the quality and texture of the material.
Furniture with a luminescent effect looks unusual and especially interesting.
Making your own furniture for your garden or home is a great way to save your budget. You are unlikely to see such products on the open market; they are usually made to order and are quite expensive, as they are handmade. Thick boards or a finished wooden table with an interesting texture are suitable for production. Applying epoxy resin takes half an hour. After some time, if all processing steps are followed correctly, you will receive a table with a mesmerizing glowing effect.
Making your own furniture for your garden or home is a great way to save your budget.
Manufacturing materials
To make a table with an infinity effect, you need a translucent mirror or glass covered with a reflective film. It is mounted at the top of the structure. A mirror cloth is also usually needed. Translucent glass should be 10 cm larger in size.
Performance characteristics of sawing tables, nuances of choice
Another main element is the backlight. This could be an LED strip, a garland or another lighting device. For its operation, you need a power supply equipped with a USB output. To adjust the brightness or characteristics of the glow, a programmer and microcontroller are used. To make a box, you can use the following materials:
| Material type | Characteristic |
| Chipboard | Inexpensive option. Easy to process. The product is lightweight and thin, so even a beginner can handle the task. However, fibreboard has a loose structure and contains harmful components. Before use, a protective layer is applied to the sheets - it is better to use the laminated version. The material is temperature resistant, there is a choice of colors to suit every taste |
| MDF | Environmentally friendly and characterized by good strength. Easy to process, does not contain toxic substances. This material is able to imitate the texture and texture of wood. It is resistant to moisture and suitable for complex processing. When choosing MDF, you need to make sure that there are no mechanical damages or chips on the surface. In addition, it is necessary to ensure proper care of the slabs |
| Plywood | The material is durable, but somewhat difficult to process. Plywood has a relatively low cost. Positive properties include flexibility and a smooth surface, which eliminates the need for additional grinding. Coloring of the material is allowed. The disadvantage is the risk of fire and the negative impact of moisture. Plywood contains harmful components in its composition, since glue is used in production. The surface requires additional protective impregnation |
| Tree | Environmentally friendly material, which is characterized by high strength. Quite expensive raw materials, but the price is justified by the long service life. The wooden frame can be repaired if broken. Since wood is flammable, it must be treated with a protective compound. |
Advantages of using a transformable console table in the interior
When making your own coffee table with an infinity effect, it is better to use wood.
All lighting fixtures must be well insulated. It is allowed to use ready-made frames that are suitable in size.
Chipboard
MDF
Tree
Plywood
Deciding on design and construction
The luminous table can be made stationary or folding. When processing, the stage of furniture construction does not matter. To create a luminous effect, use only the tabletop, although you can make furniture entirely with a luminescent surface. Designers agree that it is better to process individual panels - this way the product looks more interesting.
The luminous table can be made stationary or folding.
Making a glowing table with your own hands does not require any special material or labor costs.
Depending on the texture, you can apply some of the resin to the cracks, or cover the entire tabletop, including the edges, with a luminescent compound (with a light blue or other tint). It is necessary to choose a “variegated” option or a relatively evenly glowing one based on your taste and needs.
Designers agree that it is better to process individual panels - this way the product looks more interesting.
Necessary materials
To make a glowing table you will need the following materials:
- boards - 2 pieces (40-50 cm wide, 1-1.2 m long);
- epoxy resin;
- sticky paper;
- luminescent and transparent polyurethane paint;
- sandpaper.
It is necessary to choose a “variegated” option or a relatively evenly glowing one based on your taste and needs.
Anyone who knows how to hold a tool in their hands can treat a wooden tabletop using a special resin.
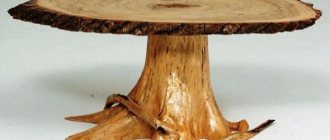
The tree is selected with noticeable cracks of irregular shape. A board with visible areas where branches have been cut and an uneven texture is welcome. Good for cypress or oak. If the tree is not dry enough, expose it to the sun for a while.
The tree is selected with noticeable cracks of irregular shape.
You need to take enough epoxy resin to fill the cracks several times.
You need to take enough epoxy resin to fill the cracks several times.
Making your own furniture for your garden or home is a great way to save your budget.
Stage two: assembling and decorating the tabletop
At this stage of the work, you need to fasten the boards together and fix them on a piece of plywood. The boards are secured using glue and screws placed in the pocket holes. If you plan to stick with just glue, you'll need carpenter's clamps.
You need to do the following:
- lay the planks on a piece of plywood;
- apply markings for the design of pocket holes;
- drill holes;
- coat the boards and plywood with glue;
- secure the boards to the plywood;
- wait for the glue to dry completely.
As soon as the glue dries, any excess glue should be cleaned off with sandpaper, and then the tabletop should be sanded.
The next step is decoration. In the presented project, the tabletop is decorated with a tinting impregnation that reveals and emphasizes the natural grain of the wood.
From Aristotle to Leo Tolstoy: who he played and how K. Plummer is remembered
A huge column of ash, fiery lava, peals of thunder: Etna woke up (video)
NASA plans to explore the surface of Mars using a mini-drone
Required Tools
To finish the furniture you will need:
- Sander;
- jigsaw
The table is sanded both before and after the surface is coated with epoxy resin.
The table is sanded both before and after the surface is coated with epoxy resin.
Before treating the surface, the tabletop should be assembled from two prepared boards.
After some time, if all processing steps are followed correctly, you will receive a table with a mesmerizing glowing effect.
LED strips
When making the table, an LED strip is used, which creates the effect of infinity. The most convenient are self-adhesive tapes.
Operating principle
The LED strip consists of two diodes - a single-chip one, which has one color spectrum, and a three-chip one, consisting of three color spectrums (green, blue, red).
The emanations of the crystals are mixed, forming a wide range of colors.
Specifications
- The type of LED is the main difference between all LED strips. The most common LEDs are SMD 3028 and SMD 5050. The abbreviation stands for “surface-mounted device”, and the numbers indicate the dimensions of the LED lamps: 3.0 x 2.8 mm and 5.0 x 5.0 mm.
- Density. The more LEDs there are per linear meter, the brighter the glow from the tape.
- The color of the LEDs can be any. The most popular colors are white, yellow, cold and warm tones.
- Moisture protection. IP 20 - open, IP 65 - moisture resistant, IP 68 - the highest degree of moisture protection.
Advantages
- High light output;
- High strength and vibration resistance of the tapes;
- Long service life (about 100 thousand hours);
- Various tones and shades of lamp glow;
- The inertia of the tapes is low, which allows you to use the highest brightness from the very moment you turn it on;
- The number of on/off cycles does not affect the service life of LED strips;
- Environmental friendliness;
- Safety;
- Budget cost;
- Not susceptible to breakdowns due to low temperatures.
Note! High temperatures are strictly contraindicated for LED strips.
How to illuminate a computer desk using an LED strip, watch the video:
[rek_custom1]
Manufacturing process: step-by-step instructions
- Before treating the surface, the tabletop should be assembled from two prepared boards. Having connected them, sand the base.
- Pour the prepared mixture of epoxy resin and fluorescent paint onto the table. The composition should fill all the cracks, so repeat the procedure 8-10 times. After this, cover the surface with adhesive paper and leave to dry until the next day.
- After removing the paper, sand the finished surface. After cleaning, coat the base with polyurethane paint.
- Run the sander again over the still damp surface. Remove any remaining resin. If necessary, the edges can be cleaned and the corners rounded with a jigsaw.
A table with a luminous surface can be decorated to your liking
Table with lighting made of concrete and wood
Greetings to all lovers of crafts, I offer for your consideration instructions for making an interesting table with LED lighting. The table top is made of concrete, and the author made the base for the table top from wood. The table looks great, and it’s not that difficult to assemble. If the project interests you, I suggest you study it in more detail! Materials and tools used by the author:
List of materials:
- boards for the base;
— GFRC concrete mixture; - fiberglass; - epoxy resin; — LED strips; - wood oil. List of tools:
- circular saw; — construction mixer; — spray gun for spraying concrete; — CNC milling; - screwdriver; - Bulgarian; — a router for making holes for dowels. Homemade manufacturing process:
Step one. Assembling the formwork
First of all, we will assemble the formwork in which we will make a concrete countertop. The author uses chipboard as a material, since it is the cheapest material for him. We assemble everything using self-tapping screws, treat the joints with silicone sealant so that nothing leaks and there are fewer defects. Thanks to the sealant, the tabletop will also have no sharp edges and will not need to be processed.
Step two. Forming a tabletop
First of all, we mix the GFRC concrete, the author applies the first layer using a spray gun, this will be the front side. After application, carefully smear and level everything by hand.
Step three. We are finalizing the tabletop
We finalize the tabletop, cut off all defects with a grinder, and grind it if necessary. If there are sinkholes on the surface, they can be covered with concrete and sanded.
When everything is ready, without dismantling the formwork, pour epoxy resin into the niches; if desired, you can add dye there. Once the resin has hardened, the formwork can be removed, we do the final sanding and cover everything on top with a thin layer of resin or apply another coating of your choice.
Step four. Wooden base and assembly
We are making a wooden base, here we will need boards with a beautiful texture. We make a slab under the tabletop itself; it can be assembled from boards, connecting them with dowels. However, all other parts of the wooden structure are also assembled on dowels. Finally, we impregnate the base with oil, stain, and so on.
That's all, now the table is ready, the homemade product looks great, you can turn on the color mode to your taste. With such a table you won’t need night lights; it will be an excellent alternative lighting in the dark. This completes the project, I hope you liked the homemade product and found useful thoughts for yourself. Good luck and creative inspiration if you decide to do this again. Don't forget to share your ideas and crafts with us! Source
Become the author of the site, publish your own articles, descriptions of homemade products and pay for the text. Read more here.
The final stage is decoration
A table with a luminous surface can be decorated to your liking. A thick wooden board looks great both in its simple form (even with visible “defects”), and in combination with carved legs. This can be done using a jigsaw. You can varnish them or use leftover epoxy resin, just like the tabletop, to give a unified style to the product.
You can varnish or use leftover epoxy resin, just like the countertop, to give a unified style to the product.
The luminous table can be made stationary or folding.
After processing, you need to sand the furniture using a machine.
After processing, you need to sand the furniture using a machine.
At night, the product will glow in heterogeneous patterns, which creates a “magical”, festive effect, which in itself is a decor.
In the dark, the product will glow in heterogeneous patterns, which creates a “magical” effect.
Depending on the texture, you can apply part of the resin to the cracks, or cover it with a luminescent composition.
If contrast is desired, the supports are coated with paint that differs in color from the main palette.
Creating a festive effect, which in itself is a decor.
Good for cypress or oak.
Stage one: determining the dimensions of the countertop and cutting the materials
Since in the presented project a ready-made base was used to create stylish furniture, it was this base that determined the dimensions of the created tabletop. If you start creating furniture from scratch, then the size of the tabletop can be any.
Why we disliked the new girl, or Why openness and kindness are not always good
There is an unusual holiday in Japan: how to celebrate Cat Day on February 22
Grandmother wrote letters to Yana, but did not send them. A few years later, my granddaughter found them
To create the tabletop in this project, plywood and boards were used. The base is made of plywood, and the surface of the tabletop is made of boards.
You need to do the following:
- cut off a piece from a sheet of plywood, the size corresponding to the base of the table;
- lay tightly on a piece of board cut from plywood and mark them for cutting;
- on the middle board, mark with lines the segment that will be cut and filled with resin;
- cut the boards according to the markings;
- Carefully sand all sawn parts.
In the presented project, the luminous insert occupies the central part of one board, that is, it is narrow and long. But, of course, you can design the lighting in a different way, for example, make an edging from LED strip or make a large square in the center of the tabletop. However, you need to take into account the fact that the larger and fancier the niche for the lighting, the more epoxy resin will be needed to fill it.
Studies have shown that excess vitamin D is harmful to the kidneys.
The girl tried to cure the cat, in the end it became like the Pokemon Pikachu
After the party, the girl decided to apologize to her neighbor: the answer was unexpected