A carpenter's table or workbench is a craftsman's workplace adapted for working with wood. The workbench is a horizontal surface with stops and clamps for securely fixing wooden parts.
An additional function of a carpentry table is to store all working tools and parts for assembling products in one place. Table drawers and shelves are used for this. The workbench is equipped with stops and a vice. Boards can be attached to the table with clamps. The equipment of a workbench depends on its functions.
The carpenter's table must easily withstand increased load. Its surface should be flat and smoothly planed.
Simple DIY wooden workbench
A carpenter's table can be ordered from a hardware store, but it is expensive. Often a craftsman has a limited place to work, for example, a space in a garage or under a shed, where a purchased table may not fit due to its dimensions.
Many models of purchased tables are equipped with circular saws for cutting boards. Not everyone needs this feature, which makes it redundant
Manufacturing theory
The simplest carpenter's table must have strength that can easily withstand shocks, blows, and pressure that occurs during work. The workbench should not wobble.
It consists of two main parts: a durable frame of four vertical posts with a bottom shelf and horizontal braces, and a thick, solid tabletop securely attached to the frame.
Four rows of round holes can be drilled on the tabletop to allow the stops to be installed in a convenient position. But, more often, permanent stops are installed for homemade workbenches.
Material selection
To make a table, ordinary lumber available in hardware stores is sufficient. The main thing is to carefully select them. For the frame, it is unacceptable to use timber and boards weakened by knots and cracks. It is better to take ready-made planed timber of a suitable cross-section.
You can save on material by using unplaned timber. It can be polished mechanically. Use coarse and fine sandpaper attachments on a renovator, drill, or angle grinder. Firmly fix the block with clamps and, without pressing too hard, so that the wood does not burn, first go through the nozzle with coarse sandpaper, and then with fine sandpaper. This processing takes only a few minutes. The polishing is perfect.
Hardwood is preferable, but softwood lumber (pine, spruce) can also be used. Make sure that there are no resin leaks on the lumber. It may ruin the instrument, or you may get stuck.
The workbench frame can be welded from metal structures. U-shaped elements or a corner are suitable. The wooden tabletop is securely attached to the frame using bolted connections.
It’s easier to buy a tabletop, but it’s cheaper to cut it out of laminated wood or assemble it yourself from thick boards connected at the bottom with a transverse beam.
After the tabletop is knocked down, it is carefully planed so that the boards are all in the same plane and there are not even minimal gaps in height between them.
Another option for the countertop is to use thick plywood or laminated chipboard. The thickness of such material must be at least 50 mm.
Finally, if you have an old solid door door lying around at home, you can use it for a countertop – it will be cheap and practical.
Model selection
Before starting the manufacturing process, you should choose the format of the furniture. The table can be straight for placement against the wall, or corner. It all depends on how much space is required for the computer itself and its auxiliary equipment. Therefore, all types should be considered:
- Straight is a classic option that looks like a desk. It contains additional shelves with compartments to accommodate not only computer equipment, but also auxiliary devices. Suitable for short-term work, as it is not always convenient.
- Corner - suitable for long gatherings at the monitor. You can place many shelves on it, and such a table also takes up little space, since it uses hard-to-reach corners for installation. Another plus is savings; its production requires quite a few materials.
- Combined is a comfortable corner model combined with a long straight tabletop. Occupying a lot of space in the room, it is nevertheless equipped with many shelves and drawers in which you can store both objects and things.
If you need more drawers, the best option would be to make a corner or straight computer desk with your own hands.
The number of shelves and additional compartments depends on the format of the furniture and the needs of its owner. For example, it will not be possible to insert more than six drawers into a straight table, and three if you have a system unit. They are usually located on the sides, providing additional strength.
Combined
Straight
Angular
What tools will you need?
- hammer;
- hacksaw or electric jigsaw;
- tape measure or folding meter;
- clamps;
- screwdriver or electric screwdriver.
To cut metal parts or polish wood, you will need a grinder or renovator.
If the frame is assembled from a metal profile, you cannot do without a welding machine and a protective mask.
Necessary materials
- boards and beams;
- screws and self-tapping screws for wood;
- anchor bolts;
- tabletop material (plywood, laminated chipboard, etc.);
- metal corner;
- dye.
For a table with a metal frame, welding electrodes will be required.
Because Since the designs of workbenches are very diverse, the set of materials will differ for each specific case.
For example, if the top of a carpentry table will be covered with metal, then a galvanized sheet will be needed. If you plan to install drawers, you cannot do without special fittings.
The joiner's table does not require additional finishing. It is enough to polish the boards. You can also paint it with any durable paint, or cover it with colorless or dark varnish.
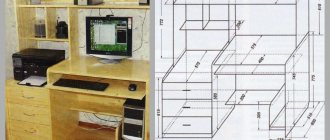
Drawing of a carpentry workbench with dimensions
There are a lot of workbench designs. It’s easy to make a drawing yourself, based on the fact that the optimal table height for work should be at the level of 85-95 cm.
The height depends on the height of the master. It is necessary to count on the fact that the master standing at the table can freely rest his palms on its surface.
He should not slouch or spread his arms to the sides. If it works, then the height of the workbench is correct.
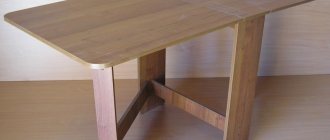
The width and length of the table depend on the location where it is installed. As an example, we give the design of a wooden carpentry table with a lower shelf and a wooden vice. This is a multifunctional workbench for different jobs.
The parts are assembled using spikes. The grooves for the tenons are selected either with a band saw or with a sharply sharpened chisel. It is necessary to make grooves and tenons carefully, without haste, so as not to make a mistake with the dimensions. The connection is reinforced with wood glue.
Manufacturing and assembly of sidewalls
The side of the workbench consists of a support, frames and legs. The support and drawers consist of two halves with figured cutouts. They can be made with a band saw or a hacksaw with fine teeth. The wood is removed from the grooves using a chisel. The edges of the cutouts of the drawers and supports and tenons on the legs are ground.
It is best to make tenons and grooves using a saw with a mortise blade. This ensures high accuracy.
The spikes should fit tightly into the cutouts and not dangle in them. Additionally, the connection is strengthened with wood glue. The halves of the frames and supports are glued together and tightened together with self-tapping screws.
Bolted connections are acceptable. To prevent the bolts from unscrewing while the table is in use, locknuts are used.
Often they are limited to gluing the drawers and supports, but for a homemade design, additional reliability will not hurt. The sidewalls can be additionally covered with plywood or laminated chipboard, but this is not necessary, although plywood walls will provide additional rigidity to the structure.
Manufacturing of pedestals and underbench shelves
The legs provide a horizontal connection between both sides of the workbench, preventing them from wobbling. The design includes four prongs. They all have the same dimensions.
To connect the legs and sides of the leg, a tenon is used, which is inserted into the grooves on the table legs. No glue is used in this connection.
The connection is made detachable, which allows, if necessary, to quickly disassemble the structure for transportation or moving to another location. The connection is made using a standard furniture fastener, consisting of a long screw and a round nut.
A hole with a diameter of 14 mm is drilled at the end of the legs and in the legs strictly at an angle of 90. It passes right through the legs, in the leg to a depth of 95 mm. On the side of the leg, blind holes are drilled to a depth of 32 mm for inserting round furniture nuts with a diameter of 25 mm.
When assembling, the leg is aligned with the hole in the leg so that the long bolt and screw enters to the end of the blind hole where the round nut is inserted.
Using a screwdriver, adjust its position so that the screw fits into the threaded hole on the side of the nut. This operation is repeated sequentially on the other side, using a screwdriver to tighten the screws tightly.
On the inside of the lower legs, screws are screwed into the bars to install the lower shelf. They are called support strips. In the general drawing of the workbench, the parts are designated D and E.
Then you need to measure the distance between the inner walls of the lower legs and cut the boards to make the lower shelf out of them.
The shelf boards are fastened with self-tapping screws. It is better to screw them in at a slight angle so that they pass through the shelf board and are secured in the support strips. One screw from the edge of each board is enough. It is best to lay the boards tightly, without gaps.
Installation of the bench cover
In the center of the upper ends of the collets and on the inside of the workbench cover, blind holes with a diameter of 19-20 mm and a width of 32 mm are drilled for wooden tenons. In the general drawing they are designated by the letter L.
It is best to drill all holes using purchased or homemade jigs, which allows you to accurately maintain the depth and angle of the hole.
Instead of dowels, you can attach the top cover to the sides using metal corners and screws. The connection will be strong and reliable, but if it is necessary to disassemble the structure, you will have to unscrew the screws to remove the cover. The mounting method is most suitable for a workbench that is not planned to be disassembled in the future.
Installation of a bench vise
There are various designs of vices. To attach a standard bench vice, you will have to make three through holes in the table top and secure the vice with a bolt connection.
Carpenter's vices have a different design and are mounted on the side surface of the work table. To do this, three holes are drilled in one of the drawers for the screw guide of the vice and two mounting bolts.
To accurately drill holes, mark the edges of the bolts and guide with a pencil lead, pressing them to the place where you plan to attach the vise. Using the slate marks it will be easy to make holes so that they fit perfectly under the vice.
There are also vices that are attached to the table surface with self-tapping screws. It is best to cut the handles for a carpenter's vice from hard wood so that they do not crack during operation. It can be oak, beech, acacia, cherry, etc.
Video - how to make a carpentry table with your own hands at home
Making a universal workbench is not that difficult. A homemade table will have the functionality and dimensions that a craftsman requires.
Boxes for storing tools in a carpentry table
Boxes for a carpentry table can be purchased ready-made or made from scratch yourself. For the sides of homemade boxes, thin boards or strips of plywood are used, the bottom is made of thin plywood 3-5 mm thick. The edges of the side boards can be joined into a tenon or fastened with metal corners.
The cabinet for drawers is made according to the size of the drawers. One of its walls is the side of the workbench; for the second, you can cut out a sheet of thick plywood or install two vertical boards. The width of the cabinet should be 1-2 cm greater than the side size of the drawers. This is necessary for installing fittings and easy movement of drawers. Guides are purchased at furniture stores.
The simplest guides can be horizontal wooden blocks.
Use boxes from old furniture
If you have drawers left over from old furniture, you can use them. They should be strengthened. To do this, replace their bottom with plywood 3-5 mm thick, fasten it to the side walls and them together with metal corners.
After strengthening, you can store tools and other heavy things in the boxes without fear that the bottom will fall out.
Carpentry table compartment for portable box
Many craftsmen have portable tool boxes. They are conveniently stored on the bottom shelf of the workbench. If you like everything to be neat, you can make a special compartment the size of the box. In this case, the width of the compartment should be slightly wider than the box itself, the height should allow you to easily grab the handle to carry the box.
How to make modules with convenient drawers
The space under the countertop can be divided into separate modules with drawers of different sizes. The height of the module should allow it to be inserted into the workbench and secured there. The module is a box assembled from chipboard or plywood without a front wall. They can also be welded from sheet metal and angles.
Modules can be mounted on both sides of the workbench with an open space in the center, or occupy the entire volume.
How to make a carpentry workbench drawer from plywood
Plywood is a convenient material for assembling boxes. You will need thick plywood 1-1.5 cm for the side walls and thinner 3-5 mm for the bottom. The side walls are connected either by a tenon joint with glue, or (which is simpler) with metal corners on self-tapping screws. The bottom is attached to the walls with small screws or corners.
Carpentry workbench design
A carpenter's workbench is a special work table for a carpenter, on which a worker can process wood manually or mechanically. The most common workbench design is suitable for performing basic types of work:
- fix wood products or its main parts for further processing;
- develop sketches and diagrams;
- keep all necessary tools at hand;
- thanks to its convenient structure, assemble wooden structures at any stage of work;
- use as a workplace for painting and varnish work.
To carry out all these operations on a homemade workbench for carpentry, you must initially build it in accordance with all standards and norms. It is advisable to take into account the basic requirements and know the “composition” of the design. Basic parts and parameters of a homemade table for carpentry:
The table for carpentry work must not only be fully equipped, but also meet certain parameters:
- The height of the machine for carpentry work can vary from 85 to 95 cm. This height will be the most optimal.
- The dimensions of the working surface may vary. The most popular option is a rectangle with sides 183x91.5 cm.
- The support legs and other parts are made individually and can therefore have different sizes.
When making such a table, it is important that the craftsman himself is comfortable performing various manipulations in the process of working with wood. Therefore, all parameters can be selected individually.
Types of carpentry workbenches
Homemade surfaces for carpentry are divided into 3 types:
- The mobile table for carpentry work is a compact design, weighing about 30 kg. The length of the working surface reaches 1 m, and the width is only 0.7 m. A structure of this type may consist partly of metal parts. This type of table is used when working with small wooden parts. You can install a workbench in any part of a small workshop.
- The stationary table for carpentry work is characterized by large dimensions. This type of workbench is not intended to be moved. Typically this is a wall-mounted workbench with a vertical screen for tools. Additionally equipped with numerous drawers and shelves. Due to its large size, it can be used for processing wooden parts of any size.
- The composite type is a collapsible structure, the parts of which are connected by metal bolts. If necessary, parts of the working surface for carpentry work can be replaced or folded out. This is a complex type to manufacture, but very functional and practical in working with wooden parts of any size.
Each type is designed for a specific type of room and type of woodworking. If you sometimes need to make repairs or manufacture parts, then a mobile type of joinery surface would be an ideal option. If the work is carried out at a professional level and constantly, then it is better to make a stationary type of workbench.
Where to put a carpenter's table
The workbench is installed where you intend to work. This could be a garage, a basement, a heated or unheated barn, or a shed in the yard. The desktop can be placed in a separate room of the house, intended for a workshop or in a part of the room allocated for this. Many craftsmen use a wide balcony or loggia to work.
Drawings of a carpentry table are always developed for a specific installation location. If there is absolutely no space to work, you can think about a collapsible table.
Construction drawing
Before starting work to make a computer desk with your own hands, you need to create plans in the form of drawings. They will allow you to correctly manufacture the elements from which a single structure will be assembled. First of all, you should determine the parameters of the table, there are only three of them: length, width (depth), height.
For a computer desk, it is important to choose a medium length. Too small will not allow you to sit comfortably, and a large one will take up a lot of space, as a result, it will also be inconvenient to use. The length should be selected according to the areas required for work:
- Personal - this is where the monitor, keyboard, and other work tools are located. For comfort, it is recommended to choose a length of about 70 centimeters.
- Area of the system unit - for its placement it is optimal to prepare a niche with a size of about 25 cm; if you plan to place it lengthwise, you will need a space of about 30 cm;
- Rotation of the tabletop in corner tables - the best indicator is 60 centimeters.
- Cabinet - this particular element is equipped with drawers where additional items are stored. Typically their length is 40 cm.
Features of making a manicure table with your own hands with a hood
The total length of the table should be about 170 cm, which is optimal for corner structures; a straight line can take 100–130 cm. The depth, which refers to the width of the computer table, is also important. If there is an extension (an additional shelf above the main tabletop), the depth is selected at 70 cm; without it, 45 cm will be sufficient.
If there are drawers, you will need about 65 centimeters of depth, and corner options with shelves at the bottom will be comfortable with a depth of 85 cm. Finally, the height is selected according to the user, if he is alone. Height must be multiplied by 75 and divided by 175 cm, for example, a person with a height of 175 centimeters will need a table 75 centimeters in height.
Having decided on the basic parameters, you should prepare a drawing. If you have the skills and knowledge of design, this can be done on a sheet of paper, schematically drawing a sketch of the table and indicating the dimensions of the various elements. The work will be much simpler if you use special programs, for example “Basis Furniture Maker”.
This and similar services will not allow you to make mistakes in the drawings, they can adjust dimensions, and also mark points for marking and placing fittings. The completed diagram can be printed for use in paper form (as a ready-made action plan). In any case, you can take correctly calculated computer desk plans from the Internet and adapt them to your personal project.
Children's workbench
A children's woodworking table is a place where a child can learn to work, make crafts and models.
You don’t have to buy it at all - it’s easier to make it yourself, taking into account the layout of the children’s room.
Children's workbench made from pallets
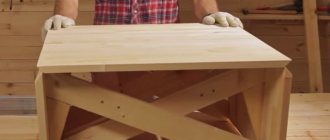
If you have a couple of wooden pallets, they will work perfectly. One of the pallets will serve as a tabletop and a second shelf. Both pallets are held together with side legs to create a stable workbench. Some of the pallets can be sawed off with a hacksaw so that the workbench has the desired width.
It is better to strengthen a sheet of plywood on top of the tabletop. Now the product needs to be thoroughly sanded, painted, and the child’s workspace is ready.
Children's folding workbench
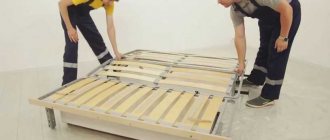
A folding children's table is made according to the principle of an ironing board. Legs made of a metal tube are attached to the top tabletop, made of thick plywood, on a hinge; a rubber tube is placed on the legs below to prevent slipping on the floor.
The unfolded legs must be securely fixed in the unfolded state so as to prevent spontaneous folding.
The folding workbench can be attached to the wall at the side edge using a hinge. In this case, after the legs are folded, it remains on the wall, hanging along it and not taking up space.
How to make a workbench for children
The workbench is made taking into account the growth of the child. You will need boards and timber. The timber is for the legs, and the boards are for the table top and shelves. The basis of the design is a homemade table measuring approximately 40x80 cm.
We attach boards 140-150 cm high to the rear legs with self-tapping screws. We attach a plywood board to them, on which we will hang the tools.
We assemble a shelf under the tabletop - it is needed for structural rigidity and for storing tools, materials, and crafts.
Video: how to make a workbench for a child.
Make a workspace for your child with him - this is an incentive for further creativity. In this regard, a purchased workbench will lose out, easily turning into a no longer interesting toy.
How to Make a Wooden Workbench Clamp
For a children's workbench, you can limit yourself to a simple stop for fixing the processed wooden products in the form of a “swallow’s nest” or a wooden pin inserted into a blind hole in the tabletop. The stop and simultaneous clamping is a bar with two pins.
Wooden edge clamp
It is convenient to press the edge with clamps, but you can also make a special clamp. To do this, a metal profile is cut into the side edge of the tabletop. Metal bolts are inserted into its holes, onto which wooden blocks (one or two) are placed. Pressing is carried out by lambs.
Workbench composition
A workbench of “our” type (conditionally, since it is impossible to accurately establish its origin) consists of:
- A bench (in carpentry workbenches), or a bed (in metalworking benches), ensuring the stability of the entire unit and the ergonomics of the workplace.
- Covers, box-shaped or in the form of a tray, giving the work area the necessary rigidity.
- Shelves; possibly with a tray, nests, and stops on which work operations are performed.
- An apron on which the tool is hung. An apron is not a necessary accessory for a workbench; it can hang on the wall or be replaced with a cabinet, rack, etc.
Note: the height of the workbench is approx. 900 mm. The length and width are selected according to the installation location and type of work within the range of 1200-2500 and 350-1000 mm, respectively.
The lid and shelf are most often made at the same time, one-piece, and are simply called a lid, a workbench board or a tabletop. To dampen vibrations, the shelf is always made on a base (bed, substrate) made of wood. In a metalworking workbench, the bed is covered with a steel sheet of 2 mm thick and can be made of coniferous wood. Its overall strength is sufficient, and the steel tire protects the tree from local damage and the ingress of technical fluids. In a carpentry workbench, a bed made of high-quality (without knots, twists, etc. defects) solid fine-grained wood (oak, beech, hornbeam, elm, walnut) also serves as a shelf; in a workbench for the home, for the sake of simplifying it, without sacrificing quality, it is possible to have 2 -layer construction, see below.
The traditional design of the bench, on the contrary, is collapsible from the same wood as the carpentry shelf. This comes from the master craftsmen of the past, who transported their equipment from customer to customer on a cart. It is from the bed/bench that you should start developing your workbench, no worse, but simpler than traditional ones.