From this article you will learn how to make from, literally, pasture lumber:
- several options for simple but stylish shops;
- two options for benches;
- stool;
- table.
In addition, you will receive plenty of food for the development of your own design fantasies, the implementation of which depends only on your skills in handling tools and the availability of free time.
All garden furniture products that will be discussed are made in a “wild” or rustic style, or in country style. They are perfect for furnishing a relaxation area outside the home. And if you have a “wild log house”, then even more so, you can’t think of anything better to tastefully “furnish” the area around the house for summer outdoor recreation or gatherings with barbecue.
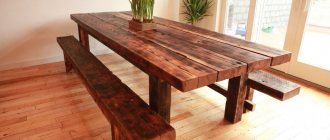
To immediately understand what we are talking about, here it is:
Bench and table without a single nail. With some skill in using a chainsaw, such a kit can be quickly made without a single nail.
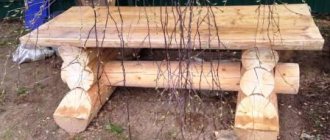
... and about this:
The bench option is more complicated.
Such a product will require more time due to the larger number of parts and the need to fasten them together.
If you don’t mind, you can leave the log bench without protective treatment. But if durability is important to you, then the products should be protected with antiseptic compounds, treated with stain, or varnished.
Tools for making garden furniture
The set is, in general, standard. If you have a workshop, then most likely you have everything you need there. You may need a hammer, mallet, screwdriver (drill), grinder or grinder, axe, plane, stapler, saw...
In order to build a bench or other furniture in a “wild style” quickly and without extra effort, it is advisable to have a chainsaw or electric saw at your disposal. This will make your work a lot easier! Because the main idea in wild furniture projects is the use of half-logs as structural elements.
Of course, it is more convenient to cut whole logs and blocks with a chainsaw. But if you don’t have one, this doesn’t mean that you don’t have the technical ability to build a bench or table yourself. You just have to split the logs with a cleaver and wedges.
In fact, it is possible and not as difficult as it seems. Here is a video on this topic:
In this video they use a cleaver - an ax for chopping wood. Its difference from a carpenter's ax is that the working, piercing part has a noticeable expansion, and the sharpening angle of the blade is wider. You can also use an axe, you just have to drive in the wedges earlier.
On the left is an ax, on the right is a cleaver (the width of its blade may be thicker)
With this method of halving a log, it is important that the log splits along the plane of impact and that the crack does not go sideways. Much depends on the quality of the log. Firstly, it must be dry. In principle, it is advisable to work with dried lumber when building garden furniture, because raw timber can become deformed during the drying process, crack, and your bench, bench or table will become uncomfortable, unstable, or simply lose its aesthetic appearance.
Secondly, if you are splitting a log with a cleaver to obtain smooth materials suitable for building a bench, then it should not be too twisted. That is, the fibers must run more or less evenly, because the crack will go along them. Minor irregularities and deformations along the split surface can be removed with a plane and grinding. In addition, “wild” furniture does not have to be perfectly flat!
What to consider when choosing a material
Wood is a good material for outdoor furniture. It is easy to process and looks beautiful, especially antique wood sets. After decoration, such items look luxurious. Garden furniture made of solid wood with stone or metal trim looks elegant. Wicker sets are light and elegant. Folding sets are very convenient because they are quickly assembled and disassembled.
The reliability of the kits depends on the quality of the wood:
The nuances of using a chainsaw when building garden furniture with your own hands
Here is a wonderful example of a garden bench that is as designer and unique as it is simple:
Exclusive bench carved from a single curved log
But the simplicity is only apparent. Indeed, its design is elementary - just one log, no other parts or fasteners. The entire structure - seat, back - was cut out with a chainsaw. However, to cut such a shaped product, you need to have excellent command of a chainsaw, a feel for the tool and the material. Therefore, this bench is not so simple.
To evenly halve a log, you also need to have some skill. A couple of tips to make your work easier:
- make markings not only at the end, but also along the log;
- if the log is debarked, draw two lines - a strip along which the cut will go, 1 cm thick - this is the approximate thickness that the saw will “eat”;
- if you want to leave the bark and it is inconvenient to draw on a log, then you can stretch a cord from end to end and carefully saw along it;
- secure the log so that it does not “walk” due to the vibration of the saw, support it with wedges, bars, etc.
To decorate a bench or bench, you can lightly run a saw chain along the flat part of the half-logs - the seat and back - and make a few transverse scratches and gouges to age the wood and give the shape a natural look. When sanded, the chipped areas will be smoothed out and will not interfere with use, but the appearance of the bench or bench will become more interesting.
To age wood, firing and brushing are also used - scratching with a hard steel brush.
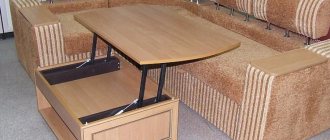
Furniture made from lumber and metal
It is easy to make a hanging garden chair with your own hands from wood. You only need a few thin boards or lining. Their length will be equal to the width of the chair. For fastening and hanging you need a strong nylon cord.
You need to determine the length and width of the hammock chair depending on your own dimensions. Calculate the number of boards by dividing the length of the product by the width of the elements. Cut the material and drill holes in the boards along the long sides. Connect the boards with cord using standard boot lacing patterns. You can also string the parts onto a longitudinally laid rope, lowering it into the hole, passing it under the board and bringing it up. By interweaving all the parts one by one, you can end up with a continuous flexible seating panel. Such furniture made from boards can be a comfortable couch or chair. You can hang a wooden hammock on strong tree branches, on gazebo supports, or on rings specially fixed in the wall.
How to make collapsible chairs?
Folding furniture made of metal and wood is very convenient. It can only be installed in the warm season and removed in case of bad weather. For the frame, it is easiest to use duralumin tubes from old folding beds or strollers. Many of these designs already have a folding mechanism. You just need to modify them to suit your needs.
To simplify the task, the furniture can be made so that only the frame will fold. It is better to make tabletops and seats in a removable version. To do this, you need bars or cuttings 3-4 cm thick. The length of the segments is slightly greater than the width of the frame. You can connect them according to the principle described for the hanging hammock chair. A very successful option would be to attach the bars to dense synthetic fabric (burlap or similar material). By attaching them with a small gap with glue or self-tapping screws, the craftsman will be able to boast of an exclusive product: a rug made of bars on fabric can be quickly spread on the frame. Depending on its shape, you can get a folding table, a bench or a chair for the garden.
There is another way to make seats or tabletops for furniture from scrap materials. Having collected a lot of caps from PET bottles, you need to burn 4 holes in their sides. Pass strong fishing line or wire through them, joining them into a fabric with or without a pattern. Fasten the mat to metal structures.
Simple and solid wooden furniture with your own hands can be made from timber
DIY wild style bench
The simplest piece of garden furniture that you can make with your own hands is a bench. If you have a thick enough log, you can cut it out of a solid mass, and you will get something like this:
Solid log bench
We cut it out with a chainsaw and polish it. We burn it, cover it with varnish, stain – details to taste. This shop looks quite original, despite the simplicity of the design.
If there is no such thick log, then here is the second option:
The ideal combination of ease of manufacture and aesthetic results
It's intuitive how this is done, right? In general, all furniture of this type is folded, just like a log house - the upper elements are placed in cut-out grooves. In this case, the connection goes “into the bowl”, but it is not necessary to cut out an even “moon” groove; it is enough to cut out a triangular segment so that the main half-log sits firmly in the block legs. Such grooves are easy to cut out with an ax - no fine work is required.
The log for the seat does not have to be smooth and without knots; it can also be crooked. The same is true in the case of making a bench. The natural curvature of the material, on the contrary, will add spectacularity to the product - brutality and stylish “wildness”.
Bench made of crooked half-logs
From idea to implementation
Immediately before making a chair, table, bed or armchair from timber, it is necessary to make assembly drawings of the future product. On the drawings of individual parts we indicate the exact dimensions and mark the places of drilling and gluing. If there are carved designs on the product, before assembly it is necessary to apply its outline to the part and cut it out.
To make doors from laminated veneer lumber, all of the above materials and tools will be useful; in addition, you will need hinges, a lock and a door frame. The hinges must be of high quality, since doors made of timber will be much heavier than those made of plywood or chipboard. When creating a door structure, a drawing is also made for accurate and coordinated production and connection of all component elements.
Cabinetmakers make furniture from bars and wooden panels; this combination allows you to use all the advantages of these materials. The bars will make a chic dining table or chair, headboard and stools or garden furniture.
A simple “wild” bench without a single nail
How to make a bench is already clear. To get a bench, you only need to attach the backrest. It can be attached without a single nail, screw, etc.
To do this, take two bars of triangular or trapezoidal cross-section. We get it from one, sawing it in the middle. A triangular section is needed to make a dovetail connection between the bars and the seat and backrest.
Dovetail connection: trapezoidal tenon into trapezoidal groove.
In the half-logs for the seat and back, triangular (trapezoidal) grooves for supports are cut out so that the wide part is inside the half-logs. Then all the elements are connected in these grooves. In the video you will see that it is easier than it sounds in words:
But this is more difficult than it looks. The main difficulty is to cut grooves of the desired shape at the desired angle in the rounded surface of the half-logs. Without certain dexterity and experience in working with a chainsaw, this is not easy.
There is a simpler option - do without the dovetail, use self-tapping screws or nails to attach the backrest supports to the bench. The supports are attached to chocks, which serve as legs; they can also be attached additionally to the seat mass. The back can be secured in the same way by cutting out moon grooves in the supports themselves, if they are thick enough. We get approximately the following:
Simple and stylish - a bench made of logs.
To make the benches and benches described above, you need initial logs from approximately 35 cm in diameter (if we take the same ones). This is dictated by the comfortable parameters of the bench or bench itself. Its height is 40-50 cm. The height of the seat plane is about 1.5 times the diameter of the log. The final calculation depends on the depth of the groove, but it is not necessary to cut it deep.
Another important note:
For two benches, it is advisable to cut the log in half, but for a bench, it is better to move the cutting plane away from the diameter plane, so that the beam for the back is smaller than for the seat. Firstly, your bench will be 5-10 cm higher, which is important if the log is not thick enough. Secondly, do not forget about the center of gravity of the bench.
If the half-log for the back is as massive as the seat, and the back is sloped, then the structure may be unstable. This problem can be solved if you rigidly attach the seat to the lower supports, but you will also be sitting on this bench! And you'll want to sit back!
To prevent the center of gravity from shifting so that the bench will tip over or wobble, the top of the backrest should not extend beyond the vertical axis passing through the extreme points of the lower supports and legs. It is better if the legs protrude further than the back of the bench.
The relative position of the extreme points of the rear legs and the back of the bench
Another significant parameter. There are various original design benches, chairs, etc., but for a standard bench or chair, the backrest slope is within 30° from the vertical axis.
Nuances
Original garden furniture
- Beginning carpenters in the furniture industry should give preference to more economical options that are not too difficult to implement. That is, those for the manufacture of which you do not need to make difficult connections. Make a choice in favor of wood, which is easiest to process and purchase at a relatively low cost, and it is much more pleasant and easier to work with;
- For the practical design of furniture, semi-hard, hard and soft woods, as well as wood-based materials, are ideal. Rounded pine blanks are often used as legs, and boards with a cross-section of 2*12 cm are used for seats and backs; armrests are optimally made from bars 5.5*3.5 cm;
- You can begin the process only after you have drawn up a sketch, either drawn or in the form of a drawing. Before starting work, decide on the dimensions of the future product, and stock up on the following tools:
- bolts;
- screws;
- PVA glue;
- self-tapping screws.
Garden furniture made of logs
Also, as a support for the products, you will need metal corners, pipes, channels and other available materials suitable for the furniture you have chosen. At the same time, make sure that all fasteners are completely recessed into the material, otherwise you may get injured by them while using the furniture.
Country wood furniture must be treated with antiseptic and protective compounds that will protect the parts from rotting and abrasion. If you do not yet have experience in making furniture, when making seats, follow proven technological advice: the product should have a slight slope towards the back, which will make the use of the bench or chair as comfortable as possible.
Another bench made of logs that is easy to make with your own hands
This option is suitable if you have logs of small diameters. To make it clear, it’s better to see it once:
Log bench, front view
The same bench, rear view
Everything here is also clear from the picture. The logs are connected - articulated into longitudinal grooves. Half logs - for the back and seat. For the backrest supports, grooves are cut out in the logs of the “legs”, but, in principle, they can be secured with screws or nails. The bottom bar is necessary for the rigidity of the supports.
What's the main thing here? The main thing is to fasten the supporting logs, “legs”. They can be fastened together:
- dowels - metal or wood; as such, reinforcement can be used;
- nails;
- screws, self-tapping screws.
The fastening elements should be staggered between different logs. When attaching the supports for the backrest to the body of the main lower supports, you need to make sure that the fastening elements do not intersect inside the solid wood.
Checkerboard arrangement of dowels in the joints of logs
Important: Do not screw in a screw or drive a nail from scratch! This way you can split the log, especially if it is small in diameter. Pre-drill the holes with a drill equipped with a long drill bit!
Making tables and benches using simple logs
Of course, not every site has a tree stump or a large log; more often, there are many small or medium-sized logs for creating furniture. Massive logs are used to make table legs; they can be dug into the ground for greater stability. It is better to nail the table top not to the legs, but to the frame encircling the legs from the outside. Drawings of a table and an original chair made of thin logs are presented in the photo below.
Photo - part of the log was used for firewood, and the back was a board
This is the simplest DIY garden furniture, which requires a long, thick log to create. We saw it crosswise, exactly in the middle.
We saw the first log formed lengthwise. You will get a back and a seat. The second log needs to be cut crosswise into two more parts, these will be the legs of the bench.
It is better to make recesses in the legs for the seat to make the structure more stable and durable. To attach the backrest, you will need two boards or two short pieces of wood. Secure it as shown in the photo.
DIY log table
For example, in this video you will see in two minutes how a master will make a simple set of a bench and a table in a “wild” style without a single nail:
By the way, to strengthen the structure, no one bothers to use glue, nails, etc.
The tabletop can also be installed on a wide stump, which remains from a cut down tree. In general, if there are stumps left on your site, take a closer look at them before uprooting them. Perhaps, if they are positioned well, it will be possible to install a bench on them, but certainly - you can put a table! In this case, it is better to knock down the tabletop from rough boards, or use a homogeneous array.
If you make a table entirely from logs, then the principle is the same as in the construction of benches. The structure is assembled in the same way as a log house - the elements are placed in grooves. If it is necessary to increase rigidity, fasteners and glue are used.
The following image shows a one-piece structure that combines both a table and benches. Doing this is technically no more difficult than a separate bench. The only difference is that you need to tinker with calculations and drawings; you can’t do it by eye.
Single chopped design of a table and two benches made of thick logs and half-logs
We make a chair and a table from a stump
Photo - even a simple stump can be turned into a piece of furniture
If the tree stump is large, wide or forked, as in the photo below, all you need to create the chair is an ax or saw.
It’s another matter if the tree stump is small and stands straight. Then it is better to make a seat using several boards and a backrest. The seat will be easy to make, but for the back you need to cut out part of the stump from any convenient side to give this part a slight slope.
Then the back can simply be nailed to the stump. After all the procedures, do not forget to paint the stump with white paint to protect it from parasites and rot. After all the work, you can cut down the stump at the base and move it to a more convenient place.
Watch the video: DIY log furniture:
- The design will be similar to the previous masterpiece. In order for the table to be the desired height, the stump must be at the level of one meter. But there is a technological feature here - the table top needs to be made perfectly horizontal. You will need a device for measuring the slope of the surface - a spirit level, or, in other words, a building level.
There is no point in buying it (expensive), but you can ask your friends who work in construction. If it is impossible to get the device, you will have to try to place the table top exactly horizontally.
To create a table, nail a cross beam to it, and then nail the boards onto it to form the table top. You can even make an interesting ensemble using several tree stumps, which is shown in the photo to the left.
You can also make a large umbrella over the table; to do this, drill a hole in the center of the stump and widen it with a round file. Insert the umbrella shaft into the resulting recess.
A simple way to make a “wild” stool from thick wood
... which you won’t be ashamed to put in your home. Look how easy it is:
Please note that it is not at all necessary to master a chainsaw, since the scale of the workspace allows you to correct the unevenness of the first cut.
Such a stool will fit into the interior, as well as a table made of logs, especially in a log house in the “wild style”.
Another method of making a stool, where you don’t even need to cut anything out:
A thick enough piece of wood can make an excellent chair. If you burn it, sand it and varnish it, you get an exclusive product that would be a pity to take outside:
What tools and materials will be needed
To operate, you will need a chain saw with a gasoline or electric motor. The cutting edge of the chain will need to be sharpened to work with hardwood. In addition, for an electric saw it is necessary to use a special extension cord designed for high currents. A home electrical extension cord is not suitable for this purpose. As practice shows, when trying to cut a log of small diameter, 25-30 cm, the insulation of the wire melts and the extension cord fails.
In addition, to make a bench you will need:
- The plane is manual or electric, the model is selected depending on the volume of work and the size of the bench;
- Hand carpentry saws. It is better to have two types of tools, with wide teeth for rough cutting of wood and a bow saw with fine teeth for fine cutting of logs;
- Carpenter's ax with a narrow blade;
- Carpenter's chisel with a wide and narrow cutting blade;
- A rotator, an electric drill with a set of large-diameter drills for drilling holes in a log;
- Gauge for depth and width of cut.
If the bench is planned to be made from rounded logs and scraps of material remaining after assembling the log house, then, as a rule, no problems arise. It’s another matter if you plan to build a bench from an old tree that has just been cut down. You may need to rent a table saw to cut the wood for the bench into boards and timber, or have a professional carpenter do the work.
Important! You should not try to trim logs for a bench with a diameter of more than 30 cm using a chainsaw, much less an electric saw. Such work requires certain professional skills and knowledge of pruning techniques.
Homemade sawmill
Using a chainsaw or an ax with your own hands, you can cut a log for a bench with a diameter of 20-25 cm. As a rule, the amount of work is small, and all mistakes made can be easily eliminated with a jointer or electric plane.
A good material for building a bench would be pine, birch, apple, and spruce wood; walnut and cherry are a little less processed. You definitely can’t use poplar, oak, or acacia for a bench. Poplar wood quickly rots even under a layer of bark; the last two materials have very hard and sticky wood, which is difficult and time-consuming to cut at home.
For inspiration
Any material can be used to make garden furniture if you get creative. Any snag, branch, or stump. Below are photos that confirm this.
Using curved branches to decorate the back of the bench and armrests
Wild-style bench made of half-logs and crooked branches
Designer bench made of logs and branches with an awning from rain and sun
Designer swing bench made from driftwood and naturally shaped branches
Simple and elegant
Basic rules when creating any furniture made of wood
The rules are based on the fact that country tables and chairs differ from home ones
Outdoors, wooden furniture is forced to withstand bad weather, rain, bark beetles, and frost. Its strength and reliability must exceed the requirements for home interior elements.
To make furniture from wood, choose those parts of the wood that are not damaged by bark beetles and have not begun to rot. Do-it-yourself garden furniture is made in the following order: after all the work is completed, it is necessary to coat it with paints and varnishes in order to protect the products from pests and precipitation.
Photo: if you have a head and hands, you can also build an excellent table with benches from old logs with your own hands
Also, garden furniture made of wood requires sanding with a file or sandpaper to remove burrs, so that splinters do not dig into the skin during use. If you use bolts, screws, or self-tapping screws to connect parts, make sure that there are no protruding edges. This will prevent you from getting cut.
To make wooden furniture quickly, economically, and with good results, follow several technological rules:
- even the simplest product requires drawings; drawing a drawing on paper will take little time, but will protect you from bitter mistakes;
- making legs in an X-shape will give the structure more stability and reliability than when creating a U-shaped support;
- It is better to make the backrest slightly inclined, then resting on a chair or bench will be much more comfortable;
- to create furniture it is not necessary to use only boards and beams. Stones, boxes, bricks, large logs, branches or stumps on the site can greatly simplify the manufacture of furniture and make it more original;
- It is better for inexperienced carpenters to try to make furniture that is simple to make, without difficult joints.
How to make a bench from logs for a summer house with your own hands
Despite the apparent simplicity, the manufacture of benches and benches from massive logs and beams has its own secrets and nuances. For example, almost all log benches are assembled using metal pins and studs. A metal profile, square pipe, and thin fittings are also often used. Typically, such fasteners remain hidden in the thickness of the log, and visually it seems that the bench is simply made up of individual pieces of material.
A simple do-it-yourself half-log bench
One example of a successful combination of a massive thick log and a metal frame is shown in the photo below.
The seat and supports of the bench are made of a massive half-log blank with a diameter of at least 60 cm. The parts are fastened together using embedded metal elements and pins. For the back of the bench it was necessary to make a frame from a square profile, and for the top edge a thin log was used, cut on a machine to give it a hexagonal cross-section.
The only difficulty may be adjusting the plane of the bench seat; often half-logs are cut and processed with a plane before installation on the supports. This is not entirely correct, since when assembling a bench it is very difficult to perfectly align the position of the log, and a situation may result as in the photo below.
From a technological point of view, it would be correct to install half a log on supports, and then use an electric plane to bring the bench seat plane to the required level of quality.
How to make a garden bench from a round log with your own hands
It is not necessary to try to build a bench from large-diameter material. Moreover, massive logs are not easy to process, cut and adjust to size during assembly. It is much easier to use logs and scraps of logs with a diameter of 10-15 cm.
To make a simple bench from a round log, you will need to select 2 logs with a diameter of 25-30 cm and a length of 60 cm. From these we make blanks for the supports of the future bench. We cut off part of the material with a chainsaw or an ax so that we get a platform 15 cm wide along the entire length of the workpiece.
To make a bench seat, you can use any material at hand, timber, thick boards or even an ordinary slab. The most difficult part of the project is making the backrest. We sew two small pieces of logs with a diameter of 10 cm on top of the already installed seat. It is easier to attach the sides of the bench using ordinary carpentry screws with a length of at least 140 mm. On the back side you will need to lay spacers made of the same material used to make the bench.
This model does not have rear posts, like a regular bench with a backrest. We cut the back support with a chainsaw or an ax from a single piece of log and attach it to the sides using metal pins.
How to make a bench from birch logs
Often there is simply not the right amount of material of the required size and texture at hand. This does not mean that the dacha will be left without a beautiful and comfortable bench. You can review your firewood supplies or use old trunks of dried birch trees in the nearest copse.
The only problem is that a birch log is relatively small in size. Therefore, we have to combine and look for new frame assembly schemes.
One of these options is shown in the photo below.
To make a bench, the remains of the trunk and short cuttings of branches with a diameter of 6-8 cm are used. Making such a bench is no different from assembling furniture from ordinary timber. You will need to make front and rear racks that are connected to each other by cross members. In addition, the lower part of the frame will need to be reinforced with a horizontal brace to prevent the bench from swaying.
The most interesting part of the bench is its back. It is made of two horizontal sections of logs, between which a vertical sheathing of thick branches or short logs is sewn. In general, the design turns out to be very unusual and quite interesting in design and style.
How to make a bench with a back from logs with your own hands
To make a bench you will need a log of large diameter sawn in two, the larger the better. The optimal size is considered to be at least 40 cm.
For the seat of the bench we use the thick part of a half-log. In order for the bench to be strong enough, the thickness of the workpiece must be at least 15 cm.
We make two supports from it
To connect them to the bench seat, we use threaded rods with a diameter of 12 mm and a length of at least 150 mm. For each support you will need at least two pieces.
The next step is to cut out grooves for installing holders for the back of the bench from timber with a section of 60x60 mm. The blanks for the holders will need to be attached to the seat in the bench, so they also have to be sawed at an angle of 65-70°C.
Important! The main difficulty in installing the bench back holder is to align the position of each workpiece relative to the seat so that they are in the same plane.
We fasten the holders with self-tapping screws both to the supports and to the seat of the bench.
All that remains is to attach the back itself to the holders
In a similar way, you can make products that are more interesting in style and design. For example, add carvings or simple patterns; one of the options for making a bench from a log with your own hands is shown in the video
Chopped log benches
Many summer residents prefer to build simple garden furniture from what is on the site. Moreover, high-quality rounded logs are expensive, and it doesn’t always make sense to buy it for the sake of making one or two benches.
Chopped furniture can be no less interesting and attractive. For example, bench seats can be made from hewn wood left over from cutting an old apple or walnut tree, and stands from branches dried and sawn to size. The greatest difficulty is making the back of the bench itself, since it is a kind of face of the entire structure. It has to be cut from a thick board, giving the shape and outline of a chopped log.
After sanding and varnishing, the chopped bench looks no worse than models made from real logs.
How to make a bench from the remains of a rounded log with your own hands
Using standard material used for assembling log houses and log buildings to assemble benches greatly simplifies the work. It is much easier to saw a log of the same diameter using locks and assemble it into one structure.
Moreover, the process of cutting blanks and making grooves is greatly simplified when using standard templates and patterns.
The only significant drawback of this technology is the inexpressive appearance and design of the bench. The products look quite simple and give the impression of industrial furniture.
Solid log bench
Of all the options for a garden bench, this is the simplest; you can make furniture with just a construction tape and a normal chainsaw with a well-sharpened chain.
In addition, you will also need a log of the largest diameter that can be obtained on the site. It is installed and leveled in place and they begin to cut out the bench from the log with a chainsaw. You will need to cut a sector to the size of at least ¼ of the log. It turns out to be a very simple and cute bench.
Country furniture does not have to be primitive in style and design; a bench can be decorated with patterns or stylized as a garden sculpture.