by Alexey | Crafts Decor Workshop Furniture | Saturday, February 17, 2018
| Follow Make-Self.net on Facebook and be the first to read our articles. |
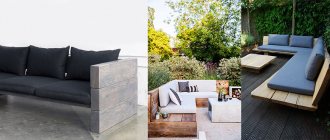
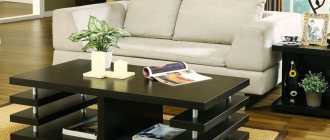
We bring to your attention a hit parade of coffee tables that you can make yourself. I don’t promise that they will be stylish, but everyone will find something that will touch his heart, his hands will tremble and he will rush to the workshop. Don't drink beer, but create a new piece of furniture for your home. Take a look at 25 examples of coffee tables , maybe they will inspire you.
Table from a suitcase
An original table can also be made from an old suitcase. For such a piece of furniture, you will need to purchase furniture legs. They can be either metal or wood. If you use special wheels, you can get an original model of a mobile coffee table. You will also need a screwdriver, screws and a piece of plywood for the job.
Related article: Rhododendron - photos of shrub varieties, planting, cultivation and care
First of all, you need to cut a rectangle out of plywood, the dimensions of which must correspond to the width and length of the bottom of the suitcase. Plywood is placed on the bottom of the suitcase and markings are made for the legs. Using a screwdriver and screws, the legs are attached to the base of the suitcase. Then felt is glued to the base, inside the suitcase. The table is ready. There are many different options for turning an old suitcase into a coffee table. By choosing the right legs, the table can be made in a classic or retro style.
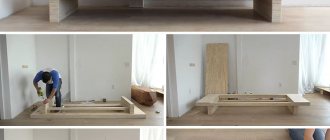
Tools
The first step, of course, is to determine a number of tools that will be needed to make a desktop:
- Plane. It will be needed to level the tree.
- Chisels. They are needed to make holes where different parts of the table will be connected.
- Saws of various sizes that cut or make cuts in wood of various thicknesses.
- Pencil and ruler.
- Screwdrivers.
- Clamps. They are needed to ensure that the components of the table stay together for a while.
- Sandpaper. It is needed to make the wood smooth.
With modern technology, it is possible to use devices that can easily replace ineffective tools. For example, an electric jigsaw can easily replace saws, and a sander will make wood smooth without much effort.
Read here DIY armchair: simple instructions, expert advice and design of modern homemade furniture (115 photos)
The milling machine will make the perfect grooves for you. A screwdriver will quickly and effortlessly tighten the screws, and instead of a ruler and a triangle, you can use a building level.
Think everything through before you start
Before creating your first masterpiece, in addition to the idea of how to make a coffee table with your own hands, you need to think through all the little things in advance. Is there enough material available now? If not, does the budget allow you to purchase everything you need?
Tools for work must be available and in good condition. If you don’t have the skills to use a certain tool, it’s important to think about who to ask for help and whether he will be around in the near future.
Pallet table
Even the most ordinary pallets that can be found on each one will make an excellent coffee table. To work you need to prepare:
• Wooden pallets; • Hammer; • Drill; • Nail puller; • Clamps; • Glue; • Screws; • Screwdriver; • Legs or wheels; • Primer; • Soap.
First of all, the surface of the pallets must be cleaned of dirt. To do this, you can use a drill with a wood cutting attachment. You should also use a nail puller to get rid of old nails and disassemble the pallets into pieces. All damaged and broken pieces of boards must be glued together. Gently clamp the boards with clamps and let them dry thoroughly. Then glue the prepared parts of the tabletop on the back side and again with clamps. After complete drying, the surface of the table must be coated with a layer of primer and then varnish. Wheels or legs must be attached to the back of the resulting table. To make it easier to attach the screws to the table, their surfaces can be rubbed with regular soap.
Article on the topic: How to properly treat wood in a bathhouse?
After all the work done, you will get a functional, stylish and compact table.
Old window frame at the base of the table
From an old window frame you can make a table that matches the “romantic” style. There are different modifications. Therefore, everyone has the right to add their own twist. But in the manufacturing technology itself there are such general points.
Step by step guide
- The old window frame is cleaned of dust and dirt. To do this, the glass is removed (it can be replaced with a new one with increased thickness), and a layer of old paint is removed. All metal parts on the surface of the frame are removed. It is smoothed with sandpaper.
- The frame is covered with white paint. You can use acrylic, after which the wood dries and is cleaned with sandpaper. The product will have an archaic look. You can use two paints (dark and light tones). First, the frame is covered with a dark shade of paint, then after drying - a light shade. The surface is treated with sandpaper until the first layer appears. A very intricate pattern is created.
- Legs 34 cm high are made from cuttings. They are smoothed with sandpaper.
- 4 trims are selected (from wood or thick chipboard), equal in width to the frame. Their length is 8–10 cm. The edges are cleaned with sandpaper.
- In each of the scraps, 4 through drillings are made in the corners. Along the center line, at the same distance from the edges, 2 more holes are drilled: one for fixing the leg, the second for more reliable fastening to the frame.
- Each of the scraps is attached to the leg with a long self-tapping screw or confirmat (European screw).
- Trimmings with legs are attached to the front of the frame. When the structure turns over and sits on its legs, you should end up with a “box” or a kind of niche or recess. The front part of the frame (covered with glass) is directed towards the floor, and the open niche is directed upward.
- A rough thin rope is wrapped around each leg. The ends of the rope are fixed with a glue gun.
- The glass is washed and degreased on both sides. Various accessories are placed in a niche on the glass. These can be sea pebbles, shells, colored glass. They need to be laid out with an imitation of negligence and chaos. You can arrange these elements thicker in one corner with a gradual decrease diagonally, leaving the opposite corner clean. Each element is fixed to the glass with transparent two-component glue. The height of small objects should not protrude beyond the edges of the frame.
- Glass with a thickness of 4 mm is cut out with indentations of 1.5–2 cm according to the size of the frame. This is a table top that should cover the frame box completely. It is better to cut glass in a workshop. There you can also ask that the edges be sanded and holes drilled in the corners (4 mm in diameter). The glass is ground on both sides. Then they cover the frame with it. To fasten the glass, cut out leather or rubber gaskets for the washers. Self-tapping screws are screwed into the top. They must be screwed in extremely carefully, without excessive effort, so as not to damage the glass.
- Next, take a coarse thick rope. A loop is made at one end, equal to half the long side of the frame. The rope folded in half is glued from the center to the edges. No glue is used in the loop area (10–15 cm). The loop remains free for tying a knot. The long end of the rope is used to circle the perimeter of the glass. The rope is fixed along its entire length with glue. Having reached the loop, they thread the rope end into it, imitating a sea knot. The rope is pulled back, doubled, and glued to the frame.
- The outer side of the frame is decorated (the corner where many decorative elements are concentrated). You can continue the composition by lowering decorations along the table leg. It will appear that the table details are flowing out.
The table you created with your own hands is ready. You can enjoy your own creation, surprise your guests and share with them the joy of contemplating an original item. Such a table will enliven the interior and become its visual focal point.