The circle is a perfect figure. If you look at this from a certain point of view, you will notice that almost all things around us, one way or another, have a round shape.
Psychologists say that on a psychological level, rounded shapes have a positive effect on a person. For example, if you negotiate at a round table, then with a high probability they will be successful. Your interlocutor will feel as relaxed and at ease as possible.
Dear reader, it’s not just that we made several analogies with rounded shapes. Today we want to talk about making and assembling a round table with our own hands. Make yourself comfortable, it will be interesting.
Round table options
We will not list all the variations of the round table, because there are countless of them. However, there are several classic variations that are always relevant:
- A small round table with one massive leg in the middle.
- Classic table with 4 legs.
- A table with 4 legs that has several “floors” for storing books and magazines.
Manufacturing and assembly
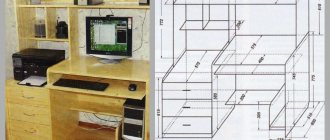
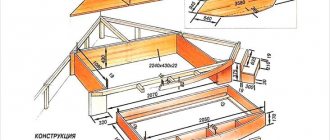
Blanks for the table are cut out with a jigsaw according to the drawn drawings. Each part is cleaned with sandpaper.
Attention! Experienced craftsmen recommend processing each element in 4 steps. First polish the surface and apply a layer of varnish. After drying, repeat the steps.
Lay out on the diagram and connect the blanks together with glue . A disc is cut out of plywood using a paper template. The legs are made of timber with a section of 12x5 cm.
Reference. If we take a standard 3.5 m long beam as a basis, it will yield 4 legs of 76 cm each. This is the optimal size.
The circle is glued to the finished bars. Blocks of a given size are cut out inside and polished. Next steps:
- The prepared parts are fixed with glue into a circle made and pressed on top.
- When the support disk is ready, the legs are attached using 4 bolts, having previously made holes for them. Initially, drill a plane with a diameter of 0.8 cm, then an end of 0.5 cm.
- The tabletop and crossbars are formed.
Attention! The dimensions of the crossbars depend on the parameters of the standard workpiece. The length of the plywood is one and a half meters. The outer diameter of the support should be 128 cm and 104 cm internal. The legs are installed with the flat part inward. The dimensions of the plank are 12x106 cm.
What can a table be made from?
There are many materials for making a round table, ranging from a variety of wooden coverings to durable metal fittings.
Craftsmen most often use the following materials in their work:
- Chipboard.
- MDF and plywood sheets.
- Stones.
- Glass.
- Metal elements.
- Durable plastic.
With these materials, desire and a little imagination, even a beginner can create a truly beautiful and practical table.
We would like to note that handmade furniture is most valued, because it is one of a kind and made with love.
Preparatory work
I propose to consider one option for self-assembling a round wooden table.
It is simple enough that even a beginner can assemble such a structure. After re-reading the assembly features and the progress of work, you will decide for yourself whether it is worth making a similar table, or whether you will somehow modernize the proposed design.
You will need a set of tools consisting of:
[adv2]
- roulette;
- pencil or marker;
- jigsaw;
- screwdriver;
- drills;
- set with drills;
- construction compass;
- clamps;
- grinding machine;
- sandpaper, etc.
Prepare everything in advance so that at the most crucial moment it doesn’t turn out that something is missing or missing.
Materials required:
- pine boards for making a lid (table top);
- wooden blocks for the legs;
- self-tapping screws;
- wood glue;
- corners (metal);
- varnish;
- wood processing products;
- paint if you are going to paint the table.
Only when everything is collected and prepared can you begin to implement your planned project.
Don’t be afraid, but also be prepared to devote a lot of time to the round table. Especially if you are doing this for the first time.
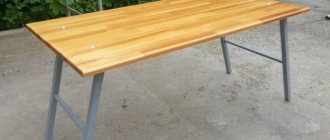
Making a wooden table
Next, precise instructions will be given on how to properly make a round table. First of all, prepare the wooden flooring for work. Grind it on all sides so that the wood becomes smooth without splinters.
Then several thin layers of wood glue should be applied to it. If you are worried that the structure is unreliable, then it can be further strengthened with clamps.Then apply the drawings and dimensions of the future round table to the wooden surface. The next stage of work will be to carefully cut out your drawings with a jigsaw.
If everything is done correctly, you will get an even circle, which will be the basis of the table. Next, you can start working on the table legs. To do this, prepare 4 beams and make them the same in size and height.
Yes, the work is not easy, but every craftsman can do it. Then use metal corners to attach the legs to the table.
The final touch of the whole work will be to apply water-repellent impregnation to the table. This product will not only help cope with moisture, but also protect the tree from small insects.
Materials and tools
Materials for round tables should be selected so that the product is durable and functional. Therefore, you should focus on a number of criteria:
- material strength;
- long service life;
- ease of self-processing;
- moisture resistance;
- attractive appearance;
- compatibility with the interior.
For different structural elements you can use one material or a combination of different ones. For the countertop you need to use durable, presentable options, which include:
- Solid wood - pine, beech, ash, oak are ideal. This wood is quite easy to process and fits perfectly into most interiors. At the same time, it must be protected from moisture, insects and the risk of mechanical damage.
- Chipboard - it is better to choose laminated boards, they are durable and inexpensive. But finished tables can become deformed and break over time, since the loose material will not provide reliable fastening of the screws.
- Monolithic polycarbonate is a beautiful, durable material, which quickly loses its attractive appearance due to scratches and can melt upon contact with heated dishes.
- Plywood is waterproof and beautiful, but despite this, humid air eventually leads to dampening of the material. For countertops, you should choose slabs with a thickness of more than 16 mm.
- Metal is a strong and durable tabletop. It is difficult to process, requires coating with an anti-corrosion agent, and installation should be carried out using professional technology.
When thinking about a tabletop that will be installed on a round table, you should choose a material that is visually compatible with the design. A table made of chipboard, glass or solid wood will fit perfectly into the kitchen. A metal or plastic product will last a long time in a gazebo.
The base of a round table is almost always made of metal or solid wood, which provides strength. Ideal would be profile and water pipes, parts of corrugated fittings. They are durable and require minimal maintenance (regular cleaning to prevent corrosion).
Solid wood with a thickness of at least 20 mm, as well as chipboard from 12 mm, are also quite durable and are generally suitable for creating the base of a round table. It is better not to use plywood, as it deforms under relatively light loads. But you can pay attention to it if the coffee table is not subject to significant loads.
Wood massif
Chipboard
Monolithic polycarbonate
Plywood Metal
The tools you need to stock up on are:
- tape measure for taking measurements;
- level;
- hacksaw;
- drill;
- screwdriver;
- compass;
- miter box;
- sander;
- pencil;
- clamps.
If there are metal particles in the project, you will also need a grinder, welding, and electrodes. Assembly will be impossible without iron rods and a steel disk, and the fasteners can be self-tapping screws - they can be easily screwed into the material, achieving high quality construction. For strengthening, you can also prepare steel corners and wood glue; they will help securely connect different elements.
How to assemble a simple coordinate table with your own hands, tips for craftsmen
Interesting ideas
Now we will give you some interesting ideas on how to make a round table with your own hands.
Despite the rapid development of modern technologies, elements of antiquity are still in demand. For example, if you are the owner of a dacha or a nice country house, then why don’t you make a knight’s table from the times of Medieval Europe? Let’s say right away that it will take a lot of solid wood to make it, but the result will be worth it.
To make a knight's table, take a look at several thematic sites where craftsmen share their knowledge and give useful advice. Don't worry, because 50% of the work is identical to making a regular round table.
Another interesting solution will undoubtedly be a loft-style table. Its lid will be made of stone, and the legs and other structures can be made of wooden and metal elements.
Take note - as designers say, loft-style furniture looks great against the backdrop of burning fireplaces.Deciding on the appearance
Country furniture option - round table and stools
Round table in the interior of a small kitchen
Before moving on to detailed instructions, let’s decide what we want. The concept of “appearance” includes several items with a number of options. Let's look at them and we can determine the type of future table. And at the same time we will decide what needs to be done and build an action plan.
| Criterion | Implementation options |
| Purpose | · indoor; · street. |
| Construction type | · folding; · ordinary; · with one leg; · with two or more legs. |
| Additional items | · with or without drawers; · with a footrest; · other additional elements. |
| Material | · natural wood; · Chipboard; · metal; · plastic. |
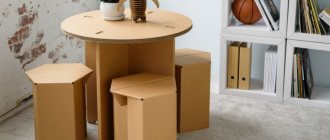
Round folding transforming tables
Round folding plastic table
Now let’s look in detail at how the criteria described above influence our choice, decide on the appearance of our brainchild and get down to business.
Beautiful and spacious round wooden table in the living room interior
Purpose
This factor is important; it influences further actions. The table will be located outside - then it needs to be treated with special means to prevent it from being damaged. It will stand in the house - the conditions will be greatly simplified.
This factor also affects others: the type of construction, the presence of additional elements and design. Depending on the location and its further functions, a model will be built. When this is an outdoor option, additional boxes are needed. If the creation is intended for barbecue, it can be made without additions. If the product is intended for a child, it must have appropriate parameters and additions.
So, the remaining criteria depend on the functions assigned to the future creation. Therefore, determine in advance what is necessary for the full implementation of the intended functions.
Construction type
Let's divide the types of tables into folding and regular. Depending on the choice, you will need different tools and the assembly process will vary. Determine this criterion in advance.
White round table on one leg
Next, we find out the number of legs. We can make a table with our own hands on one leg, two, three or four. All of these models are durable (if designed and built correctly) and look great. It all depends on your own preferences and functions of the product.
Round dining table on three legs
The design type also includes additional elements. Find out whether you need a drawer inside or a footrest; it may be enough to make one shelf under the lid of the product. In this case, the determining factor is the purpose.
Diagram of a round wooden table for self-assembly
In general, think through everything in advance and start creating a drawing. It is at this stage that you can make adjustments or make mistakes (then they must be corrected on paper!).
Important!
To avoid mistakes when designing a table, take the drawing seriously.
This stage is very important. If you can’t complete it yourself, find a ready-made drawing on the Internet, adjusting the dimensions, or entrust this task to a master.
Choosing material
The most common material for creating a table with your own hands is solid wood. That is natural wood. The basis can be pine, beech, oak, ash. Pine is most often used. It is easy to process and does not require special skills.
DIY solid pine dining table
The next option is chipboard (chipboard). They can be used, but not for the entire table, but only for some parts, such as the lid, drawers or shelf. The legs should be made of solid wood for stability and strength of the product.
Large round chipboard table with metal legs
On summer areas you can see plastic tables and chairs. You can make them yourself, but for this you need to purchase elements. And creating a table comes down to assembling the resulting parts.
Plastic table and chairs for outdoor
Metal is a common material among people who have welding skills and the appropriate tools. This base is strong, durable, and well suited for outdoor items. But if you do not have the necessary skills, it is better to give preference to wood. A DIY round table made of wood will suit any design and does not require any special skills to create.
Round table with solid oak top and metal base
Selecting decor
This is also an important part and should be thought out in advance. Some types of decor, such as burning, must be included in the action plan in advance, since the product should be varnished only after the decor has been displayed.
Choose a design depending on the purpose and location of the table. If this is a children's work area, make it bright, and it is better to avoid white. If intended for an outdoor gazebo, leave the color of natural wood by varnishing the product.
Overall, the choice is yours. But do not forget that the decor should not interfere with the main function and should be in harmony with the surrounding environment.
DIY photo of round tables
Please repost
0
Finishing
When the table is ready and the glue in the fastening areas has dried, you can begin decorative finishing. A piece of furniture can be coated with paint or stain, or treated with transparent furniture varnish using a foam roller. A table used in a garden can be covered with water-based acrylic paint.
To make a table a stylish decoration for your kitchen or living room, there are many ways to decorate :
self-adhesive film . It is carefully glued to the tabletop and smoothed out so that there are no bubbles or folds left. At the ends, the self-adhesive is dried with a hairdryer for perfect fixation;- mosaic _ PVA glue is applied to the tabletop and patterns of mosaic pieces are laid out. After drying, varnish several times to make the table surface perfectly smooth;
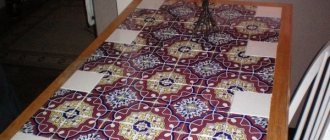
- ceramic tile . Finishing is carried out using tile adhesive;
- decorative tape . The material can be combined in any way you like, forming unique designs according to personal taste.
Original finish “under glass”:
- Make indentations on the surface of the table .
- Fill the holes with dried flowers, pebbles, and pieces of colored glass.
- Cover the top cut to fit the table parameters.
A round dining table will look impressive if decorated with epoxy paint.
Advice . For a large family, a changing table, writing table, or sand painting table may also come in handy.
Wood or plastic?
The choice of materials for a homemade table is determined by their availability and appearance. Particular attention is paid to the tabletop. It can be made from the following materials:
tree .
The most spectacular, but also expensive, option is solid wood. Such tables have a rich appearance, but the overall design is heavy. A cheaper option is shields assembled from boards. They can be tightly fitted to each other, imitating a monolith, or they can be laid with a gap - a lightweight country table;- wood-shaving and wood-fiber materials . Chipboard, MDF, and plywood are widely used. They are technologically advanced, but have a reduced service life;
- plastic _ Plastic sheets can be selected in different colors. Their advantage is low cost, light weight;
- glass . Glass countertops have become fashionable and are in demand for modern interior styles. The main disadvantage is the complexity of manufacturing.
In addition to the tabletop, the table must stand securely on legs. For their manufacture, wooden beams are most often used.
Tip : you can also use a metal profile for them; in particular, an aluminum flat pipe, corner or U-shaped profile looks modern.