Attaching the drawer guide
The drawer guide is attached to the drawer, and the body guide is attached to the wall of the main body.
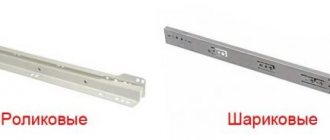
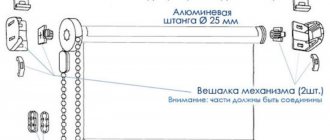
Both drawer slides are attached to the bottom of the drawer. In this case, the roller should be located not at the front, but at the back wall of the drawer, the other end of the strip rests against the front.
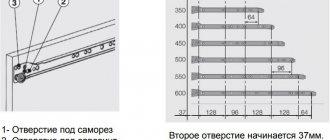
Let's look at the diagram of a roller guide manufactured by GTV. There are holes for fastenings on both sides of the guide. You can attach it either to the bottom of the box or to the side. It is believed that it is more convenient to attach the guide to the bottom of the drawer. Fasteners must be made in at least three places. Make sure that the heads of the fasteners do not protrude above the surface of the strip, as this will interfere with the movement of the drawer.
The guide has two types of holes: round and oblong. For novice assemblers, it is recommended to use oblong holes, which allow for slight position adjustment.
Ultimately, the view of fastening the drawer guide from the front side should be as in the figure (the drawer guide is highlighted in blue).
Now let’s look at 2 different ways to attach the housing guide to the wall of a cabinet or cabinet.
Keyboard shelf: choosing material and guides
Hi all! Many of you are reading this article while sitting at your computer. And if you leave a comment, that would be great. To write a review or question you will need to use the keyboard. Where exactly is it located? In most cases, a special shelf for the keyboard is used.
You can assemble it, or simply buy it and install it yourself. This is a great way to complement your computer desk or repurpose a desk that doesn't have a keyboard shelf.
In the standard version, this is a roll-out design, which is located just below the main table top. Allows you to comfortably position your hands for long-term work with the device. The computer mouse is usually located nearby.
Mounting the housing guide
Option #1. Take careful measurements, according to the diagram of the mounting points, which can be found in the catalogs of guide manufacturers (see the figure as an example).
Mark the location for drilling holes for fasteners, drill holes, apply a guide and secure it in at least three places.
Option #2. Mark the location of the guide with a pencil. Then place the guide so that the line you drew runs through the center of the holes in the guide.
And do not forget that the housing guide roller should be on the facade side.
Source
Design and dimensions of the keyboard shelf
When it comes to functionality and comfort while working at a computer desk, then, of course, we cannot forget about such an important element as a keyboard shelf. Let's start with the definition:
A keyboard shelf is a design element of a computer desk that provides not only a place to place a computer keyboard, but also a comfortable working environment for the PC user.
On my own behalf, I would like to add that the “correct” keyboard shelf should accommodate not only the shelf itself, but also a computer mouse. This is logical, in my opinion. Although, very often you see computer desks with shelves on which the keyboard itself hardly fits. And what do the designers who design such tables think about? Well, definitely not about users! But in vain!
Installation features
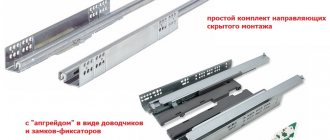
Placing the guides will not cause any serious difficulties. The main thing is that you need to assemble or purchase a suitable box yourself (selected specifically for the main furniture), and take care of the devices in question. Make sure all fasteners are included in the kit. In this case, self-tapping screws are most often used.
Let's start with preparation. Check the strength of the base and box. If the cabinet or cabinet is loose, tighten the fasteners securely; it is important to achieve a tight and rigid tie.
Naturally, we will not make any through holes, so self-tapping screws are required of a shorter length than the thickness of the walls of the structure, and definitely for wood. If you have a screwdriver, you won’t need a drill; it’s convenient to screw in screws with this tool right away, without first making indentations.
Procedure for performing basic work
First of all, we install the corner strips, they are attached to the box. Round holes are provided especially for fasteners. Nothing supernatural: we place the part tightly against the module and start screwing in the screws. For strength and reliability, you can use all the holes on the fittings. Make sure the lines are placed evenly.
When this matter is dealt with, we move on to the box. First we make markings: on the side parts, using a pencil and a ruler, we draw straight lines, they should be strictly on the same level, so watch the distance from the top panel.
Advantages of a keyboard shelf
By the way, why is this furniture element needed? After all, if you buy a wireless computer mouse and keyboard, you can easily operate your computer even while lying on the couch. Basically, the user has no problem using these computer accessories. They can be placed on the table, and if necessary, removed, freeing up the tabletop.
Where should I put it? And why force yourself to make unnecessary movements? Why strain your brain and require it to indicate the next place to move the computer mouse and keyboard from the table? Wouldn't it be easier to make a shelf for them? Personally, I think it's easier. After all, you will immediately feel a number of advantages:
Well, I think I managed to convince you of the usefulness of this furniture element. Therefore, I propose to understand its optimal sizes.
Marking, drilling and assembling shelves
Preparing the parts takes longer than drilling and assembling the shelf. A novice master will complete the final stage in a maximum of 2 hours. Let's consider the sequence of assembling a universal shelf, which is suitable for flowers, books, and various small items. This particular model is designed for use on a glazed loggia. To assemble it, ready-made parts were used (cutting was done in advance), covered with PVC edges on a professional machine.
Part marking
To make marks for future drilling on parts, you will need a tape measure, a corner, a simple pencil and an awl. All parts must be marked on the same side. That is, at the beginning of this stage you will need to immediately decide on the basic reference points. They are usually marked from the back of the parts.
When marking the ends, it is recommended not only to mark the drill entry points with a pencil, but also to prick these points with an awl. On the front surface of the laminate you must do the same. Pricking with an awl will prevent the drill from slipping and ensure precise alignment of the end and face holes during assembly.
Drilling
The easiest way to connect adjacent parts to each other is with confirmats. These fasteners are specifically designed for furniture assembly.
The holes for them must be drilled with a confirmatory cutter, which is capable of making recesses for the heads of fasteners.
A confirmatory cutter is similar to a regular drill and is compatible with both drills and screwdrivers. That is, any of the mentioned tools is suitable for drilling.
What is needed to assemble a computer desk
Typically, computer desks are made from chipboard or MDF sheets 8-10 mm thick.
You will also additionally need a sheet of plywood for drawers, furniture fittings and guides for drawers and shelves for the keyboard, screws or self-tapping screws. Tools you should have on hand are a drill or screwdriver, a hacksaw and a chisel. Additionally, you will need 2 rulers, of different lengths, and a square. To make the product smooth and to eliminate defects, you will need sandpaper.
After all the parts are made and assembled into the product, everything fits perfectly, the table is disassembled, sanded and coated with paint or varnish. After complete drying, the table is reassembled.
It seems that making a corner computer desk yourself is quite a labor-intensive task. But if you make a little effort and show creativity, the result will be not only a comfortable workplace created with your own hands, but also complete satisfaction from what you have done.
Optimal shelf sizes for a keyboard
In order for the keyboard shelf to effectively perform its functions, you need to correctly calculate its dimensions. After all, you probably want not only a keyboard, but also a computer mouse to fit on the shelf. And for this, the length of the shelf must be at least 650 mm
.
Also, the shelf must have optimal depth - the user needs a place to conveniently place computer accessories. The optimal shelf depth is 400 mm.
Another important point is that the shelf must extend to a sufficient distance for the user to work comfortably. This is provided by furniture guides. Practice shows that the length of the guides for the keyboard shelf should be at least 350 mm
. Most often, roller guides are installed.
I think it makes sense to supplement the above with an image:
When designing a keyboard shelf, be sure to take these dimensions into account. In principle, I advise you to take them as a basis.
How to make a pull-out keyboard tray
1. To install the shelf, we need the shelf itself, for example, 670x280 mm in size. A set of guides for sliding furniture drawers, two bars with a section of 90x35 mm and a length of 420 mm, fasteners. The shelf can be cut out with your own hands from a piece of plywood or treated chipboard.
2. The guides are screwed with self-tapping screws with a conical head, respectively, to the ends of the shelf and the side walls of the bars.
Shelf and guides Bars for guides Fastening the guide Guides on bars
3. Wooden blocks are attached to the tabletop using four furniture screws. To do this, two through holes with a diameter of 5 mm are drilled in each block, and on the outside the holes are additionally drilled with a drill with a diameter of 10 mm to a depth of 40 mm so that a furniture screw 70 mm long can reach the tabletop.
4. We outline points for securing the first block under the tabletop. At each point, a hole with a diameter of 3mm is drilled for attaching a furniture screw 30mm deep (do not drill through the tabletop.). One block is secured with screws, then with the shelf installed, the installation location of the second block is outlined. The second block is secured in a similar manner.
5. Install a pull-out shelf for the keyboard and mouse. That's it - the now homemade computer desk was built with your own hands. It has become more convenient to work, the keyboard and mouse do not interfere with working with the printer, and there is more work space on the desk. Look at the photo.