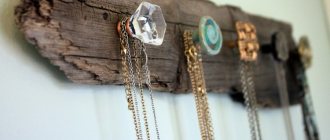
Every mother knows that her little princess’s favorite and most expensive toy is a doll. Therefore, even she should have her own dollhouse with furniture filling. Buying a mini interior in a store is not a cheap pleasure. Therefore, today we will give several interesting examples of master classes that will clearly show how you can make decent doll furniture yourself, which will be no worse than purchased furniture.
How to make furniture for dolls with your own hands: detailed master classes
If you want to give your little one something new for her dollhouse, then you might find the following useful:
- matchboxes, from which it is easy to make drawers for toilet cabinets and tables;
- plastic bottles;
- cardboard boxes for cosmetics, shoes or household appliances;
- egg molds, plastic food containers;
- bright kitchen sponges, viscose napkins;
- plywood;
- scraps of fabric, leather;
- foil, flexible wire;
- knitting threads and other little things that may be useful in the process of creating doll furniture.
In addition, beads, rhinestones, beads, polymer clay and other decorative details may be useful, because the more elegant and brighter the doll interior, the more charming it is.
Process planning
In order for everything to work out perfectly and meet the girl’s expectations, it is advisable to organize each stage of the work in detail:
- Number and design of elements;
- Dimensions;
- Decide how to make drawings of furniture for dolls, with your own hands or take ready-made ones from the Internet;
- Select the material from which the parts will be made;
- Prepare the base for the furniture (draw a template on cardboard or plywood, cut it out);
- Connect the structure;
- Take care of the exterior design (paint, seal, attach decorative elements)
Furniture for dolls from boxes
Miniature furniture made from cardboard boxes is a great idea for a doll's interior. Today we will show an example of making a dressing table and a chest of drawers.
So, for the dressing table you will need:
- a small box (you can take a hair dye package);
- pencil and ruler;
- stationery knife or scissors;
- glue;
- foil;
- colored or white paper for pasting at the final stage.
First, determine the height of the future table so that the doll looks harmonious next to it. Cut the cardboard box to this height.
From the remaining box, cut a flat piece of cardboard (a blank for a mirror). Its width should match the width of the dressing table, the height can be about 15 cm. Using glue, attach the mirror to the base. Decorate the edges beautifully with openwork figured patterns or make them round.
Cover the structure with colored or white paper.
Decorate the blank with painted drawers and doors, and decorate the place for the mirror and the wall of the table with beautiful patterns.
Finally, all that remains is to cut out a “mirror” from foil, handles for doors and drawers and stick them on the finished product.
You can complement the dressing table with an elegant bed and armchairs in the same style. For example, you can decorate them with a pattern similar to the pattern of the mirror and table. This way the interior for the doll will look more organic.
Making a doll chest of drawers couldn't be easier. To do this, prepare:
- matchboxes;
- beautiful napkins or decorative paper for pasting;
- glue.
Glue the matchboxes to each other so that the drawers slide out. Cover the finished product with decorative paper.
Decoration
Decor is the final stage of furniture manufacturing; it is the most important. It determines how much the child will like the furniture and how it will fit into the design of the doll’s home. When decorating products, you can use any available materials that are available in the house.
The main rules for decorating furniture for Barbie:
- Maintain a consistent style throughout the entire furniture set.
- Do not use flammable materials.
- When choosing a decoration method, pay attention to the hypoallergenicity and durability of materials.
- It is dangerous for a child under 5 years old to use small parts, such as beads.
- Take a responsible approach to securing decorative parts so that the child can enjoy playing for a long time without worrying about the safety of the furniture.
Furniture for dolls made of plywood
It’s also easy to make a round coffee table for a doll from plywood. You will need the following materials:
- plywood;
- glue;
- a tool for cutting plywood (for example, a jigsaw);
- acrylic paint or varnish.
The surface of the table and the shelf will be in the form of two identical circles; we will cut them out of plywood. At the same time, we cut out the racks for the shelf and the legs. Next, we connect the blanks together using glue and finally cover them with paint or varnish.
Table and chair
You can use plywood for the table. This is a more labor-intensive process than working with cardboard, but as a result of the effort, the product comes out quite practical.
Instructions for implementation:
- Using a compass and a jigsaw, draw and cut out a circle (two for a coffee table), legs;
- Glue;
- Cover with varnish or paint.
The base for the chair can be wire, which can be twisted into a convenient shape, or you can use other objects such as boxes, cardboard, clothespins, ice cream sticks.
The height of a standard chair is approximately 40 mm, with a backrest - 75 mm.
Furniture for dolls made of wood
Even doll furniture can be almost like the real thing. We suggest making a wooden mini-sofa. Prepare:
- wooden flat planks, the thickness of which is about 1 cm;
- a piece of fabric for pasting;
- glue;
- wood cutting tool.
Cut out 5 elements of the sofa for the doll:
- Base (height – 6 cm; length – 16.4 cm).
- Back and lower part (height – 6 cm; length – 14 cm).
- Two armrests, expanding towards the top (height - 4 cm; length at the bottom - 6 cm; length at the top - 7 cm).
We glue the parts together, except for the lower part for the seat.
We cut out the fabric components of the appropriate sizes and glue them onto the workpiece.
Separately, we cover the lower part of the doll sofa with fabric and lay it on the base.
The adorable sofa for the doll is ready! We recommend using fairly dense textiles that resemble real furniture upholstery. It can be velor, velvet, suede, linen, cotton, corduroy, leather, etc.
How to determine the size of furniture
A doll is a small copy of a person, so its furniture is the same as ours, only smaller.
To determine the scale you will need:
- meter;
- doll;
- a sample of the furniture you want to make.
Actions:
- We measure your height and the size of the doll.
- Let's find out the parameters of the existing furniture.
- The resulting numbers, for example, 168 and 14, must be correlated; for this we will find the quotient, 14/168 = 0.083. This will be the similarity coefficient of objects.
- We calculate the dimensions of the furniture for the doll; to do this, we multiply the height and width of the object by the resulting figure from the point above.
For a standard Barbie doll, this coefficient can be taken as 0.09.
Taking this into account, the following parameters will be acceptable (dimensions are presented in centimeters):
- single bed - width from 7.5 and length - from 16;
- double - width from 13, and length - also from 16;
- for a chair, the seat height starts from 4;
- the table must be at least 6.5.
What tools and consumables will be needed
It’s interesting to come up with and make different elements of furniture in a toy house from scrap materials. It is impossible to clearly define the list of necessary tools; it will depend on the imagination of the craftsmen. Useful in any case:
- Scissors;
- Glue;
- Ruler;
- Napkins;
- Oilcloth;
- Threads with needles;
- Pencils.
These things will help create very beautiful details. In fact, it is possible to create furniture using a much larger list of items. For example, to make a lamp with a switch you may need a blowtorch, LEDs, and wires.
Before making furniture for Barbie dolls with your own hands, you need to decide what tools and supplies you will need for the creative process. The list depends on the type of material used.
| Type of material | Consumables | Tools |
| Paper | Glue, tape, gouache, glitter | Scissors, ruler, brush |
| Plastic | Duct tape, nail polish, fabric, markers | Knife, cutter, hacksaw |
| Plywood | Glue, screws, paint mixtures, nails, sandpaper, wallpaper scraps | Jigsaw |
| Cardboard | Watercolor or acrylic paints, glue, colored paper, decorative fabrics, pencil, markers, tape | Scissors, compasses, brushes |
| Wire | Ruler, beads | Pliers |
| Matchboxes | Felt pens, paints, glue, tape, colored paper | Knife, brush, scissors |
Sequins
Paints, colored pencils
Colored paper
Wooden table for Barbie
The next table option is suitable for more handy dads. It will be made from noble wood. To make it you will need a more complex tool than in the first case. You will need a pencil, ruler, hacksaw, brace, glue, sharp knife and sandpaper of several sizes. And of course wooden materials.
Take a board that is not very thick, 3-5 mm will be enough. In principle, a sheet of plywood may also work. Mark your table using a pencil, leaving small allowances of a couple of millimeters for processing the edges. Next, use a hacksaw to cut out the future tabletop. Sand all edges and both surfaces with sandpaper, starting with the largest number sheets and gradually moving to the smaller ones. When all surfaces have reached an ideal state, we move on to the next stage.
You should have not very thick slats prepared, although for these purposes, in principle, an ordinary glazing bead going to the windows is also suitable. We cut it to the required length, taking into account all the same points mentioned above. Next, use a knife to shape it into a cone, at this point the main thing is not to overdo it and not remove excess, we process your workpieces with sandpaper until they achieve perfect smoothness.
On the tabletop, use a ruler to mark the centers of the legs and then use a hammer to drill grooves slightly larger than your legs.
Apply wood glue to the ends of the legs and into the grooves. We insert the legs there and then turn your assembled table over and place it on the legs. On the tabletop, you can place some non-burdensome load, for example, a thin book. We leave your work for the time necessary for the glue to dry and that’s it, the next day or a little later your table can be used.
Several rules for manufacturing and materials
It is important to note that to create chairs, sofas, and stools for your little favorite dolls with your own hands, you can use simple, affordable materials.
Metal and wooden structures are more similar to the original pieces of furniture. But for beginners, cutting wood or processing metal structures is quite a complex and time-consuming task. Therefore, the best and fastest solution would be a do-it-yourself paper chair for a doll. To do this you will need the following materials and tools:
- cardboard paper;
- PVA glue, or super glue;
- scraps of any fabric (10x10 cm);
- stationery knife;
- acrylic paints and other materials as desired.
The prototype for creating chairs for dolls with your own hands is the home designs of an armchair, stool and chair. First of all, we decide on the size, for which we can place the doll on some kind of box or box. To create complex structures, additional wood screws and braid may be required.
Types of materials often used
To decorate your daughter's dollhouse, you may need the materials that we most often throw away:
- cuttings of plywood sheets;
- matchboxes:
- plastic jars and boxes for cosmetics;
- shoe boxes;
- colored dish sponges;
- viscose napkins;
- plastic bottles;
- egg tablets;
- textile;
- foil
- wire and many other small things, the place of which we often determine in the trash can.
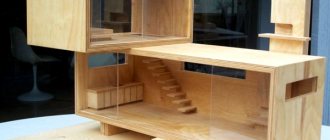
Doll wardrobe
You will need: plywood 4 mm thick, white wood paint, cabinetry veneer, carbon paper, sheets of paper, pencil, ruler, jigsaw, jigsaw blade for straight and radial cuts, glue, sandpaper, brushes and sponges for painting, scissors, screwdriver, construction knife, 2 wooden sticks, furniture fittings (hanger hooks, 3 handles, self-tapping screws, 4 hinges).
Master Class
- Draw a sketch of the cabinet.
- Draw each detail on paper.
- Cabinet parts: 2 side walls and 2 rectangular parts for them, roof, bottom, back wall, partition, 2 shelves, drawer module, 2 doors and 2 patterned parts for them, 4 figured legs, upper horizon (shaped part), drawer (bottom, back, 2 sides, front panel and a rectangular part for it).
- Cabinet size: height 34 cm, width 22 cm, depth 9 cm.
- Transfer the cabinet parts onto the plywood using carbon paper.
- Use a jigsaw to cut out every detail of the future cabinet.
- Sand each piece of the cabinet with sandpaper.
- Glue the redwood veneer to the cabinet sides, drawer fronts and cabinet doors, then leave to dry.
- Paint the patterned pieces for the cabinet doors, the rectangle for the drawer and 2 rectangles for the side walls with white paint, then wait until dry and glue them on as decoration.
- Paint the 4 curly legs with white paint and leave to dry.
- Glue the 2 sides, the back wall of the cabinet and the legs as shown in the photo and leave to dry.
- Glue the box parts together.
- Glue the roof and the upper figured horizon.
- Glue the partition inside the cabinet, visually dividing it in half.
- Glue 2 shelves as shown in the image.
- Glue a wooden stick as a pipe for things.
- Make hangers from pieces of wood and hooks.
- Paint the inside of the cabinet, hangers, top horizon and inside of the drawer with white paint, then leave to dry.
- Attach handles to drawer and cabinet doors.
- Screw the hinges to the cabinet and attach the cabinet doors.
The plywood doll closet is ready!
Nightstand
You will need: 3 matchboxes, glue, cardboard, scissors, toothpicks, black paint, brush, drawer handles.
Master Class
- Pull out the inside of the matchboxes.
- Glue together the 3 outer parts of the matchboxes.
- Cut out the back, top and sides of the nightstand from cardboard, then glue them on. It is worth noting that the side parts should be slightly higher than 3 matchboxes.
- Prepare 18 toothpicks and try them on the lining of the drawers. Shorten the length of the toothpicks and glue 6 toothpicks onto each drawer.
- Glue the drawer handles.
- Remove and set aside the drawers.
- Paint the bedside table with black paint, wait until it dries and insert the drawers.