A wooden kitchen table is one of the interior items that is easy to make with your own hands. The easiest option is suitable for a country house.
It is better to initially carefully consider the design, dimensions and configuration of the product before starting its manufacture, taking into account the surrounding interior.
Optimal table sizes
The most important point in manufacturing is the correct determination of dimensions, then it will be much easier to understand how to make a kitchen table with your own hands.
Examples of the ideal combination of furniture in a kitchen interior can be viewed on the website https://kyhni.guru.
The size of the table depends entirely on the area of the kitchen and its location. He is obliged:
- harmonize with the interior of the room;
- contain everything you need;
- do not constrain when preparing food;
- have all the functions for comfortable eating.
For a person’s comfort, seventy centimeters of personal space is necessary, this means that nothing interferes with him within a radius of thirty centimeters. Please note that our partners have TV walls in a modern style, come in.
For four people, the best options would be tables with the following dimensions:
- 90x90 cm;
- 100x100 cm.
If you are planning on seating for four people, then these dimensions are acceptable if you can move the table to the center of the room.
Otherwise, it is advisable to increase the length by 30 centimeters or think about how to make a folding kitchen table yourself.
If the room area is sufficient, it is better to make a large dining table: up to one hundred and eighty centimeters long, ninety centimeters wide.
Such a piece of furniture will allow you to freely accommodate up to twelve people during a feast, and on ordinary days you can feel comfortable with family members.
The table height parameters depend on the build and height of the people sitting at it. The optimal height is seven hundred millimeters.
When furnishing a room with a table, you need to determine its location. When serving guests, they should not be a hindrance to the hostess.
Transformer
There is no need to confuse transforming and folding tables. The transformer's initial state is the starting surface. It initially looks like a standard table. But with a few movements its size can be increased by 2-3 times.
If you decide to make a transforming table for the kitchen with your own hands, then you need to select in advance the elements that will be used to attach the panels. Table Features:
- If you take it apart, the table will look like 2 small tabletops.
- There are slots on the sides that can be used when transporting the table and for hanging towels and napkins.
- At the bottom there is a hook for placing various kitchen accessories.
- Can be used as a bar counter.
The role of the legs
When calculating the dimensions of the table, it is necessary to take into account the quantity and type:
Products with one massive leg are usually small in size. They are mainly intended for: gazebos, as a coffee table, children's room, kitchen with a small area.
Stability is achieved with the help of a strong cross-shaped strapping.
Designs with two massive legs are made for oval and rectangular tables.
The supporting elements are installed from each other at a distance suitable for stability. They are comfortable because they do not interfere with the feet of people sitting at the table.
- Do-it-yourself shoe racks: a review of the best ideas and a step-by-step description of how to build a shoe rack (85 photos and videos)
Do-it-yourself bag chair - a detailed master class on how to sew a properly comfortable chair (75 photos)
- DIY chest - how to make a beautiful and stylish craft from a box, paper and wood (80 photos)
The most common option is a model with four legs and a rectangular tabletop. The table turns out to be stable and reliable without any special reinforcements; only the correct calculation of the dimensions is important.
The legs are often firmly connected by drawers, but can be independent parts.
Making a table
Decorating details
To make our dining oval sliding wooden table look as attractive as possible, it needs to be decorated.
We proceed as follows:
- We treat the table legs with alcohol or water stain, and then cover them with several layers of furniture varnish. If light wood was used for production, then the varnish can be tinted - this will emphasize the texture of natural wood.
But the photo shows the sequence of operations for multi-layer varnishing
- We process oval tables made of solid wood according to the same scheme: first we impregnate the tabletop with stain, and then apply several layers of varnish.
But when making a working surface from plywood you will have to work hard:
- We carefully level and sand the flat surface, after which we cover it with veneer made of valuable wood. When veneering, we carefully select the pattern to achieve the ideal appearance of the part.
Veneering of countertops
- The ends of a plywood tabletop can either be covered with thin strips of veneer, or treated with a special edge tape. The second option is less labor-intensive, but the appearance of the tape, naturally, is inferior to natural veneer.
- After completion of the work, the surface is also varnished.
Assembly of the structure
Now you can start assembling the table.
The instructions will differ depending on the product configuration, so here we will provide recommendations for the main cases.
Underframe diagram
- First, we make an underframe - a box of boards on which the tabletop will rest.
- We attach the legs to the corners of the base from the inside. If necessary, we strengthen the corners with diagonal braces.
- If we are assembling a solid structure, then we lay the tabletop on the underframe and fix it to it using steel brackets. For fixation we use short self-tapping screws.
Attaching legs and table top
- When making an extendable table, we install runners on the outer parts of the tabletop, and attach special protrusions to the semicircular parts of the tabletop, which we see in these runners.
- We assemble the sliding system in such a way that when the side parts are opened to their maximum width, a rectangular insert can be installed in the free space.
- Finally, when making a folding table, we attach the rectangular part of the tabletop to the underframe. We attach the side semicircular parts to the ends of the tabletop using hinges.
Sliding model design diagram
- We install additional legs on both sides below, mounted on external hinges. When folded, they should be pressed against the table, and when unfolded, they should serve as support for the side folding parts.
As you can see, if you understand the design, even assembling a complex table will not be difficult.
Folding structure on pipe legs
Material selection
At the moment there are many building materials for making furniture. However, wood remains a more affordable and reliable option.
Anyone can make such products with their own hands; you just need to have some carpentry skills. The main thing is to choose the right type of wood.
Oak furniture is best suited for the kitchen. Due to qualities such as:
- durability;
- strength;
- ease of processing;
- flexibility to paint and varnish coatings;
- Great for rooms with high humidity.
- DIY bread box - step-by-step master class on making and tips on how to decorate a wooden model (105 photos + video)
DIY high chair - interesting drawings and projects on how to make a comfortable and functional high chair (120 photo ideas)
- DIY built-in wardrobe: 115 photos of original ideas and video tips for building built-in wardrobe models
When making a tabletop, it is advisable to use solid wood.
It is also possible to make countertops from chipboard and fiberboard, plywood, covered with laminate.
These materials are less environmentally friendly, stronger and more durable than natural wood, but there are also advantages:
- much easier to process;
- low cost.
Working space and tools
When deciding to start producing a table, you need to allocate a separate room, taking into account that there will be a lot of dust and debris, as well as harmful fumes, so the room should be well ventilated. It is best to use a workshop, garage or barn for this purpose. It is also advisable to use a respiratory mask.
To implement the idea you will need the following tools:
- drill;
- a circular saw;
- milling cutter;
- grinding machine.
In addition to the basic ones, you will also need measuring instruments, antiseptics and finishing solutions.
Room
To work with wood, it is necessary to equip a special place, given that the process generates a large amount of debris and dust, and when processing parts with various substances, harmful fumes are released, so a well-ventilated room is needed.
Suitable for these purposes:
- garage;
- barn;
- self-equipped workshop.
DIY corner cabinet: 80 photo ideas and video description of how and what to make a cabinet from. Main manufacturing stages and best design projects- Do-it-yourself wardrobe for the balcony - 80 photos of how to make a balcony wardrobe from various materials with your own hands
- Do-it-yourself wardrobe - a detailed description of how to make and assemble a wardrobe with your own hands at home (110 photos + video)
It is necessary to take into account that when we make a kitchen table from chipboard with our own hands, the material emits phenolphthalein, so it is better to work in a respirator.
Form selection rules
The shape of the kitchen table plays a significant role in the perception of space. Universal design - rectangle or square with right angles. It is balanced and can be installed close to the wall or in the center of the room, saving space.
Oval models are also quite comfortable and beautiful, but they are not very spacious - the largest product will accommodate no more than 8 people. In addition, they require large areas - more than 8 square meters. meters, because you can’t put them against the wall.
A round table can also be called a universal and traditional option, suitable for both very small and large kitchens. But it has less capacity than a rectangular table.
The best option is a rectangular table with rounded corners. We have already described above how to make just such a table from chipboard with your own hands.
Material and tool
Having found a suitable place, you need to prepare a standard set of tools for carpentry work; you will also need power tools, such as:
- a circular saw;
- drill;
- milling cutter;
- Sander.
In addition, you need to have a measuring tool on hand, as well as the material for making the table, antiseptic and finishing compounds.
How to make a wooden dining table
A table made of solid wood is beautiful, natural and, as a rule, expensive. But you don’t have to buy such a table, because you can make it yourself with no less quality and for much less money.
So, to make a dining table with your own hands you will need:
- 4 things. baluster legs for the table, 73 cm high and not too thin;
- For the tabletop: 4 dry edged wooden boards 1 m long (for a table 60 cm wide);
- For the frame: 2 boards 80 cm long and 2 boards 40 cm long.
Prepare the tools: plane, grinder or grinder, jigsaw for cutting boards, circular saw, drill (with 8 mm drill), screwdriver, sandpaper, self-tapping screws (30 mm), wood glue, dowels, clamps (preferably). And, of course, a pencil, tape measure, gloves and safety glasses will come in handy.
To finish the table you will need varnish, stain or paint along with a primer. First we'll make the tabletop. To do this, you need to adjust all 4 boards as accurately as possible to the same length - 100 cm. If your boards were not sawn on a sawmill, then they also need to be trimmed in width and thickness. Then they need to be carefully sanded with a plane. The better you sand the wood, the smoother the countertop will be. Finish the edges well so that the boards fit together as tightly as possible.
We will connect the boards not with screws and nails, but with glue and dowels (chops). To do this, we make identical marks on the edges of all boards in increments of 10-15 cm and drill holes for the dowels with an 8 mm drill. Then we sand the edges and apply wood glue to them and into the holes made. Now we drive the chopsticks treated with the same glue into the holes and connect all 4 bars one by one. We remove excess glue on the surface with sandpaper and sand it, as well as all edges, with a plane. At this stage, you can go over the countertop with a metal sponge to give the wood texture.
So, the tabletop is ready. Now you need to fasten the legs and make a base for it.
To do this, you need to evenly fasten the balusters with short transverse boards with glue and screws. The glue dries for at least 12 hours.
We attach the legs to the long crossbars and drill holes in them in order to install the tabletop later.
After the glue in the frame has dried, you can begin installing the tabletop on it (frame).
If you want to make the table longer and wider, then you need to strengthen the table with two additional cross bars, as shown in the photo.
So, the table is almost ready, all that remains is to treat it with varnish or stain, or paint it, having previously primed it.
What color should I paint the table? Based on personal preferences and the color of the rest of the furniture. Below is the most versatile option - the table top and legs are covered with stain.
You can see the main mistakes in staining wood with your own hands in this video.
If you like gloss, then the surface of the table can be covered with stain, and on top - with varnish (example in the photo below), or simply coated with varnish.
You can paint the legs white and cover the tabletop with stain to get a design like the one in the next photo.
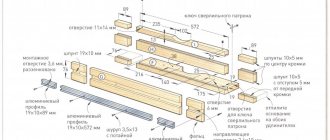
Drawings and preparation of parts
Before you start making a kitchen table with your own hands, you need to draw up a drawing that will take into account:
- dimensions;
- configuration;
- design and other parameters.
At the design stage, it is necessary to decide on the appearance of the product and its level of comfort. Samples can be seen in the photos of DIY kitchen tables.
The main thing is to maintain harmony in the kitchen interior and to ensure that the piece of furniture is functional to the maximum.
Transformable tables
Source:
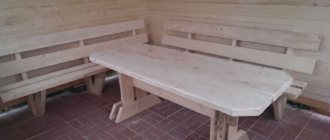
A folding table made of wood, made by yourself and capable of changing its original shape, is a real masterpiece. Folding structures look equally advantageous in a country house and fit into the interior of a city apartment. The simplest option is to make a transformer for a personal plot, and you can easily cope with this task yourself.
To surprise guests and get a comfortable wooden picnic table, you need to assemble 2 benches with high backs. The seat is made of 3 boards connected to each other by crossbars. There is one nuance here: the edge of the crossbar, which is located on the back side, should protrude beyond the edges of the seat by 10-15 cm.
Assembly
The process of creating any wooden product requires preparation of parts. Main elements of the table:
- legs;
- kings;
- tabletop.
If you have a ready-made tabletop, then how to make a kitchen table from it yourself will not be a difficult task.
Connect the legs in pairs with jumpers. Having previously drilled a pair of holes in them from the inside with a slope.
Secure the structure with screws, screwing them through the legs into short drawers.
Next, connect the made pairs of legs with long drawers. This process is the same as in the previous step. Install the tabletop on top using fasteners.
Restoration
Here we will briefly look at how to update a kitchen table with your own hands:
- decoupage;
- painting. The original method is to dye through the tulle to create a lace pattern;
- burning. Makes it possible to improve wooden surfaces without damage;
- ceramic finishing. Allows you to veneer a tabletop with severe damage;
- covered with self-adhesive film. The easiest way to give furniture a fresh look.
From glass
If you decide to make a kitchen glass table with your own hands, then get ready to face difficulties. All sharp edges must be processed to prevent injury. There are several types of glass fastening:
| Using a frame. | In this case, a tabletop made of glass is placed in a frame made of metal or wood. This method is reliable, but it has a drawback - there will be gaps at the joints, and it will not be possible to completely get rid of them. |
| Using special devices. | It can be done quickly; you just need to install suction cups. |
| Connecting parts together using adhesives. | Please note that PVA glue is not suitable for this purpose - it is carpentry glue and is not capable of joining wood and glass. It is necessary to use glue that polymerizes in ultraviolet rays. The cost of the glue is high, and special lamps must be used to harden it. |
Photos of DIY kitchen tables
Read here - DIY bathroom shelves - the best options for placement and selection of materials for shelves (100 photos and videos)
Did you like the article?
0