The climax of the holiday is a wedding cake on a stand, which solemnly rises above all other desserts.
The use of special bases for a culinary masterpiece performs several functions at once: it is a solid base that retains its shape during transportation and positioning of a soft product, serves as a decorative frame, and saves space, allowing you to place the cake in several tiers.
For this purpose, you can purchase designer products from professionals or make your own backings in accordance with the style of the event.
Why do you need a turntable?
A rotating cake table is a great find for those who are interested in baking complex confectionery products.
The device has the following advantages:
- significantly facilitates the final processing of the cake, rotating around its axis;
- the pastry chef can decorate the product without moving, which greatly speeds up the cooking process;
- Often there are special markings on the table surface that allow you to create smooth and neat elements.
The rotating stand will help professional confectioners and ordinary housewives create culinary masterpieces.
Cake turntable prices
cake turntable
Features of the rotating table
If you want the cake to be accessible to you from all sides at the same time, and at the same time you do not have to run around it, be sure to consider having a rotating stand.
What is a rotary design for cakes? This is a product consisting of:
- round work surface;
- legs-bases;
- rollers, rubber bands.
Thanks to its design, the table easily rotates around its axis and provides convenient access to the confectionery product . With such a supply, you can create elegant and original decors in the most convenient way and create decorations of any complexity. At the same time, you don’t have to worry at all that your masterpiece will move, get damaged, or fall to the floor.
You can either purchase a turntable for cakes ready-made or make it yourself. A homemade design has many advantages. Firstly, you will be able to make a product that will fully meet your requirements and preferences . Secondly, you yourself will be able to create a thoughtful drawing of the product, select materials for its manufacture and think over the most optimal dimensions. In addition, a homemade design will be much cheaper than a purchased one.
Basic option
The basic option includes a single-tier cake stand. It’s easy to make it yourself; this work will take no more than 15 minutes. To do this, you need to take a piece of polystyrene foam, which you can purchase at a hardware store.
Expanded polystyrene of the desired shape is combined with a special food substrate, which is a thin cardboard with a foil coating on one side. Such a substrate should have a round shape. Its diameter should correspond to the size of the confectionery product that will be created. Connect the substrate to polystyrene foam using double-sided tape.
If you can’t buy a store-bought backing, you can make it yourself. To do this you will need thick cardboard and scissors.
To make a round substrate:
- cut out of cardboard the most perfectly even circle;
- connect with polystyrene foam as indicated above;
- Using a sharp knife, carefully trim the polystyrene foam that extends beyond the edges of the backing.
After all the manipulations, you get a round cake stand. To prevent the edges from being rough, it is better to trim them with sandpaper and then tie them with a satin ribbon. Double-sided tape is used to secure the tape.
When using a homemade cardboard base, the surface in contact with the food must be covered. A hot tablecloth or adhesive glossy paper that can be washed may be suitable for this purpose.
Thanks to the materials used to create this stand, the product does not deform, since it is quite solid and will reliably hold even a heavy cake.
Features of choice
In order not to make a mistake when choosing a good table, it should be assessed according to several criteria.
Rotation mechanism
The most important part of the model, without which the table simply will not spin, is the rotation mechanism. It is a metal bearing located under the table top, ensuring it rotates evenly around its axis.
It is recommended to choose a reliable turning mechanism to ensure uniform and non-stop rotation while cooking the cake.
Diameter
The most common tabletop diameter is from 26 to 30 centimeters. A standard size cake of up to four kilograms has these parameters.
But for convenience, it is better to choose a larger diameter so that you can rest your hand with the palette on the tabletop while working. This will help achieve a more accurate result.
Silicone feet
A necessary part designed to fix the structure in one place. This prevents the confectionery product from sliding on the surface of the countertop, thereby eliminating possible defects and damage to the cake during processing.
Such legs are quite inexpensive, around a few hundred rubles, but thanks to them the product will turn out perfectly smooth and without damage.
Marking
On the round surface of the tabletop there are special divisions that divide it into equal segments. This is markings that help create decorative parts that are completely even and identical in size. Plus, the pieces of the cake will be positioned at the right angles, which is sure to ensure a quality end result.
If there are no markings, you can apply them yourself using a ruler and compass.
Materials of rotary cake stands
It is important that the stand is stable and strong. Manufacturers offer a wide selection of products from various materials, depending on which the price will vary: metal, plastic, wood, glass.
The metal stand is particularly strong and durable. When you buy such a product, there is a chance that you will have it forever.
Metal structures are heavy, but they are designed to last longer.
Plastic trays are lightweight and inexpensive. In addition, such a product quickly breaks, begins to jam, and becomes bent. It is suitable for rare uses and home tea parties. But it offers a wide range of models and colors.
This is the most affordable option. Thanks to the last circumstance, it is also the most common.
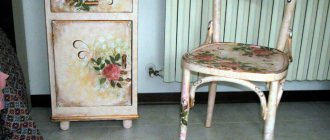
Wooden is in demand - a natural and durable product, in addition to its environmental friendliness, will fit into any interior. The downside is that it wears out quickly. Over time, the wooden surface darkens, wears off and softens, chips and scratches appear. This means it becomes an unhygienic environment for the proliferation of microorganisms.
A wooden cake maker made from natural material looks aesthetically pleasing.
Glass is the most common option. Strong, stable, durable, it will last a long time if it does not break.
Transparent with an addition in the form of a lid will become a real highlight in the design of the table.
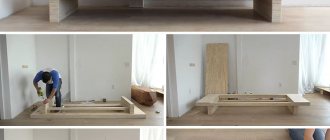
How to make a rotating table?
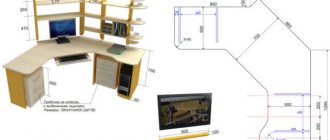
Making a turntable is quite easy and simple. First you need to make a well-thought-out sketch. In this drawing, indicate the design of the product, its exact dimensions and materials of manufacture. Having such a diagram at hand, you can easily assemble the table the first time and without errors.
The manufacturing process of the rotary table is carried out in the following sequence:
According to the drawing, we cut out a round tabletop from plywood.- Take the bearing (if you chose a double bearing rather than a pressed one, then use nails to hammer the smaller element into the larger one).
- two circles with a diameter of 20 cm in a wooden slab .
- We insert a bearing into one of the pre-made circles .
- Next, we twist the two parts together using self-tapping screws and place the bearing in the center.
- The turntable is equipped with plastic pipes . They will connect the top and bottom of the product. The tube must fit into the bearing with millimeter accuracy. It is best to make it 15 cm long. This will simplify the process of decorating cakes. Since you won't have to constantly bend over your masterpiece.
- The top of the table is made of metal . Particular attention is paid to its diameter. It is best if the diameter of the metal surface varies within 30-40 cm.
- Next, we weld the elements together . If you do not know how to use a welding machine, you can use cold welding.
- We install the rotating part on the pipe and fasten the elements with self-tapping screws.
That's the whole simple process of manufacturing a rotating structure.
Tip : to give the product a decorative appearance, it can be covered with thin plastic.
The product can also be decorated with self-adhesive film. It simply sticks on and is easy to clean.
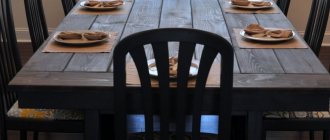
Tip : An extendable table, coffee table or a good quality kitchen table can also come in handy in the kitchen.
Materials used
In addition to the above materials, there are still a large number of possible options.
Stands can be made:
- from plywood;
- from fiberboard;
- from foam plastic;
- made of cardboard folded together in two or three layers.
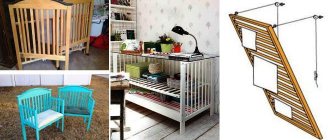
In addition, you can use old, unnecessary things. There is a review on the Internet about how a cake stand was made from old wooden doors and a metal pipe from an old vacuum cleaner.
To make a cake stand with your own hands, you need to show a little imagination and find everything you need for the job even at home.
The surface of the product is also covered with various materials. Since food products should under no circumstances come into contact with building materials, finished surfaces must be coated. Suitable for this:
- foil;
- cling film;
- decorative paper;
- tablecloth;
- sticky paper and the like.
We should not forget about the decorative treatment of the stand. In this case, satin ribbons, sparkles, corrugated paper and other decorative elements would be appropriate. The stands can also be painted. For decoration, it is better to use pink, blue or white paint. The main thing is to get a harmonious composition with the cake.
You need to remember about the safety of the product. If wooden skewers are used, they should be covered with cling film or a plastic cocktail straw, as the wood may be chipped.
The finished stand must be perfectly clean and safe for use, because children are rightfully considered the main lovers of sweets at all celebrations.
Main criteria when choosing
When planning to purchase a kitchen accessory, pay attention to:
- Reliability;
- Quality of the material (it must be hypoallergenic and hygienic);
- Persistence.
Decide on the shape of the baked product, focus on the appropriate diameter. The wider the plate, the more convenient it is for the pastry chef to act. In specialized markets you can find models with a width of 10 to 40 cm. Many consider the optimal diameter to be 28 - 30 cm.
Don't forget about the stability of the turntable. This is an important selection criterion.
When choosing a rotating cake platform, check whether there are markings on it. This is an excellent help when decorating: decorative elements can be distributed at the required angles, and the edges of the cake can be made as even as possible.
It is worth paying attention to the possibility of disassembling the structure: if the bearing in the rotational mechanism breaks, the non-dismountable stand will have to be thrown out. In such a situation, it does not stop functioning, but simply does not rotate normally. When you run a spatula along the side of the cake, it just jerks sometimes. This prevents the complete design of the product.
When choosing a rotating cake platform, check whether there are markings on it.
Often, for most confectioners, the decisive condition for purchasing such a cake maker is the presence of a transparent coating. It is ideal for serving purposes.
An additional mesh is also popular with experienced craftsmen. It often comes as an accessory to a swivel stand. This accessory makes it easy to cut cakes into beautiful pieces. It ensures accuracy in work: perfect lines, symmetry, a layer of mastic or glaze after cutting is not smeared.
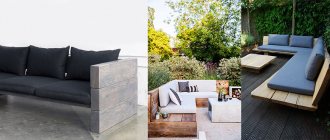
It is useful to purchase a rotating platform on a leg for decorating cakes because today it is the most convenient equipment for the design and subsequent presentation of sweet products.
A rotating tray is useful for banquet events and as a “showcase” for restaurants, cafes, and pastry shops. You can purchase either an inexpensive plastic product or a six-tier stand.
The turntable is useful for banquet events and as a “showcase” for restaurants, cafes, and pastry shops.
What is a swivel stand on a leg and how does it function?
The product consists of:
- Round working surface;
- Leg-shaped bases;
- Rubber bands;
- Rollers.
The design is designed so that the tray (stand) rotates freely around its axis. This makes it easy to access the cake from all sides. Some options are manufactured with a tilt, so it is possible that the device can be bent at different angles. It is these designs that are most convenient when decorating desserts and when demonstrating sweet masterpieces. Such a stand allows you to create original decorations and create any decorations with maximum convenience. Moreover, the confectioner does not have to worry at all that his product will be damaged, eaten away, or even fall.
A tilting stand allows you to create original decorations and create any decorations with maximum convenience.
How to make your own rotating cake stand
You can buy a rotating cake stand ready-made or assemble it yourself if you don’t plan to buy one in the near future. A homemade device has many advantages:
- You yourself are free to create a drawing of the product, think in detail about what dimensions will be most optimal.
- You can create a cake maker that will fully suit your desires and preferences.
- A self-made design will cost less than one purchased in a store.
You can create a cake maker that will fully suit your desires and preferences.
Materials for production
A rotating platform can be made from the following materials:
- Plywood;
- Fiberboard;
- Tree;
- MDF.
Each option has its own advantages:
- Plywood and MDF are easy to process;
- It is safe to work with wood, the material is environmentally friendly, the texture is pleasant to the touch;
- Chipboard is inexpensive, has an attractive appearance, and is a pleasure to work with.
Chipboard is inexpensive, has an attractive appearance, and is a pleasure to work with.
Necessary tools for manufacturing
You will need the following:
- Bearings (you can buy them at any auto store; they can be pressed or double; the first option is preferable, since they are easy to install);
- Self-tapping screws;
- Metal circle;
- Nails;
- Plastic tubes;
- Lumber (in this case plywood).
Necessary tools for manufacturing.
Manufacturing process
Think through your sketch carefully before starting work. Indicate on the drawing the design of the product, what its exact dimensions are, and what you are going to make it from. With this diagram at hand, you can easily and without errors assemble a rotating platform.
Subsequence:
- We cut out a round tabletop from plywood according to the drawing.
- Next, take the bearing (if you choose not a pressed one, but a double one, use nails to hammer the smaller one into the larger one).
- Cut 2 circles (d 20 cm) in the wooden base.
- Insert the bearing into the circle prepared in advance.
- Using self-tapping screws, screw both parts together and place the bearing in the center.
- The turntable is equipped with plastic pipes. They should connect the top and bottom of the future cake pan. It is better to make the tube at least 15 cm long (to simplify the process of decorating baked goods: in this case, you do not need to bend over the culinary masterpiece being decorated).
- The top of the turntable is made of metal. Ideally, the diameter of the metal surface is 30-40 cm.
- The elements are welded together. If you do not know how to use a welding machine, use cold welding. The rotating part is installed on the pipe, the elements are fastened with self-tapping screws.
Your design is ready.
To give the rotating cake stand a decorative appearance, it should be covered with thin plastic. The product can be decorated with self-adhesive film. It won't be difficult to stick it on and it's easy to clean.
If you approach the issue of making a rotating cake maker creatively, you can get different trays.
If you approach the issue of making a rotating cake maker creatively, you can get different trays. The main thing is to clearly check the drawing and select high-quality materials.
How to make a turntable with your own hands
This process is not too complicated, but requires male participation. First, you should draw a drawing of the future stand and prepare all the necessary elements.
If the bearing is not double, then two will be required, and one must fit into the other.
- We push the smaller bearing into the larger one using nails.
- Using a jigsaw, we cut out two circles with a diameter of 20 cm from a chipboard blank (or an old door).
- In one of them, a hole should be made in the center into which the bearing is placed. It is this technique that will ensure the rotation of the entire mechanism.
- We attach the second circle with self-tapping screws (you can use liquid nails) to the first.
- The bottom circle, which does not have a hole, will stand directly on the table.
- Then a plastic tube is inserted into the bearing (an iron tube can be used, if available). It will connect the base and the top - the pedestal for the cake. The tube must fit very accurately into the bearing so that it does not dangle, otherwise it will be difficult to use the turntable. The optimal length of the connecting tube is 15-18 cm. In this case, it will not be too short or too long, and it will be as convenient to use the device as possible.
- The top (the stand itself on which the cake is placed) is best made of metal. You will need a metal circle with a diameter of 30-40 centimeters. It is attached to the top of the tube (metal or plastic) by welding. Of course, not everyone has a welding machine at home and a person who knows how to do it. In this case, you can use cold welding, reminiscent of plasticine.
- Plywood or chipboard, equal in diameter to the metal circle, is attached to the top of the metal circle using liquid nails or self-tapping screws.
Now the DIY cake turntable is almost ready. All that remains is to add aesthetics to it. To do this, the top is covered with wallpaper film or a plastic round base. This will give the device a finished look and make it easier to maintain.
As you can see, if you want, making a turntable for a cake with your own hands is not so difficult. A set of materials for its assembly can be found in almost any home, and the work process itself is not that complicated.
How can I replace a cake turntable?
What is the solution for those who do not have a turntable? A very simple and affordable solution can also be found in almost any home. You can use a rotating plate from the microwave. Almost all models are designed in such a way that they have a glass plate and a round stand at the bottom. You need to remove the plate and the circle underneath it from the microwave. If the table surface is too smooth, you can place paper (a paper towel) underneath to reduce slipping. This way you can decorate the cake by smoothly rotating it around its axis. Also, a glass plate will not spoil the view when serving the finished decorated product.
Cardboard cake stand
Cardboard, as a separate type of material, rather than a box, is also available for sale. To create a cardboard backing for a cake, we need to stock up on some materials and tools:
- one sheet of high-density cardboard - it is better to choose three-layer cardboard;
- self-adhesive paper or beautiful special packaging paper; a simple plastic bag.
Assortment of cardboard thickness
We will not cut out a cake shape from cardboard. We simply cover, for example, a square-shaped stand with wrapping paper, which we secure on the reverse side with pieces of tape.
We will assemble the cake on a base, only on baking paper cut to fit the circumference of the cake. And first, we will cover the substrate with additional polyethylene.
Simple kit for covering a cake base
It will turn out neatly and very convenient to carry and serve dessert.
Cake on a simple dessert base
How to make a cake base with your own hands from polystyrene foam?
In addition to polystyrene foam, you can also use polystyrene foam boards (penoplex), but only for cakes weighing up to 1 kg. To make the substrate you need:
- polystyrene foam or penoplex;
- a stationery knife (if you don’t have one, you can take a regular kitchen knife, but you first need to warm it up in the sun);
- cling film;
- fine sandpaper;
- double sided tape;
- decorative satin ribbon along the thickness of the base material.
Now you can make a cake base with your own hands, following the instructions:
- Cut out a circle or any other shape from foam plastic, depending on the design of the cake itself.
How to Make a Rotating Cake Decorating Stand
You can buy a stand in a store, or you can make it yourself. First you need to decide on the appearance, size, shape and material. Looking at your sketch, you can easily assemble a rotating cake stand. You will need two bearings, a wooden plate or sheet of plywood, a plastic or metal tube 14-16 cm, a metal circle 30-40 cm, nails, screws.
Before making, decide on the shape of the cake, match it with the appropriate diameter.
Once you have decided on the initial data, start making the tabletop. To do this, you need to draw a diagram. Next, you need to prepare the bearing, assemble one from 2. You need to cut two circles of the same diameter of 15-20 cm from wood. Cut a hole for the bearing in one circle and hammer it into it. Secure the circles together with nails.
The optimal diameter of wooden structures is at least 34 cm.
Install a pipe of the required height of 14-16 cm into the bearing. The pipe must stand firmly and rotate due to the mechanism. The metal circle must be welded to the tube using conventional or cold welding. Cold welding is similar to plasticine; it is convenient to work with without experience. Secure a wooden circle on top of the metal circle. The top can be decorated with self-adhesive film of the appropriate color. The rotating cake tray is ready!
As the film wears out, it can be replaced.
No. 2 Foam cake stand
This type of stand can be made in different heights and widths. Using the same scheme, you will get a two-level stand, only the polystyrene foam circles in this case need to be taken not of the same size, but of different sizes (for example, one circle with a diameter of 15 cm, and the second with a diameter of 30 cm). Let's now look at what we need and how to do it all.
Necessary materials:
- 2 polystyrene foam circles (you can use squares or rectangles if you wish). In this case, the height of each circle is 5 cm and the diameter is 30 cm.
- Kraft paper and crepe paper in your chosen color
- Glue, brush
- Pencil
- Scissors
- Double sided tape
- Thread matching the color of the crepe paper
- Ribbons/decorations
Step-by-step lesson with photos
Step 1: Cut out the top cover
Place two polystyrene foam circles glued together on craft paper and trace the outline with a pencil. After this, cut out the circle with scissors.
Step 2: Apply glue
Apply glue (PVA glue will work) to the top of the Styrofoam cylinder. Use a cyst
b to evenly distribute the glue over the surface.
Step 3: Glue the paper
on top of the stand
Then place the cut out circle of craft paper on top of the cylinder and press down with something heavy so that it sticks evenly to the entire surface.
Step 4: Making Crepe Paper Side Decorations
Cut a long strip of crepe paper.
- The width should be the same as a polystyrene foam cylinder + 2-3 mm. Fold it in the middle so you can see where to sew.
- Then unfold this strip and sew it with a simple stitch in the middle. Gently pull the strip together to create gathers.
- Secure with a few stitches to keep the gathers from falling apart. Repeat, making these voluminous strips until there are enough to cover the entire circumference of the cylinder.
Step 5: Attach the crepe paper
Glue the strips you made in the previous step to the side surface of the cylinder in three layers to make it more fluffy. The glue needs to be applied little by little and not over the entire surface, but in places, so that the paper (which is thin in structure) does not fall apart.
Step 6: Add a Ribbon
Tie the side over the crepe paper with double-sided tape. Do this in the center, thus overlapping the thread used to stitch the paper.
Step 7: Additional Decorations
The stand is already ready and looks soft and airy. You can place the cake or cupcakes on it right now and serve. Or you can add a little more decoration to your taste, for example, more ribbons or sparkles.
Whatever stand you choose, it will wonderfully complement the holiday table and make it more perfect. Good luck!
You can also decorate with beads or gold fabric!
Why do you need a rotating cake stand?
Everyone, even a novice pastry chef, should have a rotating cake stand in their arsenal. It is a smooth round or square tray on one or more legs, at the base of which lies a twisting element.
A turntable will help keep the cream decoration level. And the decorating process itself turns into a mesmerizingly beautiful event.
Please note a number of advantages of the stand:
- Easy to use. There is no need to invent anything, it is easy to rotate and wash.
- Convenience. Makes it easy to cut the cake into equal parts and place it on plates.
- Aesthetics. Beautiful presentation, decorative part of the interior.
- Speed. With such a stand, decorating the cake will go much faster.
- Versatility - suitable for holidays and as a kitchen tool.
- Material. Almost all coasters are made from durable, high-quality raw materials.
- Sustainability. When decorating, your cake will not float or fall off the plate.
The design is designed so that the tray (stand) rotates freely around its axis.
In addition, the dish helps:
- make a perfectly smooth creamy coating;
- turn the baked goods in different directions;
- pour confectionery products with an even layer of glaze;
- adds stability to large desserts;
- draw patterns and designs without stopping or bending over the plate;
- Cover the cakes with mastic quickly and effortlessly.
Some options are manufactured with a tilt, so it is possible that the device can be bent at different angles.
How to make a cake stand at home: 3 ways
Beautiful cakes, decorated with fondant, glaze, ganache and other tasty treats, need to be presented properly.
An amazing culinary dessert needs a beautiful stand, especially if the cake must “travel” to the celebration on its own.
Celebration cakes on special convenient trays
You can, of course, put the cake on a tray or a large plate, but then bother with this stuff.
A plate or tray certainly will not work if you need to present a cake for a celebration in which you will not be a participant. This is more of an option for home use.
A plate serves as a stand for the cake
On sale there are special culinary decorative stands for baked goods, cakes and cupcakes of various types, and from a wide variety of materials. With such products you can immediately assemble the cake and decorate it.
Ready-made transparent cake stands
So, there are many ways you can make a cake stand, which can also be called a cake stand. Today we will look at the 3 main and easiest to manufacture and most common options.
Fiberboard cake stand
Fiberboard material is sold at any hardware store. We have the form of a thin and dense sheet of a certain size (for example, 120*240cm). It looks like a fairly thin sheet that can withstand a weight of about 5 kg.
Fibreboard sheet for cake base
Cutting a circle from fiberboard yourself is a hassle at home if there is no one to help. You won't be able to cut a regular circle with a knife; you need to work with a jigsaw. Plus, there's a lot of garbage.
Cut out circle for cake base
There is a way out of this situation: many construction stores offer a service for cutting fiberboard sheets - so use it. Unfortunately, this is not done everywhere, so find out.
You can cover the surface and edges of a not entirely attractive, but thin material using food foil or self-adhesive.
DIY cake board made of cardboard
This option for making a substrate is considered the simplest and most affordable. For such a product you need:
- three-layer cardboard;
- paper (packaging, self-adhesive or any other decorative);
- simple plastic bag.
After preparing all the tools and materials, you can begin the work itself. This should be done as follows:
- Cutting out the circle is optional. A do-it-yourself cake stand with a square shape that protrudes beyond the cake will look much more interesting. The stand must be wrapped in wrapping paper and secured with tape on the reverse side. Then you should protect the product with cling film.
- You need to assemble the cake immediately on the base, but first you need to lay a circle cut out of baking paper on it.
This backing is easy to use, and the increased size expands the possibilities for decoration.
The substrate performs not only a practical, but also a decorative function. Therefore, it is recommended to design it in harmony with the main design of the cake, and to use only durable, reliable materials for production.