Computer games are gaining more and more popularity every day, both among children and teenagers, and among the older category of the population. They surprise with their realism and exciting plots, enticing us to completely immerse ourselves in this amazing virtuality. However, spending many hours in front of a monitor screen does not go unnoticed - in addition to the eyes, the back and arms get tired, especially if the person’s body is in the wrong position, sitting on a regular chair. Therefore, you should make sure that during the game it is not only interesting and exciting for you, but also, first of all, comfortable. To remove the load from the spine, thereby ensuring a comfortable position for your body, you should take care of having a special chair. Unfortunately, not everyone can afford to buy a professional chair for gamers. Today we will talk about how to make a gaming chair with your own hands that can ensure safety and comfort during games and relaxation.
DIY home chair
Now let's look at making a regular home chair with our own hands. Unfortunately, there were quite a few photographs; there was no time to take photographs. The main stages were recorded in a timely manner, switching from a tedious workflow.
I wanted to get an ordinary chair, and not just some incomprehensible rookery. So that it is strong and stable, like store-bought options. I had to look on the Internet for views and drawings of chairs in order to correctly assemble my design. I suggest you immediately look at the photographs of the chair assembly process itself.
At the first stage, a base-frame for the future chair in the form of a semicircle is made. Chipboard with timber is used. The base of the chair was 10 centimeters thick. This will be just enough to secure the walls. And the uprights have the same ultimate function.
Hardboard was perfect for the back, and plywood for the front wall. I drew out all the curves and outlines of the future chair by eye from the remaining wallpaper. Children's wooden cubes were used for the base.
The next step was to glue cardboard to fill the interior space. During the work, we even had to change the glue; the initially chosen PVA did not work. The walls swelled and became like a wafer, the glue was replaced with ordinary wood glue. It turned out to be the best choice of all that was offered. There was even an idea for a rocking chair with my own hands, but I will implement the idea a little later.
After looking at the photo, you can immediately easily understand how the finished walls were obtained. For leveling I used a regular knife; the material is easy to cut and can be deformed.
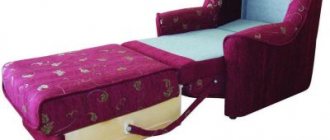
At the next stage, work with instant adhesive and foam rubber, seal the entire surface with a layer of foam rubber, leaving no bald spots or uncovered areas. A cover must be sewn onto a monotonous surface.
Well, we have reached the final stage, when we pull on the cover and get a beautiful finished chair. The product turned out to be quite heavy, but it will be completely safe for children, which can be considered a plus. As for the fabric used, nothing was bought anywhere. We used scraps and sewing scraps available at home.
We wanted temporary furniture; no one planned to make a chair that would last forever. The fabric on the armrests, despite being well tacked with glue, will peel off over time. If we say a little about the design of the chair, it turned out to be simply indestructible.
Possible difficulties
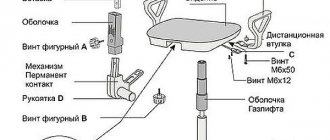
It happens that when disassembling office furniture it is inconvenient to unscrew the short rear fastening screw. In this case, it is recommended to replace the screwdriver with a screwdriver.
If the gas lift moves away from the piastra with great difficulty, using a bronze or wooden drift will help solve the problem. It should be remembered that strong impacts may cause the plastic cross to burst.
It happens that when replacing or repairing rollers, a metal rod gets stuck in the cross. This often happens if the office furniture has never been disassembled, since over time all the fastenings become compacted. In this case, the use of technical lubricant will help eliminate the problem.
Experts do not recommend repairing a worn pneumatic cartridge. This part can only be replaced. The device contains compressed air pumped into a chamber under high pressure; its accidental release can cause serious injury to a person.
The swing mechanism is also rarely repairable. Usually it is changed immediately, but the main difficulty is that it is very difficult to find this spare part. In this case, the best solution may be to purchase a new office chair.
Before disassembling office chairs, experts immediately assess the condition of the crosspiece. Inexperienced users often change a shaky base. However, it can last for several more years. In order to secure the chair support in a stable position, it is necessary to insert a metal pin into its rod and seal the connections.
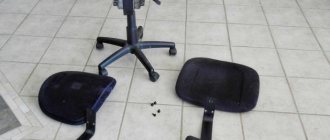
You can also repair minor damage to the upholstery yourself. To do this, you need to use a furniture stapler. Cleaning of contamination should be carried out before dismantling and repairing the product. Also, before disassembling computer chairs, they are usually vacuumed.
In order not to waste time on frequent repairs of rollers, you can install special plugs - gliders - instead. However, with them it will be more difficult to move furniture on the floor than with wheels. The plugs are attached to the sockets according to the same principle as the rollers. The use of gliders allows you to reduce the height of the chair.
READ MORE: Crib toys for newborns 29 photos of musical baby rattles on the bed when you can hang soft hanging products
In order to avoid frequent breakdowns, it is recommended to choose high-quality furniture from well-known manufacturers with a warranty period of at least one and a half years. If the malfunction is serious, it is better not to risk disassembling the office chair at home, but to seek the help of a qualified specialist.
Inconveniences during disassembly
State of the cross
Office chair gliders
Manufacturing process
We start by making the back and seat.
- We take a sheet of plywood and transfer the image of the back, seat, and armrests. The shape, size and type of chair on which you plan to spend time in front of the computer depend entirely on your imagination. Consider your preferences, height, weight. Take standard sizes or create your own.
- We carefully cut out the parts along the contour with a jigsaw, sand the edges and surface with sandpaper. Give them smoothness and evenness.
- Preparing the base of the chair. The most important requirements for this part are reliability and stability. The model will depend on what kind of base you plan to make - like a regular chair with 4 legs or with one, but ending with a cross and wheels. If you plan to stick to the classic shape of a computer chair, then prepare a reliable steel pipe, channel, or corner with wheels as the base. But in this case there will be no possibility of adjusting the height of the product; immediately select the necessary one. Don't forget about the wheels; their sizes should also be taken into account when calculating. Yes, it cannot be raised or lowered, but its main advantage is absolute stability.
- We design the back. Whether to allow height adjustment or not is your decision. The part fixed in one position will be made of a metal profile. We give it the shape of the letter “X” or a frame, then fasten it to the base by welding or bolts. Mobility is achieved by a frame fixed to a hinge, a bar with holes attached to the back, and bolted to the seat. So, we get fixing strips on both sides at a certain angle.
- A computer chair differs from a regular chair in one detail - the presence of armrests. Usually they are made in the form of the letter “P” - the top one should be positioned so that the elbows rest comfortably on it, and the lower part of the “letter” is secured to the base using welding or bolts. But this is usually the case - you are the chief designer, whatever form you choose, so it will be.
- Now the final stage. Direct assembly of the chair. We sand the body parts, coat them with primer, and paint. Let it dry completely. Then the armrests and seat are attached to the structure using bolts or screws. We attach legs or a cross to the base. It can be made from different materials - metal, wood or plastic, but the main requirement is that it must be durable and withstand the weight of the user.
Wheels designed for the chair are attached to the legs of the chair. We fix the foam rubber on the seat, back, and armrests with tape and ropes. Try to evenly distribute the material over the surface of the parts. To add aesthetics, we stretch padding polyester or thick upholstery fabric over it. We fasten the fabric using a furniture stapler. Now the final stroke - we cover all the “unsightly” parts of the product with a cloth. We measure the sizes of such parts and cut the fabric.
When we start cutting out the parts, we need to add an allowance of 2 cm in each direction. We apply the resulting blanket so as to hide the stapler staples, folding the edges.
Well, the main work has been completed. Your DIY computer chair is ready. A new piece of furniture will delight you for a long time. Now we are redecorating the rest of the workspace to match the new chair.
Recommendations
If you decide to build a good computer chair with your own hands, you should arm yourself with some useful advice from professionals.
- A computer chair can be made more functional by adding a table top for later installation of a laptop. But we must take into account that this option is only good for freelancers, but not for gamers.
- You can make a chair from old furniture, but in this case you need to be prepared for the fact that the end result will not be the most beautiful product.
- When making a computer chair with your own hands, it is not recommended to use used materials. Typically, such structures last much less and are not strong enough.
- When making a homemade computer chair, it is recommended to use only environmentally friendly, practical and safe materials.
- U-shaped armrests are classic, but they can be different. Other options turn out to be more complex in execution - not every novice master can make them himself. If this is your first time encountering such work, it is better to build U-shaped side parts.
How to make a computer chair with your own hands, watch the video.
Making your own chair
The sequence of making a chair yourself looks like this:
It is necessary to cut out the bases for the back and seat from a sheet of plywood. Also, if this is intended by the design, you can also make a base for the armrests. The resulting elements will need to be sanded. It is always worth considering the weight and height of the future user, as well as the design idea. Using a welding machine, you need to make the base of the chair. This can be a classic style with four legs or a more intricate model. The main thing here is the stability and reliability of the structure. The material can be metal pipes, angles, profiles or channels. Making a chair yourself means there is no height adjustment. Therefore, it is necessary to calculate in advance the optimal dimensions, taking into account the diameter of the wheels and the thickness of the foam rubber. As for the back of the computer chair, here you can adjust the height. Whether this function is needed or not is an individual question. The fixed version is simple to make: a metal profile in the shape of a cross or rectangle is attached to the base with bolts or it can be welded. The design that allows you to adjust the backrest looks a little more complicated. Here it is necessary to make an adapter. The frame is made on hinges, and slats with holes are attached to the back. Bolts are installed to the seat. As a result, you should get a structure of two fixation strips. The presence of armrests is also determined independently. They are attached to the base by welding. Their shape should resemble the letter “P”. In this case, the upper part of the armrest should be directly under the user’s limb
When taking measurements, it is important to take into account the thickness of the foam. The next step is grinding the structure. Particular attention should be paid to welding seams
It is necessary to clean the body from dust and dirt, prime it and apply the required number of layers of paint. After complete drying, you can install the seat and armrests. This is done using bolts or self-tapping screws. Wheels are screwed to the legs. A layer of dense foam rubber is glued to the back, seat and armrests. Synthetic padding is applied on top and upholstery material is applied. You can use a furniture stapler to secure the fabric. For cladding, every detail is cut out in advance. Approximately 20 mm of material is left on each side for allowances. The finished backs and seats are attached with the curved edges inward. This way the staples from the furniture stapler are hidden.
Some useful tips:
- Old parts of chairs or furniture that are out of order or simply not in use will allow you to save on material. It might even save you from welding work.
- Using old upholstery as a stencil will simplify the patterning process.
- The presence of a working lift from an unnecessary chair will allow you to create an adjustable structure.
Before you get started, you should evaluate your options and decide whether buying a ready-made chair would be a more appropriate option.
Chair design
First of all, you need to think about what this piece of furniture should be: a classic four-legged chair or something like an executive’s office chair. To do this, you will need to solve 3 main questions:
- The design of a computer chair should fit into the overall interior.
- Dimensions must take into account the height and weight of the future user.
- The materials used must be suitable for the intended loads.
The design of a computer chair requires the presence of three main elements: a supporting frame, a back and a seat. Having decided on the configuration of the chair, you can move on to the preparatory stage.
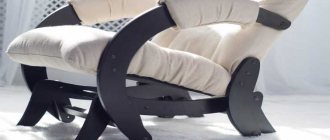
Why do you need play furniture?
Modern humanity can no longer imagine its existence without IT technologies and modern gadgets. Coming home from work or after school, you want to escape from the everyday problems of the outside world and, sitting comfortably in your favorite chair, immerse yourself in the virtual world of games and entertainment. In order for such a vacation to bring complete pleasure, and damage to health to be minimized, it is necessary to properly arrange the playing area.
A standard computer chair is not entirely suitable for these purposes, despite the fact that it is also quite comfortable. It is perfect for short work at the computer, but not for hours of gaming gatherings. A special gaming chair is an improved office chair, which, thanks to its comfortable and reliable design, ergonomics and high functionality, will give you not only comfort, but will also allow you to completely immerse yourself in a real world of amazing adventures.
Tools and materials
You can make good and comfortable chairs with your own hands using different materials.
The chair can be built not only from profile boards, bars or metal, but also from barrels, tires, tires, polypropylene and PVC pipes.
The most commonly used materials for the manufacture of the frame base of chairs are:
willow vine is a beautiful material that is afraid of moisture;
To make a chair yourself, you need to stock up on all the necessary materials and tools. If you plan to make a frame-type structure, you will need the following devices:
- drill;
- a sheet of sandpaper;
- jigsaw;
- pencil and ruler.
Materials that will be useful:
- lumber (most craftsmen prefer 20 mm plywood);
- screws;
- thin nails;
- foam rubber and upholstery material for furniture structures;
- special wood glue;
- stain;
- high quality glossy paint.
They also require different tools and materials.
Tools that will be useful:
- chalk, pencil and ruler;
- sewing machine;
- pins and scissors;
- thread and needle.
The materials you will need are:
- material that will be used for the internal and external covers of the chair;
- suitable filler (home craftsmen often turn to inexpensive foam rubber);
- 2 zippers: with a length of 40 cm and 1 m.
Also, to carry out various works you will need the following tools:
- drill;
- hammer;
- compass;
- meter;
- screwdriver;
- self-tapping screws
Let's consider what types of upholstery are the most popular and relevant.
Faux suede. A beautiful looking material that does not require complex and constant maintenance. The main advantage of artificial suede is its breathability, wear resistance and durability - it is not so easy to tear. In addition, such upholstery will not fade from light.
Wood as the main material
Making a wooden chair can be quite easy if you choose the appropriate method. You can use an old armchair or stool if it is not possible to purchase individual parts. Even from a banquette you can make a small chair that any child will like. To create a classic chair, boards, bars, and logs are usually used. A solid wood product has a number of advantages over other pieces of furniture, because wood is an environmentally friendly material that is absolutely harmless to health.
Natural wood is not a cheap material, but it is the key to the quality of a homemade chair. Once you are confident that the wood is of high quality, you can begin creating a work of art. There should be no knots or cracks on solid wood or bars. All parts must be carefully polished, and only then proceed to assembly. A special coating will protect the material from insect attack and drying out.
To make a chair, it is better to use oak, birch, ash or alder, because they have a unique beauty. These materials allow the product to serve for a long time without squeaking or cracking. The beauty of the product can be emphasized by high-quality textiles that will be used for its upholstery.
Wood is very durable and can compete even with metal. It does not lend itself to plastic deformation and withstands shocks and loads well. It is easy to work with, and therefore you can make a chair from wood yourself. The disadvantages of this material include intolerance to moisture and high temperatures. When exposed to water, wood swells and crumbles, so you need to first coat it with varnish.
Helpful Tips:
- It is much easier to make a chair from the parts that you have lying around from old and broken pieces of furniture. Such enterprise and thriftiness will save you from working with a welding machine.
- And if you also take the upholstery as a stencil, then patterning the covering will be significantly simplified.
- And finally, with a whole lift you can recreate a chair that will be able to be adjusted.
Important! In order to create complete harmony and comfort in the room, we also offer you:
- Ways to hide all unnecessary wires under the table.
- Room design ideas with a computer desk.
DIY rocking chair
During the manufacturing process the following will be required:
- plywood sheets;
- cardboard;
- putty;
- dye;
- pencil;
- ruler;
- tape measure;
- sandpaper
- jigsaw;
- fasteners;
- drill.
Step-by-step instruction
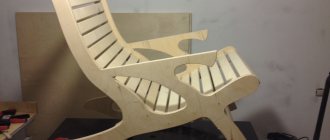
Step one: prepare the details. The entire structure of the chair consists of two side parts, three horizontal connecting strips and 35 crossbars (needed to create the seat).
In this design, the most labor-intensive stage is the creation of the sidewalls, so it is recommended to mark them on cardboard, then cut them out, and only then transfer them to the wood.
Side parts diagram
Step two: to make the side parts you need to take multi-layer plywood 3 centimeters thick
Then you should transfer the part from the cardboard to the plywood sheet and carefully cut it out with an electric jigsaw
It is necessary to make such parts in the amount of 2 pieces
Step three: after which the side parts must be thoroughly sanded with sandpaper and their edges trimmed using a grinder or milling equipment.
Hand router is suitable for cut processing
Step four: from plywood of the same thickness you will need to make horizontal connecting strips 120 centimeters long and 10 centimeters wide. After which they need to be sanded with sandpaper, but you should not process the edges with a router.
Cut three horizontal strips
Grinding
Once your armrests have finally taken the desired shape, proceed to their final finishing. Go over the elements again with a rasp and coarse sandpaper. Next, bring the surface of the armrests to a perfectly smooth state using fine sandpaper.
In the 1960s, everyone was called that: in a Ukrainian village, almost all men have the same name
Dangerous fence: an ice wall made of icicles has appeared in the UK
Save the climate: Bill Gates named humanity's greatest challenge