Handmade furniture is becoming increasingly popular. However, not every person has the tools and relevant skills to assemble a product from scratch. But giving new life to an old cabinet, sideboard or table is quite a feasible task. According to statistics, chests of drawers are most often restored at home - the large working surface area and the absence of complex elements open up a wide range of possibilities for creativity. The basis is the finished product, the design of which changes depending on personal wishes.
Required tools and materials
The first thing you will need for work is the chest of drawers itself - antique or modern, but simply lost its presentable appearance. Its external condition does not play a special role, since after restoration it will look like new. The most important thing is that the frame remains strong and can withstand further use.
In addition, for proper work you should prepare certain materials and tools. It is also necessary to decide in advance in what style the restoration will be carried out. All this information will be needed to compile a list of decorative elements, finishing materials, paintwork. In addition, a basic set of necessary tools is provided:
- For preparatory work you need a grinding machine, screwdrivers or screwdrivers, self-tapping screws, putty, and a spatula. You also cannot do without a special glue for wooden surfaces.
- For finishing you may need an old toothbrush, a paint roller, brushes, varnishes and paints.
- To protect yourself from the harmful effects of dust and paint fumes, it is advisable to use gloves and a respirator.
If you don’t have a sanding machine, you can replace it with sandpaper of varying degrees of grit.
In addition, if desired, you can install new fittings on the chest of drawers. You should also take care of purchasing it in advance.
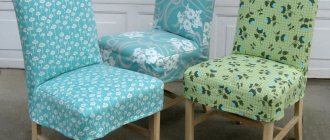
Dresser decor for the bedroom
After restoration, you can safely begin decorating. For decoration, everything is used: from beads, coffee beans and old newspapers to nails, apartment numbers and plastic figures. The only limit is your imagination (well, you shouldn’t take away your children’s favorite toys). To know where to start, we’ll introduce you to a couple of ready-made techniques and inspiring ideas.
Preliminary preparation
Before starting finishing work to give the furniture a new look, a number of preparatory measures should be carried out. First of all, you need to remove all the contents from the drawers - the chest of drawers should be completely empty. For high-quality implementation of decorative finishing measures, it is recommended to disassemble the chest of drawers into its component parts. All fittings are unscrewed. Drawers are available. The hinged doors are removed. If necessary, you can separate the tabletop. All this is necessary for a more detailed and thorough study of each individual element. The end result will be the highest quality product.
Advantages of wooden chests of drawers, range of models, colors and styles
Further stages of work:
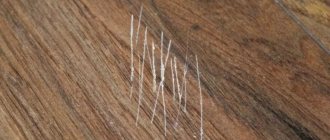
- Removing old coating. This is the most important component of restoration work, because decorative finishing is applied exclusively to a clean, impregnated surface. To remove any paint coatings, you can use a special solvent and a regular spatula. If you need to remove plastic film, experts recommend arming yourself with a hair dryer. A small area is heated, the coating peels off under the influence of hot air and can be peeled off without any problems. In this way, piece by piece, all the furniture is gradually cleaned.
- Eliminating cracks, leveling the surface. The procedure is carried out using putty, which is applied over the entire area of the chest of drawers. Each element and section of the furniture is thoroughly processed, after which the product is left to dry completely - sometimes this may take at least a day.
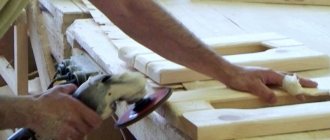
- Grinding the treated surface. At this stage it is worth using a sanding machine, but if you don’t have one, sandpaper will do. Particular attention should be paid to corners and transitions. The final goal is a perfectly flat surface.
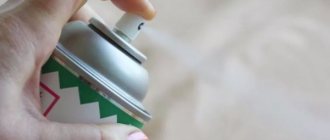
- Primer. It is a necessary base for decorative finishing.
For priming, it is recommended to choose a special composition for working with wooden furniture.
Apply stripping solvent
Remove a layer of old varnish
Walk through hard-to-reach places
Sand the surface with a sander
Sand small parts with sandpaper
Spot-treat all deep damage with putty.
Sand the putty areas
Ready
Antique decor
Required materials : acrylic paint, roller or brush for painting, sandpaper, gold leaf, glue, varnish.
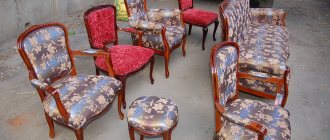
An antique decorated chest of drawers is suitable for a bedroom in country or Provence style. It's funny that even the marks of time have to look stylish, so you have to work a little. On the prepared surface (5th stage of our list) we apply two layers of acrylic paint in contrasting colors. After the paint has completely dried, we sand the corners and protruding areas with sandpaper.
If you want to give your chest of drawers a feeling of former luxury, additionally use thin foil called gold leaf. Apply glue to the selected areas, and then place the gold leaf on top. Give it at least two hours to dry and remove any excess. The final stage of work, as you probably already guessed, is varnishing.
Stages of restoration taking into account the chosen technique
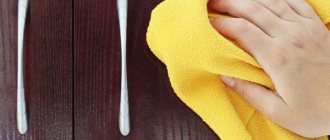
After all the preparatory work is completed, the chest of drawers should be wiped first with a dry, then with a damp cloth. This removes any dust that has settled during the drying process. Further actions will depend on the technique chosen for restoration: staining, decoupage, and the method of artificial aging are most often used. Master classes selected from thematic resources will help you do everything correctly, in the right sequence.
Decoupage
The common technique of decoupage is quite simple to perform. To work, you will need PVA glue and special napkins, which are distinguished by a variety of designs and patterns. Everyone will be able to choose a theme according to their personal preferences.
When applying decoupage elements, it is important to pay attention to the integrity of the pattern over the entire surface of the chest of drawers. Experts recommend that before fixing each piece, apply it to the future location to adjust the overall harmonious picture. For beginners, it is advisable to first create a sketch of the future product, working out all the nuances.
How to restore an old chest of drawers step by step:
- Cover the entire surface of the furniture with white acrylic paint and leave it until completely dry.
- While the chest of drawers is drying, prepare the decor. Cut out all the necessary patterns and designs, clearly defining their location.
- Fix the cut parts on the dried surface with PVA glue. In the process, you can adjust their angle of inclination.
- Smooth all applied elements and eliminate air bubbles. You can use a special roller at this stage.
- To consolidate the result, coat the entire surface with varnish.
Instead of napkins, you can use scraps of fabric. The application principle will be the same.
The final stage is to screw on the fittings, all parts of the furniture are assembled in the required sequence. The restoration of the chest of drawers is complete, the updated piece of furniture is ready for use.
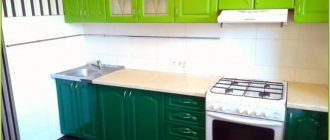
Functional chests of drawers for the kitchen, current materials, styles, colors
Replacement of accessories
After restoration, the appearance of the chest of drawers often changes dramatically. As a result, there is a need to update the fittings. As a rule, it is selected in advance in accordance with the overall design of the product. The number and sizes of handles, clamps, and plugs are also calculated at the initial stage. It is possible to install fittings in new areas; in this case, during the preparatory work, all old, unnecessary holes should be masked, and new ones should be drilled in selected places.
It is important to remember that the installation of fittings is carried out after all the measures for restoring the chest of drawers with your own hands. The procedure is always the final stage. In addition to decorative, visible elements, care should be taken to replace guides and fasteners. This is necessary not only for aesthetics, but also for the full functioning of the furniture.
Painting
The simplest, but at the same time quite effective method of restoring an old chest of drawers is painting. The modern building materials market offers a wide range of paint colors, glossy, matte, and imitating surfaces of different textures.
You can paint the chest of drawers in a color that matches the interior. Or, conversely, make it a bright accent by using shades that contrast with the room’s decor.
To update an old chest of drawers with your own hands, painting each element with a separate color is often used. The result is a colorful, unique product. There are many options, it all depends on personal tastes and the boldness of design decisions.
After the preparatory measures, the entire surface should be covered with a layer of paint. Next, you need to give it time to dry completely, after which it is recommended to carefully inspect the product. This way you will be able to understand how tightly the paint layer is applied and whether the chosen shade looks harmonious on the furniture. If necessary, one or more coats of paint should be reapplied, depending on the end goals. To obtain a glossy shine, the restored chest of drawers or its individual sections are coated with a special varnish.
Criteria for choosing a children's chest of drawers for clothes, popular models
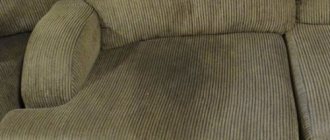
Artificial aging
Due to the popularity of the vintage trend, you can restore a chest of drawers at home using artificial aging techniques. The finished products look quite original and expressive.
To work, you may need sandpaper, two colors of acrylic paint, a wax candle, a sponge and brushes. To create an “antique” chest of drawers you will need to follow three simple steps:
- Initially, preparatory measures for surface treatment are carried out. The furniture is then painted with a base coat of paint. After which you will need to wait for it to dry completely.
- The main stage of aging is to create “age-related” abrasions on the surface. In the designated areas, usually along the edges, you should rub with sandpaper with varying degrees of intensity to achieve a natural effect. The main condition is not to overdo it, otherwise unnatural stains may appear. It is recommended to treat abrasions with a wax candle.
- Afterwards a layer of paint of a different shade is applied. Waxed areas are wiped with a sponge. The paint can be easily removed.
To consolidate the effect and give the wood a glossy sheen, a layer of varnish can be applied to the finished “antique” furniture.
Decoupage
Necessary materials : pictures for decoupage, scissors, PVA glue, roller/brush for painting, varnish.
According to Wikipedia, decoupage is the decoration of objects using napkins, pictures, fabric or photographs. The technique is suitable for beginners. All you need is to cut out the illustration you like along the contour (you can use decoupage cards, ordinary three-layer napkins, postcards) and glue it to the selected area with PVA glue. Mix 2 parts glue with 3 parts water and cover the picture with the finished mixture. A final coat of varnish, and an ordinary chest of drawers turns into a work of art.
Updating children's furniture
When it comes to restoring children's furniture, you can experiment by using non-standard colors, funny designs and patterns. An old chest of drawers will look quite original with drawers painted in bright, contrasting tones. Yellow, red, blue, green or purple will fill a child's room with light and fun. The tabletop can be painted in a calmer shade, it will be more practical.
The decoupage technique is also used quite often to decorate children's rooms, since you can always choose colorful images with your favorite characters . This way you can create an even more original chest of drawers with your own hands. The child’s hobbies will help you decide on the theme of the design, and on numerous thematic resources you can choose a ready-made master class that tells in detail what to do and in what order.
For school-age children, experts recommend restoring a chest of drawers by covering it with old wallpaper. As a result, the furniture will look interesting and stylish. It is very important that the restoration of a children's chest of drawers takes place with the direct participation of the child himself. It is he who can act as the author of ideas for a new design.
Volumetric decor
Materials needed : stencil, masking tape, acrylic putty or volumetric paste, spatula, acrylic paint, brush/sponge, sandpaper.
The stencil comes into play again. The first step is to attach the stencil to the surface. Next, apply putty and level it with a spatula. After we remove the stencil, we patiently wait for it to dry completely.
In the finale, there are two ways to develop the scenario: either we cover the chest of drawers with acrylic paint, or we create the already familiar scuffed effect. To do this, paint the surface with one color, then rub the three-dimensional pattern with a candle and cover everything with paint of a different shade. After drying, sand it with sandpaper. Done, you are amazing!
Turning a chest of drawers into an open storage system
Materials needed : replacement for boxes (wicker baskets, suitcases, wooden boxes).
Another way for those who don’t want to bother. To turn a chest of drawers into an open storage system, simply remove the drawers and replace them with something more original. For example, wicker baskets or old suitcases. Just. And how impressive!
You don't have to have an art education to give furniture a second life. It is enough to arm yourself with the necessary materials, discard ideas about right/wrong and simply allow your inner child to express itself.
If the number of options makes you dizzy, take our style preference test. At the same time, you will learn something new about your inner designer.
Adding wheels
To add wheels, you need to attach a small piece of plasterboard measuring 5 x 10 cm at each corner and screw them in place. Then install the wheels and secure them with screws to the surface of the squares.
While working on such a project, you can come up with a large number of changes and modifications to the same piece of furniture. You can install doors instead of drawers. Ready-made furniture doors made from MDF can be purchased at a furniture store. You can also order such items in the required size and color at some specialized retail outlets. In any case, no matter how you remodel your chest of drawers, it will make you happy and proud.
Found a violation? Report content
Place your hand on the dresser handles
Materials needed : replacement handles (toys, ropes, wine corks), drill, bolt, washer and nut, glue, marker.
If you're tired of the look of your dresser, you don't have to bother with spatulas, sanders and paints. Just replace old handles with children's toys, ropes, keys, branches, wine corks. Yes, yes, you heard right. This is one of the simplest and most original ways to upgrade. We have detailed instructions on how to do this.
Useful tips
- When repairing and restoring, it is necessary to first change the fasteners, and then begin to decorate the appearance.
- Removing the old coating during the preparatory process is necessary. If you ignore this point, the restoration process may be in vain.
- Don't forget about protective measures. Working outdoors, wearing gloves and a respirator will help protect against serious harm to health.
- Apply primer, paint or varnish only after the previous layer has dried. Otherwise, streaks or cracks may appear. Then the work will have to start again.
A small but roomy chest of drawers has become an integral part of the design of any room. However, many products are not attractive in appearance or price. In this case, you can use a little skill and restore the old chest of drawers. Such a piece of furniture will stand out for its uniqueness and originality.
Subscribe to our Social networks
We paint the chest of drawers in an original way
Required materials : paints (acrylic, slate, marker board paints), masking tape, varnish.
Play with color: paint drawers or dresser legs in different tones, or use today's popular ombre effect (when the color fades to a lighter or darker shade). This can be achieved by mixing the selected tone with white paint. For each subsequent shade, increase the amount of white. Number of shades = number of boxes.
Do you prefer straight lines and clear shapes? Then cover the chest of drawers with stripes or geometric designs. To do this, you will have to make friends with masking tape: apply a base color, stick the tape with the desired pattern, and then cover the surface with a different color. Your new striped friend is ready!
Chalkboard or dry erase paint can transform an ordinary dresser into a space for love messages, tic-tac-toe games, and drawing. Write down dreams, inspirational quotes, or simply create a menu for the day here. Beautiful and functional – everything we love.