Materials
When assembling a cutting table from chipboard with your own hands, you should maintain an optimal balance between functionality, safety, time and money. This can be achieved by selecting parts and materials with the necessary parameters. It is possible to reduce costs by using old parts of other structures - furniture, frames of wooden houses and outbuildings.
Tabletop
The main requirements for a saw table are resistance to heavy loads, shocks and vibration. The tabletop must be smooth enough to move and not bend under a weight of 50 kg or more. Suitable options might be:
- Metal (steel or duralumin) 3–5 mm thick. The advantages of metal countertops are high strength, almost unlimited service life, the disadvantages are heavy weight, decent cost.
- Laminated chipboard or moisture-resistant plywood with a thickness of at least 2 cm. The cost of this option will be the most profitable, but the strength is noticeably reduced.
- Textolite 15–20 mm thick. The material is more durable than plywood, but inferior to metal. In terms of cost, textolite countertops are also between metal and plywood sheets.
Plastic, chipboard or OSB are not recommended as countertop materials. A structure made from this raw material will be unstable to vibration from the saw. It is possible to make a table entirely from natural wood, but it is too expensive.
Metal
laminated chipboard
Textolite
bed
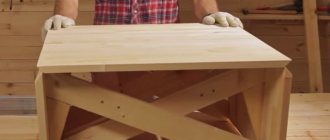
At the base of the table for sawing boards there can be wooden beams, secured under the lid to increase rigidity. Elements with a cross-section of at least 5 x 5 cm are placed at a distance of 50–90 mm from the edge of the tabletop. For the sawing table, it is recommended to choose bars made of hard wood - beech, hornbeam, oak. The advantages of wood are low cost, easy installation using self-tapping screws. Disadvantages - less strength and service life, high probability of fire.
The upper part of the table frame for cutting chipboard and other materials is often made by hand from the same sheets that were chosen for the table top. For the legs of a wooden structure, it is recommended to use timber, securing it with metal corners. The pros and cons of wooden supports are similar to the features of a frame made of the same material.
The basis of the table for cutting and sawing boards can be metal. Stability increases when choosing metal corners or channels with sides of 25–50 mm. To save money, they are purchased at scrap metal collection points or replaced with profile pipes. The frame parts are connected by welding. The use of bolted connections is not recommended due to the possibility of loosening due to vibration. The reasons for choosing a metal frame are maximum strength, reliability, and easy maintenance. Disadvantages: high cost, need to use a welding machine.
Metal
Wooden beams
Chipboard plywood
Do-it-yourself design production
After preparing a sketch of the structure (with dimensions) and purchasing the required materials, you can begin work. You should start by making a frame for the table top. It can be made from a profile pipe. Having a welding machine and a grinder on the farm, this is not at all difficult to do.
- The required pipe sections are cut.
- The sides are welded.
- Four sections connecting the sidewalls are welded.
- All welding and sawing areas are processed with a grinding wheel.
- Adjustment screws are attached to the ends of the legs, allowing you to install the table on a not very flat surface.
The structure must be painted to give it an aesthetic appearance and protect it from corrosion processes. It remains to make holes in the frame for mounting the tabletop.
The table can also be made from timber or boards with a section of 10 x 5 cm. To assemble the frame you will need metal corners, dowels and screws.
Important! When using wood blanks, one should not forget about the mandatory treatment of them from exposure to moisture and temperature. For this purpose, special formulations are produced.
table , as a base for a circular saw . It is only necessary that its base be strong. In most cases, the standard dimensions of such structures are quite suitable for cutting wood. But it is recommended to install a new countertop itself. An alternative is to glue two sheets of plywood 1.2 cm thick. This thickness will be quite enough to install a saw weighing about 5 kg.
After making the base, you can proceed to the most important stage - preparing the surface and installing the saw.
Tool, device Photo
| Jigsaw |
| Screwdriver |
| Drill |
| Sander |
| Milling unit |
| Roulette |
| Square |
It is necessary to drill mounting holes in the platform of the purchased unit (if the holes were not provided for in the design). It should be remembered that after such modification, the manufacturer’s official warranty for the purchased tool will be lost.
MDF (board made from tiny wood chips)
The tabletop is cut out according to the required dimensions. It can be made from 1.8 - 2 cm thick plywood, MDF, old furniture or sheet metal, but this option is rarely used. In this case, chipboard is not recommended, since these boards are not very durable. Plastic should also not be used as a countertop.
Important! The thickness of the cut directly depends on the thickness of the table. The larger this size, the shallower the depth the disc can cut through the workpiece, since the working surface of the disc is reduced.
It is advisable to mill the edges of the tabletop (no one has canceled the aesthetic appearance even for working devices), after which you should go over the workpiece with a grinding machine.
A slot is made in the tabletop for a saw blade.
Markings are applied for hardware. The saw is attached to the bottom of the tabletop. The fastener caps should not protrude beyond its plane.
The saw is fixed to the bottom of the table top
Many people do not drill the platform when installing the saw on the tabletop, but secure it with clamping blocks and self-tapping screws.
The table top is turned over into the working position and secured to the frame. For fixation, it is recommended to use not only self-tapping screws, but also metal corners, which provide the required structural strength.
Many craftsmen do not limit themselves to simply installing factory tools under the table. To gain a few millimeters in the thickness of the cut, they completely remove the saw guard, sole, and saw blade tilt adjustment device (if it is not useful in the future). After this, a homemade platform is produced, on which the saw is attached.
Displays the power control of the instrument. For this you will need: a plug for the socket, a plug for turning on the saw, a standard light switch, a piece of cable, clamps for clamping the power button on the saw, self-tapping screws and minimal electrical installation skills.
A socket is attached to the inside of the table; a cable for the switch is output from it, which is installed where it is convenient. The device is powered from the nearest power source in the room. The saw power button is fixed with clamps in a recessed position. The integrated saw start control allows you to quickly and easily control the operation of the tool.
READ Hammer stl1200 210c miter saw review
To work on the table, you need to make stops and a carriage.
Circular table guide carriage
A carriage for sawing small workpieces or cross-cutting lumber can be made from a plywood base and two wooden walls. It will move along two guides, which are made of sections of metal pipe with a cross-section of 2 x 1 cm and installed in grooves made using a router. The parts placed inside the carriage are very convenient and safe to saw.
Guides for working with workpieces can be made of boards, plywood or metal.
They must be able to adjust their position depending on the width of the workpieces being cut. The stops can be not only longitudinal, but also transverse, and also help to make cuts at an angle.
If you don’t want to make the guides yourself, you can install a ready-made device.
You can supply a ready-made device
To cut workpieces, you cannot do without a marking ruler. To mount it in the tabletop, a shallow groove is selected using a router. It can be done with a chisel and a knife, but using a milling machine it is much faster, more accurate and easier. All areas where work was carried out are carefully sanded to eliminate the risk of splinters. Installation holes are drilled. The ruler is secured with self-tapping screws.
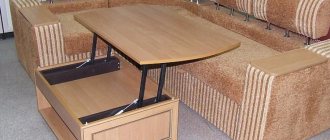
You can provide various devices to facilitate the operation of the tool: a bag under the table top to collect chips, a dust extractor for sawdust flying over the table, a mechanism for lifting the table top for servicing the tool. In small spaces, a folding tabletop is convenient.
Operating a circular saw is a traumatic operation, so you should push the workpiece toward the disk not with your hands, but with a pusher specially made from a block. The most common injuries that an operator can receive when working with a circular saw are injuries to the fingers and eyes when knots or chips bounce off. When working, be sure to wear safety glasses.
Sawing table made from a hand-held circular saw
A well-made frame, a securely fastened saw and prepared tools for work allow you to cut material quickly and safely.
Features of a circular saw
Knowledge of these features is extremely important; you must take into account the operating modes of the saw, know the type of loads and take all possible measures to strengthen the most important components. Only with this approach can long-term and safe operation of a homemade machine be achieved.
What are the common features of woodworking machinery?
High speed saw teeth. This ensures the quality of sawing. But high speeds of the saw blade cause serious injuries; during the manufacture of the machine, great attention must be paid to safety precautions. All devices available on industrial copies must be installed without fail. Do not think that some of them are superfluous, and you will be able to modernize factory samples for the better. All safety rules are written in the blood of injured people, do not repeat tragic mistakes.
Strength of all nodes
This means the inability to withstand significant static loads, although this is very important. The table can easily absorb large forces of this type, but at the same time vibrate under the influence of even relatively minor dynamic multidirectional loads. This condition does not have a negative impact on safety, but noticeably deteriorates the quality of the cut.
Marks of teeth are noticeable on the surface of lumber, it is difficult to maintain specified linear dimensions, etc.
Fire and electrical safety. Absolutely all electrical devices, motors, starters and other special fittings must be installed in strict accordance with the requirements of the PUE. You need to know that dry sawdust not only burns well, but also forms an explosive mixture at a certain concentration in the air. By the way, burning sawdust is difficult to extinguish; it floats on the water and continues to burn.
There is no need to make the simplest machine at the expense of safety devices; strictly follow the recommendations of the designers. Decide what you need, a woodworking machine or fresh problems?
Adviсe
- Before you start using an electric saw on a table, you should check the blade of the saw itself using a square, since some unscrupulous manufacturers do not install the blade exactly at an angle of 90 degrees, as a result of which the cuts end up beveled.
- If during work you plan to use the table also to store tools on it, then the dimensions of the tabletop should be larger than a square meter in area.
- For manufacturing it is better to use high-quality and durable materials, otherwise the table will not last long.
- The table can be supplemented with anything you like, for example, some manage to attach a special vacuum cleaner or a riving knife with protection for the disk to it, so that shavings and residues from cutting wood do not fly to the sides.
- Select a place to install the table in advance, and also make sure that the floor where the table will be installed is level.
- If you have the desire and certain skills, you can make a folding tabletop or a lifting table, but this will require more time and materials.
- If the table wobbles or vibrates during operation, adjust the height of the legs using suitable pieces of rubber.
How to secure a hand-held circular saw to a table
I am engaged in the manufacture of beehives. The circular one was made precisely for this purpose. To match the dimensions of the hive parts.
So, I took two headboards from the bed. Polished. 1.5 cm thick. The main thing is that they had a flat plane.
I determined a place to mount the saw. (This is done “upside down”). I fixed the saw with guides and clamps. I sawed it so that it would sink along with the riving knife. I drilled the rail together with the tabletop. I secured it all with 4 bolts.
I assembled a table frame from spruce boards. I attached a tabletop with a saw to it. A trial cut showed that it was better to remove the protective cover. It resonates.
Then it turned out that the saw vibrates if you cut with the saw blade at the minimum setting. When it stuck out all the way, there was no vibration. It’s simple. The saw weighs almost 6 kilos. The flimsy tire made of 2 millimeter iron is not designed for such a load.
The solution turned out to be simple. The saw itself had fastenings for sawing in an inverted state. I secured it with standard 2 clamps to the board, to which, in turn, the same board was screwed perpendicularly.
In short, now the circular saw is both suspended and supported at the same time. Nothing wobbles or vibrates. Exactly what is needed!
The guide (Aluminum corner originally from the USSR) is secured with two clamps. There are ideas and material for the future, but for now this will do.
Next, for trimming identical workpieces and sawing grooves, I made a trim carriage.
Plywood 7 ml. thick. THREE guides: one in the center and two at the edges. (In the future, I’m thinking of getting smarter with the carriages). I anointed it with lithol in places of friction. The carriage glides like it's on ice.
This is my first experience. But it turned out to be practical! The work went very quickly. The accuracy is pleasing. The main thing is to set it up right away.
The bees have already flown today. Tomorrow the buzzer will buzz again. A lot of work.
Important! Don't forget about safety. New fingers will grow only in the next life.
How to make a homemade table for a hand-held circular saw?
- Selection of the required material and table manufacturing technology
- Making the lid and sidewall
- Assembling the front of the table
- Installation of the control unit
Owners of hand-held circular saws often think about improving this tool, because, with all its advantages, it cannot 100% replace a full-fledged circular saw. It is quite possible to convert a hand saw to a stationary one by making a table for a circular saw.
A circular saw is necessary for precise longitudinal and transverse cutting of wood and metal.
There are many ways to correct the shortcomings of hand tools. One of them is purchasing a new circular saw. But since you have become the owner of a hand-held circular saw, then your plans probably include its direct use. Then why not make your own table specifically for a circular saw, with which you can turn your circular saw into a stationary machine. Well, as a result, in addition to the satisfaction of a job successfully done, you will have the planned result and experience in this industry. In the case when you already have a table (for any purpose) that is unsuitable for other use, but is still strong, you can use it as a bed. But if there is nothing like this on the farm, then use these tips to create a support table for your circular saw.
READ How to Sharpen a Circular Saw at Home
Table saw
When choosing a circular saw, you need to be guided by the following characteristics:
- Saw power. If the amount of work is quite large, it is advisable to take a tool with a power of at least 1.2 kW.
- Cutting depth. The thickness of the material to be processed depends on this parameter. For hand saws it is 40–70 mm. But when installing it in a table there will be a decrease of around 10 mm.
- Button placement. The design of the sawing table must provide free and safe access to all control buttons, otherwise it will be necessary to modify the control system yourself.
- Rotational speed. For cutting wood, high rotation speed is preferred. This affects the cutting quality. For plastic, for example, this is not very good. Due to the high rotation speed of the circle, the plastic heats up. You need to choose average characteristics. 3-4 thousand rpm will be enough.
Selection of tools and materials
At the beginning of work, you need to make sure that you always have all the necessary raw materials at hand, as well as a set of tools that would be useful throughout all the actions. To create a table you need the following materials:
- plywood about 2-3 centimeters thick or an identical piece of chipboard;
- wooden blocks measuring 40x40 millimeters;
- metal building corners – 12-15 pieces;
- self-tapping screws of different lengths and bolts of different classifications;
- glue used in carpentry;
- means for treating products from moisture and rust;
- outdoor socket;
- cable;
- switch.
This set of materials is necessary for a standard structure of ordinary dimensions with an area of slightly more than one square meter. You can work on such a table with almost any hand-held circular saw, except for tools with small disks, since when attached to the tabletop, the cutting depth sags by an average of 1-2 centimeters.
The following tools will be useful to you for this work:
- marker or thick pencil;
- tape measure, metal ruler, angle;
- jigsaw;
- screwdriver;
- Grinder;
- drill;
- sandpaper.
Selection of dimensions
It is worth choosing the size of the sawing table depending on the square footage of the workshop. The small area of the room allows you to use a tabletop of 50 x 50 cm. Making the sawing table smaller does not make sense - it will be difficult to use it when processing long workpieces. The universal size, ensuring convenient sawing of laminated chipboards, is 80 x 80 cm.
To comply with safety requirements, it is recommended to place the saw in the middle of the tabletop at a distance of at least 25 cm from the edge - it is this indicator that leads to the minimum width of 500 mm. The location of the saw blade also depends on how it will be used. There are three types of design:
- for longitudinal sawing;
- for cross cutting;
- universal.
The depth and location of the disk installation depend on the workpieces processed on the machine. For boards and plywood, it should protrude above the tabletop by 50-80 mm, for logs - by 110-125 mm. The height of the upper part of the frame made of sheets of plywood or chipboard can be in the range of 35–40 cm. If you make the frame only from timber, this parameter depends on the cross-section. The remaining part of the structure consists of wooden legs, the size of which craftsmen usually choose to suit their height. The overall height of the sawing table is about 1.0–1.1 m, but can be reduced to 900 mm.
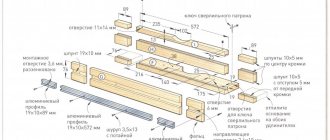
The second version of the table for a circular table. Photo of manufacturing technology
A do-it-yourself saw table is made from boards, as the most affordable material, quite often. To make this table you will need:
plywood sheet (thickness 20 mm and above);
boards 50 by 100 mm;
bars 50 by 50 mm;
several screws;
wood glue;
one of the types of wood varnish.
A blank with a hole is cut out of a plywood sheet using a jigsaw - a tabletop in which the saw will be placed. When marking the holes, follow the dimensions of the saw blade. Stiffening ribs are made from the boards, which will be attached to the tabletop with self-tapping screws. During the fastening process, the boards are tightened using clamps. A start button is later installed on the front stiffener. To make the legs, use boards about a meter long. They are attached externally to the stiffeners with bolts.
2
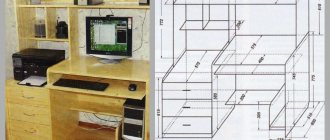
Device options - features and preparation
You should think through all the nuances of making a homemade product. Drawings make the work process easier. First, determine the dimensions of the tabletop. The hole for the circular saw must exactly match the tool. It depends on its diameter, so it is impossible to say which one is required.
The base must ensure stability; loosening of the entire product or individual elements is unacceptable. Legs for the structure are required. If you use solid sheets of plywood as a support, it is difficult to achieve stability - you need an almost perfectly flat floor surface.
The dimensions of the tabletop are chosen taking into account your own wishes and the dimensions of the workpieces for processing. When they are completely laid flat, the cuts are more accurate and even. At the same time, too large sizes are inconvenient - the room is cluttered. Craftsmen sometimes make folding tables that take up little space when not in use. Some people need to produce small parts; a machine of the appropriate size is required.
We recommend: How to make a carpentry workbench (mechanism, folding) with your own hands - drawings, dimensions
If the owner wants to always have the necessary tools at hand, the most convenient location is the countertop. For this purpose, the dimensions are significantly increased; 1.2 × 1.2 m is suitable.
Safety requirements
One of the most common causes of injuries when using a circular saw is a cluttered workplace.
In addition, it is important to monitor the stability and strength of absolutely all components of the system, and if there is imbalance, take measures to eliminate difficulties. Before connecting the saw, you must make sure that it is well secured. If necessary, tighten the screws/bolts. It is strictly forbidden to hold the material close to the cutting site! This is dangerous due to the rebound of knots and shavings into the eyes or onto open parts of the body.
Be sure to wear glasses before work and clothes with sleeves.
Making your own saw table is not as difficult a task as it might seem. If you have good material at hand, its characteristics are chosen correctly, and the power of the device ranges from 500 to 1000 W, the above instructions will be the basis of the work.
You should not lose sight of the fact that at any stage of table production you should control the accuracy of your own operations. Otherwise, if deviations in size or deformation of the legs appear when the ribs are tightened, it will be very difficult to restore stability. Nevertheless, making a table for a circular table with your own hands is an absolutely realistic task that will take several hours.