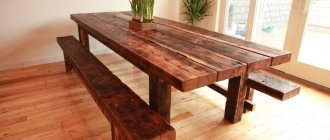
Everyone has dreamed of discovering artistic talent at least once in their life and trying themselves as a restorer or decorator. Restoring a table is a unique opportunity to combine business with pleasure. Firstly, this is a good way to save on buying new furniture, and secondly, restoring an old table with your own hands is doubly pleasant. It is noteworthy that restoration technology is available to everyone, even non-professionals. The result is an exclusive product that has no analogues. How to restore and transform an old kitchen table? How to cover a wooden tabletop? Tips, recommendations, photos, as well as a unique new master class on restoration from designers will help you make a real masterpiece from an outdated piece of furniture.
Furniture restoration is a very exciting process in itself, and with the right approach it is also very useful, allowing you to significantly save on purchasing new furniture
The benefits of upgrading your furniture yourself
Repairing an old table at home is a good way to decorate the interior of your home, giving it newness and comfort. After all, it is the little things that make up the overall impression of the house. Do-it-yourself restoration has the following advantages:
- Saving money. Repairing furniture yourself is much cheaper than buying new or ordering restoration from a specialized workshop.
- An opportunity to radically transform furniture and give it a second life.
- Decorate the table based on your own taste preferences. You can decorate your home with a unique designer item.
- If the furniture is of high value and is made of good wood, then restoration will help save it from damage and preserve it for a long time.
Updating furniture yourself is a very painstaking task that requires some skills. However, before you repair an old table with your own hands, it would be useful to study the algorithm for carrying out the work. After all, failure to follow the rules can negatively affect the result.
Saving money
Design based on your own taste preferences
The ability to radically transform furniture
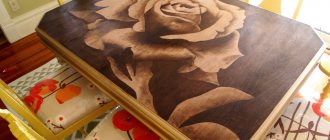
Decoupage
A book-table using the decoupage technique will bring a touch of romance to the interior, when delicate floral elements seem to be scattered on the table. Decoupage can be done at the priming stage, after repairing cracks and chips, or after painting with white or other light paint.
- Mark the proposed locations for placing images.
- Cut out the necessary elements from a paper napkin or special paper for decoupage.
- Place them face down in a flat vessel with water for 30 seconds.
- Place the soaked picture in the same position on a polyethylene file and roll up the unnecessary paper.
- Together with the file, lower the image to the selected location, the file on top.
- Carefully level and remove the file.
- After applying all the elements, if there was no painting, decorate with it.
- Acrylic varnish coating is the last stage.
Necessary tools and consumables
Before you update your desk, you need to stock up on the necessary tools and consumables, the availability of which is best taken care of in advance. To carry out the work you may need the following equipment:
- sandpaper of varying degrees of grit (from 80 to 180 for initial processing, from 500 to 600 for polishing the final coating) or a sanding machine;
- set of brushes and roller;
- electric drill and several drills of different diameters;
- chisel;
- plane;
- hammer, supply of nails and nail puller;
- saw;
- marker;
- roulette;
- rubber spatula for removing old paint;
- putty, primer, varnish, paint;
- wood glue;
- protective equipment: masks, gloves, respirator;
- wood protection products (impregnation that protects against unfavorable factors, for example, wood rot or pests).
A set of screwdrivers is also useful for disassembling the product. Using a marker and tape measure, markings will be made, and paints and varnishes will help protect the furniture from negative influences and change its appearance. When choosing a paint composition, it is better to give preference to a well-known brand. Before you restore an old table with your own hands, you need to make sure that the tools are intact and in working condition.
Stages of work execution
The result of table restoration depends on the thoroughness of execution and adherence to the sequence of actions. Only under this condition will it be possible to restore damaged furniture.
The work consists of the following steps:
- selection of tools and materials;
- inspection and initial repairs;
- cleaning surfaces from old coating, restoring wood;
- roughing;
- finishing, decoration.
If the table is badly damaged, the work plan will expand. Additional operations will be required. Their type is determined separately in each specific case.
Preparation
The initial stage of table restoration is an analysis of its condition. The inspection should begin with the structure: check the condition of the fastenings, stability, and whether there are any height differences. If necessary, the product is disassembled, marking the places of fastening with the base with a pencil, and circling small defects with a marker.
After the inspection, work to restore the integrity of the table parts: sealing holes, gluing dried elements. If the legs or tabletop cannot be repaired, they are replaced. Moving parts and mechanisms are cleaned of rust, lubricated with oil, if there are any breakdowns, they are repaired or new ones are installed. Poorly fastened parts are fixed with glue, liquid nails or screws.
If the table is varnished or painted, then the next step is to remove the old coating. You can clean it manually with a spatula, sandpaper, sanding machine, or wash it off with a solvent. When restoring a wooden table, mechanical removal must be carried out along the grain so as not to spoil the natural pattern.
Features of making your own manicure table with a hood
Inspect the table
Disassemble the product
Mark the places of fastenings with the underframe
Repair broken parts
Remove old coating
Glue all the parts
Primer and sanding
After eliminating structural defects and removing the old coating, it is necessary to remove dust from the surface. Then treat with an antiseptic and leave to dry for a day. This operation is necessary for products made from different materials: not only wood, but also MDF, chipboard.
The next stage is priming. The product is applied to the countertop and frame parts. The step-by-step process looks like this:
- Apply a small amount of product to a separate area, spread with a spatula as evenly as possible. Continue to the next section. It is recommended to carry out the work in small fragments to achieve a smooth surface. When priming, differences should not be allowed at the boundaries of areas.
- After the first layer has dried (1–6 hours), repeat priming. Subsequent operations are carried out with intermediate drying.
- Sanding primed surfaces by hand or with a sanding machine. The surface should be perfectly flat.
After this, putty is applied. The dried layer is sanded until smooth. The operation must be carried out as carefully as possible, since the quality of the rough finish determines how smoothly the paint or varnish will lie.
The furniture primer should match the tone of the paint you choose. If you plan to make a dark-colored wooden table, you should not use a light product and vice versa. Otherwise, it will be difficult to achieve uniform coloring.
Apply product
Sand the surfaces
Apply putty and sand until smooth.
Final coating
The choice of finishing depends on the design decision. The table can be glossy or matte, painted, slightly tinted or exposed varnish. The last technique is recommended for furniture made of wood with a spectacular grain pattern.
Painting is done with a brush, roller or spray in several stages, each time waiting for the previous layer to dry. If decoration is to be done with painting or other techniques that require a prepared surface, the operation is performed last. For example, they decorate the kitchen table top with drawings or do decoupage and then varnish it.
Tips for making a welding table with your own hands, work procedure
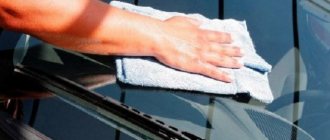
The final stage is fixing the final coating. To do this, use varnish or wax. The first product is ideal for home furniture, the second is best used to protect tables that are often exposed to the sun, wind, and precipitation.
Preparation
The process of preparing a table top or frame begins with determining the scope of work: what needs to be repaired or replaced. Detected cracks and defects in the wood (fallen knots) must be sealed with putty. At the end, everything is carefully sanded, using abrasives of different sizes, and then painting (varnishing) occurs.
Elimination of defects
Defects in the table are repaired by puttying and repairing elements using similar materials. This procedure must be carried out so that the table can be used like new. And this requires a complete restoration of the structure.
Repair
If the countertop is damaged, it must be repaired. Depending on the condition, inserts (for sliding tables) or the entire canvas can be replaced. The color, thickness of the material, and its texture (if you plan to varnish the countertop) are carefully selected.
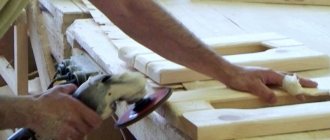
Grinding
To level surfaces and eliminate minor deformations, wood sanding is used. Performed manually, with a power tool, at the choice of the artist.
putty
Pre-repaired, sanded elements are puttied. This is necessary before painting, as well as if minor damage to the wood is detected (delamination, cracks, increased gaps). After the putty has dried, it remains to be sanded with fine sandpaper.
Grinding, degreasing, impregnation
After all the basic procedures (repair, sanding and puttying) with wood are completed, proceed to the next stage. The table elements are inspected again to make sure everything is correct. And then they sand it again, but cleanly, with a fine abrasive.
All that remains is to prepare the table surfaces for painting (degreasing and treating with an antiseptic). If at the final stage other methods of decoration are used, then, in any case, it is necessary to carry out all the specified procedures.
Option 2. Mosaic cladding
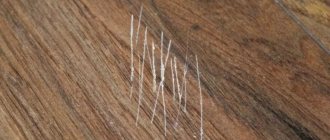
If the tabletop has been scratched during use , or dents have appeared on its surface, you can cover it with your own hands with a mosaic, which will hide all the defects and return the table to its former beauty.
For work, prepare:
- Mosaic in canvas
- Sandpaper
- Tile adhesive
- Dye
- Putty knife
- Scissors
- Scotch
Repair procedure:
- Check if the legs are holding well. If necessary, secure them properly using self-tapping screws.
- Degrease the surfaces of the tabletop and legs with alcohol or acetone.
- Sand and sand surfaces.
- Places that cannot be sanded should be puttied and then sanded.
- Cover all surfaces with a coat of paint. Leave until dry. For work it is better to use aerosol paint.
- Apply a good layer of glue on the table surface.
- Cut the mosaic and glue it with the grid down. Press the mosaic and smooth it down. Set aside work until the glue has completely hardened.
- Carefully seal the painted edges with tape and grout the mosaic.
- Wipe the table surface with a damp sponge.
- After a day, wipe the table with a small amount of vegetable oil.
Our table, lined with mosaics with your own hands, is ready.
What paint to paint the table
If you work with enamel, then before applying it you need to rub the surface with a candle. The paint will lie unevenly, which is what was required to be achieved. And in order to deprive it of its ceremonial shine, you will have to walk over the painted surface with sandpaper. But to get closer to the effect of Provencal furniture, it’s still better to work with facade paint.
When all the paint operations are completed, all that remains is to screw on the handles and attach a hook to the last drawer. Instead, a beautiful forged holder for the rod was taken; any decorative accessory, for example, the ubiquitous heart on a chain, can be hung on it.
The table turned out to be interesting, with decorative elements, as close as possible to furniture in the Provence style. But there was a simple and boring Soviet desk.
Source: elisheva.ru
Option 4. Decorating with wallpaper
One of the simplest, most budget-friendly ways to restore the surface of furniture is to wallpaper the tabletop.
To do this you will need:
- Suitable wallpaper
- Wide head nails
- Glue
- Hammer
- Varnish
- Dye
- Brushes
Procedure:
- Degrease the countertop.
- Cover the surface with paint and leave until dry.
- We measure and cut a sheet of wallpaper to fit the size of the tabletop.
- We glue the wallpaper, carefully smoothing it to avoid the appearance of unevenness and bubbles.
- We bend the ends of the wallpaper under the tabletop and glue them.
- You can optionally apply a frame or some kind of design on top of the wallpaper.
- We fix the wallpaper along the contour with nails.
- Cover the product with varnish and leave to dry.
Decorating the tabletop with wallpaper with your own hands is completed.
Laminate countertops
The desire to throw out an old table arises when it does not fit into the interior and takes up too much free space. Before you send your “old friend” to the landfill, you need to think about how to give him one last chance. Buying new furniture will be more expensive. And its quality is strikingly different (we are not talking about the most expensive representatives) from old products.
The popular bookmaker has released a mobile application for Android, you can follow the link absolutely free.
You can partially replace some parts of the table to update it. Laminate countertops are ideal for this. You can order it separately in the workshop. Agree with the master so that he can adjust it to the required dimensions.
If you yourself are a jack of all trades, and you have the necessary equipment at home, then replacing parts will be faster and less expensive. New elements are cut out, taking into account the measurements of the old structure. After the work has been done, they buy edge strips. For a beginner, it is advised to find an edge that already contains an adhesive. The strip is passed along the edge, passing over the surface with a hot iron.
The updated book-table with a laminated surface looks stylish and modern. And the desire to get rid of it will definitely disappear.
Option 6. Restoring using varnishing
If your table has not suffered too much from time , however, its appearance is no longer very good, and the varnish requires replacement, you can do this:
- We prepare the surface as described above. We process the surface first with a grinder disc with a coarse grain, and then with a fine one.
- We evaluate the condition of the legs and replace them with new ones if necessary.
- After filling the surfaces, we degrease the table parts with a special compound.
- Apply a layer of acrylic primer and wait for it to dry.
- We sand the surface by hand.
- You can proceed to varnishing. For work, choose a high-quality varnish a couple of shades darker than the original coating and a high-quality brush.
- Apply three layers of varnish intermittently and wait until it dries completely.
- Now it's time to apply the protective coating. Most often they use wax. Take some wax on a soft cloth and rub it thoroughly into the surface of the table. It takes about a week for the wax to completely harden and absorb. At this time, it is too early to use the table.
A week later, our restored table is ready.