A crib is the most necessary and useful purchase for a baby. It is in it that a newborn child spends the precious days of his life. But children grow up very quickly, and before you know it, such a previously necessary thing is already standing in the corner and collecting dust. Some parents give it to friends or to specialized shelters, and some save it until the birth of the next baby. Indeed, you don’t really want to part with such a dear and already loved thing as a crib for a newborn. Every detail in it has become so primitive and familiar, but there is a way out! The designers offered several ideas of what you can make with your own hands from a crib. The alteration will not take much time, and an unnecessary item will turn into an original addition to the design.
Playhouse
The child has grown up, but this does not mean that he will no longer need his crib. It would make a great playhouse. To create such a miracle, you just need to properly decorate your sleeping place using a special multi-colored fabric with your favorite cartoon characters. The sleeping base needs to be remounted higher. It will serve as the roof of a playhouse. By throwing toys, pillows and books inside, you can not only create a cozy atmosphere for your child, but also teach him to have order in the room.
Manufacturing of parts
The first step is to cut out the parts for the console. All sizes depend on your desire and the material you have available. Take the plywood and, using a jigsaw or saw, cut two identical pieces of the correct size for the top and bottom shelves of the console.
Humanity's first outpost on Mars: NASA plans to colonize the Red Planet
Apple pie with cream and raisins: a simple dessert with an exquisite taste
Another “Sputnik”: in Yakutia, a unique yellow diamond was named after the vaccine
Then take the stucco or slats for the photo frame and cut it, focusing on the parameters of the shelves. You should have four pieces for the top and the same number for the bottom. The idea is to cover the raw edges of the plywood with these slats.
Now you need to cut out the posts that will serve as columns. Cut them taking into account the shelf height you choose.
You will also need another bottom piece to raise the shelf off the floor. To do this, cut a piece of wooden board slightly smaller than the shelf itself. It is recommended to use a board with a thickness of 3 to 5 cm.
Sofa
Do you have any idea how to make a sofa from a crib with your own hands so that it turns out modern and stylish? It's simple! The first thing you need to do is detach the side of the crib. If the height of the base does not allow you to sit down comfortably, then move the sleep base a few centimeters up or down. To ensure that the sofa fits harmoniously into the interior, it can be repainted and varnished. The final touch is the selection of mattress and pillows.
Creative Desk Ideas
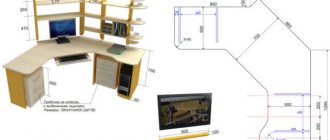
Today a designer desk can be made from anything. Today, on the Internet you can find the most unusual table options. At the moment, angular models that look a little like an open book are popular.
On one part there is a functional side for setting up a computer or conducting classes, and on the other there are shelves where you can place textbooks for classes and other literature. At the same time, the second part is often equipped with arched shelves and complemented with glass or wooden carved parts.
Folding models and regular straight tables are no less common. At the same time, their main highlight is pull-out cabinets without handles or with unusual handles, for example, made of rope. Models are popular where, instead of the usual cabinet on the left or right, there are winding shelves and a small cabinet for small items.
There are models with no drawers at all. They are made either with metal legs or with crooked legs. In this case, a cabinet is placed nearby for storing textbooks. There are floating models without legs. In this case, the table looks like an open shelf. Often it has a retractable design.
Transformer models are very popular, when one part of the table can be placed at any angle. Interesting tables have a surface that is not rectangular, as usual, but oval or semicircular.
The combination of materials is stylish at the moment. For example, a wooden work surface and glass or metal legs, or vice versa. Models where glass is placed on top of wood on the working surface itself look creative. In this case, the child can put his drawings or stickers under the glass. It can also decorate the surface with multi-colored stones or simply sparkles.
Children's table
Every child dreams of having his own children's corner in which he could draw, sculpt and play. Why not remake the crib to create it? To do this, simply remove the front part and select accessories and chairs. It is important that the chairs are suitable for the child's height. We cover the base of the crib with a special comfortable fabric. You can decorate the crib with various patterns on its surface. All that remains is to put pencils, brushes and an album. Voila, you have a designer, original table.
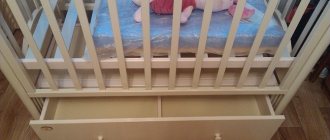
Children's desk made from an old bed
Preschool children need a table at which they can draw, sculpt, and do simple writing tasks, learning to hold their back straight. Transforming a bed into a table is not difficult.
To begin, disconnect the front wall from the frame, which will become the table. The bottom, at first, until the child grows up, will play the role of a tabletop. The removed part will be useful for a shelf, which you can also design yourself.
As it grows, move it to a higher level, and then simply lower the new tabletop to the top, securing it to the side and back walls. Select the finishing material taking into account the child’s wishes and the required degree of safety. Available finishes include laminated chipboard, plywood, and impact-resistant glass.
In addition to the table top, on the side walls of the former bed, place shallow shelves for children's crafts, hooks and pockets, jars for office supplies, folders for magazines and papers. Hang framed drawings and photographs.
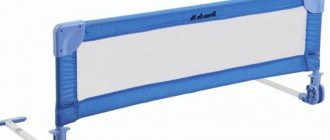
Clothes dryer
Just a few moves and an unnecessary crib can turn into a convenient drying rack. You just need to carefully detach the side parts and install them in a convenient place (on the balcony or in the bathroom). Experts advise treating the surface with a special antifungal and protective agent so that the structure lasts for a longer period. We are not in a hurry to throw away the rest of the crib, because it will become a good street shop for family gatherings.
Decorating the raw edges of plywood
Apply a layer of glue to the edges of the plywood and attach the decorative strip to it, then secure it with a nail gun. Repeat this process on all sides of the top and bottom of the console.
Scientists have discovered how harmful radiation from smartphones is
Psychotest that reveals all hidden sides (they may turn out to be dark)
First eggs, then ducklings: the guy watched as the duck settled on the balcony
Flower stand
A place to sleep can easily become an excellent flower stand. In addition, such a device is suitable for transplanting plants. The base must be moved upward (at hand level) so that it turns into a tabletop. To strengthen it, you can install several table frames at once. The design will fit into any design solution of the room if it is adjusted with paint and varnish.
Bottom Base Connection
Take the bottom shelf and place it face down on a flat surface. Now take a wooden board and drill some octagon shaped holes in it to attach the plywood and columns.
After that, apply wood glue to it. Place this board on top of the bottom shelf and press down. Then secure both pieces together using a nail gun.
Now you need to install the columns. To do this, be very careful that the left and right speakers are located at the same distance from the side, front and rear. Use a screw driver and screws to attach the shelf to the columns on the underside of the shelf through the wood board and plywood.
A woman was looking for her lost twin brother: she found her where she did not expect
Knitted pullover - spring supertrend: review of fashion news
A man’s real dream: a guy made a cozy “den” out of a closet
Double bed headboard
In order to create a sophisticated and modern frame for the back of a double bed, two side parts of a baby crib and half an hour of time will be enough! You need to carefully detach the side parts and attach them to the base of the adult bed. This can be done using screws. Before fastening, you can paint the parts in suitable colors and, of course, cover them with protective varnish for a more noble shade and shine.
Organizer for the kitchen or children's room
Tired of cleaning up your kitchen or nursery? Always running out of space? Solutions found! We disconnect the side parts of the children's bed and secure them in any convenient place. In a children's room they can become an original organizer for soft toys. If you attach several multi-colored hangers to the structure, the organizer will find its use in the kitchen as a necessary element for dishes or spices. From a design point of view, this looks appropriate and original.
How to make a shelf from a children's bed
Here are some more simple and effective options:
- Hanging shelf from the headboard
. We unscrew it from the frame without altering it, fasten it tightly to the wall (the crossbars are horizontal) or lean it against the partition and place it on the floor. The shelf is multifunctional and decorative. It can be placed in any room. The use will be beneficial both in the living room and bedroom, as well as in the kitchen, and in the bathroom it is convenient to dry clothes and towels. If you add hooks, then there will be a place for a robe or hairdryer. Books, magazines, sewing supplies, stationery items and jewelry - all the variety will fit on such a shelf and will be in plain sight. Customize the product with pockets, compartments for small items, and fasteners. - Floor rack
. Needs minimal modification. You will need the entire crib, remove only the front side, and then act according to your wishes, according to the dimensions of the place where you plan to put it. For a high rack, turn the bed vertically. We cut out and fasten several internal shelves, making a convenient interval between them. Best of all, such a shelf will look in the hallway. It will help remove piled shoes from under your feet. The rack takes up little space, but is very spacious. If you paint the shelf in bright colors, attach signs with the children's names, and make appliques, you will get a designer item for the nursery. A child always has a lot of different soft toys, boxes with construction sets and books. By arranging and arranging all this on a rack, you will have an excellent storage area.
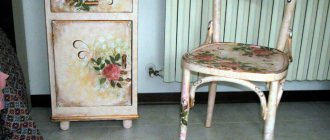
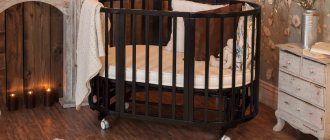
Design trolley
When a crib has already been inherited by several generations, it usually loses its perfect appearance. Scratches, cracks, and so on appear. Don’t say goodbye to such a precious gift right away! It can become a wonderful designer stroller, which will be useful for taking your baby on a picnic. Firstly, the baby will feel comfortable and safe in it, even in nature. Secondly, it will be an ideal place for transporting products necessary for nature (blanket, food, water, napkins). To create such a miracle, you just need to carefully unscrew the legs and install the wheels. You can decorate the cart with pillows and a soft mattress. Painting can bring it back to perfection.
Thus, a crib that is unnecessary at first glance can become a necessary and necessary element of the interior of your home. Infancy is the best time in the life of every person, most of which the child spends in bed, so preserving such an expensive thing as a crib is the duty of every parent. In addition, there will always be useful uses for this element.
Modern bench for the hallway from a crib
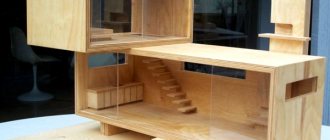
In our world, replacing furniture is no longer a luxury, but a way of self-expression for the designer who, of course, lives in each of us. Old sofas, chairs and chests of drawers are most often sent to the dacha or garage, but what about the furniture that the owners do not plan to use in the future? For example, how to use a crib if the children have grown up long ago, but the bed is expensive, like a memory?
In this master class you will learn how to turn an old crib into a wonderful modern bench for your hallway or kitchen.
The plan will use old wooden furniture, so no additional wooden parts will be required. But the author advises to approach the choice of paints and varnishes with responsibility and a dose of creativity. After all, not only the final result and appearance of the furniture, but also how long it will last depends on how high quality the paint or varnish you choose turns out to be. So, to convert a crib you will need:
1. Materials:
— a used crib, preferably wooden; - wood paint; - wood varnish; - wood putty; - glue; - self-tapping screws or furniture screws; - solvent for old paint (varnish).
2. Tools:
- electric drill; - hacksaw or miter saw; - screwdriver or cross-head screwdriver; - paint brushes; - sander or sandpaper; - spatula for applying putty; - pencil; - construction tape.
Step one: disassemble the bed
Disassemble the bed into its component parts. Actually, this will determine what kind of store your store will turn out to be.
The author used an old double bed for twins in his work. Its headboard itself prompted the idea of creating a bench, since it turned out to be quite wide and high, too.
The crib, despite its venerable age, was well preserved and did not require repairs. Take a close look at your details. If the components need repair, now is the time to do it before you start assembling the bench.
Check the tightness of the connection of the parts. If the crossbars are loose, they need to be re-secured. For this, use glue for working with wood and self-tapping screws or furniture screws of your choice.
Step two: assembling the structure
Here everything depends on your imagination and the parts that you received by disassembling the crib.
Figure out the final design of the bench, decide on the dimensions and prepare the details.
At this stage, pay attention to the old paintwork. Of course, it’s better to get rid of it, especially if the layer of varnish or paint is cracked and leaves much to be desired.
To do this, use a sander and coarse sandpaper. You can also use a solvent. However, if in the first case you will have to deal with dust, then in the second you will have to deal with a strong odor and harmful solvent vapors.
You can do without any solvent at all. Consult a construction hypermarket and they may offer you a suitable paint that will fit perfectly over the old layer of paint or varnish. You can also use a primer first.
And during the joining process, use glue for strength, since screws alone may not be enough. The author used pocket joints and filled the threaded holes with wood putty, as can be seen in the photo. Try to match the color of the putty to the tone of the material. Use a spatula to apply.
The author also applied glue when laying the seating boards on the frame. He also used screws to attach the legs to the bench frame.
Finally, the author attached the armrests to the sides, which he made from the front crossbar of the crib, as well as the front “skirt” of the bench. This time he used nails and glue. To prevent the planks from cracking during fastening, pre-drill small-diameter holes in them.
The author also added a couple of decorative details to the legs of the bench to add aesthetic value. Such overlays can be found in construction hypermarkets. It is better not to use foam materials, since they do not have a sufficient margin of safety.
Step three: surface treatment
After the structure was assembled, the author began painting.
If you have removed the previous coat of paint, sand the surface with fine-grit sandpaper to create a stronger adhesion to the paint. It is convenient to carry out partial sanding with a grinder. However, you will still have to work with your hands and sandpaper.
The old varnish coating turned out to be durable, so there was no need to remove it. Instead, the author uses a special Zinsser stain-removing primer, which is also a toner.
Since the old varnish was glossy, it was necessary to apply two coats of primer in order for the paint to adhere properly.
The next day the author began painting. He used Sherwin Williams Essential Gray with a satin sheen, which he sprayed on. All work was carried out in front of the garage door, which he hung with old unnecessary fabric so as not to stain anything.
The paint was also applied in two layers, six hours apart.
Make sure the previous coat is completely dry before applying a second coat of paint.
Step four: what to make from leftovers?
Since the author’s daughter took the most active part in creating a bench for the new house, he decided to make a mini-doll crib from the unused remnants of an old crib as a gift for his help.
This was the job for the workers who had no place in the final design of the shop.
Step Five: Finishing Touches
To complete the look, the author used flat cushions for seating. This is convenient because at any time you can change the covers to others and get a completely new and fresh look.
Ordinary pillows were also used, with decorative pillowcases matched to the color of the overall ensemble.
Finally, after many adventures, the shop took its place of honor in the living room of the new house!
Source
Become the author of the site, publish your own articles, descriptions of homemade products and pay for the text. Read more here.