Making furniture for dolls or small toy animals for your children is such a pleasure. Moreover, both for children and for mothers. Making small pieces of furniture is simple, cheap, and most importantly - exclusive. Get the kids involved in creating these fairy-tale pieces or the dollhouse itself. Children will really like this game
!
First, decide whether the doll furniture will just be decor for your apartment, or will the children play with it? If children expect to play with these pieces of furniture repeatedly, then they must be durable so as not to break on the first day. Pay attention to the reliability of fastening small parts and the absence of any objects that could harm the health of children! Of course, children over 3 years old should play with such toys to avoid accidents.
You can make furniture or the toy house itself from various scrap materials. First of all, it is plywood or cardboard as a frame, and foam rubber, padding polyester, cotton wool as padding material for soft parts. Small pieces of furniture can be made from matchboxes.
How to make a dollhouse.
A house for Barbie or other toys can also be made from several shoe boxes or plywood. For a durable plywood house, you just need to cut out the walls, ceilings and roof. A house 1 m high, divided into 3 floors, is considered optimal. On each floor you can make 1 spacious room, then the width of the house will be 50-60 cm, or divide each floor into 2 rooms if the width of the house is larger. There is nothing complicated here, this process will draw you in so much that you yourself, like a child, will enjoy the creative process as an exciting game. When the assembly of the house is completed, you can begin repairs. Cover the walls with colored paper or wallpaper scraps. You can either lay pieces of carpet on the floor or put mats made of soft paper layers, which are often placed in boxes of chocolates. Your next step is to furnish the new doll's home.
How to make furniture for dolls.
Upholstered furniture can be made from a cardboard frame covered with pieces of fabric filled with padding polyester or foam rubber. Instead of fabric, you can use knitted parts. For example, a knitted sofa and armchair look good.
Cardboard furniture is also very easy to make.
You can use it to make a bed frame and wardrobes for the bedroom or kitchen. To ensure that cabinet doors close tightly, install a wire clamp. The easiest way to make a chest of drawers or drawers in a closet or kitchen sideboard is from matchboxes.
How to make furniture from matchboxes.
From matchboxes you can make bedside tables, a chest of drawers, a desk with drawers, and a bed. For a small doll or Kinder Surprise toy, a small bed made from two matchboxes is perfect. Place two matchboxes on a sheet of cardboard so that the drawers slide out side by side, like bedding drawers in an adult bed. Then, having outlined the boxes around the perimeter, cut out 2 rectangles from cardboard. Glue these pieces of cardboard under and above the double matchboxes with paper glue to create one piece of the bed. Then cut out the head part of the bed from cardboard in any shape and glue it to the main one. You can paint the crib with paints together with your child. Cover the crib with a piece of cloth and place a pillow.
You can also make a kitchen sideboard with drawers and bedside tables from the boxes.
To make a bedside table from matchboxes
, you will need 3 boxes, PVA glue, beads and any details for decoration. First glue the boxes together with glue. Then cover the sides of the resulting bedside table with cardboard or just colored paper. It is very convenient to use some dense material for this, such as old plastic cards. Cover the sides and top of the bedside table with these cards, and you can also make sides. Then peel off the front part of the drawers themselves and attach a bead as a handle.
To decorate the boxes, you can use toothpicks or long matches. Glue them onto the surface of the drawers, then trim off the excess edges.
Sofas and tables from matchboxes are easy to make and are suitable for the smallest toys.
The dollhouse must be equipped with everything necessary. The beds should be made with beautiful linens, small knitted rugs on the floor, and calendars can be glued to the walls instead of paintings. The kitchen should have dishes and various utensils to make it interesting for children to play. In order to make kitchen utensils for dolls, you can use homemade plastic for modeling. This material will harden and be much stronger than plasticine little things.
To make plastic for modeling, you will need:
starch (1 tbsp), PVA glue for wood (1 tbsp), hand cream (1 tbsp) and 1 tbsp. lemon juice. Mix all ingredients and cook in a fireproof saucepan until dissolved. Place the warm mixture in a bowl and add paint to it. Roll into a ball and wrap it in film. Place in the refrigerator for a day. Then mold the necessary parts for furniture or dishes from the mass.
Once you try to make furniture or toys for children with your own hands, you will be unstoppable. This will certainly develop into a hobby and enjoyable entertainment for you and the children. Some parts and pieces of furniture can be made from wire and beads, for example, backs for chairs or openwork chandeliers. From n
Ice cream sticks can be used to make legs for furniture or to line cabinets with them, or to make railings for chairs. If your imagination works well, you will definitely find a lot of interesting ideas on how to make interesting little things for children's entertainment from scrap materials. This is much more interesting and cheaper than buying ready-made game sets in stores. Moreover, for children, what the mother made with her own hands, putting her whole soul into the work, is much more valuable. And if the children helped you, this will be a great way for them to develop imagination and a sense of beauty. Have a nice work!
Gifting or making your daughter a home for her dolls is just the beginning. Next, this house will have to be furnished. This is a bunch of toy furniture, equipment, and accessories. This article will tell you how to make furniture for dolls with your own hands.
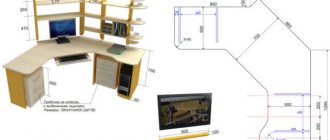
How to decide on sizes
The dolls, their houses and furnishings are smaller copies of us and our homes. And the most reliable way to make doll furniture with your own hands and not make a mistake is to measure real objects, reduce them several times, and then work with the obtained values.
Furniture for dolls - copies of our furniture
How much to reduce the actual dimensions depends on how small or large the doll is, because they range from 7 cm to 60 cm or even higher. Accordingly, they need furniture of different sizes. To determine the number by which the actual dimensions should be divided, divide the average human height in centimeters (170 cm) by the height of the doll. Let's get some number. This is how you will need to divide the dimensions of real furniture.
For example, the height of the doll is 15 cm. We calculate: 170 cm / 15 cm = 11.3. It is by this number that we divide all the parameters of “human” furniture. It is also worth saying that 14-15 cm is the most popular size among the doll population. Therefore, most of the finished furniture is made in a ratio of 1:12. We can also use the existing dimensions, at least so that we can navigate the scale of the required parts and the amount of materials.
So, the most common doll sizes are:
- male doll 150 mm;
- female doll - 140 mm;
- child doll - 75-100 mm;
- toy baby - 65-75 mm.
If you need furniture for dolls of similar sizes, its parameters will be as follows:
If the toys you have are slightly larger/smaller, you don’t have to adjust the sizes. If the difference is large, you will have to increase or decrease (or you can calculate it yourself).
Doll furniture made from matchboxes
The easiest way to make furniture for dolls with your own hands is from ordinary matchboxes. They are glued together using PVA glue, creating certain structures, then covered with paper or fabric, self-adhesive film, etc. You can use wooden beads as legs, handles for drawers can be made from small buttons on legs or from long beads.
You can make chairs, a table, a chest of drawers, a bed, and a bedside table from matchboxes. Another thing is that furniture is made for very small dolls, no more than 10 cm high. Although, you can use a larger number of boxes, gluing them into blocks, and from these blocks create furniture for dolls about 15 cm high. Also an option, but work with others materials are not much more complicated, but they are more flexible and allow you to create products of more elegant shapes.
This may be your first experience in making doll furniture. Later you can take on something more serious.
Let's sum it up
As you can see, if you have patience, simple materials at hand and inspiration, you can create beautiful furniture elements for a dollhouse yourself. We hope our tips, as well as the video of making furniture for dolls with your own hands, will help you in this exciting creativity!
Articles on the topic
Wall shelves: overview of functional models in minimalism, loft, modern and hi-tech styles
In order to enhance the interior, sometimes the most basic elements are enough, such as wall shelves. However, you need to choose the right design, not forgetting about the aesthetics of the product. Read on to find out how not to make a mistake when choosing a shape or material and not overpay for the brand.
55 Art ideas for DIY mosaics in the garden and interior
Do-it-yourself mosaic is a fascinating activity. Photos and master classes will tell you how to make paintings on the wall and tabletops from glass, broken tiles and dishes.
Furniture for a dollhouse made of cardboard
You can try your hand at making furniture for dolls using cardboard. The material is inexpensive, accessible, you can try and make mistakes, redo it. Cardboard is usually joined using PVA glue; you can use a glue gun or any universal glue that can glue cardboard, fabric, or wood. By simply making furniture for dolls with your own hands from cardboard, you will also use these materials. If we talk about convenience, then a glue gun is preferable - it glues quickly, it’s convenient to work, and the connection is reliable.
To make furniture for dolls, you can use regular packaging cardboard. It is cheap, but the furniture it makes is very delicate. It is unlikely that it will be enough for a child for a long time. But, as a “first experience”, this is a good option. Cardboard products for scrapbooking are more reliable. It is more dense, homogeneous, has different thicknesses (from 2 mm and more), and can have a textured surface, embossed monochromatic patterns, or a pattern on one or both sides. The disadvantage of such cardboard is that you have to buy it, and some types of such cardboard are not very cheap.
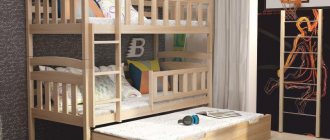
Cardboard bed for a doll
This cardboard doll bed is designed for a large doll - up to 50 cm in height. If necessary, all specified dimensions can be reduced.
This option can be done in literally 10-20 minutes. There is no need for glue or other fixatives. The parts are held in place by grooves cut into the cardboard. The width of the groove is equal to the thickness of the cardboard, the length of the slots and the dimensions of the workpieces are indicated in the diagram.
Green and yellow dots indicate compatible cuts. They are inserted one into the other, where the assembly ends. If you like this model, it can also be made from plywood.
Schemes for making cardboard doll furniture
Basically, furniture for dolls made of cardboard is glued. It is unlikely that it will be possible to make something delicate or very complex from this material, but making simple models will not take much time. Having a diagram with dimensions, you can even do without explanations. Everything is clear.
Such models can be made “by eye”. Without the “upholstery” they look unsightly, but after that they look quite decent. A bedside table with doors and an open shelf - same design, different design
Furniture patterns for dolls can be used not only for making from cardboard. They can be transferred to plywood and cut out using a jigsaw.
Material options
Do-it-yourself toy doll furniture is made from a wide variety of materials. These are simple items that are found in any home. For example, powder packaging, yogurt jars, cocktail straws, candy wrappers, matchboxes, etc.
You can also make beautiful doll furniture from plywood with your own hands. This is a thin plate of wood. Its advantages are strength and naturalness. The disadvantages of the material include the difficult method of making a toy set. To create armchairs, a sofa, a cabinet, chairs or a table, you will need certain skills, as well as various tools and consumables:
- jigsaw;
- varnish paint;
- sandpaper;
- glue;
- screws;
- nails;
- self-tapping screws
Types of children's furniture sets, reasons for their popularity
Cardboard furniture, which is easy to make at home, is also popular. The advantages of this thick paper are accessibility, ease of use, and the ability to create stylish interior items to suit every taste. There are many ready-made templates for making furniture for dolls from cardboard with your own hands. For assembly you will need a minimum amount of available materials - decorative elements, paper, glue, paints, compasses, markers, scissors, pencils. However, cardboard also has disadvantages - low strength, too ordinary appearance of the finished product.
Other popular materials from which you can make furniture for dolls with your own hands are collected in the table.
| Material | Advantages | Flaws | Features of work | Difficulty level | General algorithm for making furniture |
| Matchbox | Possibility of constructing any piece of furniture. Easy and simple drawer formation | The box may become wet or break. Poorly withstands weight, in furniture structures, used mainly for the manufacture of containers | In addition to boxes, boxes are used to make various interior parts, such as a book, a suitcase, a box | Simple | Boxes are used to create cabinets and chests of drawers. They are glued together and decorated |
| Wire | It turns out beautiful antique wicker furniture | Soft material. The job requires certain skills and abilities | The wire is easy to work with. Using pliers you can use it to make wardrobe hangers | Average | Swings, beds, and decorative stands are woven from wire, following certain patterns. |
| Newspaper tubes | Miniature imitation furniture made from wicker | Pre-production of tubes. Material may become wet when in contact with water | Before use, the material must be prepared and rolled into tubes. | Difficult | Tubes are twisted from newspaper, put on a knitting needle and secured with glue. The resulting parts are used for weaving armchairs, chairs or sofas. |
| Plastic | Durability, cost-effectiveness, ability to create complex parts | The material may be of poor quality or toxic. Over time, plastic products develop scratches. | To work with plastic you will need various available tools (glue, cutting knife, pattern) | Difficult | Various parts are cut out of plastic, from which any interior items are subsequently constructed. |
| Paper | Lightness, practicality, safety. The material is easy to work with | Paper furniture is not sustainable. Other accessories cannot be placed on such interior items; the products will wear out quickly | The paper is well painted with gouache. But painting must be done when the glued parts are completely dry. | Simple | Various items of the headset are covered with paper |
| Various packaging | Excellent opportunity to use already used material | Boxes quickly deform and have a short service life | Before using yogurt and washing powder packaging, you must thoroughly clean them of any remaining substances. This will help preserve the material and eliminate odors. | Simple | The boxes are used untouched or holes are cut into them to make a chair, table, bed or refrigerator. Often the packaging is the frame of the furniture. |
| Traffic jams | The part does not need to be cut or made yourself | Only certain types of furniture can be made from corks | Corks must be decorated using paints or fabrics | Simple | The corks are decorated (pasted with paper, beads, painted), and then they are formed into chairs or tables |
Variety of wardrobes for children's rooms, reasons for their popularity
Making doll furniture with your own hands from boxes requires minimal effort . Packaging is most often used to make tables or cabinets. Chests of drawers, benches, and various drawers are made from newspaper tubes. Matchboxes will become pull-out shelves for bedside tables, dressing tables, desks, and cabinets.
An excellent option for a dressing table and various decorative elements is a do-it-yourself miniature doll made from thick paper. Plastic is used to create frames, the main parts of any pieces of furniture, including cabinets, beds, and sofas. Corks make beautiful chairs, armchairs, and coffee tables.
Requirements for furniture for kindergarten, tips for choosing
From paper From newspaper tubes
From boxes From plastic
From corks From wire From matchboxes
Wardrobe for dolls made from scrap materials
The toy cabinet can be made of plywood, painted or covered with wrapping paper or self-adhesive film. There probably won’t be any questions here - everything is clear, and if you have questions, you can see their solution in the “natural” closet. But it can be made from very inexpensive materials. The good thing about making do-it-yourself furniture for dolls is that its cost is very low.
From a cardboard box
The main task is to find a thick cardboard box of the appropriate size. Moreover, it will be easier to work if it is packaging - with folded edges. This folding part is a ready-made door. All that remains is to finish it - hang a mirror, attach a handle, etc.
One of the options for homemade furniture for dolls is a wardrobe
To work, you will need good tape, preferably paper-based, as it will be easier to glue the trim to it later. If you have a glue gun or a construction stapler (a large stationery one will do) with staples, that’s also good. If you will use other materials in addition to cardboard and paper, it is better to find a universal glue that glues paper, cardboard, fabric, and plastic. You will also need scissors, a stationery knife, and a ruler.
If the box you find is too large, you can make it smaller by cutting off the excess. To ensure that the folds are even, take a ruler. We apply it to the place of the future fold, we pass along the ruler several times with a blunt hard object (the stem of a spoon or fork). After this, the cardboard will be easy to bend.
We cut out shelves from scraps or another box. They should be slightly - 5-8 mm - longer and wider than the internal space of the cabinet. We bend the excess so that sides are formed on all sides. Folds form in the corners; carefully cut them off. We bend one of the parts 180° and glue it to the shelf itself. This side of the shelf will “look into the world.” We bend the other three parts at an angle of 90°, coat them with glue and glue the shelves into the cabinet. The photo on the right shows how the shelves are glued. But so that the gluing points are not conspicuous, it is better to turn the sides down.
Making furniture for dolls with your own hands is no less fun than playing with it later.
In addition to shelves, you can also make a crossbar for hangers. It can be made from bamboo skewers, for example, you can try using a juice straw, wire, etc. Hangers can also be twisted from colored wire or cut from juice bags, plastic bottles, etc.
Next comes the finishing touches. You can paint the cardboard with watercolor or acrylic (preferably) paints, glue it with wrapping paper, fabric, felt. You can imitate a mirror surface by covering it with foil (food foil, for example). If you want to make a “plastic” surface, look for water bottles of the desired color, cut off the neck and bottom, and use the “body” as a finishing material.
Finishing is a creative process, but first, use simpler, softer, thinner materials; they are easier to work with
Handles can be made from wire, beads, or long beads. For larger toy cabinets, you can find buttons or buttons. We glue all this “beauty” after we have “lined” the cabinet.
Doll wardrobe made from newspapers
You will need old newspapers, PVA glue with a brush, a glue gun, a couple of pieces of wire or thread, wrapping paper for finishing the cabinet or paint.
We roll up tight tubes from newspapers, coat them with PVA around the edges and leave them to dry. Then the tubes can be glued together. A glue gun is better suited for this operation. There are two ways: first collect large blocks, then cut them into fragments of the required length, or immediately cut the tubes of the required length and immediately glue the blanks to size. The second way is more painstaking, but there is less waste.
The finished cabinet walls must be fastened together. To firmly fix an angle of 90°, it is better to use a thin wire. First coat the joints with glue, then use wire to pull the walls together. If the wires are in the way, they can be removed after the glue has dried.
Using the same technology, the bottom, top, and shelves are glued. The doors will need to be made a little differently. To make them open, two strips about 1.5 cm wide are cut out of tape. Tape is glued along the edge of the door so that a little more than half hangs in the air. We glue the door to the wall with this loose tape, but so that there is a gap of 2-3 mm between the wall and the door (it’s just tape there). This will make it possible to close the doors. We fix the glued door on the other side with a second strip of tape.
The second way to secure the doors is with wire. Only this time it should be tough and thick enough. Cut a piece that is 2 cm longer than the height of the cabinet. Immediately make a loop on the wire on one side using 1 cm. We bend the loop at an angle of 90° to the wire. We make holes in the bottom and roof, pass a wire through the bottom, the loop remains at the bottom. We put the door on the wire, using the outer tube instead of hinges. Slightly bending the wire, we thread it through the hole in the cabinet roof, bend the excess, fixing the door. We repeat the same operation with the other door. Please note that you need to attach the door with tape before finishing the cabinet, but you can attach it with wire after.
There are still some little things that need to be said a few words. Cabinet legs and handles can also be made from paper tubes. You just need to roll them from the paper you use to decorate the toy. Roll it into a tight roll, glue the edge with glue, then cut it into pieces of the required length and glue it in the right places. Instead of tubes there can be wooden sticks, beads, etc.
Paper furniture for dolls
To make a paper doll table with a cute mosaic top, prepare:
First of all, cut out the base of the future tabletop from thick paper or cardboard. Determine the dimensions according to the doll. Make holes in the corners for the legs and on 4 sides for the racks. The latter will be needed for wicker decor.
A beautiful mosaic tabletop will be made from small squares of colored cardboard, which are glued to its upper part.
Insert toothpicks into the holes, additionally securing with glue. Weave the legs of the doll table with threads in a spiral, the edges of which are also secured with glue.
Glue the end of a thick thread to the bottom plane of the tabletop near any counter. Braid the posts and legs, passing the thread alternating over and under them. It is important that the weaving is tight enough, but not too tight on the posts - this can deform the product.
The binding can be partial or complete, at your discretion. At the end, decorate its upper and lower edges with a braid woven from the same threads.
Next, prepare the base for the shelf. To do this, glue toothpicks crosswise at the required level or tie two dense threads in the same way. Place a rectangle of cardboard or thick paper on top and secure with glue.
Furniture for a doll can also be very stylish. How about a bean bag chair or charming ottomans made from ordinary plastic lids, covered with fabric with soft filling?
Let's not forget about the details. A mini wall clock made from a large button is a great addition to a cozy dollhouse.
Surprisingly, even ordinary wooden clothespins can serve as a luxurious material for creating, for example, such a miracle doll bench!
Doll furniture decorated with knitted covers and other openwork details will look very cute, cozy and homely.
More wonderful examples of doll furniture are presented in the following photos.
As you can see, creating beautiful furniture for a doll with your own hands is not at all difficult. If you start the process creatively, you can make items no worse than those sold in fashionable children's toy boutiques.
Source
Doll bookcase or shelf made of rulers
You can make furniture for dolls with your own hands from school wooden rulers. They are good because they are already processed and have the same width and thickness. In the stationery store you can find the right size - larger/smaller, wider/narrower - as desired. For example, to make a doll bookcase you need 6 rulers 15 cm long.
You will also need a jigsaw for the job. If you have an electric one, great; if not, a manual one will do, since there’s not too much work. You also need fine-grain sandpaper, glue (PVA or wood glue) and paints (acrylic or gouache).
We cut segments from the rulers: 4 pieces of 6 cm, one - 8 cm. Sand the edges until smooth, and also remove the markings and barcodes. Between the two rulers we place the shelves (which are 6 cm each), on top we leave approximately the same distance - under the lid (a segment of 8 cm). We coat the joints with PVA or carpentry glue, connect them and tighten them with masking tape, and leave them for a day. When the glue dries, glue on the very last part - the lid on top. Actually, the shelf itself is ready, all that remains is to paint it.
To obtain an even and bright color, it is better to cover the structure with white, and after drying, paint it with the desired shade. Also, do-it-yourself doll furniture can be decorated in.
Master class “Making a simple shelving unit for a dollhouse”
1. Acrylic paint (white, burnt umber color).
2. Oil paint color “mars brown dark transparent”
3. Wide flat synthetic brush. (however, who is used to what)
4. A piece of unnecessary cotton fabric, which will then have to be thrown away.
5. Sandpaper (I have the finest)
6. The actual box itself. (who has what :))
Our box is all crooked, but this is to our advantage (the house in our plans is not new either :))
First apply brown paint to the entire surface. I painted with burnt umber tempera, but I think everyone has acrylic paint, it makes no difference.
This is what we should be able to achieve. Nothing complicated